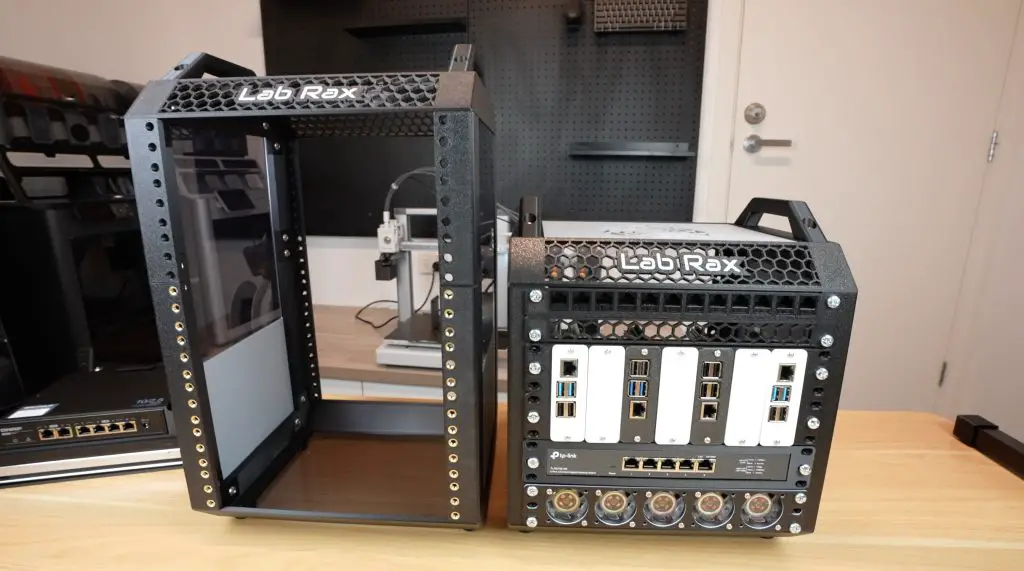
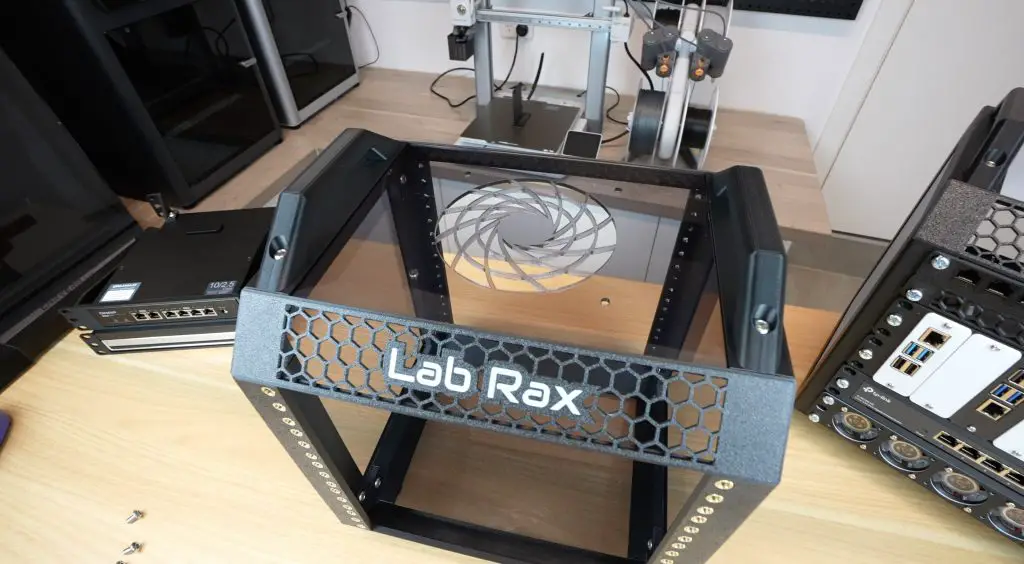
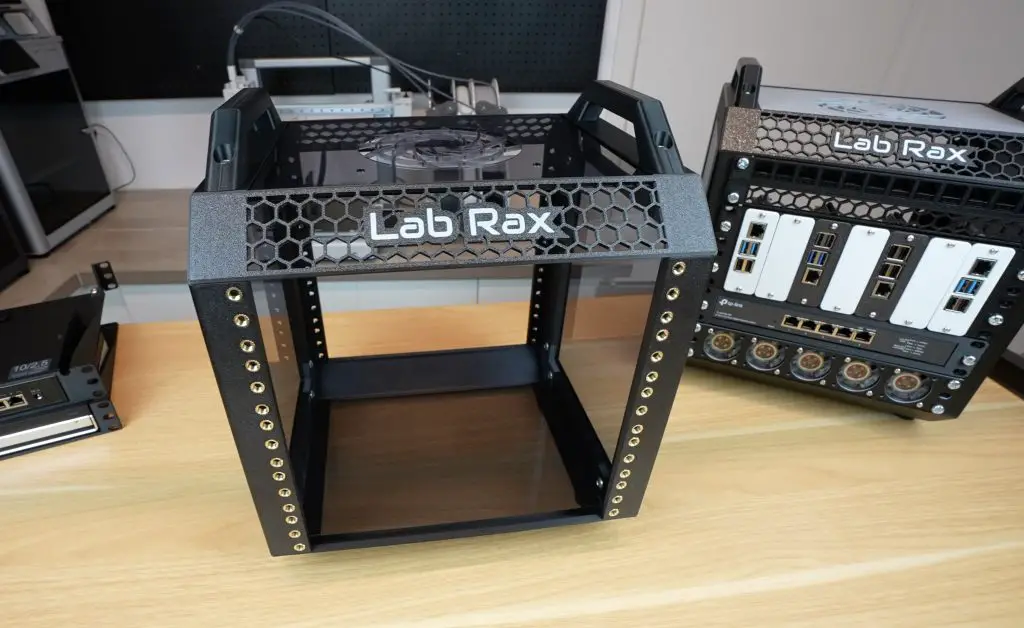
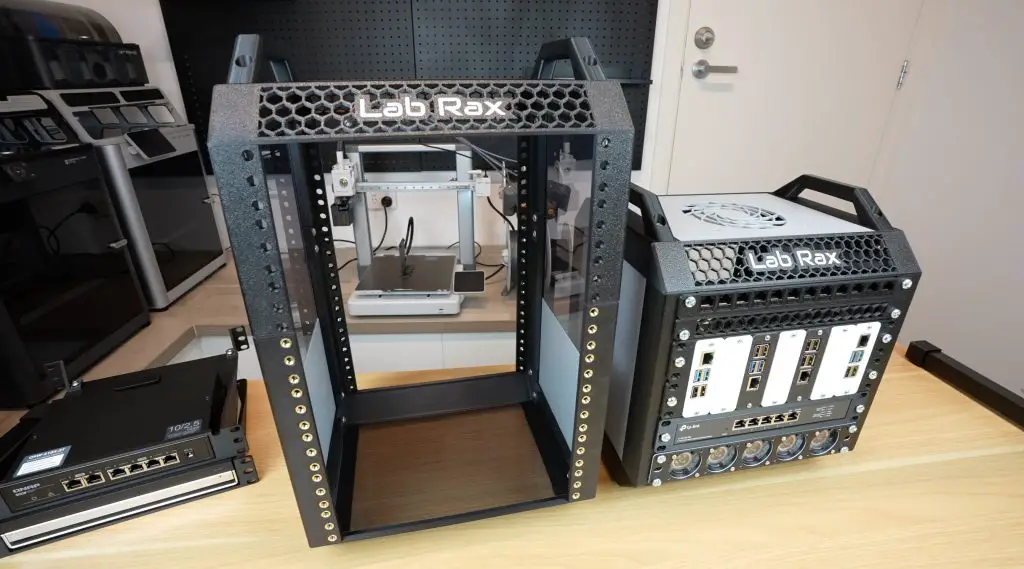
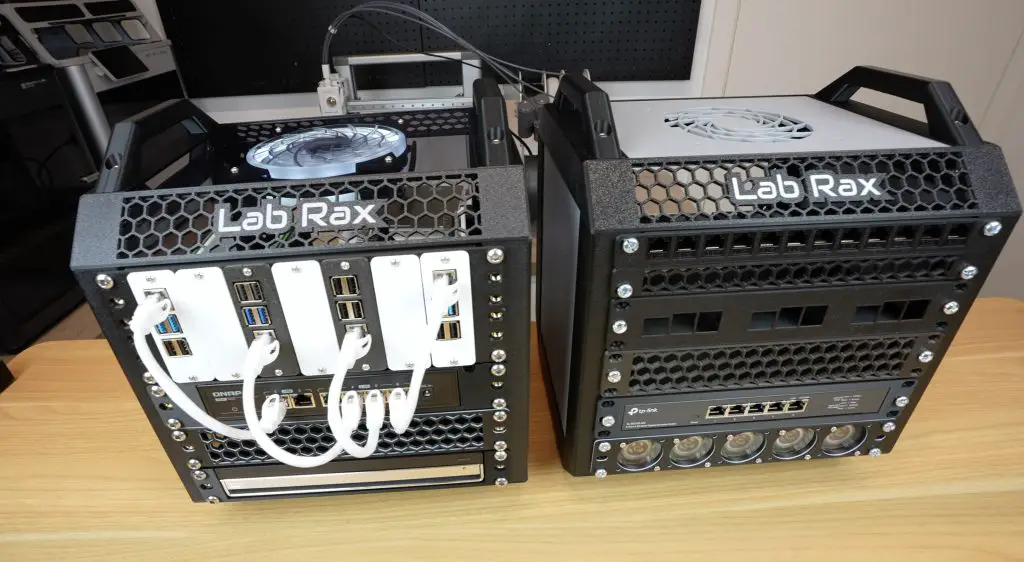
Today, I’m excited to introduce Lab Rax, my latest 3D-printable project—a fully modular and customizable 10-inch server rack system for homelab enthusiasts. Whether you’re managing Raspberry Pi setups, mini PCs, or networking gear, this rack is designed to keep everything organized, adaptable to your needs, and look great on your desk.
Here’s my video of the build, read on for the write-up;
What You Need To Assemble Your Own Lab Rax
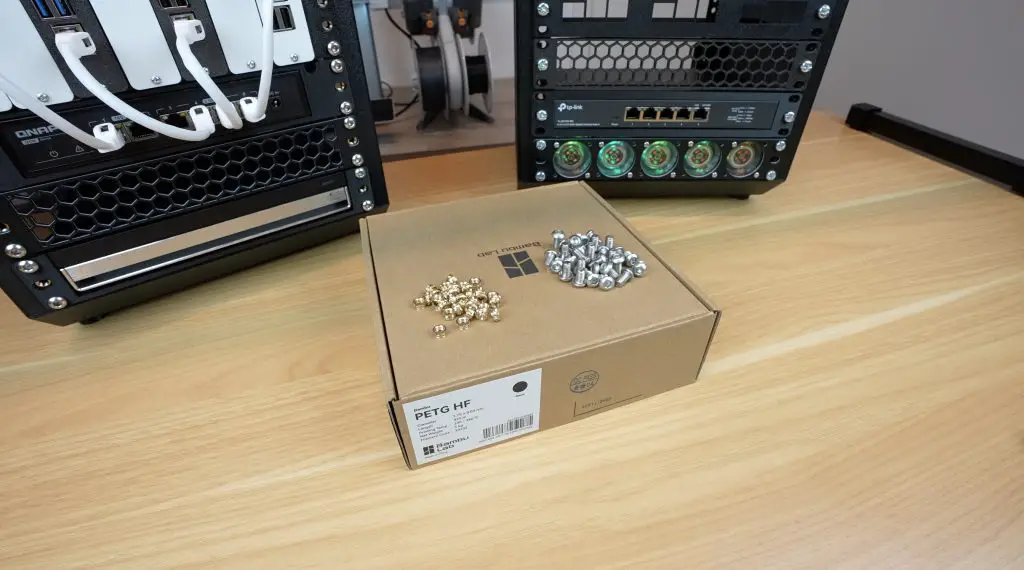
- M6x10mm Button Head Screws (16 Required For Frame + Additional For Racks) – Buy Here
- M6 Brass Inserts (8mm OD, 4mm Length) – Buy Here
For Bolted Version
Metric
- M6x12mm Button Head Screws (16 Required For Frame + Additional For Racks) – Buy Here
- Optional Black Version of Above to Match Print – Buy Here
- M6 Nuts (16 Required For Frame + Additional For Racks) – Buy Here
Imperial
- #10-32 x 1/2 Button Head Screws (16 Required For Frame + Additional For Racks) – Buy Here
- Optional Black Version of Above to Match Print – Buy Here
- #10-32 Nuts (16 Required For Frame + Additional For Racks) – Buy Here
Equipment Used
What Makes Lab Rax Special?
Fully 3D Printable
Lab Rax is designed to be completely 3D printable, except for a few fasteners and brass inserts that hold it together. It’s optimised for common 3D printer bed sizes of around 250mm square, meaning you don’t need a large-format printer to produce it. The design also requires minimal support material, just four thin strips on the edge pieces, so there’s very little filament waste and hardly any post-processing needed.
Modular Design
The side panels and posts come in increments from 1U to 5U (5U being the largest that fits a 250mm print bed). You can also combine two sections to create any combination of units up to 10U. You can technically add a second joint and extend the rack beyond 10U, but the strength of the 3D-printed parts becomes an issue when going beyond that with a rack full of equipment.
Cost-Effective
Pre-made 10-inch mini racks typically cost between $80 and $150 for the frame alone. In contrast, a 5U Lab Rax frame uses about 580g of filament and an additional 360g for side panels (if you choose to add those). A single 1kg spool of PETG is enough to print out a complete rack and side panels and costs around $15. Add about $6 for the brass inserts and M6 screws, and the total cost is only $21 – nearly a quarter of a commercial version’s price.
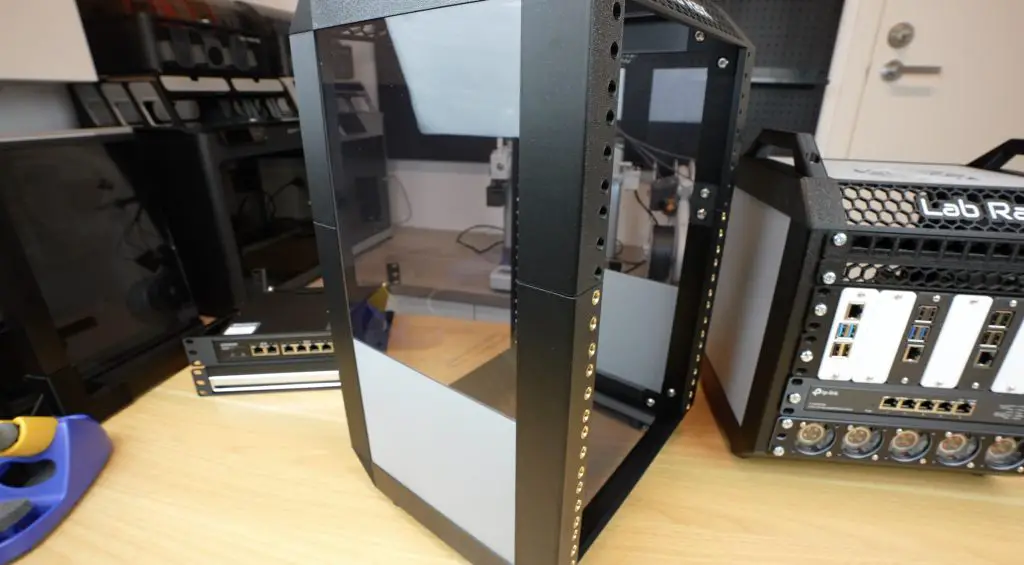
Lab Rax Dimensions & Compatibility
There is no strict standard for 10-inch racks, but Lab Rax follows the most commonly accepted dimensions.

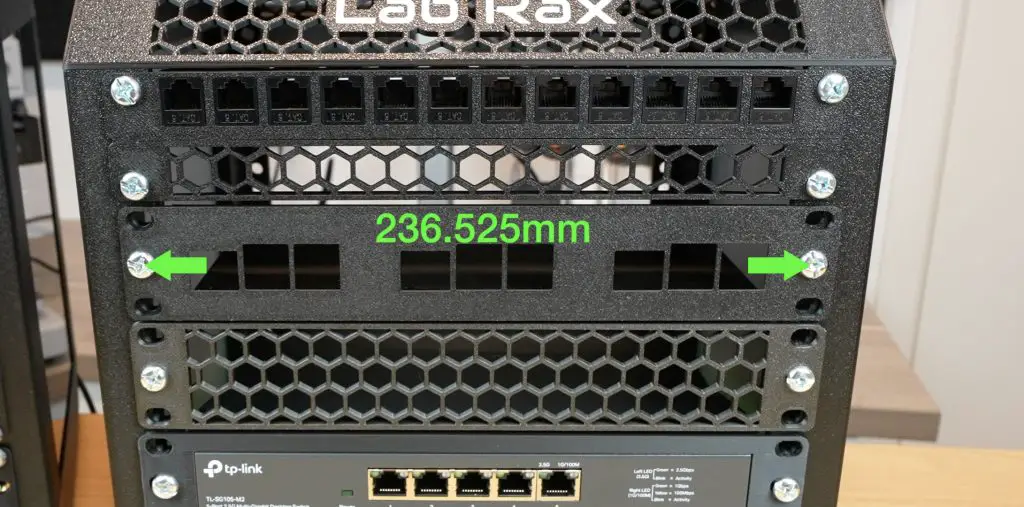
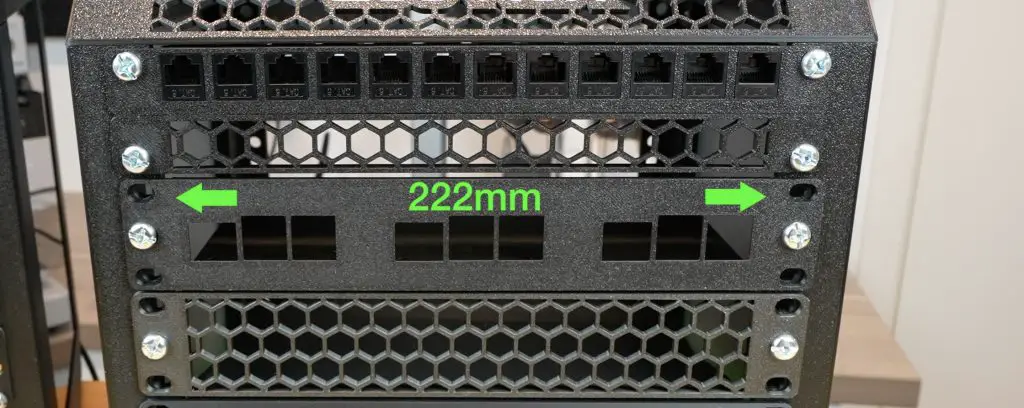
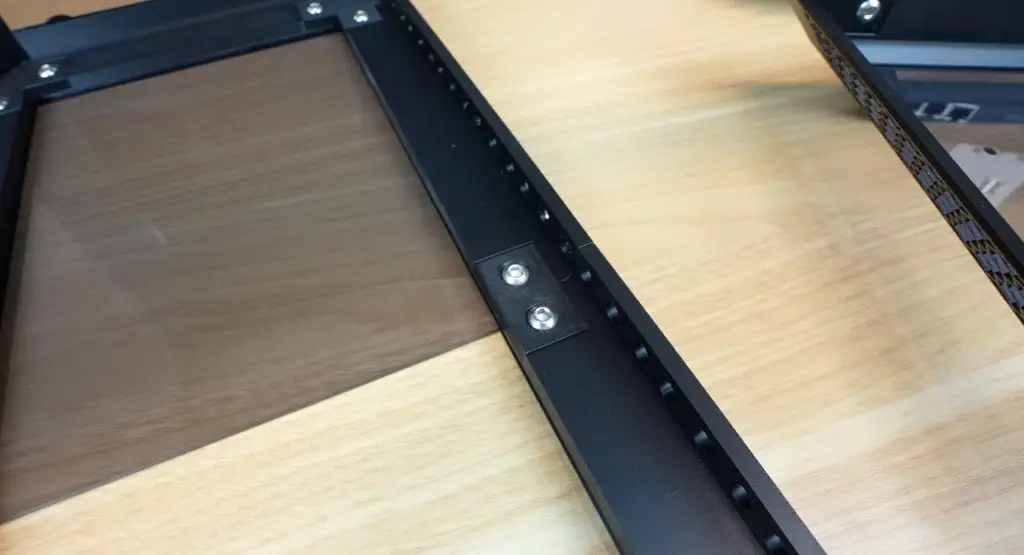
It uses the standard 44.45mm rack unit spacing that is used on larger 19-inch racks, with holes 236.525mm apart and a usable width of 222mm between posts. This makes it compatible with most commercially available 10-inch hardware.
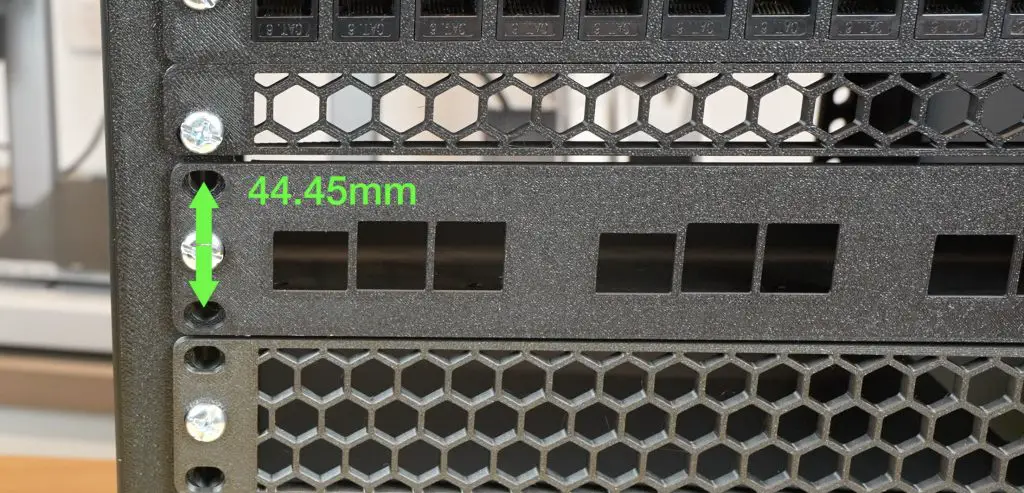
I opted to use M6 screws over 10-32 screws because they are easier to find in Australia, Asia, and Europe. Lab Rax is designed to use M6x10mm screws both for securing the racks and assembling the frame, so you don’t need to buy a bunch of different screw sizes.
Update: I have now put together a bolt-together version that used standard nuts instead of brass inserts. This is compatable with M6 and #10-32 hardware.
Customing Lab Rax
One of the best things about Lab Rax is its customizability! Being 3D printed, you can choose from a wide range of filament colors. I’ve used PETG for durability and heat resistance, but PLA works fine for setups with minimal heat, like a few Raspberry Pis and a small networking switch.
For the two sides, top and bottom panels, you can either 3D print them to match or contrast the frame or cut them from 3mm acrylic or plywood. This allows for clear or tinted window panels or even stylish wooden accents.
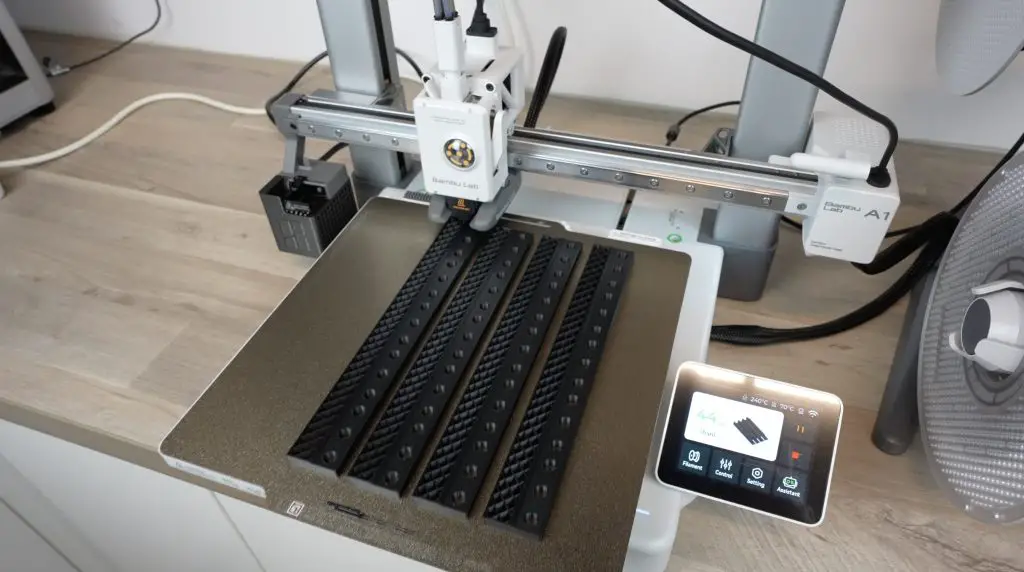
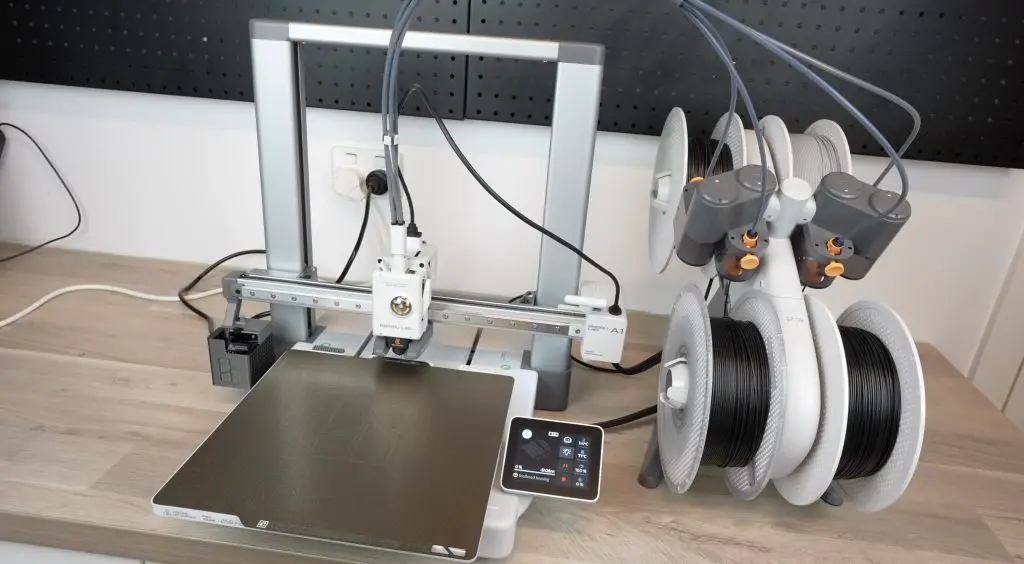
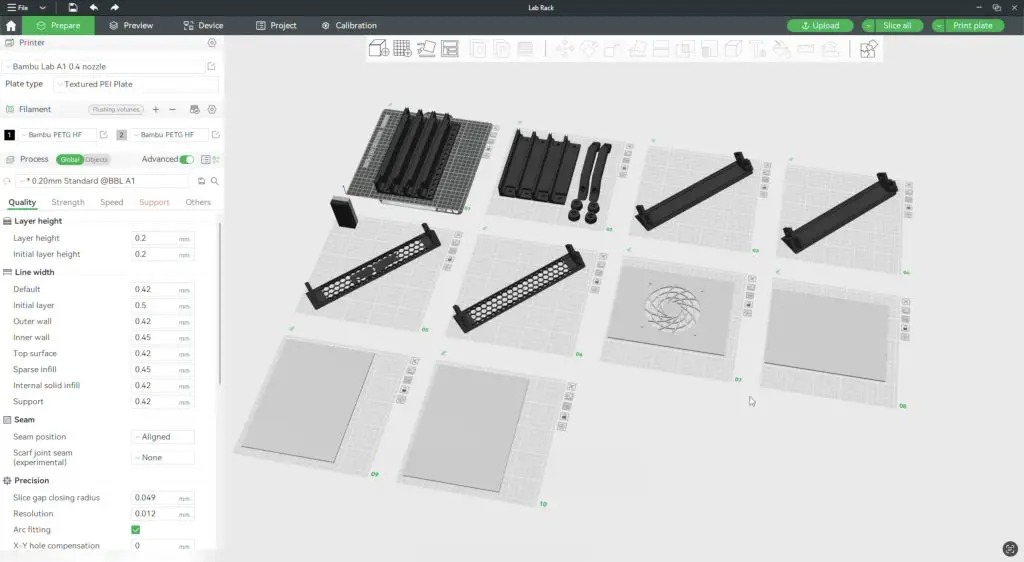
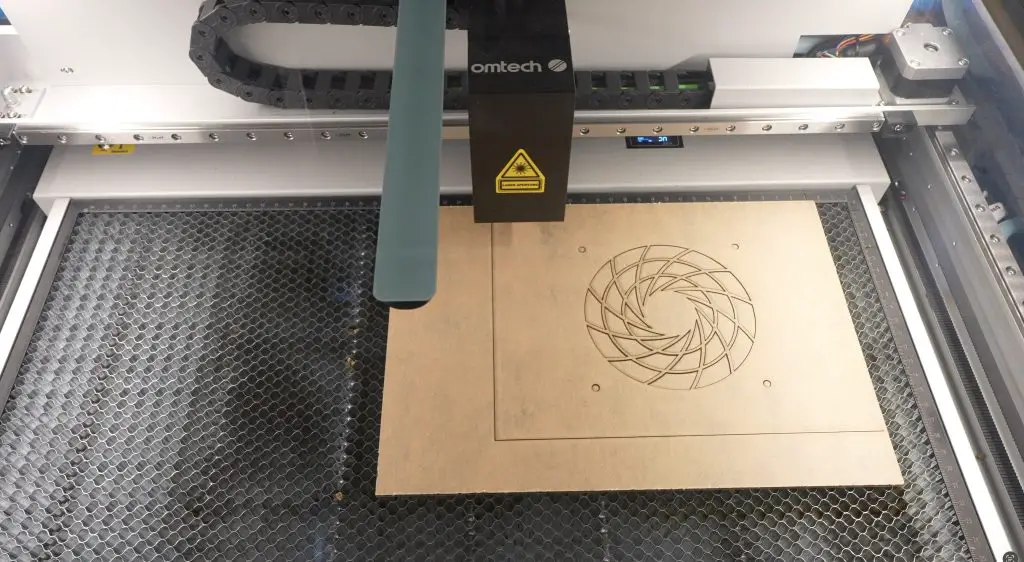
Printing Out The Components
I printed all the parts using the Bambulab A1 Combo, which has a 256mm x 256mm print bed. A full 5U frame and side panels prints across 10 plates in about 26 hours.
Download the additional sizing options
Download the Bolt Together Version (M6 and #10-32 Compatable)
This includes;
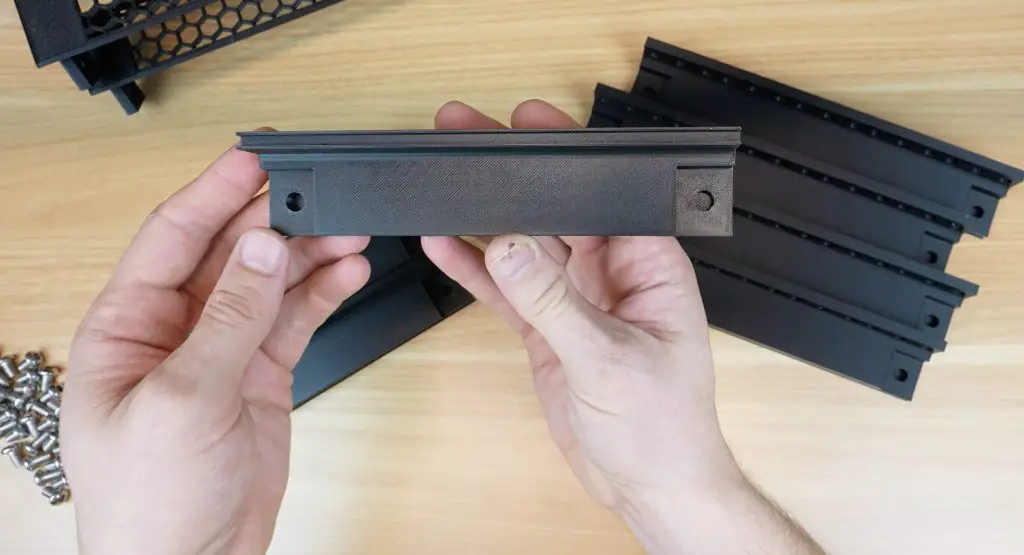
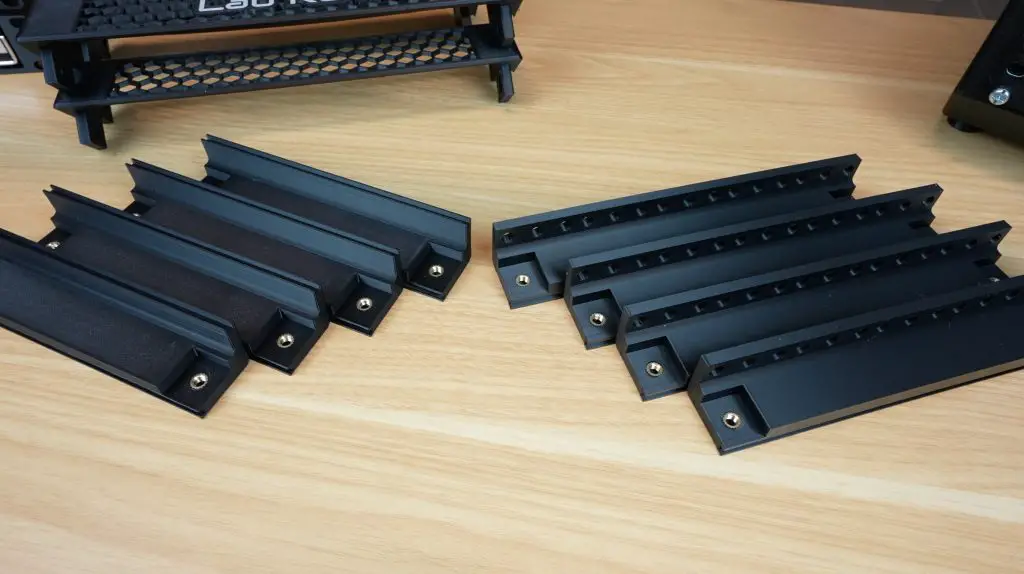
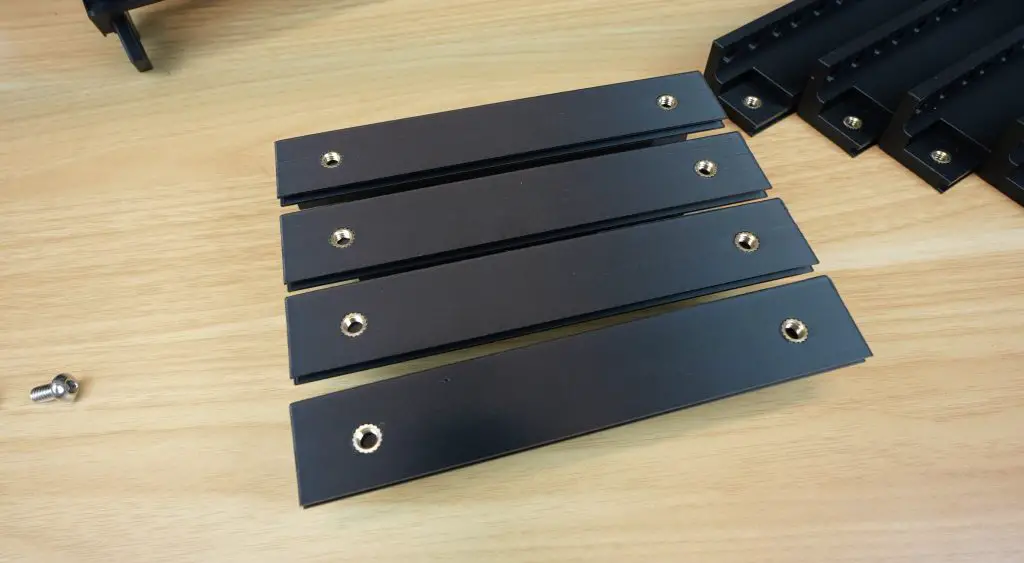
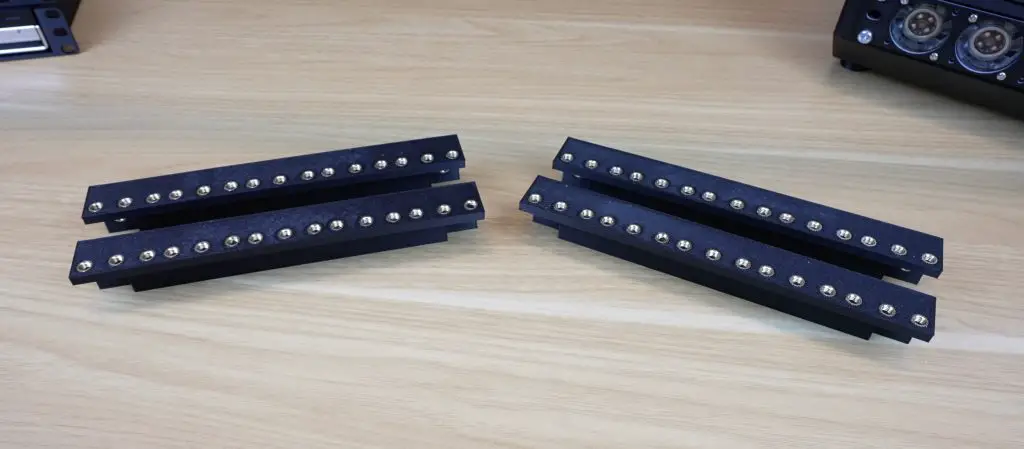
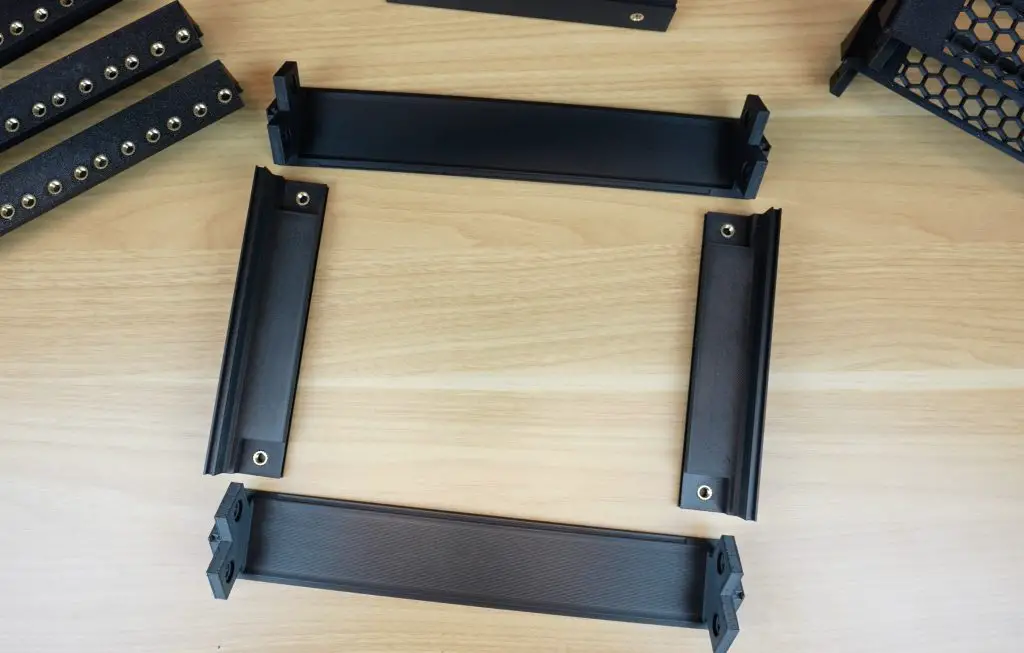
- Four vertical posts, printed in a set of four.
- Four edge pieces, two handles, and four feet.
- The feet can also be printed separately in TPU for vibration dampening if you’re running fans or harddrives in your rack.
- Four individual horizontal pieces: These only fit diagonally on the bed, so they need to be printed individually, but they print quite quickly—about 1.5 hours each.
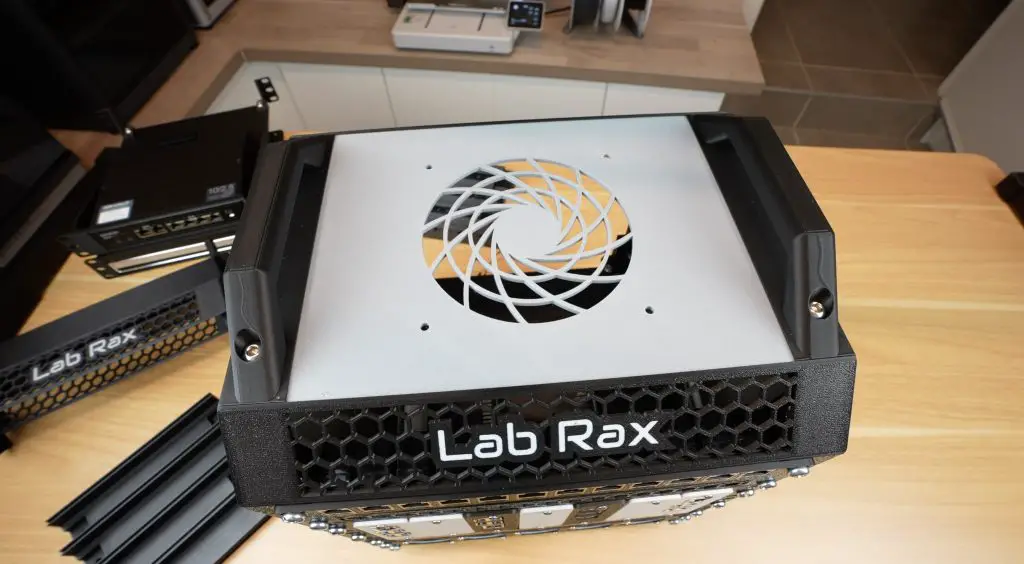
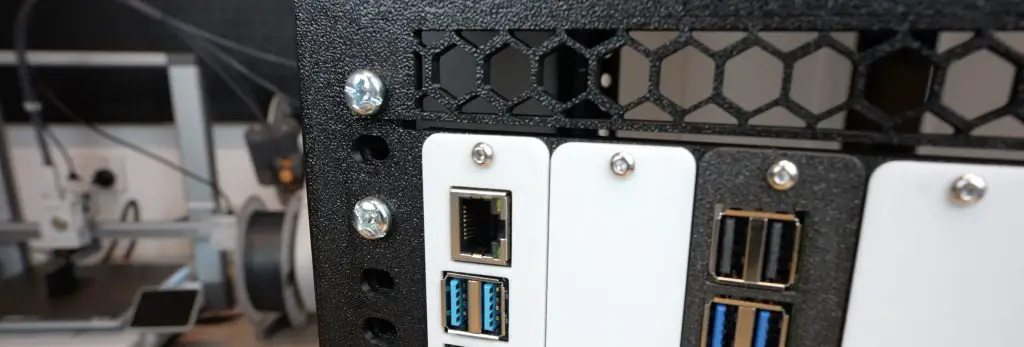
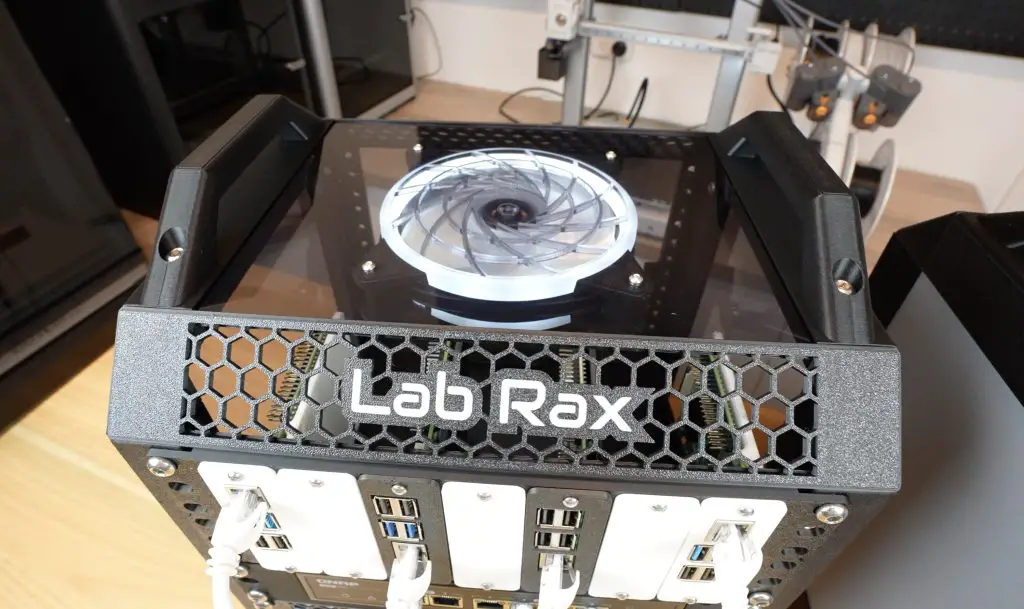
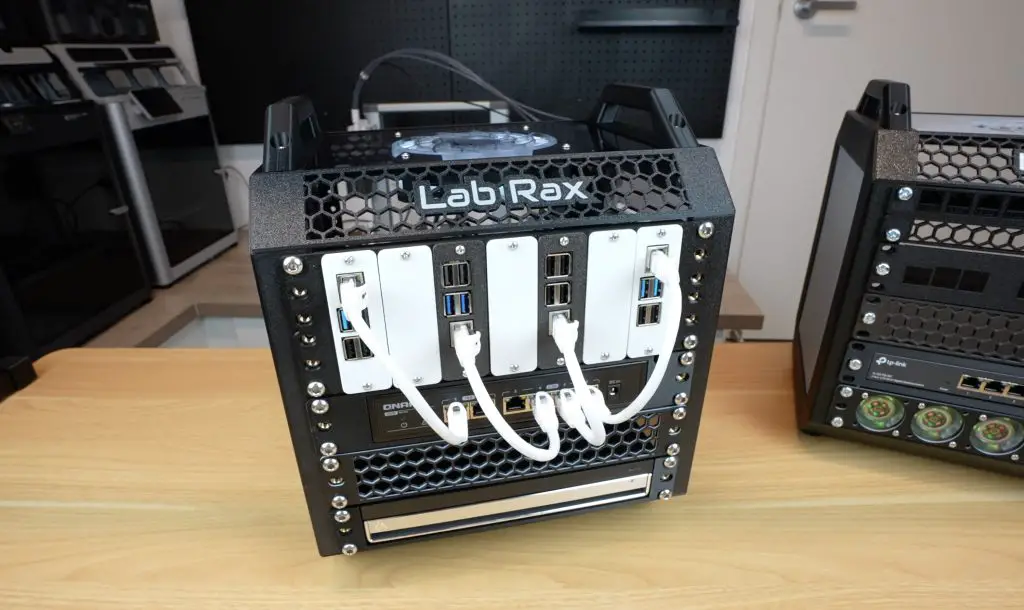
- Four individual panels, a set for the two sides, and a set for the top and bottom. The top can be printed with a fan cutout for a 120mm fan.
The next section has a full bill of materials to ensure that you have the right quantities.

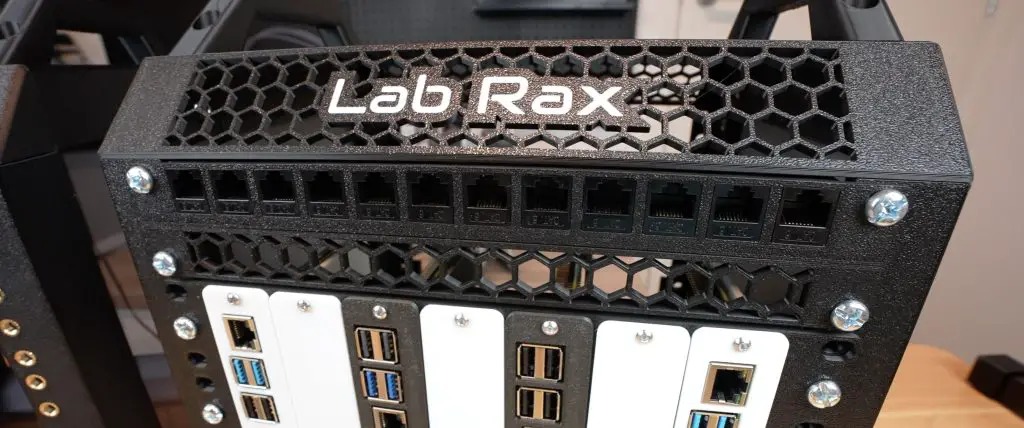
Using the AMS Lite on the A1, you can print in multiple colors to further customise your rack. You can add coloured accent layers, like I’ve done on the vent and fan panels, or add text labels to identify rack components.
I also tested two styles of side panels: a set of 3D-printed panels in grey on my first rack and a set of laser-cut 3mm tinted acrylic panels on my second rack. I personally prefer the acrylic panels for a sleek look.
Bill of Materials
Now that we’ve had a look at the design and 3D print requirements, here is a full Bill of Materials to help out with ensuring that you have all of the components you need to build your Lab Rax frame;
| Item No | Description | Quantity |
| 1 | M6x10mm Button Head Screw | 24 |
| 2 | M6 Brass Insert (8mm OD, 4mm Length) | 24 |
| 3 | M6 Brass Inserts (To Mount Equipment) | 6 per rack unit (U) |
| 4 | Vertical Post | 4 |
| 5 | Horizontal Edge (Either Solid Or Vented) | 4 |
| 6 | Edge | 4 |
| 7 | Handle | 2 |
| 8 | Foot | 4 |
| 9 | Side Panel | 2 |
| 10 | Top Panel | 1 |
| 11 | Bottom Panel | 1 |
Assembling Lab Rax
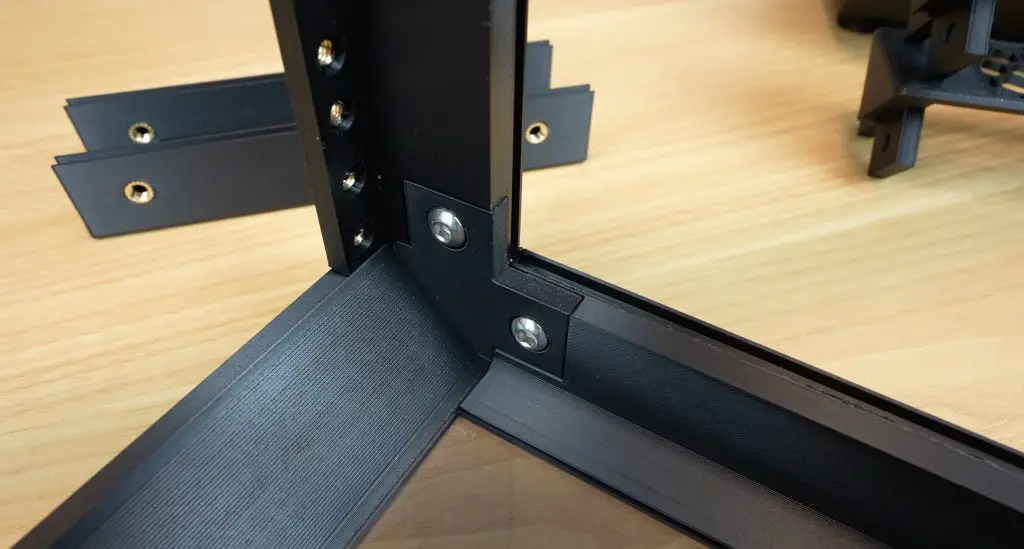
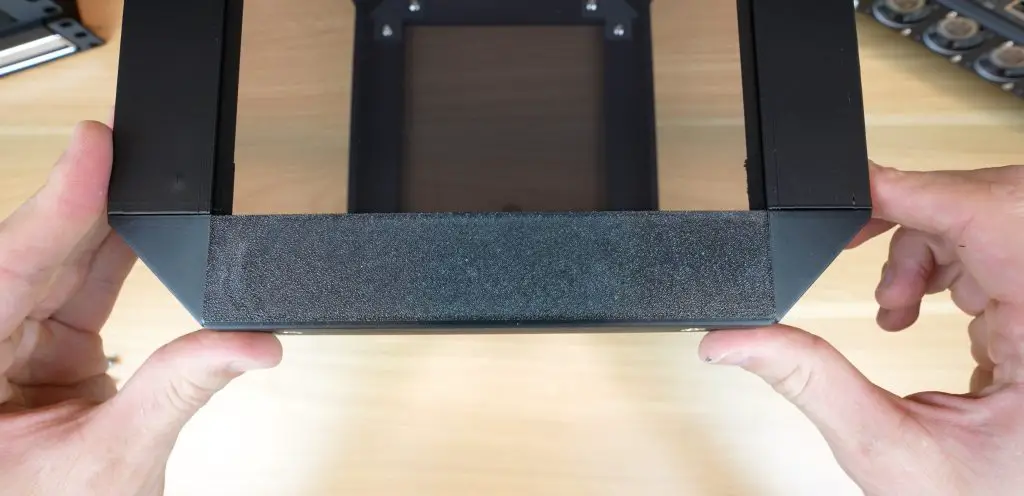
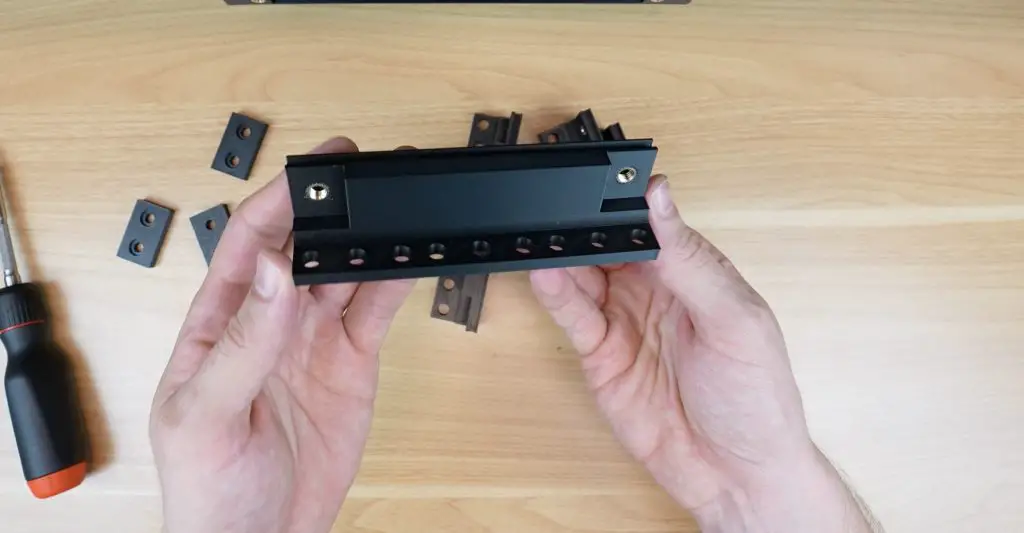
Lab Rax is assembled using M6x10mm screws and brass inserts. Each of the four posts and four edge pieces need two brass inserts, which are melted into place using a soldering iron. There are also brass inserts in the top and bottom of the edge pieces to mount the handles and feet onto.
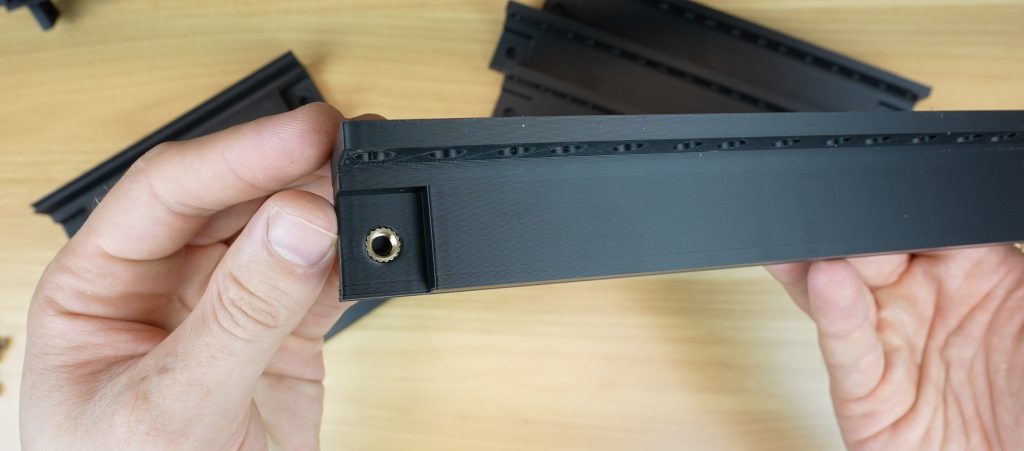
There is the option of either using nuts on the back of the M6 screws to secure the racks or you can add brass inserts to the vertical posts so that they can just be tightened from the front, sort of like a captive nut used on a 19″ rack. I made my first up to use nuts and the second one I’ll make up using brass inserts.
With those melted into place we can start assembling the base.
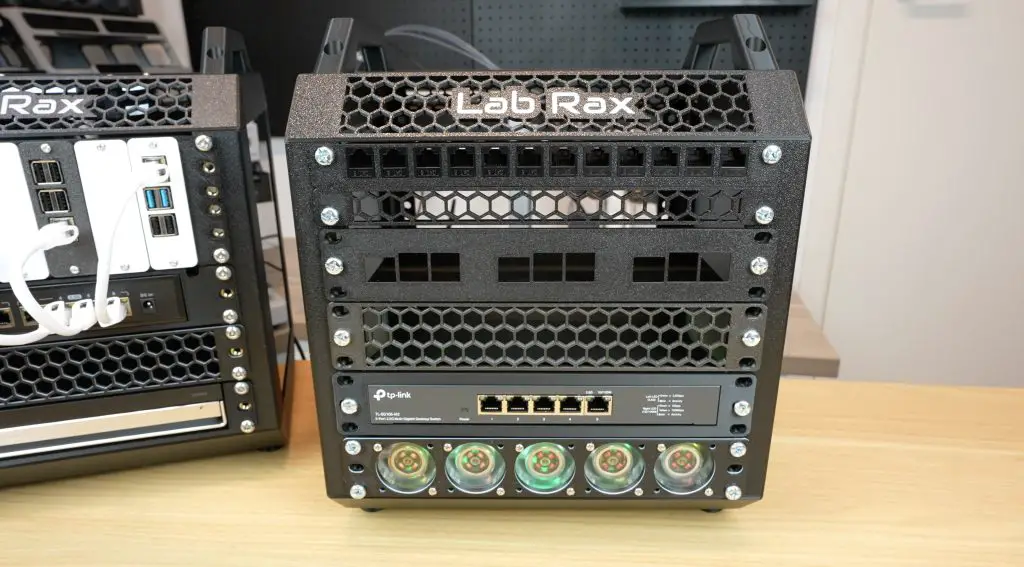
Two of the side edge pieces and two horizontal pieces are assembled around the 3D printed or acrylic base panel, with a single screw at each joint. I’ve used solid horizontal pieces around the base, and I’ll use the vented ones at the top. These are also interchangeable so you can use any combination you’d prefer.
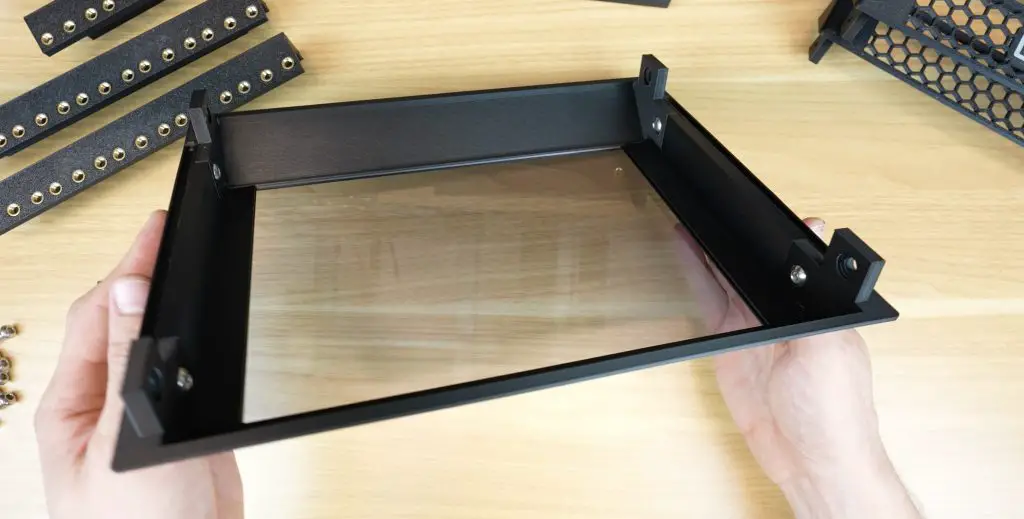
We can then add the four vertical posts, again requiring a single screw at each joint.

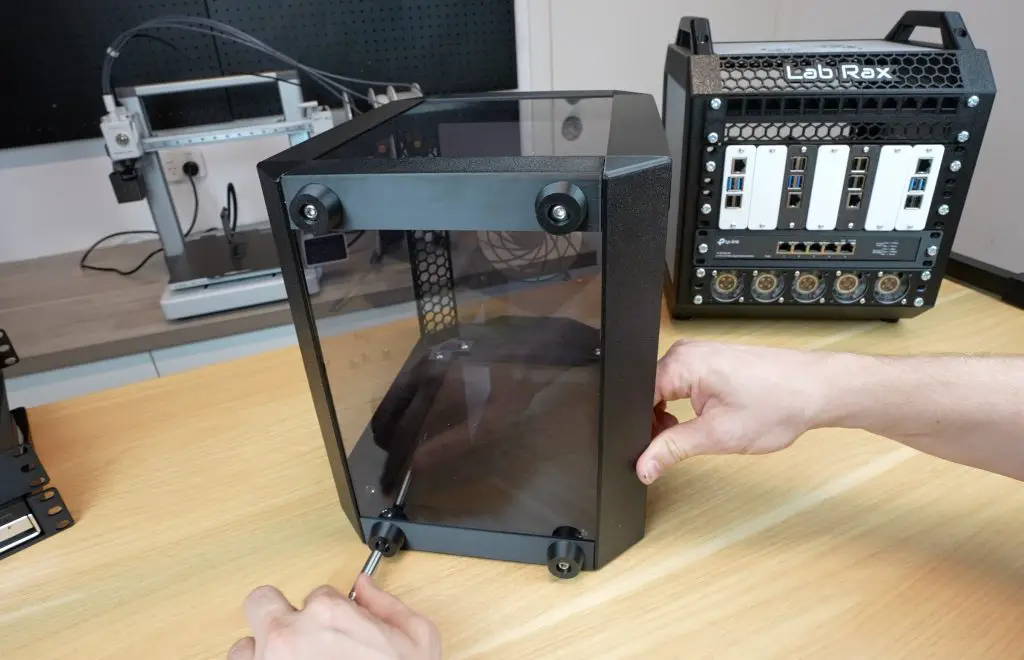
With the vertical posts as guides, we can slide the two 3D printed or acrylic side panels into place.
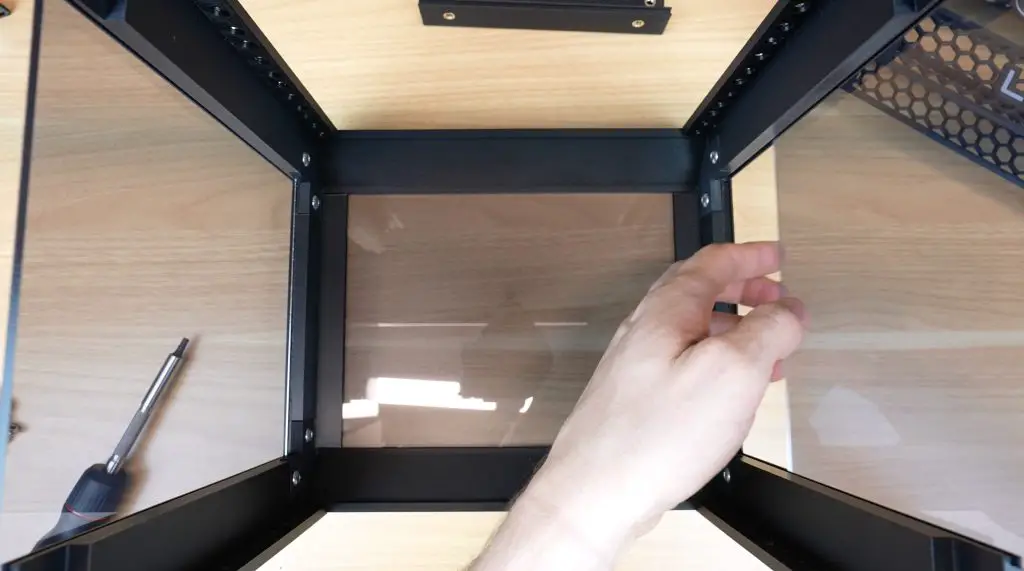
Then add the top two horizontal pieces.
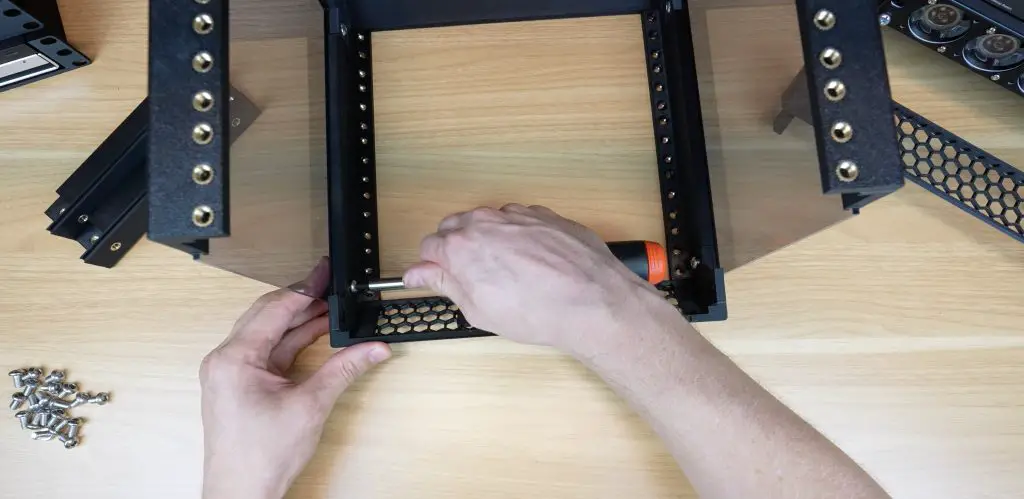
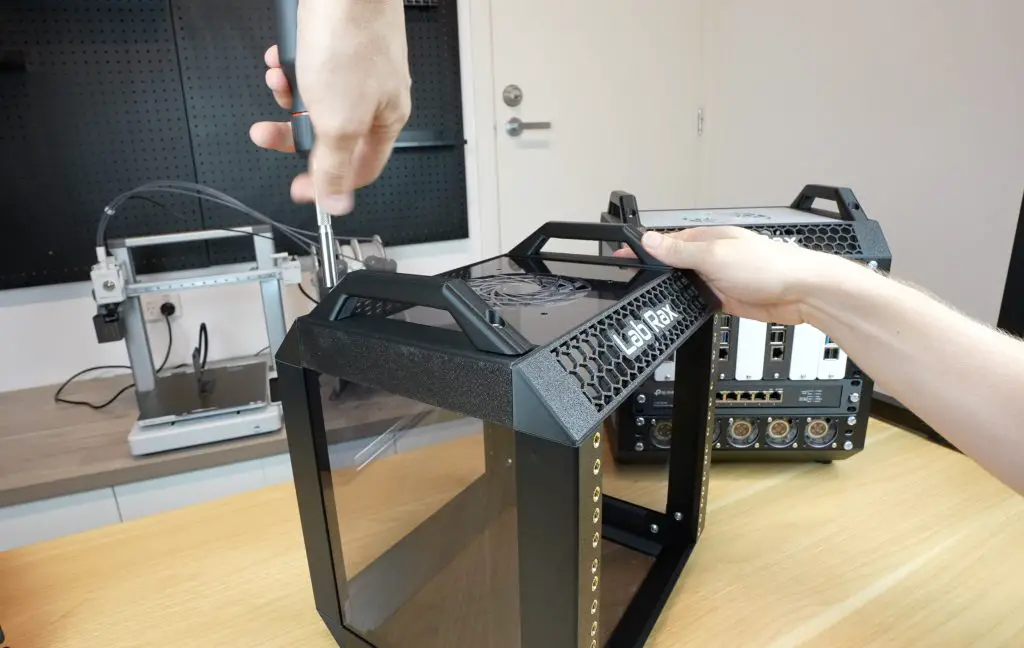
We can add the top panel into the gap and close it up with the last two edge pieces.
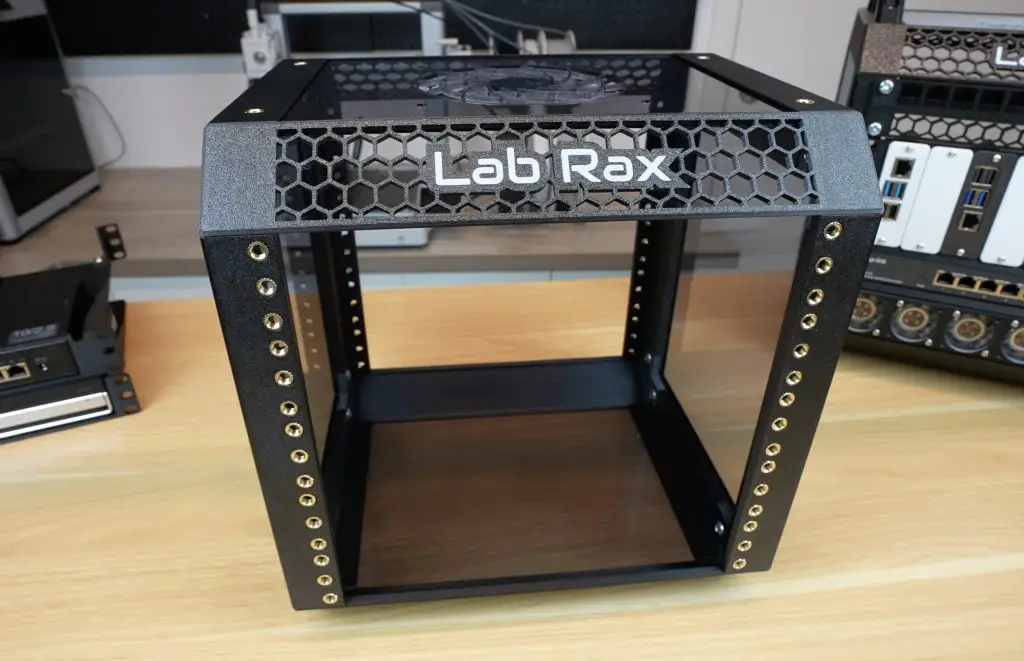
To finish the rack off, we can add the two handles to the top and the four feet to the bottom. These also use the same hole pattern, so you can put handles on the bottom as a stand if you’d like to or feet on the top to stack two racks together.
And that’s the basic rack complete.
Expanding and Customizing the Rack
I mentioned earlier that you can configure the rack to any number of rack units from 1U to 10U and reuse most of the parts. The only parts that need to be swapped out or added to are the four vertical posts and the two side panels.
Model Files For Extension Side Panels & Joiners
If we reprint the 5U posts as smaller sections, we can make up a 3U rack and if we combine the 3U posts with the 5U posts using the designed joiners then we can make up an 8U rack.
If you aren’t using two of the same length posts then it’s a good idea to put the side panels in the opposite way around to the posts so that the joints don’t line up as this gives it a bit more rigidity.
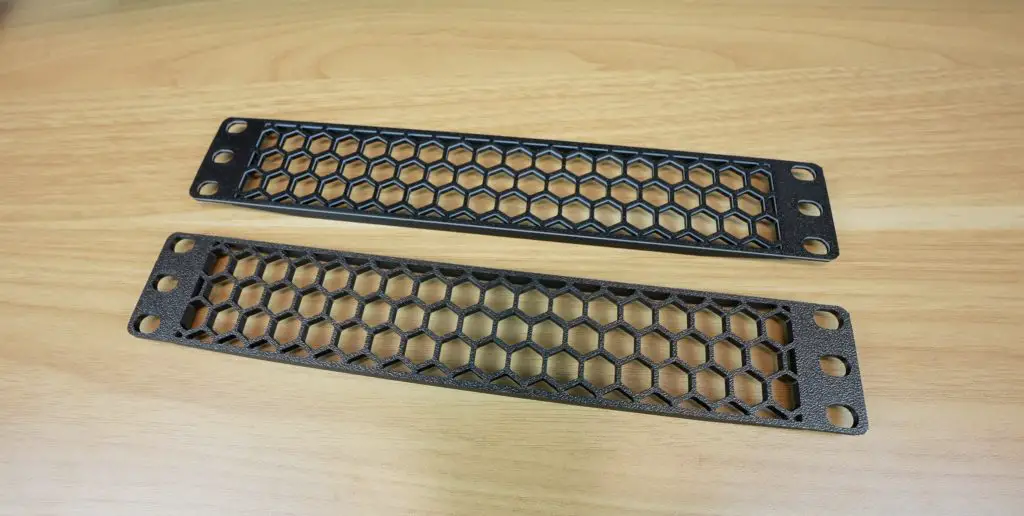
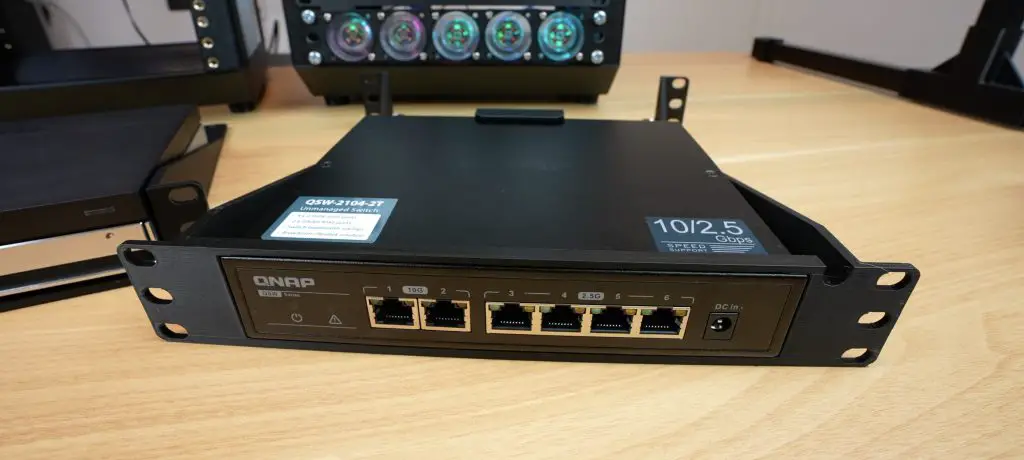
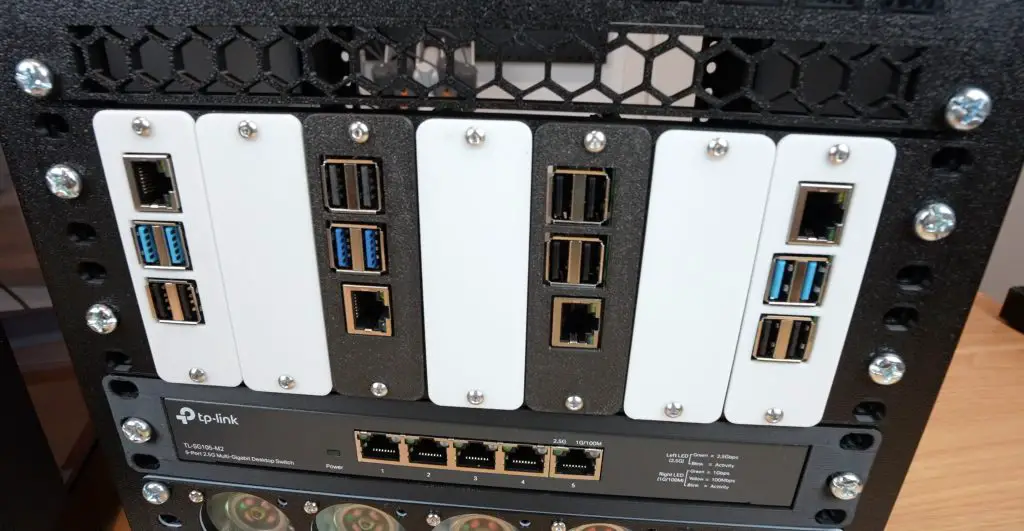
3D Printable 10″ Rack Accessories
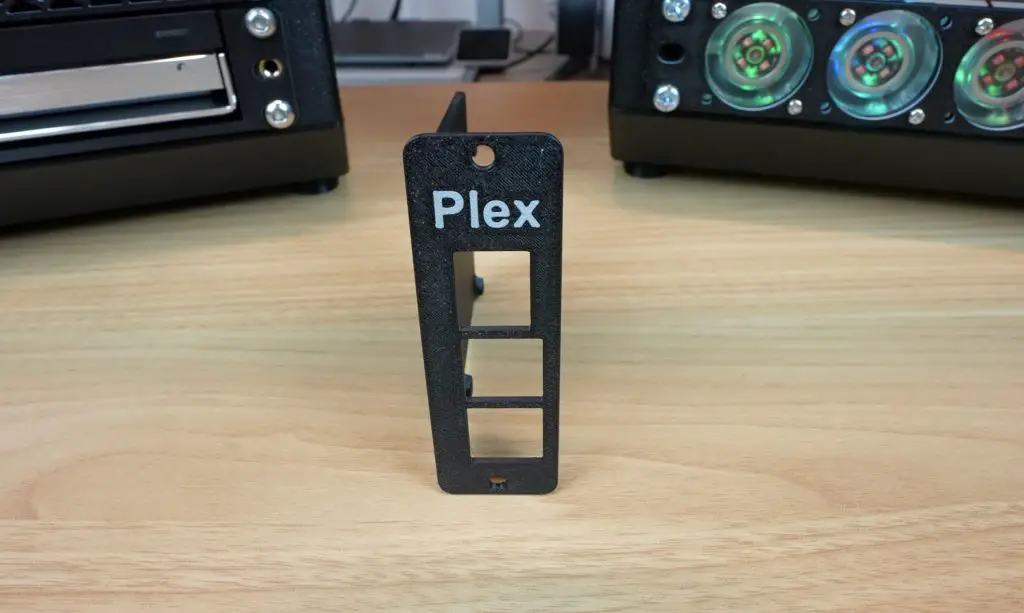
To populate the rack, I designed several accessories:
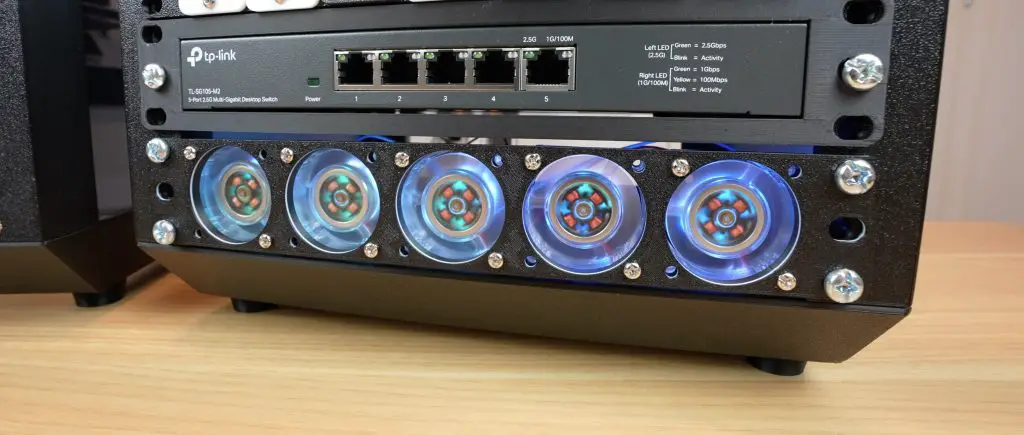
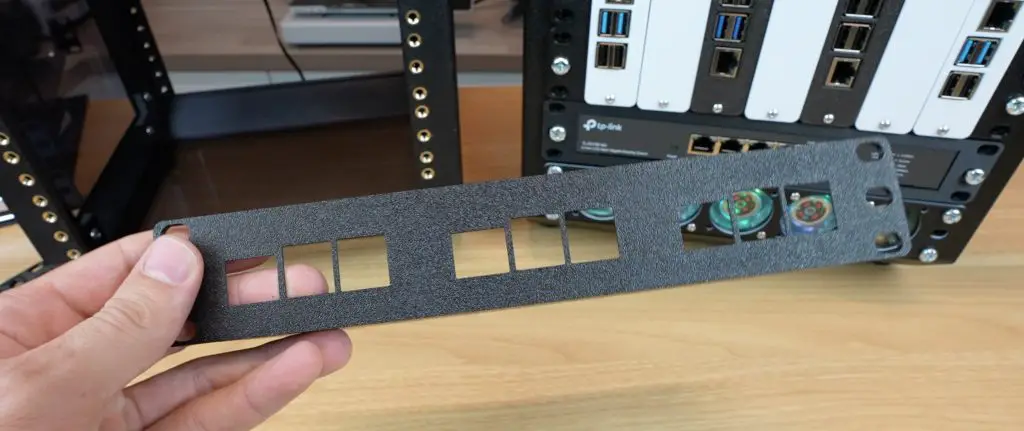
- Blank and Ventilation Panels: Cover unused rack units or allow airflow.
- Fan Panels: Options for 5x40mm fans or 2x80mm fans
- Shelves: Designed for switches, mini PCs, and UPS units
- Patch Panels:
- 1U 12-port Keystone Patch Panel
- 1U D-Type Patch Panel
- Raspberry Pi & SBC Mounts:
- 1U tray for 3 Raspberry Pi 5s
- 2U tray for 7 Raspberry Pis or mixed SBCs
As I find new hardware to add to my rack, I’ll continue to add to the accessory collection. I’m also open to suggestions or request, so leave a comment down below if you have a particular requirement.
Final Thoughts On My Lab Rax Project
So that’s an overview of my Lab Rax project – a modular, fully 3D printable homelab solution that you can customise to fit your needs. If you’re interested in building one yourself, I’ve put all of the Lab Rax system components and the racks and trays shown in this video up on Makerworld.
I’d love to hear your feedback! Let me know if there are any features you’d like to see added or if you’d be interested in a 10-32 screw version. And if you build your own, tag me on social media or drop a comment on Makerworld or my blog – I’d love to see your creations!
Hello, wonderful work, thank you for sharing your really interesting work. I wish you a very good day.
Hi Michael, first of all thanks a lot for sharing your work! I have an order in for the brass inserts and screws and my printer is primed to churn this out as soon as it all gets here 🙂
Just a note – it would be informational for people considering this project if they had a bill of materials list as well as the final dimensions specified somewhere in the write up. It helps to know at first glance if this can fit on a shelf, and exactly how many inserts and screws to order 🙂
But again, great and inspiring work, thanks for sharing!
when you gonna release your
1U tray for 3 Raspberry Pi 5s
And you updated the post with a BOM and dimensions! Love it! And it fits like a glove on my wall shelf at that.
Will post a make as soon as all the materials arrive and I churn it out. Thanks again.
Love this design, currently printing my own!
I have one question tho, how do you power the fans in the bottom? been lookin around for a solution but cant find one
I’ve powered them with a small 5V adaptor and some dupont connectors.
This Lab Rax sounds like a dream for homelabbers! The fact that it’s fully 3D printable is amazing, especially with minimal support. I love the modular design too. It makes me wonder if it could be scaled up for larger setups with some reinforcement. And that cost – $21 for a whole rack? Unbelievable! I’m curious how it holds up over time with all the equipment. Have you tried adding heavier items to test its durability?
This Lab Rax sounds like a dream for homelabbers! The 3D-printable aspect is super cool, especially with minimal support. I love the modular design; it’s like Lego for servers. Cost-effective too? Sign me up! I’m imagining setting up my own organized tech corner. How did you come up with the idea for this unique project? And does it hold up well with heavier equipment?
I wish I had a 3d printer! Thank you for this it is something I want to build but I think it will cost as much to have printer as to buy a rack.
I’d love to know what your most common use cases for the Raspberry PIs are. This looks so fun to print, but I just don’t know what I’d be using the PIs for!
1) Home Assistant server. Our home has many automation features.
2) Plex Server. With an Over The Air antenna into an HD Home Run for 4 channel recording, local stations DVR plus streams.
3) Ham Clock: With a 7″ display, you get realtime pictures of the Sun.
Also, connected to a radio for digital (FT8) work.
4) With a radio hat, I read my power meter and send to Home Assistant for energy consumption logging and display.
5) Beta test linux server for web site development. I put changes to a site on one of these, let customer test and if all ok, then publish to Live server(s).
6) Node-Red box, for tinkering with electronics and developing automations. Useful for teaching the grandkids about this stuff.
These are just a few ideas of stuff I’ve actually done with them.
Just a qucik comment – I am going to be getting some Raspberry Pi 5 with the AI Hat and installing deepseek / other LLM – also use a pi with OMV with the SATA Penta Radxa hat as my NAS (NFS Server) for my home Kubernetes cluster.
My wife also wants me to build a home automation solution that is 100% local – so we aren’t going out to Amazon/ Google – then there is getting her DVD’s over to a jellyfin / – again files over to OMV – then jellyfin containers.
I am going to print this rack just to start keeping everything organized.
I was about to start getting into the 2020 Aluminium MackRack (I think it was called on Thingiverse) – but printing the entire thing – at least for now seems a much better way to go.
I am in the US and cannot get the M6 brass inserts. PLEASE PLEASE release the 10-32 version?
Use case: 3-6 Pi’s and network switch, (Home Assistant, Plex server with NVMe bottom hat, Beta test server for web site design work),
And for the Ham Radio WinLink VaraFM Gateway:
1 mini PC brick and a SignalLink USB to Radio interface.
Having all of this nicely enclosed in a 10″ Rack seems delightful.
Printing started on the sides and waiting for the 10-32 modifications if necessary.
Just go to Amazon. I searched and found a lot of options. Use this search query….
m6 brass inserts 8mm od, 4mm length
https://amzn.to/3Fe6Hfr
Hi ,
I have all the parts printed and assembled, the only thing I need now is to mount the Pi’s. Can someone let me know what size screw and nut I need to mount the Pi’s to to trays?
Thanks
The Pi trays use M2.5x6mm screws and M2.5 nuts to mount the Pi to the tray and then M3x8mm to mount the trays to the faceplate.
Thanks for the response . I have 2.5mm x 6mm screws but they are not long enough for the trays I printed.
I want to say that your design is FANTASTIC!!!!
Mark
Hi,
Since you mentioned in your video on YouTube that you used PETG to print yours out, how fast were you able to print everything? It looked like your printer was moving pretty fast. I ask because I have printed VERY little PETG since getting into 3D printing and when I did it was on my old Creality Cr-6 SE which on a good day I can print PLA at 100 mm/s (with really good quality) with the mods I’ve done, but now I have an Anycubic Kobra S1 that prints circles and squares and triangles etc. around the old printer. It apparently does so at up to 600mm/s max. Also, is PETG really necessary for a Lab Rax if there isn’t going to be a lot of gear going into it? PLA should be strong enough, right?
1) Home Assistant server. Our home has many automation features.
2) Plex Server. With an Over The Air antenna into an HD Home Run for 4 channel recording, local stations DVR plus streams.
3) Ham Clock: With a 7″ display, you get realtime pictures of the Sun.
Also, connected to a radio for digital (FT8) work.
4) With a radio hat, I read my power meter and send to Home Assistant for energy consumption logging and display.
5) Beta test linux server for web site development. I put changes to a site on one of these, let customer test and if all ok, then publish to Live server(s).
6) Node-Red box, for tinkering with electronics and developing automations. Useful for teaching the grandkids about this stuff.
These are just a few ideas of stuff I’ve actually done with them.
Oh boy did I make a mess of things!
I’ve never done these before… So… lessons learned:
1) Don’t use a tapered soldering iron tip to insert the brass inserts. All got plastic inside and became useless.
2) The inserts (short with 2 vertical rows of ribs) are intended for injection moulding, not 3D printing,.
3) The plastic covering the bottom of the holes? WHY? It just gets into the threads.
I had to reprint vertical supports and ordered different inserts. Get the inserts with the little lip at the bottom and angled ribs. These insert MUCH better and are WAY stronger in 3D prints.
Also use a tip that is intended for inserts. These don’t protrude below the bottom of the insert and is far less likely to infuse plastic into the threads.
Great video on how to model the holes for inserts:
https://www.youtube.com/watch?v=5n_V9oUTbIo
Great video on inserting the inserts:
https://www.youtube.com/watch?v=KC1LLU54DKU
I hope my ignorance and lessons learned might be of use to anyone.
Great work
4mm length heat set inserts aren’t a widely available length, and you want a minimum of the diameter of the bolt of thread engagement as a rule of thumb. I can get inserts pretty quickly, but these are difficult to come across.
Could you provide the dimensions of the acrylic panels or share the laser file so I can recreate them?
Could the bolted version be combined with the vertical posts that use heat set inserts? I can easily find 5mm deep m6 inserts that simply stick out of the backside a bit (ok since you wouldn’t see it). Seems the nuts fit into the joiner pieces so it should work, right?
Excited to put this together!
The bolted version and heat set version have the screws installed the opposite way around, so aren’t compatible.
bonjour vois ma version https://photos.app.goo.gl/Y4BmfvQn2a7WoZq36
I love this 10″ mini rack and currently have the 5U bolted version. It is populated with a 2 Pi 1U for Pi4 and a Pi5, cable management, Ubiquiti 8 port POE, Philips Hue, and 5 fan 40mm fans. I would like to expand it to a 8U but haven’t been able to find the 3U extension for bolted only for brass inserts.
Would it be possible to get the various extensions and side panels for bolted?
Since 4mm inserts are hard to find and/or expensive in the US, would this design work with longer ones (e.g., 6mm)?
How do you power the equipment in the rack? Have ypu mounted power outlet to the rack?
+1 on the question about power management. I don’t see an easy way to deal with power connectors for multiple Pi’s, a switch, fans, etc. without cables galore spewing out the back of the rack.
A nice accessory option would be to create a pi holder that also exposes the gpio pins and maybe even the SD card slot to the front of the rack. I’m thinking a panel mounted connector/SD card holder with a ribbon cable connecting them back to the pi. Would be perfect for your 7 pi tray to have such a plate right next to the vertically mounted pi. I’m always messing around with new OS images, sensors on the gpios, etc. so this would be a hugely beneficial option.
Do you have measurements for the side/bottom/top panels? Plan on doing acrylic and while I can get pretty close using the 3d print files, if you know what acrylic you used that would be easier.
thanks
hey michael,
brilliant project …2 requests
1. can you create a side panel so you can join 2 x 10 inch racks together side by side I have a 19inch rack but would prefer to 10inch racks side by side as there is lots more printable models for 10inch racks and also for weight distribution.
2. could you do a third version of your 10 inch NAS video using the beelink mini ME as the compute …aka it would have its own shelf bracket and then a nvme to sata converter to run the sata disks. ( also possibly have a 3.5 hd virtical tray rather than a horizontal tray)
I have been wanting to do this with my mini me but don’t have the skills to create a custom case with drive trays myself ..and this system looks like it maybe able to be customised to achieve what i want to do…
either way let me know what you think about my idea requests ..love to know your thoughts
This is exactly what I’ve been wanting to do since I saw the lab rax video on youtube several months back. 6 x 3.5″ hard drives in a vertical layout and a mini pc as the server using an m.2 to sata adapter. The problem I’m having is how to power everything. Sure I can use the power brick for the mini pc, but how to power the hard drives? A pico PSU connected to a power brick with enough wattage/amperage is an option, but If you want them to power off automatically when the mini pc powers off, you need to somehow add a relay to that.
I have a 300w 24v meanwell PSU from a 3D printer that isn’t being used, so there is that as a possible PSU for everything, but then I’d need step down converters for the mini pc (24v to either 12v or 19v) and the hard drives which use 5v and 12v. And the aforementioned relay to make the hard drives power off when the pc powers off.
Here’s where I’ve been having an issue with the last option. 6 x 3.5″ hard drives are going to consume up to 18 amps on spin-up and up to 9 amps when all drives are being fully utilized (depending on the drives of course). Finding a single input, single output 20A step-down converter isn’t difficult, but I was hoping to find a single input dual output converter so I only have to have one for the drives 5 and 12 volts requirements. I can’t find any. Any ideas or direct links from anyone would be greatly appreciated.
Thank you. This is a very nice start for my own 10″mini rack. The detailed descriptions are very useful. It takes away a lot of the guesswork for me.
It’s really helpful for all of us thinking in doing one of these, like me. The question that I have now is, how I make for the power supply for all the equipment?!
Good job on making one of the most attractive and functional mini racks out there. It seems like this gets mentioned in nearly every rack comparison video out right now. Is there a place to buy and/or download the files for this project in CAD friendly formats like .STP or .X_T (parasolid)? I need to customize a few things for my space constraints and STL’s don’t play nice with parametric modeling software like Solidworks. Let me know!
Hello,
Looks fantastic, but can you fit a microatx motherboard inside ?
I would like to do a modular nas with:
psu atx tray
microatx motherboard
6 drives
1 switch
Thanks
Max, I was thinking the same thing as you, but an M-ATX mobo is 9.6″x9.6″ with some being 9.6″x8.1″. The larger boards will fit the width, but be inside the rails, the depth however is an inch and a half smaller, so it won’t fit. The smaller boards should just fit based on what my tape measure tells me! I used the AI search built into duckduckgo to ask which boards have dimensions of 9.6″x8.1″ and there doesn’t appear to be many mainstream choices (I didn’t check for chinese brands not known well or at all in Canada or the US). Those choices were way more than an M-ATX motherboard should cost however, and from I can recall from my search they were mostly older AMD AM4 boards. One B550, one B450 an X370 and a couple intel boards.
My thought was to use a decent mini pc that has a minimum of two m.2 2280 slots, one for storage (with proxmox installed), the other for an m.2 to SATA adapter and a 24v 300 watt Meanwell PSU for a 3D printer with step down converters for 12 and 5 volts for the hard drives, as 6 actual NAS drives spinning up at the same time will require about 18Amps (some headroom is good to have so 20A buck converter would be good). After the spin up they won’t need nearly as much. And I wanted to find a way to have the drives power on and off when the mini pc is turned on/off. I was thinking a relay perhaps. All just in my head at this point.
https://www.printables.com/model/1176409-10-x10-minirack-now-with-micro-atx-mount/comments
Here is a 10×10 that can fit a microATX, in theory a deskpi TL1 might but it would be a very tight fit.
What orientation did you print your horizontals with the 45° surface to get the best finish and minimize the need for supports? I’m also struggling to get them to fit onto my Prusa i3 MK3s print plate. Trying to rotate just right but I think I might need to import the 3mf into an editor and slice some of the corners to get it to fit.
I see in one of your images how you oriented the horizontal supports. Still working on trimming in an editor to get it to fit the prusa which is 250 x 210 plate.
Thanks for this awesome design and well done guide post! I am preparing mine to print using PETG filament was curious if you have any recommended print settings for it, such as wall loops, bottom/top layers and infills. Thanks!
Do you have an assembled step file available anywhere or just the stl files?
Great project and I am starting to print off the pieces. You mentioned that you could customize the text (you have Lab Rax) and I was wanting to do something similar on the back panel but cant figure out how to add the text so its printed on the outside like you did. When I add text it appears on the inside of the bracket – I assume some sort of 180 degree flipping but not sure how to do it. I am using a Bambu Lab P1S with AMS and Bambu studio. Any help would be great
Hi, I want to print that rack so bad but I am not sure if I can print it with my Creality K1C. You mention that the dimensions are around 250 mm in square but my printer bed is only 220x220x250.
Can you tell me if it will fit with my printer? I cannot look at the files currently. Thanks for your amazing work.
Unfortunately the main cross member swon’t fit onto a 220mm bed. I’m working on a solution that splits this part into multiple smaller parts though.
Hi,
What size is the fan for the top?
Thanks
120mm