Home Blog Page 57

Switching to Solar Power, The Start To Off Grid Living

Solar technology is developing at an increasing rate, making it easier and more affordable for the average household to switch some or all of the power requirements to solar. Solar panels turn energy from the suns light into electrical energy which, with a bit of technology, we can use to power anything from lights to appliances in our homes for free.

A basic system is setup as in the below graphic:

solar power design

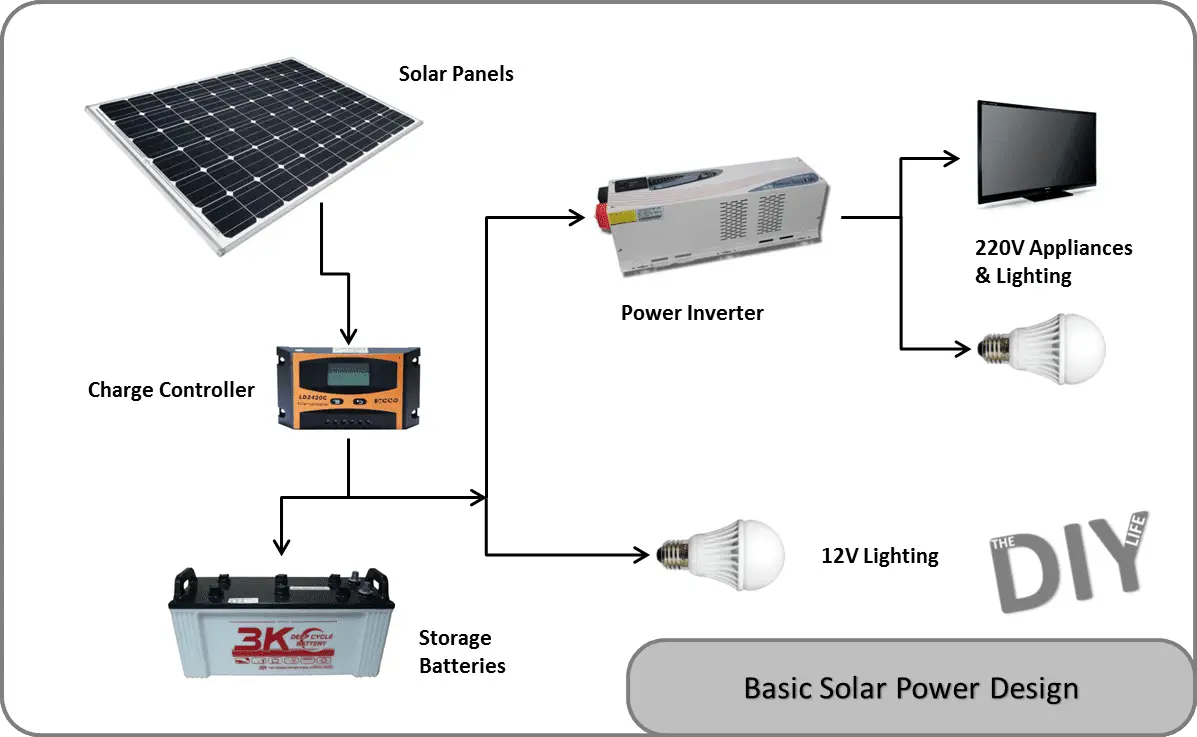
The first component needed is one or more solar panels. The panels provide electricity with which to charge the storage batteries. A small household system would be made up of a few 100W to 400W panels while a larger household system could have up to ten 200W panels. Click here to buy 250W panels.

charge controller

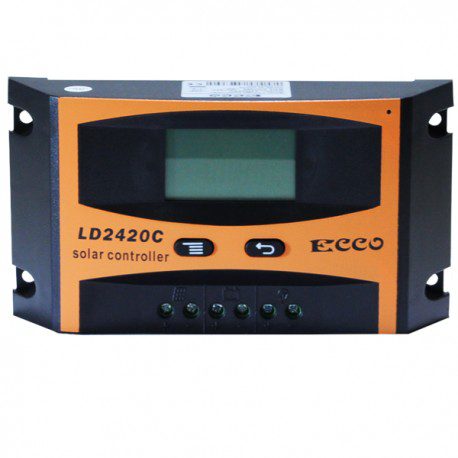
A charge controller is needed to convert the power from the panels into the correct voltage to charge the storage batteries. The charge controller also monitors the voltage of the batteries and prevents them from being over charged. A good quality charge controller will increase the life of the batteries. Click here to buy a 30 amp solar charge controller.

power inverter

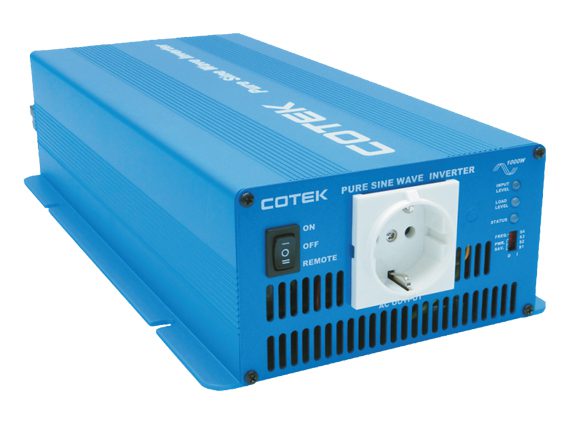
A power inverter is the last item required to convert the energy form the sun into energy our household appliances can use. Most houshold appliances run on 110V or 220V alternating current while the batteries supply 12V direct current. The power inverter converts the 12V DC into 110/220V AC which our appliances can use. Some power inverters can also be used to charge the batteries when connected to a 110/220V AC supply when there is no solar power available. Read this article for more information on selecting an inverter for your system. Click here to buy a 3000W pure sine wave inverter.

solar storage batteries

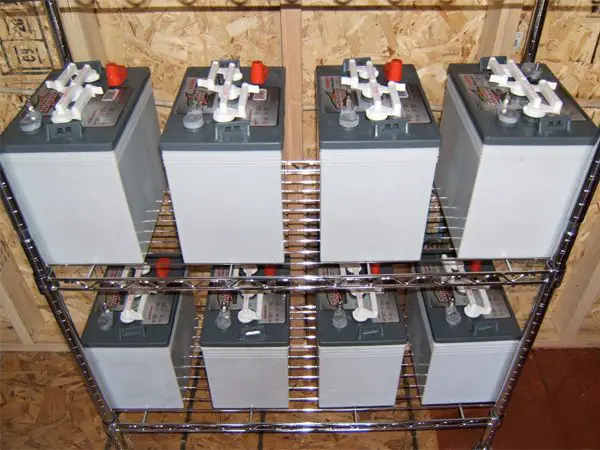
The storage batteries are used to store the energy which the solar panels have produced. The solar panels only produce full power when they are in full and direct sunlight, which only occurs for a few hours a day. The batteries are charged using this power and they then store the energy for use when we need it. Each battery has a storage capacity in amp hours (Ah) and adding up the capacity of all of the batteries together gives you your total storage capacity. Use the guide provided through this link to assist you in selecting how many batteries you need for your solar power system. Click here to buy a 155Ah solar storage battery.

LED lights are available in 12V options which are designed to run directly from your battery supply. If you are going to be using your solar power system to only power your lighting then you can do away with needing an inverter by using a 12V lighting system in your house.

Once you have selected the main components for your solar power system, use this guide and spreadsheet to check that the components are compatible and adequately sized: Design Check.

In order to further save on your household electricity consumption as well as to reduce consumption to allow a smaller solar array to be installed, have a look at this article on how to reduce your electricity requirements.

Add A Plug Outlet To A Drawer

Installing a power oultet in a drawer or cupboard makes it easy to charge phones and gadgets, keep your hair straightener or hair dryer plugged in or to keep your laptop charged. There are two ways this can be done and the first of them is super easy.

drawer multiplug

The easiest way to get an electric outlet in a drawer or cupboard is by using an extension cable with a multi-plug on the end. This requires no cutting or electrical work to be done. The multi-plug can be double sided taped or screwed onto the back edge or bottom of the drawer. The cable is then fed over the top of the back edge of the drawer, this is sometimes easiest to do by removing the drawer from the sliders, placing the cable over the back and then replacing the drawer. If that is not an option then drill a hole in the bottom or back of the drawer, remove the plug and then thread the cable through the hole and replace the plug. For a guide on wiring a plug, click here. The extension cable can then be run behind the drawers or side table and plugged into the nearest available outlet.

electric outlet

The second option is to install a proper electrical outlet in the back of the drawer. This requires an outlet with a closed or covered back panel, not the typical wall outlet which leaves the wires exposed at the back. If the unit where the drawer or cupboard is located is built in, then it may be possible to wire this outlet to the household plug circuit, if not then you will have to wire an extension cable onto the outlet with a plug on the end to plug into a nearby outlet.

Note: The electrical work required to install an outlet usually requires a certified electrician. Check your local regulations and call in a professional if required.

No Sew Rope Basket

Turn a roll of cord or rope into a decorative basket with nothing more than a glue gun with this easy guide.

What You Will Need:

  • 15m (14yrds) Thick Cord or Rope
  • Glue Gun & Glue Sticks
  • Bowl or Bucket to Shape the Basket

Start by forming a flat coil to act as the base of your basket. If your basket is oval instead of round, start with a straight piece and form a coil around it.

cord coil

When the coil is the same size as the base of your bowl or bucket, place the coil on the overturned bucket and begin gluing the cord together and wrapping it tightly around the bucket to provide a template for the shape.

Continue gluing the cord together until the basket is the height you want. Remove the bucket template from the cord and your basket is complete.

optional handles

Add leather strips or short pieces of cord as optional basket handles to complete the project.


Repair Leaks In Roof Sheeting

A sheet metal roof is a popular choice as it is cheap and versatile. Leaks in sheet metal roofs are quite common and occasionally some leak repairs may be required. Fortunately , they are easy and relatively cheap to repair as long as they are not too badly damaged.

What You Will Need:

  • Bitumen Tape – Enough to patch the leaking area
  • Blow Torch
  • Ladder
  • Scissors

Firstly you need to locate the leak, this can be quite tricky. The starting point is to locate the mark on the ceiling board and try to align this with a spot on the roof sheeting bearing in mind that the water may run down the inside of the roof sheeting a small distance before finally dripping onto the ceiling. Common areas for leaks include joins, roof screws, chimneys and skylights, low spots and rusted areas.

Clean up the area to be repaired with a dry rag and some lacquer thinners or mineral turpentine.

bitumen tape repair

Once clean you will need to use a square or strip of bitumen tape to patch the leaking area. Press the section of tape down firmly over the leaking area. Finally, use a blow torch to heat up the reflective surface of the tape. This melts the bitumen underside and makes it stick better to the roof sheeting and to the tape surface so that a strong waterproof bond is formed.

If the damaged area is too large to be patched, you need to consider replacing the single roof sheet. Loosen any screws or nails holding the sheet down and note which of the surrounding sheets overlap it and which it overlaps so that the replacement can be installed the same way. Position the new roof sheet and then screw it into place by driving screws through the ridges (high spots) on the sheeting and not the lower curves as water will be running in these curves when it rains.

corrugated iron roof

Regularly inspect the roof especially after heavy rains or winds. Make sure that the gutters are regularly cleaned and kept unclogged to prevent water from pooling up on the roof. A well installed corrugated roof requires minimal maintenance as long as the drainage is correct and water does not pool up in any areas of the sheeting.

Chocolate Lasagne

This no bake chocolate lasagna consists of  layers of Oreo, cream and chocolate pudding assembled into a lasagna , what could be better? Or easier?

Serves about 8, Preparation Time 30mins, Setting Time 3-4hrs.

What You will need:

  • 1 Pack Regular Oreo Cookies (About 36 Cookies)
  • 6 Tbsp Melted Butter
  • 220g (8oz) Pack of Cream Cheese
  • 1/4 Cup Sugar
  • 2 Tbsp Milk
  • 340ml (12oz) Pack of Cool Whip / Orley Whip
  • 2 Packs of Chocolate Instant Pudding
  • 800ml (28oz) Milk
  • 1 1/2 Cups of Chocolate Chips

Crush the Oreos by placing them in a zip-lock bag and rolling them with a rolling pin or break them up with a tenderising mallet. Mix the melted butter into the crushed Oreos and combine well. Now pour the crushed mixture into a 22x30cm (9×13″) baking dish and press the crumbs into the bottom of the dish in a single compact layer.

Beat the cream cheese in a mixing bowl with an electric mixer until it is light and fluffy. Add the 2tbsp milk and the sugar and mix well. Stir in the pack of cool whip and then spread the white mixture over the Oreo crust.

Mix up the instant pudding in another bowl by combining the two packs of pudding with the 800ml milk. Stir slowly until the pudding starts to set and then carefully spoon the mixture on top of the white layer. Place the dessert in the fridge for 5 minutes to allow the instant pudding to set.

Spread a thin layer of the remaining white mixture over the top of the instant pudding layer. Finally sprinkle the chocolate chips over the top white layer. Place the completed lasagna in the fridge for 3-4 hours to set before serving.

Mini Pallet Coasters

Pallets are every DIY fan’s dream, they are cheap and versatile and can be turned into all sorts of furniture and decor for our the house. This guide shows you how to make small pallets out of craft sticks which can be used to package gifts or as awesome drinks coasters.

A beer soap on one of these coasters make an awesome gift for a guy or try out making a soy candle for a more feminine gift.

What You Will Need:

  • 17 Craft Sticks Per Pallet
  • Glue Gun or Super Glue
  • Scissors
  • Optional – Wood Stain

cut and trim sticks

First trim the round ends from both sides of the sticks, make sure that you cut them all to the same length.

stick laying out

Lay two of the sticks flat and glue three sticks vertically on top of them to start the pallet frame. Turn the frame over and continue gluing a further five sticks along the three vertical ones to make one surface of the pallet.

completed pallet

Turn the pallet over again and glue a further seven sticks to the bottom surface of the pallet.

It’s that easy! The pallet can now be stained or painted depending on what you would like to do with it. Here are some more ideas for these mini pallets:


Homemade Beer Soap

Craft soap making is becoming increasingly popular and this beer soap makes the perfect manly gift for a boyfriend or father. The recipe goes well with exfoliants such as course ground coffee, seeds, barley kernels and oats.

What You Will Need:

  • 326g (11.5oz) Flat Beer
  • 126g (4.6oz) Lye
  • Optional Exfoliants – 1/4 Cup Ground Coffee, Seeds, Barley, Oats etc

Oils

  • 270g (9.52oz) Olive Oil
  • 45g (1.59oz) Castor Oil
  • 270g (9.5oz) Coconut Oil
  • 180 g (6.35oz) Avocado Oil
  • 135g (4.76oz) Shea Butter

Firstly you need to make the beer flat. This can be done in three different ways, open the bottle and wait for a day or two, heat it up in a pot over the stove or pour it into a jug and stir it up every hour or so until it goes flat. Once the beer is flat, pour it into a Ziploc or freezer bag and place it into the freezer until it is solid.

Now weigh out your ingredients paying particular attention to the quantity of lye and oils. Inaccurate measurements will result in a soap which is lye or oil heavy which will have to be thrown out.

frozen beer

Next you need to make you lye solution. Start by breaking up your frozen beer into smaller chucks. Mix the lye into the frozen beer by sprinkling a little over the top and then mixing until it is combined. Do this with small quantities of lye until it has all been dissolved. The lye will slowly react with the beer and produce fumes as well as melt the frozen beer. Do not add too much lye at a time and do not add the beer to the lye as it will cause a violent reaction. Take care not to breath in the fumes and always wear protective gloves.

melting oils

Prepare you base oils next by melting the Shea butter on the stove over a low heat. Once the butter has melted, remove the pot from the heat and add the liquid oils. Before you mix the oils with the lye solution, you need them to be about the same temperature, around 35 degrees Celsius (95 degrees Fahrenheit). If you have a thermometer, measure the temperature of the oil mixture and allow t to cool to the correct temperature. The lye solution can be heated if necessary in a double boiler until it is the same temperature as the oils.

Now you need to combine the two solutions. Slowly pour the lye solution into the oils while stirring. You need to continue stirring the solution until the mixture reaches a thin trace (thick spirals form in the liquid), this is usually achieved in 5 to 10 minutes. To speed up the mixing, a few pulses of a stick blender in between stirring  helps. Mix thoroughly until the mixture turns creamy and begins to thicken.

Once the mixture has thickened, you can mix in the additives. Work quickly as the mixture will continue to thicken and may become too thick to pour. Pour the soap into a bread tin lined with wax wrap or baking paper. Cover the tin with a towel and allow the soap to stand for about a day. During this time the mixture will gel and produce additional heat, keep an eye on the tin as it may be necessary to open the towel up a bit if it gets too hot.

Once the soap has cooled to room temperature and firmed up, you can remove it from the tin and begin cutting it. Cut it into large slices with a sharp kitchen knife. The slices now need to cure for 4 – 6 weeks before they are ready to use, place them on paper towel in a dry, cool and dark place.

beer soaps

Your soap can now be wrapped in paper or cling film and  is ready to become your next gift. Try using different types of beer and different exfoliants for a range of different soaps. What are your favorite ingredients to add to your homemade soap? Let us know in the comments below.

Pallet Candle Sconces

Pallet sconces are really easy and cheap (if not free) rustic decor items to hang on a bare wall. The sconces are made out of a few scraps of pallet wood or scrap timber which is often lying around the garage. Alternately you can find old pallets at junk yards, hardware stores and fruit and veg stores.

What You Will Need

  • Pallet Wood (Two Pieces 35-50cm/14-20″)
  • Wood Glue
  • Wood Saw
  • Miter Box (Optional)
  • 80 Grit Sandpaper
  • Wood Sealer, Varnish or Stain

Firstly you need to cut out the main lengths which will go up against the wall. They should be around 20-30cm (8-12″) and can be cut to the same length or different lengths for a staggered look. Use a miter box to make clean and square cuts on the ends.

Next you need to cut the ledge. The ledge needs to suite the size of your candle, 15cm (6″) is usually the correct size for a large round pillar candle. The triangular support brackets for underneath the ledge can be cut by first cutting a 8cm (3″) square piece of wood and then using the miter box to cut it at 45 degrees, making two brackets.

candle-sconce

Now sand down any rough or jagged edges. You want the pallet wood to be rustic looking and not too smooth, just neaten up the edges and remove any splinters.

Glue the pieces together with the ledge roughly one third of the way up the vertical piece and the bracket underneath to support the ledge. Apply a generous amount of glue and wipe away any excess which is squeezed out when pushing the pieces together. Allow the wood glue to dry for about 5 hours or overnight.

Lastly, you can stain or varnish the wood. A dark stain makes the wood look more aged and expensive. Apply the stain to all sides of the sconces and allow to dry overnight. To give the wood and aged and distressed look you can lightly sand the dried stain to bring the rough grain out.

pallet wood candle sconce

Add a picture hanging hook to the back of the sconces or screw them onto the wall from the front. Add the candles and your cheap and effective sconces are complete.

Original Article From Amanda Katherine

Repair A Carpet Cigarette Burn

0

Fix a cigarette burn in a carpet easily with some common household tools.

What You Will Need:

  • Hot Melt Glue Gun
  • Scissors
  • Craft Knife

Firstly you will need to cut out the existing burn. Use a sharp craft knife and cut out a square a little larger than the burn mark. Try to cut through the pile and the base layer with a single cut to get a clean finish. Hacking at the pile or base layer will pull strands out and make it difficult to get a neat finish.

Now you need to cut a replacement plug. When installing carpets, you should always ask for a few of the scrap pieces to use to repair damaged areas. If you do not have any scrap pieces available then you will need to cut a corner or edge out of an inconspicuous area of you existing carpet. Cut a small square, the size of the plug you removed out from behind a couch, under a bed or in an unused corner of a room. If the hole is going to be noticeable then use the cigarette burned piece you cut out to plug the removed portion, which will make it less obvious.

Test that the plug fits snugly into the hole where you removed the cigarette burn. The base layer should not overlap anywhere or the plug will protrude from the rest of the carpet.

You will now need to glue the plug into the hole. Heat up the glue gun so that the glue is as hot as possible. Use the glue gun to put hot glue all over the layer underneath the carpet in the area of the hole, make sure to get a generous amount of glue around all four of the edges. Now press the plug into the hole. Press the plug down so that the glue hardens with the base layer at the same level as the existing carpet base layer. Put a dap of glue onto the ends of any protruding strands and push the ends back onto the base layer.

If the plug has not seated well, try ironing the area with a clothing iron on a high heat. The heat will melt the glue and allow you to manipulate the plug to get a better seating.

The plug may be noticeable for a few days or weeks (depending on the area traffic) after the repair until the piles in both the plug and the existing carpet become similar (the plug came from an unused piece of carpet and will likely be fluffier than the carpet around it). Care should be taken when sweeping or vacuuming over the plugged area as it will never be as strong as the original carpet.

Using Pebbles To Upscale Your Garden

Pebbles are a cheap and low maintenance way to add decorative features to your garden. They are available in a range of colours and sizes and when used with stones, gravel and pavers can really transform your garden and give it a high end landscaped appeal. Here are some ways in which pebbles, gravel and decorative stone can be used to upscale your garden.

line path with pebbles

Line a path with pebbles to make it appear bigger, provide a transition between the steps and the plants and keep the plants from growing in between the steps.

patterned pebble beds

Patterned contrasting stones and pebbles make an effective alternative to flower beds and require almost no maintenance. A few scattered shrubs or bushes add some greenery.

contrasting stones

Another good example of contrasting stones and pebbles used to create a flower bed. The potted plants are used to effectively add height to the garden decor.

pebbles in water feature

Place dark pebbles in the bottom of a pond or water feature to add texture and character to an otherwise dull surface.

gravel between paving stones

Use gravel or shale to fill the gaps between paving stones for a more complete and professional looking pathway.

pebbles for drainage

Create a pebble drainage channel from you gutter downspout to channel water out of your beds and keep the mulch in place.

pavers and stones

Create a feature transition area between your patio and pool or patio and grass with paving slabs and white pebbles.