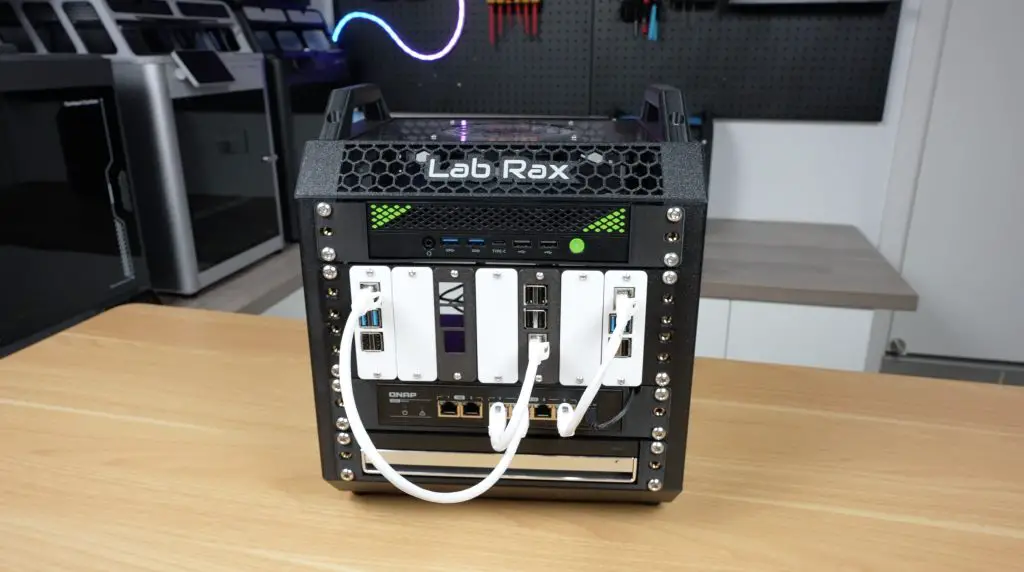
If you’ve been following my projects, you’ll probably remember my Lab Rax system, a 10-inch modular and 3D printable rack I designed to make it affordable and flexible to build your own homelab.
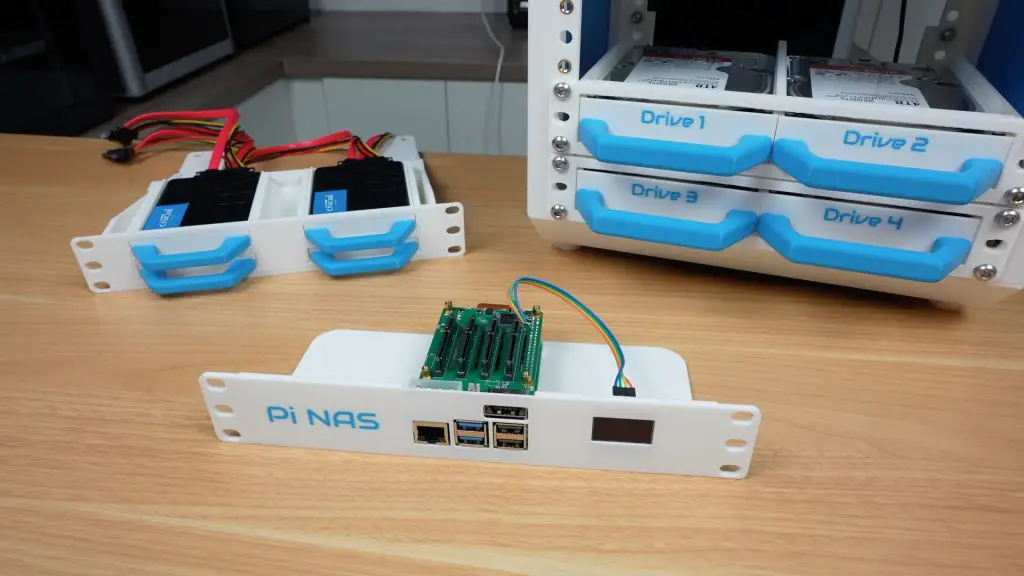
Today I’ve got something new to add to it, a set of 3D printable shelves for drives and SBCs (Single Board Computers), designed specifically to turn your Lab Rax homelab into a compact and customizable NAS (Network Attached Storage).
These shelves can be used as part of a larger Lab Rax setup or on their own as a dedicated NAS. In this post, I’ll walk you through the four new shelf designs, explain how to assemble them, and then show you two example NAS builds, one with a Raspberry Pi 5 and another with a Zimaboard 2.
Here’s my video of the project, read on for the write-up;
Where To Buy The Components For This Project
- Raspberry Pi 5 – Buy Here
- 32GB Sandisk MicroSD Card – Buy Here
- 12V Power Supply – Buy Here
- Radxa Penta SATA Hat – Buy Here
- Zimaboard 2 – Buy Here
- 5 Port PCIe SATA Adaptor – Buy Here
- SATA Cables For Drive Trays – Buy Here
- QNAP Switch – Buy Here
- WD Red NAS Drives – Buy Here
- Crucial BX500 Drives – Buy Here
- M3 Drive Screws – Buy Here
- M3x8mm Assembly Screws – Buy Here
- M3 Brass Inserts – Buy Here
Tools & Equipment Used:
- Bambulab P1S Combo 3D Printer (USA Store) – Buy Here
- Bambulab H2D 3D Printer – Buy Here
- Brass Insert Tool – Buy Here
- USB C Pencil Screwdriver – Buy Here
Some of the above parts are affiliate links. By purchasing products through the above links, you’ll be supporting this channel, at no additional cost to you.
A Quick Recap: The Lab Rax System
The Lab Rax framework is 10 inches wide, making it a lot smaller than a standard 19-inch rack. But it still uses the same unit height (U) spacing and hole patterns as a 19-inch rack, so you can mix and match modules from other 10-inch rack systems.
The goal is flexibility, start with a small setup and then expand as you need more shelves, drives, computers, or networking gear.
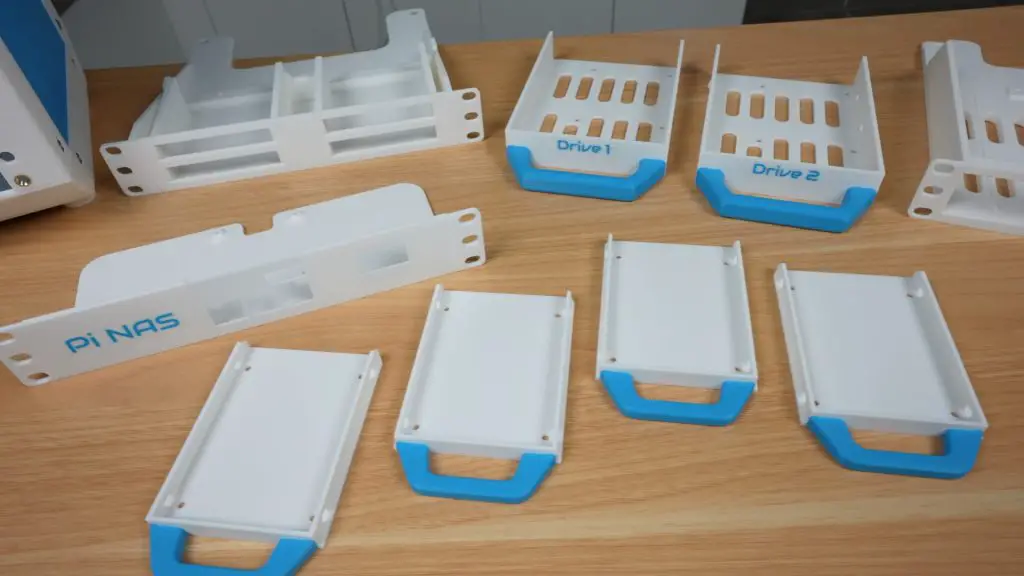
The New 3D Printable NAS Shelves
I’ve designed four new 1U shelves, two for holding drives and two for housing SBCs to run the NAS. Let’s go through them one by one.
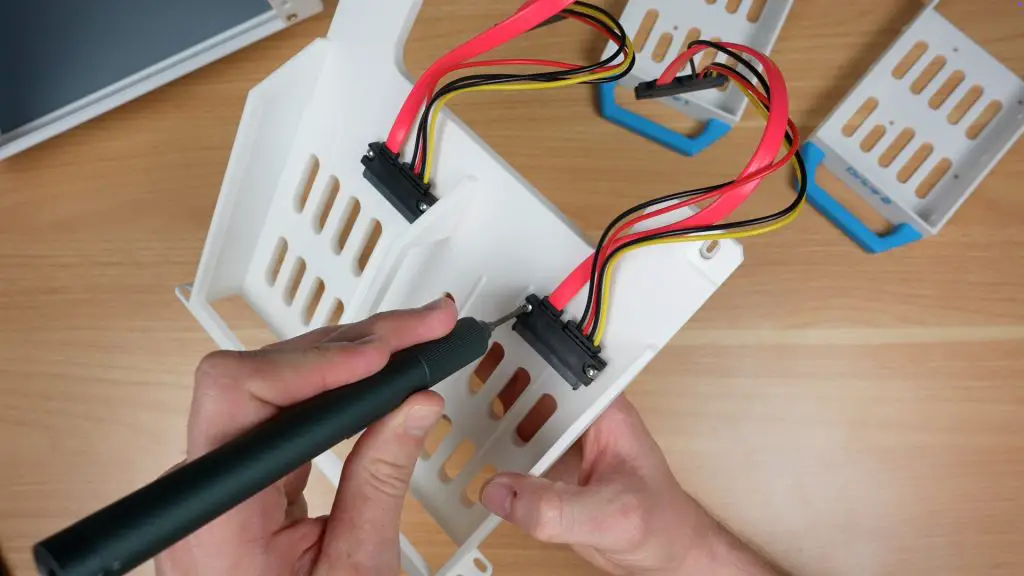
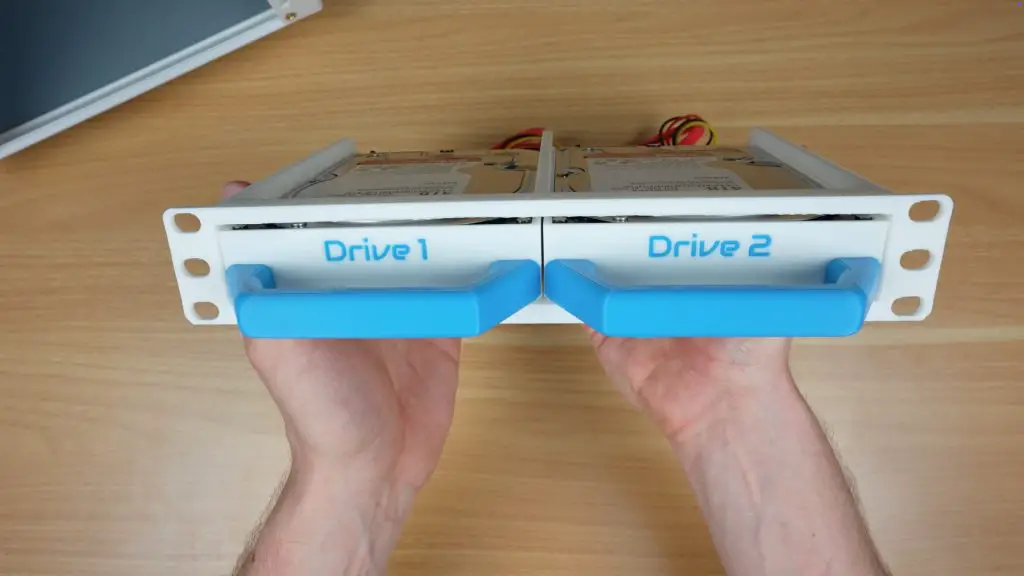
1. Dual 3.5″ Drive Shelf (1U)
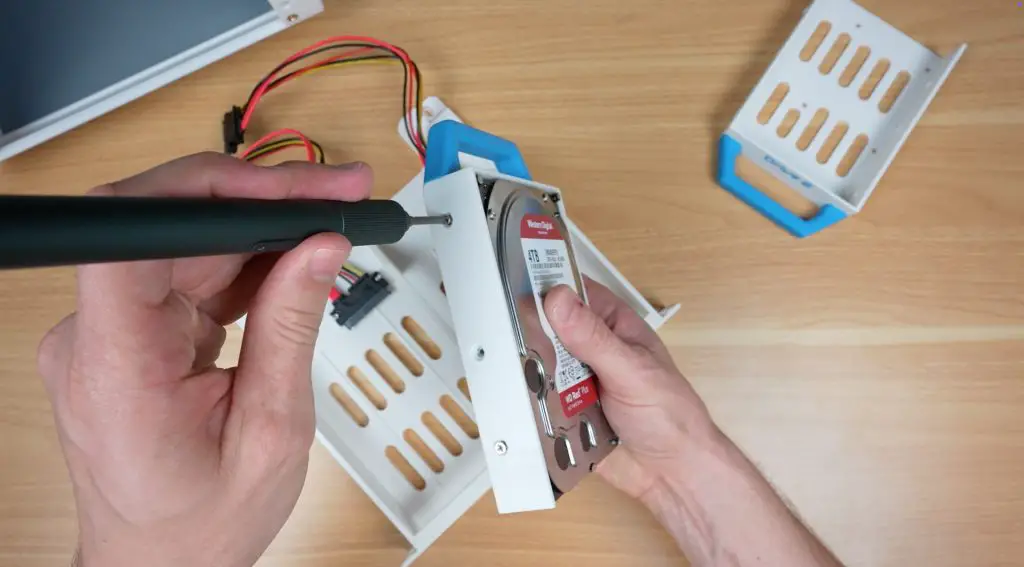
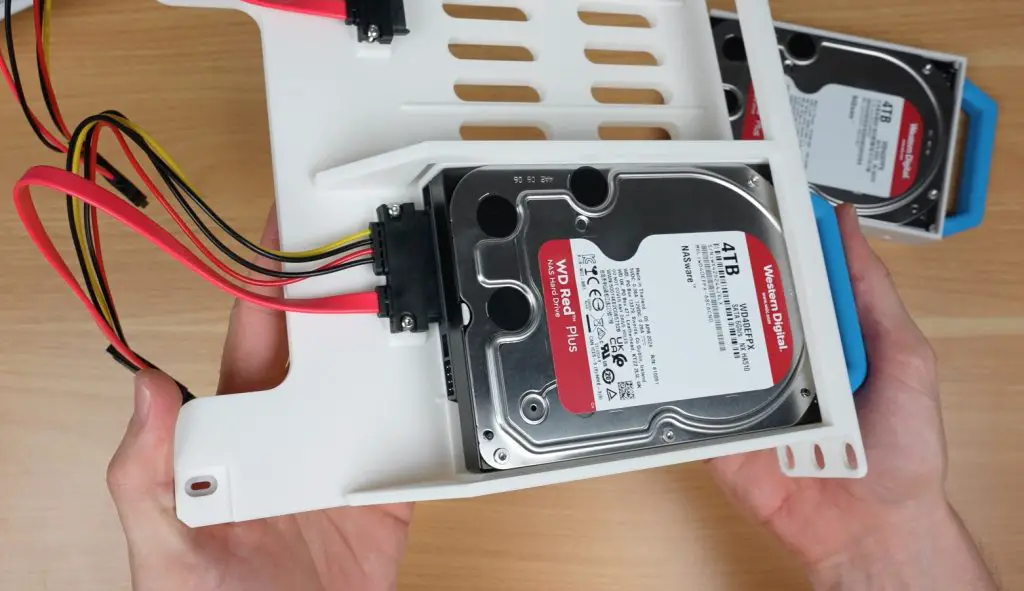
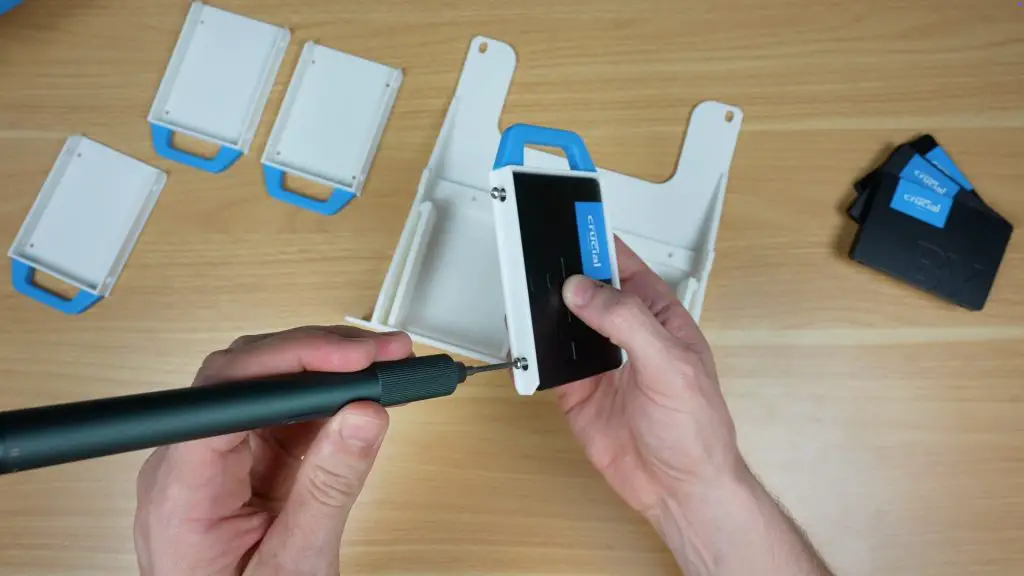
This shelf holds two 3.5-inch drives, each mounted in a pull-out tray for easy swapping. The trays slide into rails built into the shelf body, and each drive is secured with M3 drive screws through holes in the sides of the tray.
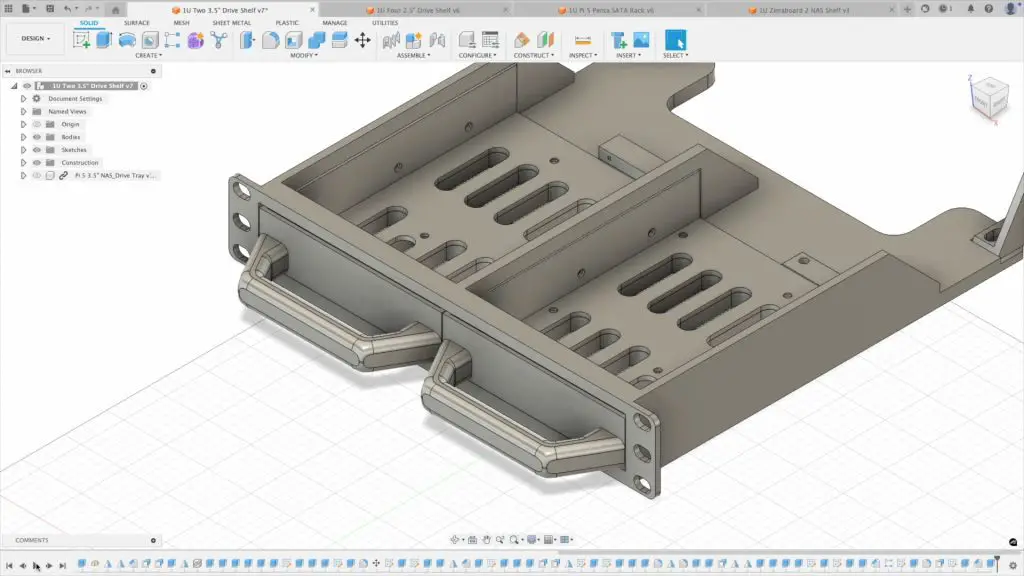
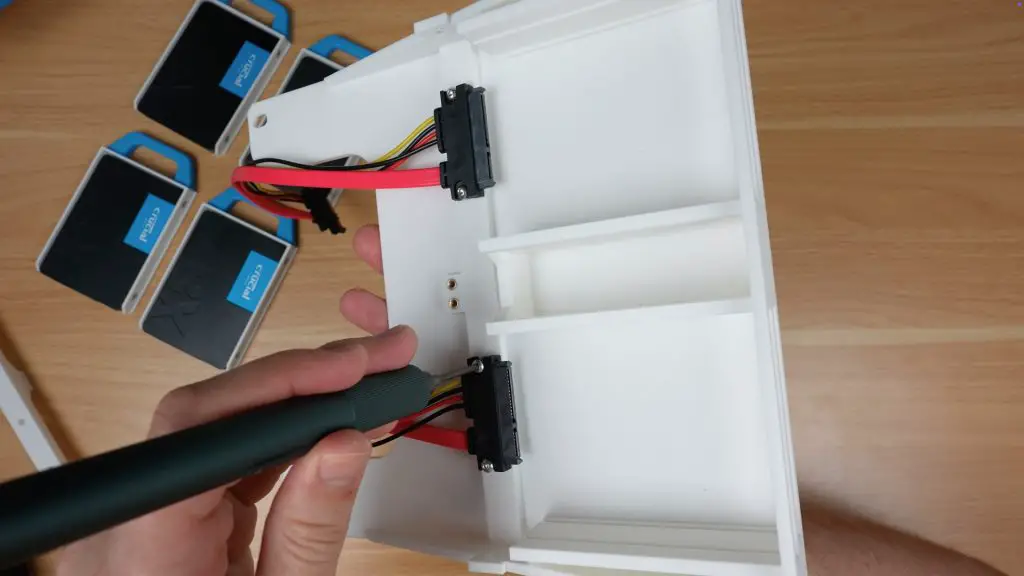
- At the back of each bay, there’s a mounting point for a SATA data and power cable.
- Although designed for 3.5″ drives, the bays are dual-purpose, so you can mount 2.5″ drives into the same trays using the appropriate screw holes.
- For airflow, the front and sides of the shelf are vented. I recommend leaving at least 1U of space for cooling, or installing a 120mm fan on the sides of the rack if you’re stacking multiple of these with spinning hard drives.
Download the Dual 3.5″ Drive Shelf (1U) 3D print files.
Assembly tips:
- Print the main shelf body and the drive trays separately. I’ve prepared print profiles on Makerworld for Bambulab printers.
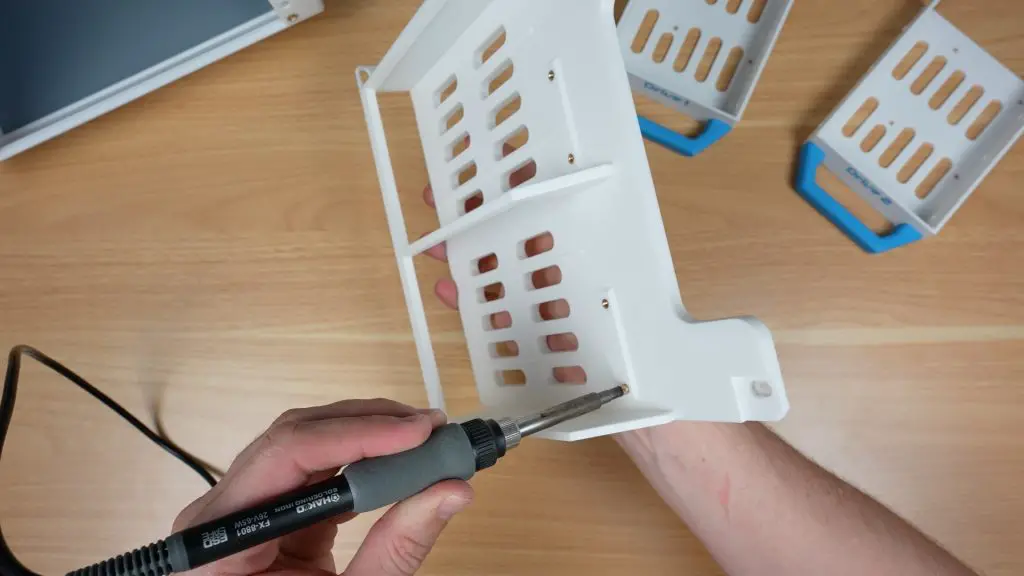
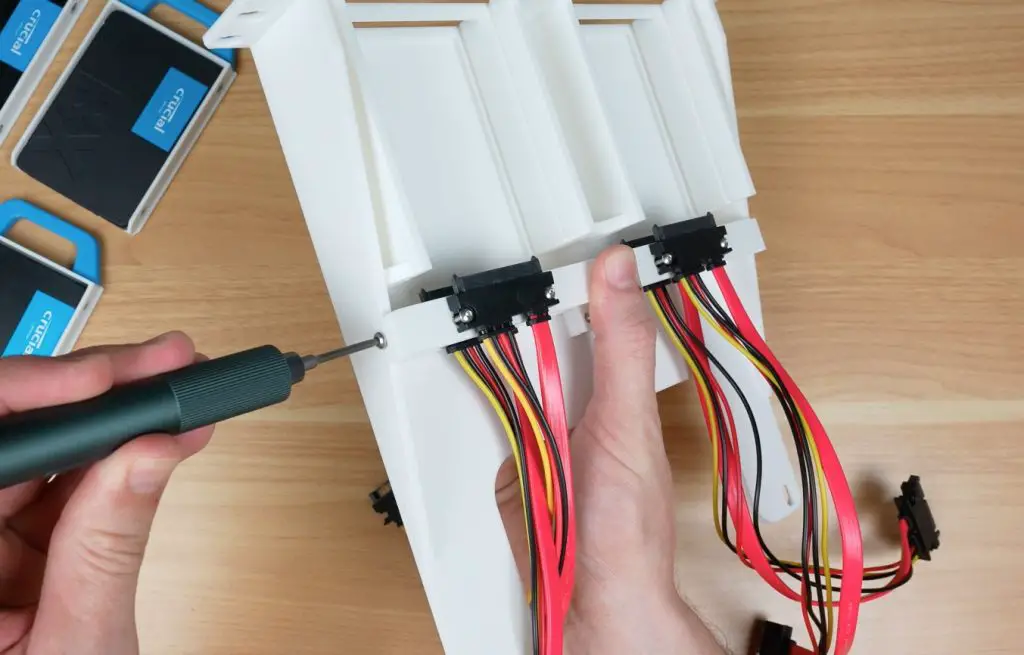
- To mount the SATA cable connectors;
- Use a soldering iron to add M3 threaded brass inserts into the prepared holes, two per connector.
- Secure each connector using two M3x8mm button head screws.
- You’ll need M3 drive screws to secure the drives to the trays.
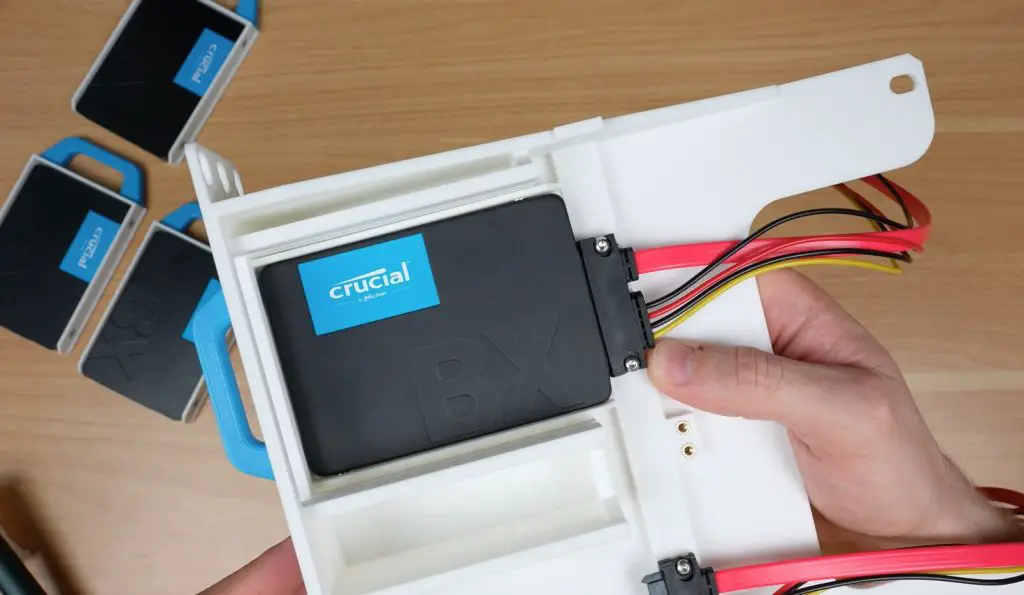
- Once the drives are fixed in place, slide the trays into the shelf until they click or stop against the rear cable mounts.
- If they don’t click into place easily, loosen the M3 screws on the connector slide the drive in and then tighten them with the drive in place to correct the alignment.
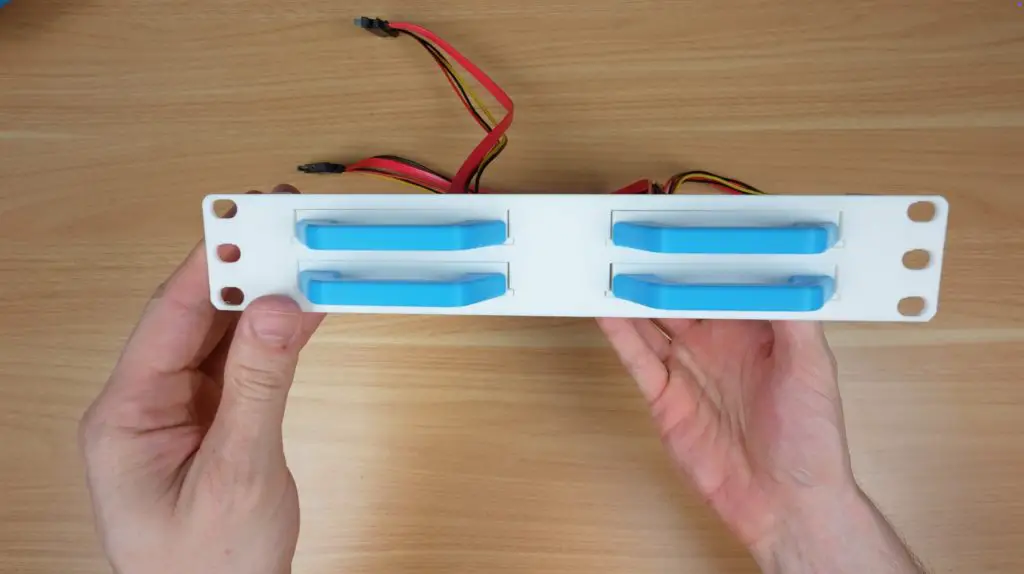
2. Quad 2.5″ Drive Shelf (1U)
If you’re using SSDs or smaller mechanical drives, this shelf is ideal. It holds four 2.5-inch drives, again using pull-out trays with the same SATA cables as the 3.5″ version.
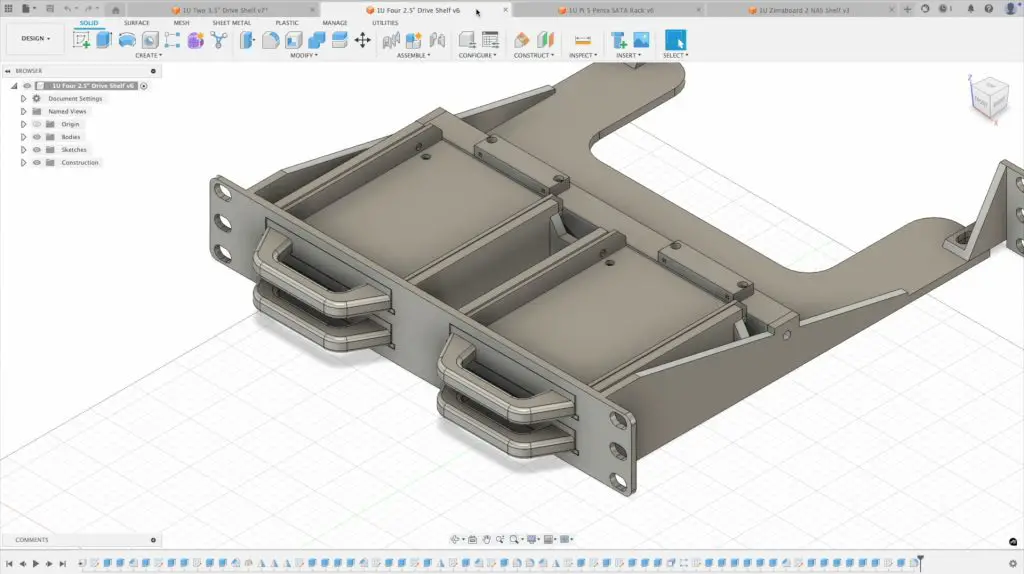
- Each drive is secured to the tray with M3 drive screws into the sides of the drive.
- Because 2.5″ drives run cooler and lighter, this shelf is especially well-suited for higher density SSD setups.
Download the Quad 2.5″ Drive Shelf (1U) 3D print files.
Assembly tips:
- Print the main shelf body and the drive trays separately. I’ve prepared print profiles on Makerworld for Bambulab printers.
- To mount the SATA cable connectors;
- Use a soldering iron to add M3 threaded brass inserts into the prepared holes, two per connector in both the shelf and the SATA connector bracket (for the top two drives).
- Add another four threaded brass inserts for the SATA connector bracket. One in each end of the bracket and two in the centre of the shelf for the bracket to be screwed onto.
- Secure the two bottom connectors using two M3x8mm button head screws each.
- Secure the two top connectors to the bracket using two M3x8mm button head screws each.
- Screw the SATA connector bracket to the shelf using four M3x8mm button head screws, one on each end and two in the middle.
- You’ll need M3 drive screws to secure the drives to the trays.
- Once the drives are fixed in place, slide the trays into the shelf until they click or stop against the rear cable mounts.
- If they don’t click into place easily, loosen the M3 screws on the connector slide the drive in and then tighten them with the drive in place to correct the alignment.
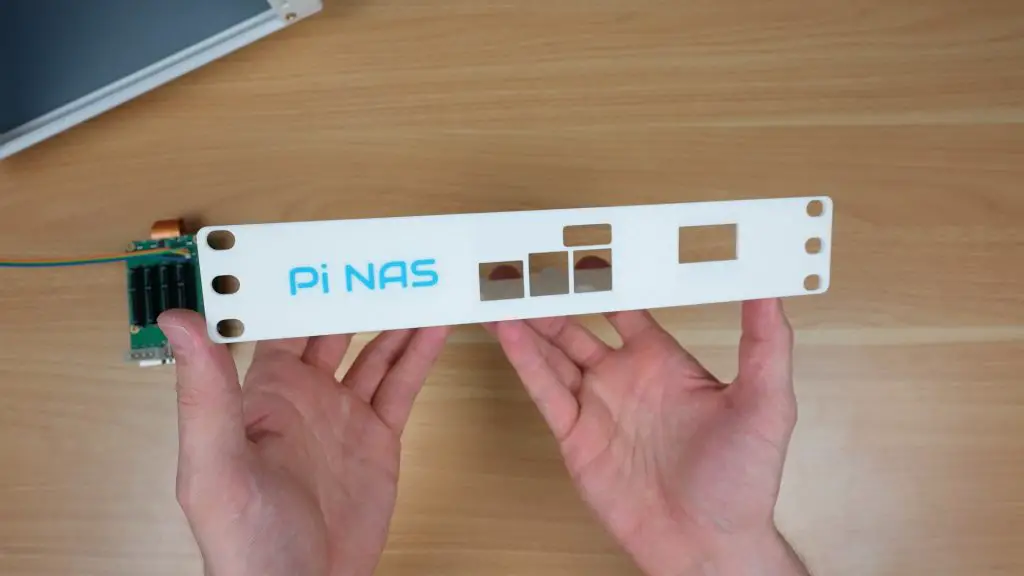
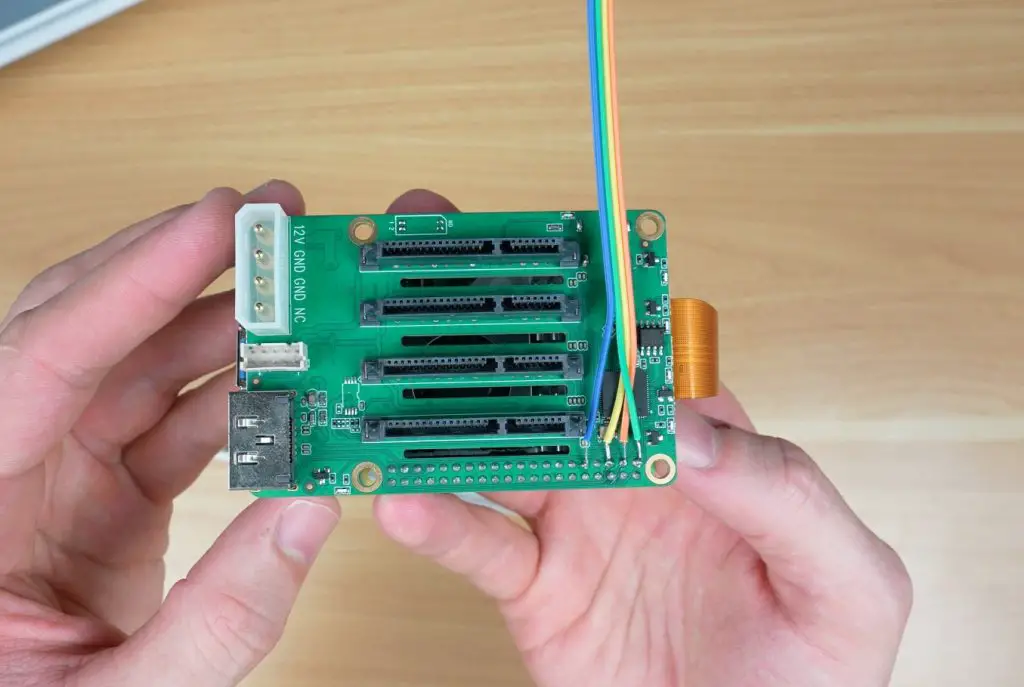
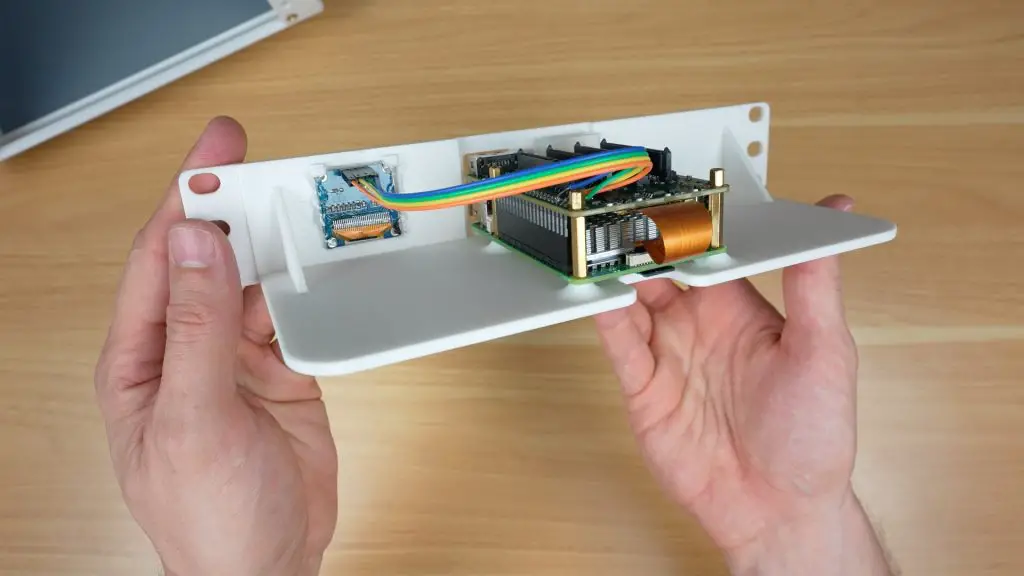
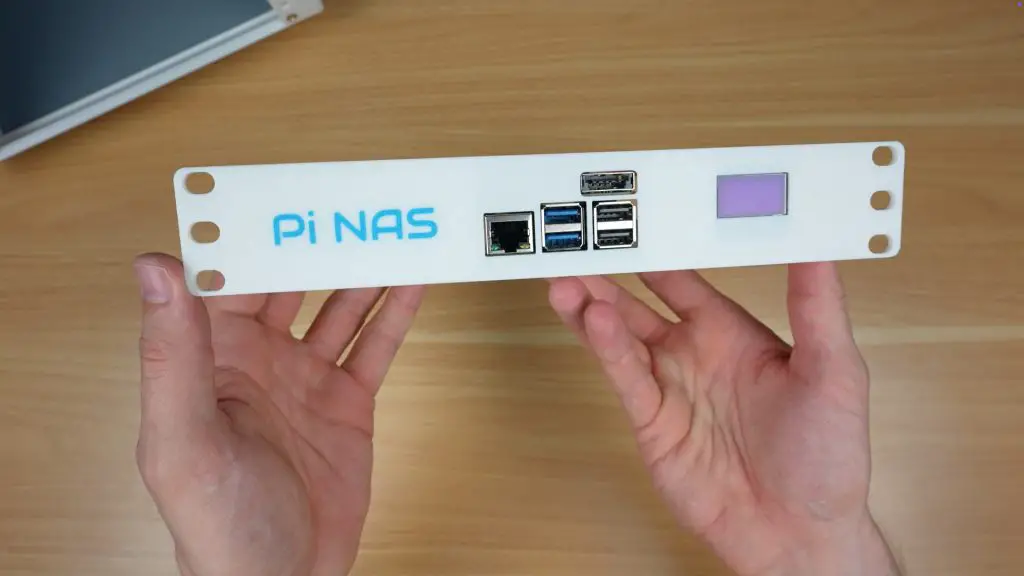
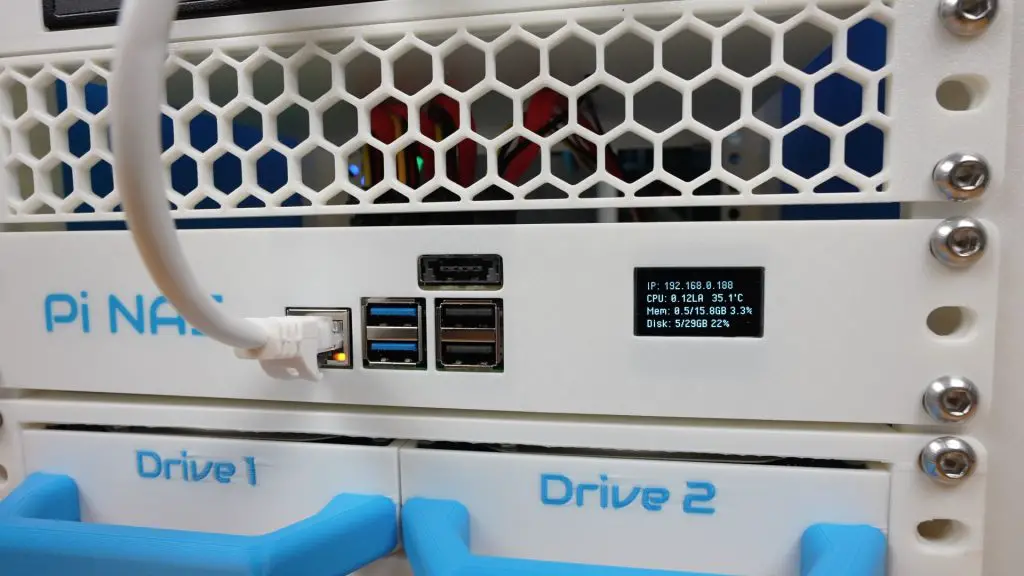
3. Raspberry Pi 5 NAS Shelf (1U)
This shelf is designed to house a Raspberry Pi 5 alongside the Radxa Penta SATA HAT, which provides up to five SATA connections, four standard SATA ports and one eSATA port.
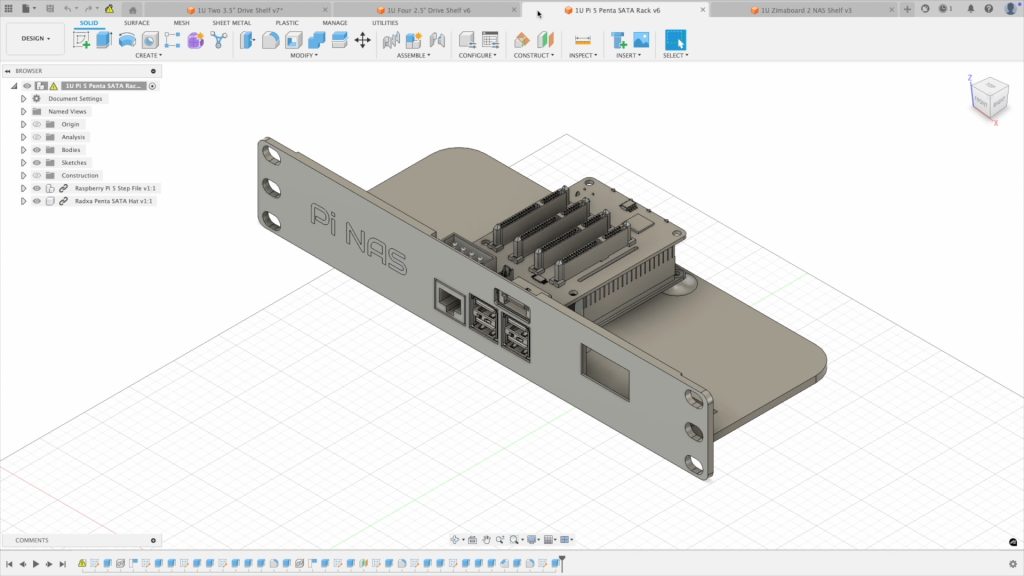
- The Pi mounts into 3D printed standoffs on the shelf base.
- The SATA HAT sits directly on top of the Pi, with the four SATA ports facing upward and the eSATA port facing the front of the rack.
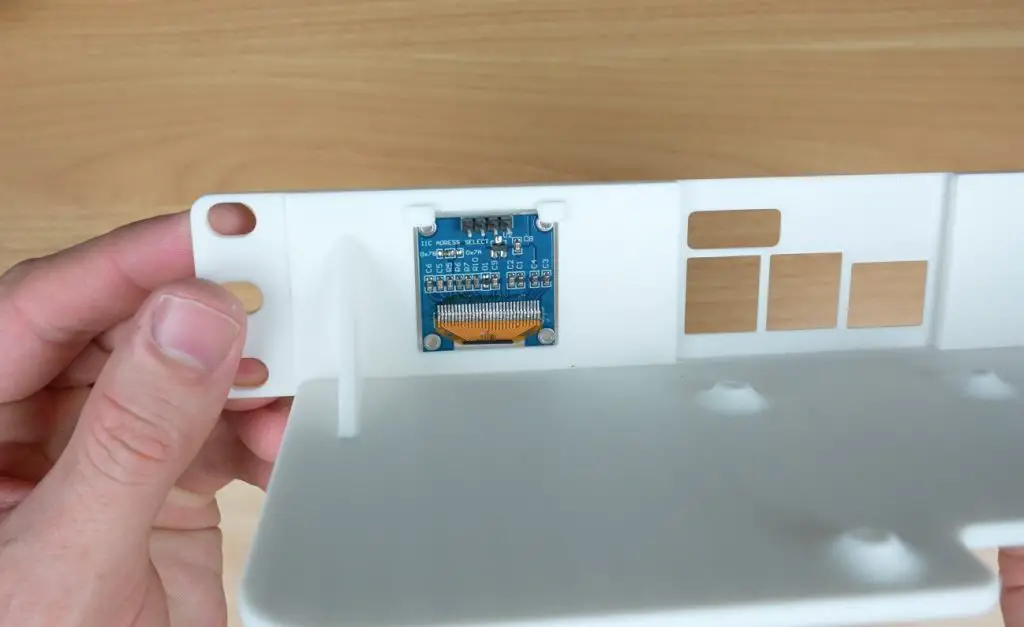
- I also included a space for a small I2C OLED display so you can install my OLED display stats script to monitor system stats.
This compact design allows you to run a full NAS controller with stats feedback in just one rack unit.
Download the Raspberry Pi 5 NAS Shelf (1U) 3D print files.
Assembly tips:
- Start by installing the Pi on the shelf using the 18mm brass standoffs supplied with the Radxa Penta SATA hat and nuts through the pockets in the bottom of the shelf.
- Plug the Penta SATA hat into the Pi’s GPIO pins and connect the PCIe ribbon cable. Secure it with brass standoffs on top of the hat.
- Install the OLED display in the holder. It is held in place at the top using the 3D printed clips and you can secure the bottom with a few drops of superglue or hot glue.
- A 4 wire ribbon cables connects the display to the GPIO pins. You’ll need to connect GND, 3.3V, SCL and SDA. I’ve soldered the ends to the tops of the GPIO pins on the Radxa hat.
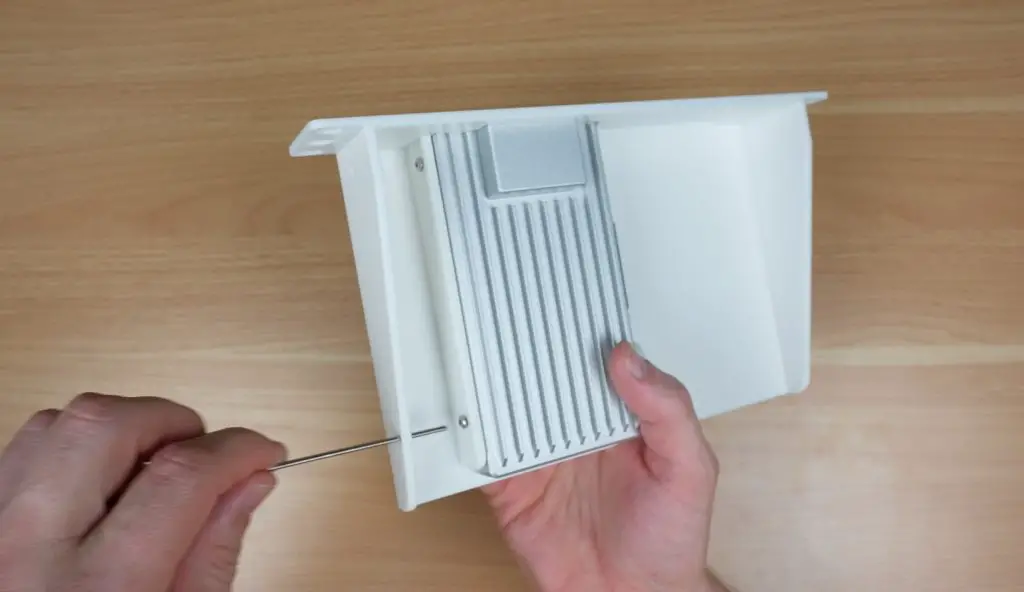
4. Zimaboard 2 NAS Shelf (1U)
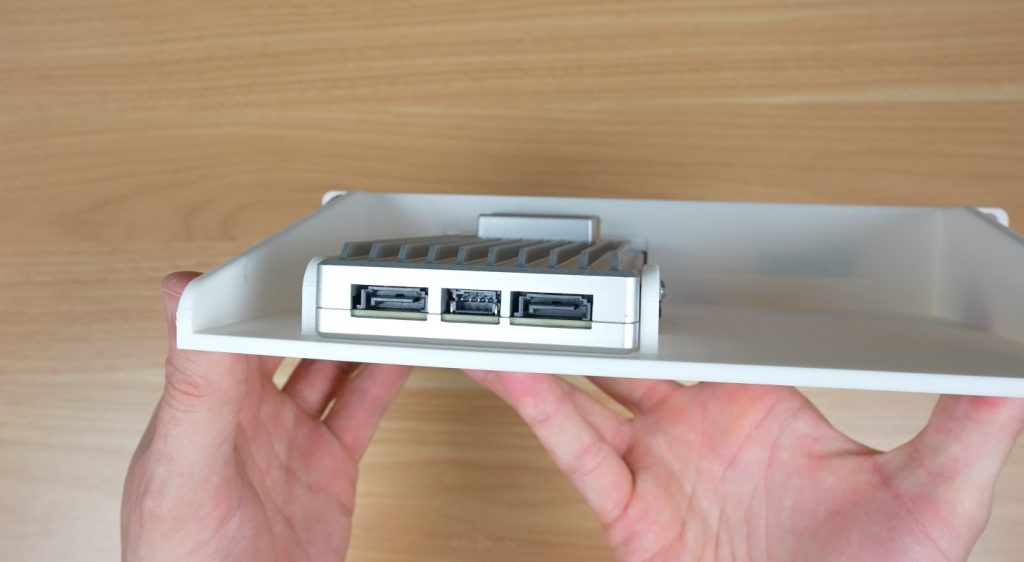
The final shelf is built around the Zimaboard 2. I made this one up because the Zimaboard already includes two SATA ports on the back panel and has a PCIe port for expansion, so its a more versatile option for building a multi-bay NAS.
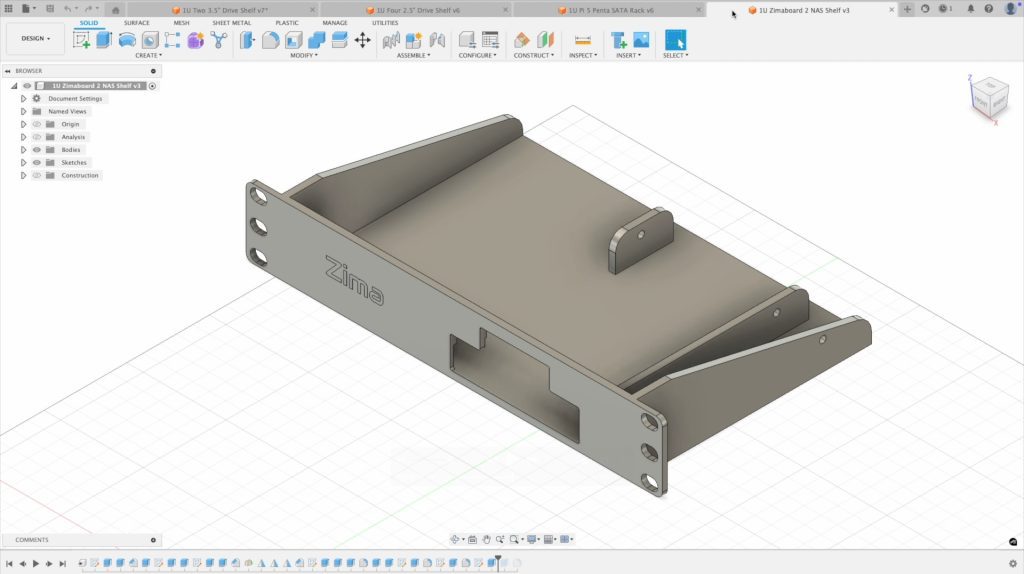
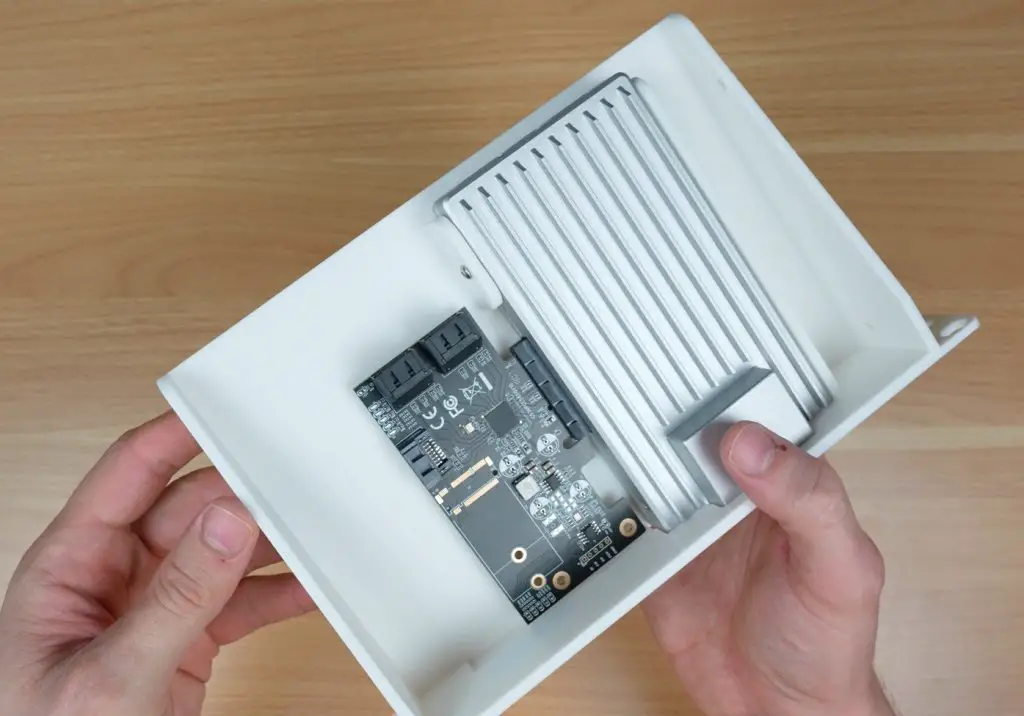
- The Zimaboard mounts neatly into the tray, with easy access to the rear I/O.
- The design also allows space for a PCIe SATA expansion card. The card I’ve used gives you five additional SATA ports for a total of seven. This makes it a much more expandable option if you’re planning a larger NAS.
Download the Zimaboard 2 NAS Shelf (1U) 3D print files.
Assembly tips:
- The Zimaboard 2 slides into place and is secured by three M3x8mm button head screws through the sides. These are easily installed using a hex key through the holes in the side walls of the shelf.
- A PCIe SATA card can then be installed in the slot alongside it.
Example NAS Builds
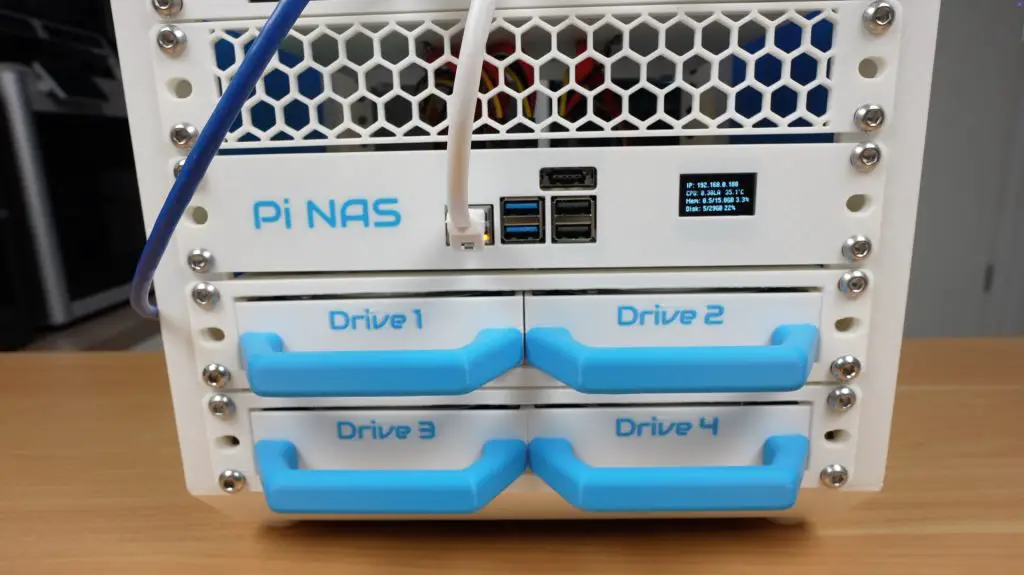
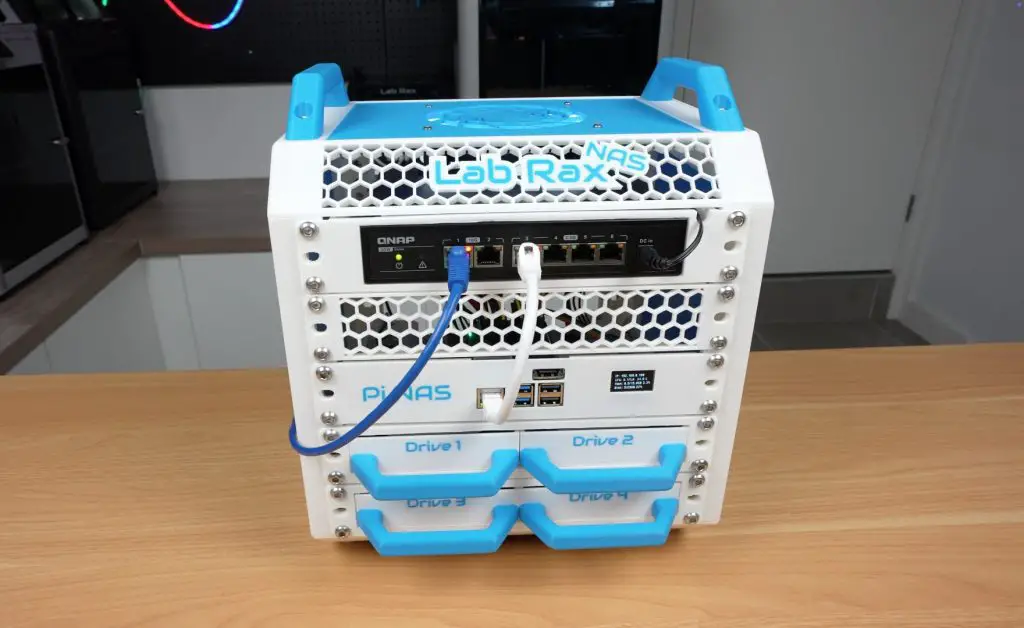
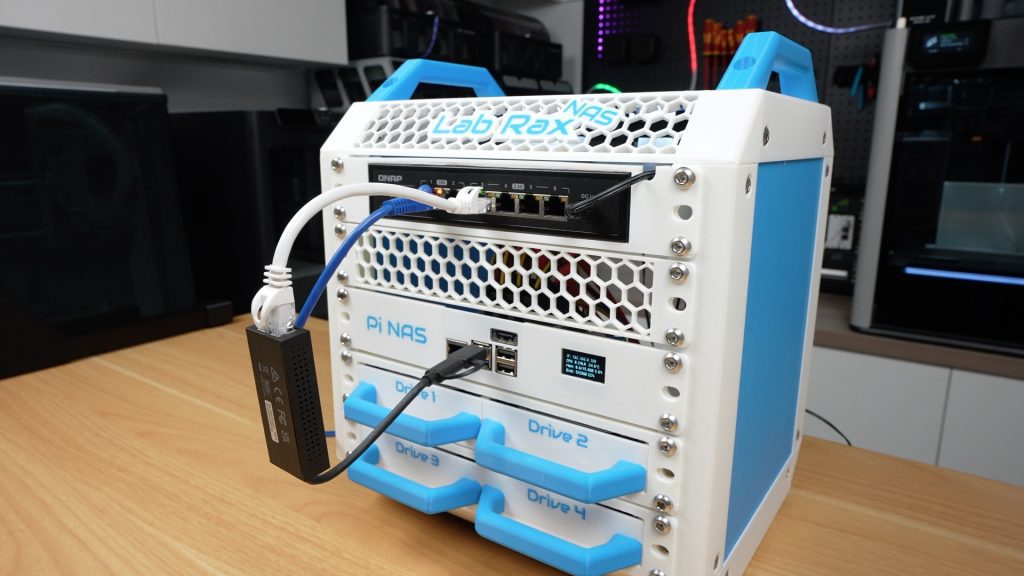
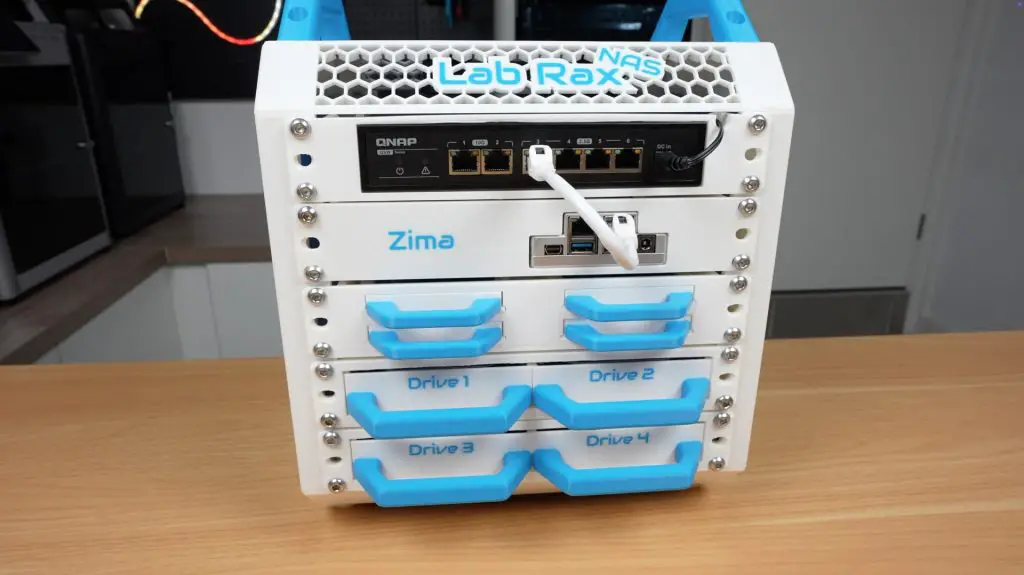
Now let’s look at two example builds using these shelves, both built into a standard 5U Lab Rax case. The Pi build only uses 4U, leaving one spare unit for future expansion.
Build 1: Raspberry Pi 5 NAS
- Top unit: QNAP network switch.
- Second unit: Ventilation panel to allow space for the SATA cables (and can be used for future expansion)
- Third unit: Raspberry Pi 5 shelf with Radxa Penta SATA HAT and OLED display.
- Fourth and fifth units: Two dual 3.5″ drive shelves (4 drives total).
This switch is a bit overkill for the Pi’s gigabit ethernet port but I’m going to be using it wit a 2.5G network adaptor plugged into one of the Pi’s USB 3 ports. This gives significantly faster transfer speeds compared to the Pi’s built-in gigabit Ethernet.
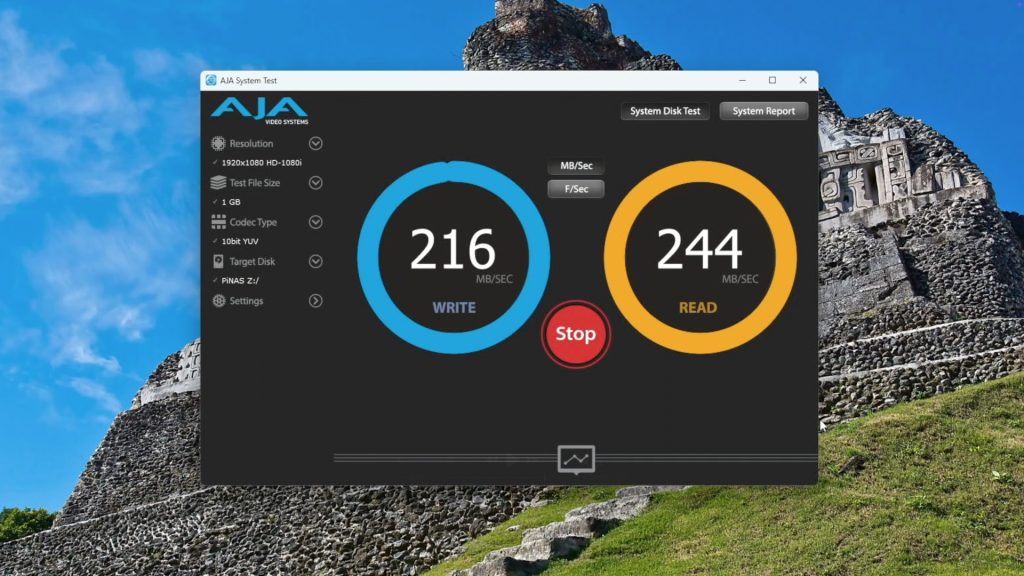
Running OpenMediaVault (OMV) on the Pi 5 with the drives set up in a RAID 5 pool, I achieved:
- Write speeds: ~215 MB/s
- Read speeds: ~240 MB/s
The main limitation here is expansion, with only one PCIe lane on the Pi 5, there are limited options for going beyond 5 drives.
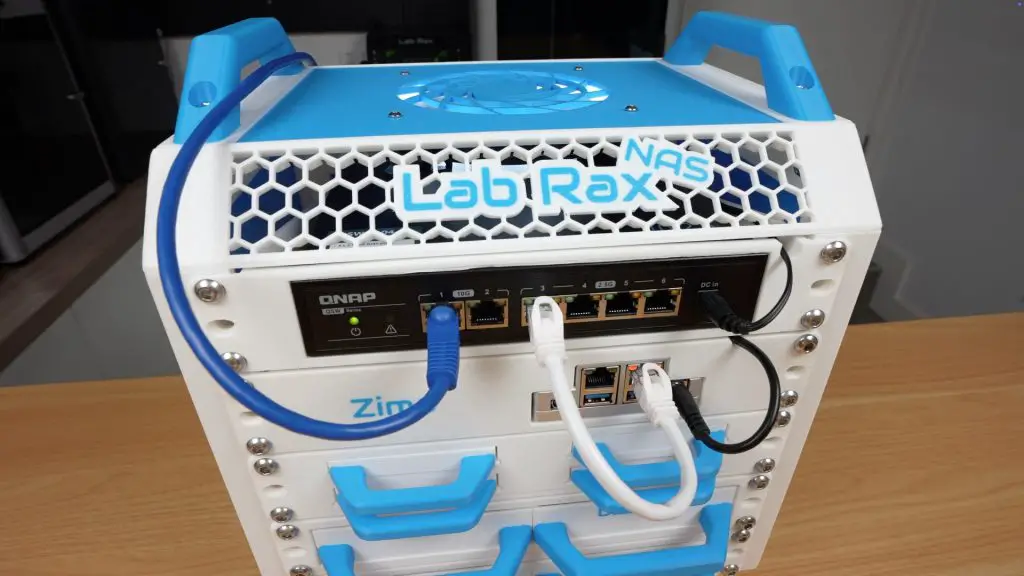
Build 2: Zimaboard 2 NAS
- Top unit: QNAP network switch.
- Second unit: Zimaboard 2 shelf with space for PCIe SATA expansion.
- Third unit: Quad 2.5″ drive shelf (4 SSDs).
- Fourth and fifth units: Two dual 3.5″ drive shelves (4 drives total).
This setup offers much greater expandability thanks to the PCIe slot. With the PCIe card that I used, you can connect up to seven drives in total, but these cards are also available with higher port counts.
The Zimaboard runs ZimaOS, a clean and user-friendly NAS operating system that makes pooling drives and managing shares very straightforward.
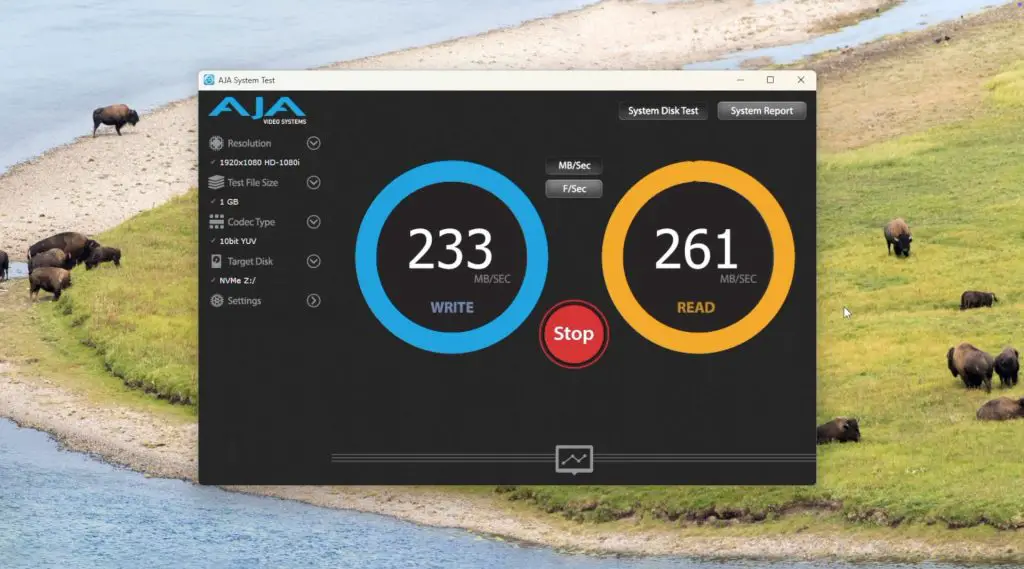
In testing, I saw slightly higher performance than the Pi build:
- Write speeds: ~230 MB/s
- Read speeds: ~260 MB/s
- Better handling of multiple simultaneous transfers and generally performs better due to the more power N150 CPU.
- Dual network ports for redundancy or link aggregation.
Final Thoughts
These new shelves transform the Lab Rax system from a general-purpose rack into a capable and modular NAS framework.
- If you want something small and affordable, the Raspberry Pi 5 build is an excellent option.
- If you need more power and expandability, the Zimaboard 2 build is the better choice.
Because the shelves are 3D printable, easy to assemble, and designed to fit common print bed sizes, anyone can replicate these builds at home. I’m really happy with how they turned out and I’ll be adding more modules in the future as I keep developing the Lab Rax ecosystem.
Which one would you build, the Pi 5 NAS or the Zimaboard 2 NAS? Let me know in the comments below!
Thank you for the fantastic rack!!! I gonna print it today. I would like to place 3 minipc there and make a cluster but the question is how to organize power supply. Maybe easiest is to mount a server power outlet?
Hey really love them idea of this, big thanks! – Question: i have a NAS that i want to put in there, the N5 Pro and think that NAS is as big as your complete setup in height, about 20-22cm heigh. Can i extend your setup somehow in height, to make it 2, 2.5 or 3 times that high?
It can be as tall as you want it to be
https://www.the-diy-life.com/introducing-lab-rax-a-3d-printable-modular-10-rack-system/
Hey Craig thanks for the link and the answer, sadly Michael doesnt seem to answer questions on his own website :<
It looks like the 7 HDDs of the Zima Board 2 need an external power supply (at least for 5 of them). Would a 1U 300W psu fit the bill? (I’m thinking of a FSP FlexGURU). Would I also be able to power up the Zima board with it? (to avoid cable clutter)