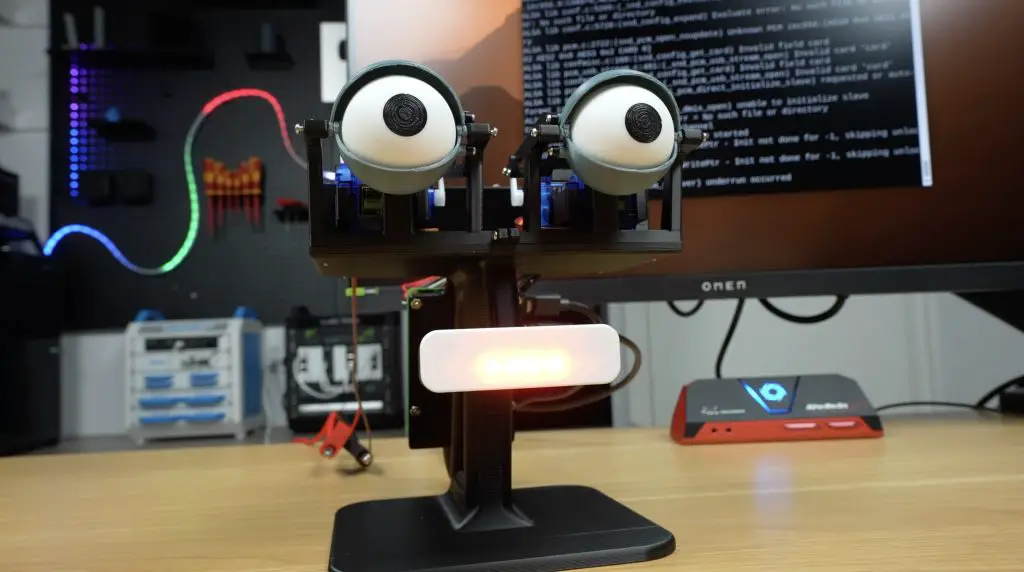
There’s something fun about bringing tech to life, literally. Today’s project is all about that, building an AI chatbot that blinks, looks around, and even talks back using a set of custom animatronic eyes and a mouth made from a Neopixel LED light bar. The AI chatbot runs on a Raspberry Pi 5, and the result is a lively little assistant sitting on your desk.
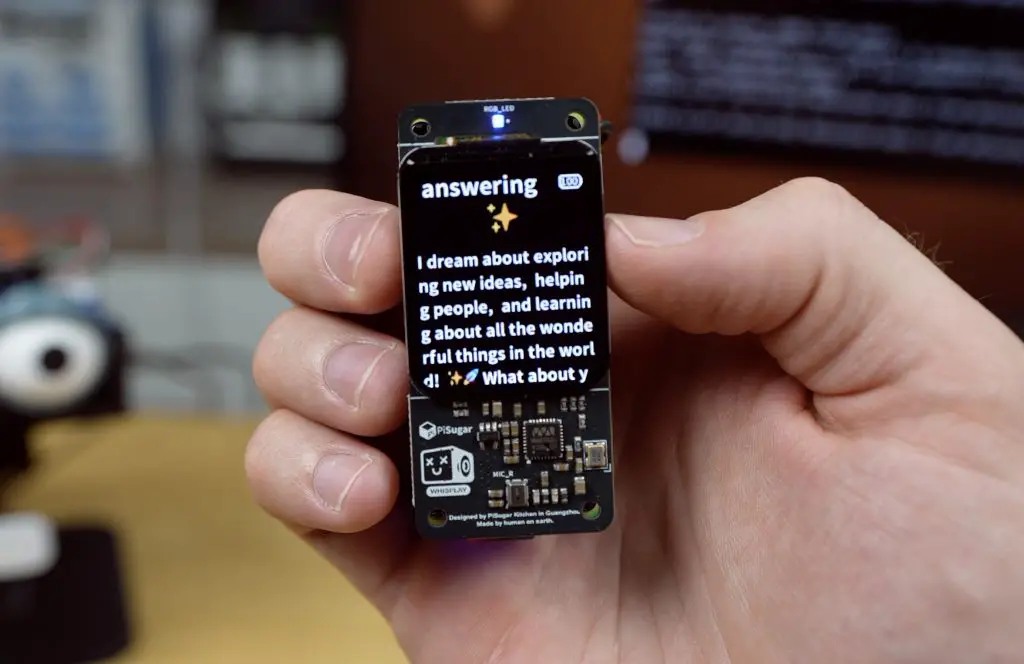
This idea started after I experimented with the Whisplay Hat by PiSugar. It’s a clever add-on for the Pi Zero 2W that turns it into a compact, portable AI chatbot. You press a button on the side to speak, and it replies through a small onboard speaker while also showing text and emojis on its built-in display.
It’s a surprisingly capable setup considering its size. After playing around with it for a while, I wondered whether I could build my own version with a bit more life-like appeal. There’s something fascinating about giving an AI a face, not just a screen, but expressive eyes that blink and move around while it talks. This makes it feel more “alive”, which is exactly what I wanted to explore.
Here’s my video of the build and the AI Chatbot in action, read on for my write-up;
Where To Buy The Parts For This Project
- Raspberry Pi 5 – Buy Here
- 32GB Sandisk MicroSD Card – Buy Here
- PCA9685 Servo Driver Board – Buy Here
- 6 Micro Servos – Buy Here
- 2 Universal Joints – Buy Here
- 4 RC Pushrods – Buy Here
- M2 Screws & Nuts – Buy Here
- 8 LED Neopixel Bard Light – Buy Here
- Breadboard Jumpers – Buy Here
- 5V Power Supply For Servos – Buy Here
- USB Omnidirectional Microphone – Buy Here
- USB Speaker – Buy Here
Tools & Equipment Used:
- Bambulab H2D – Buy Here
- USB C Pencil Screwdriver – Buy Here
- FNIRSI Power Supply – Buy Here
- PiSugar Whisplay Hat – Buy Here
Some of the above parts are affiliate links. By purchasing products through the above links, you’ll be supporting my projects, at no additional cost to you.
Revisiting My Animatronic Eyes Design
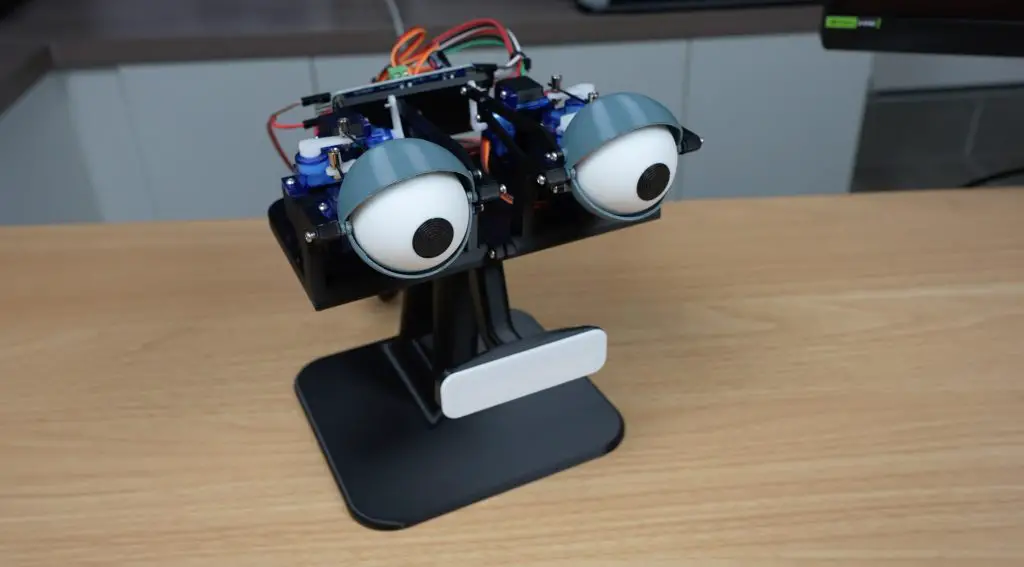
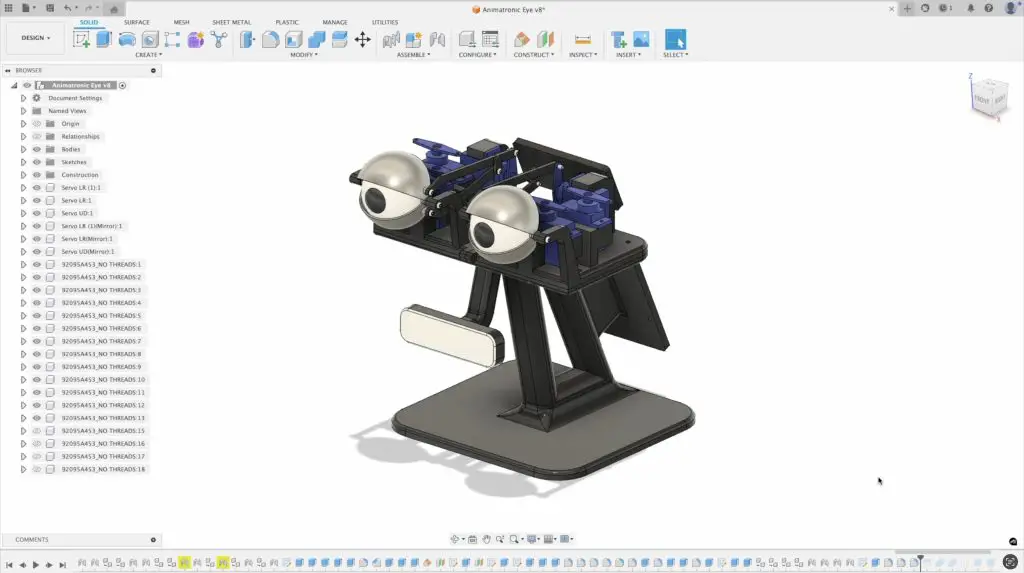
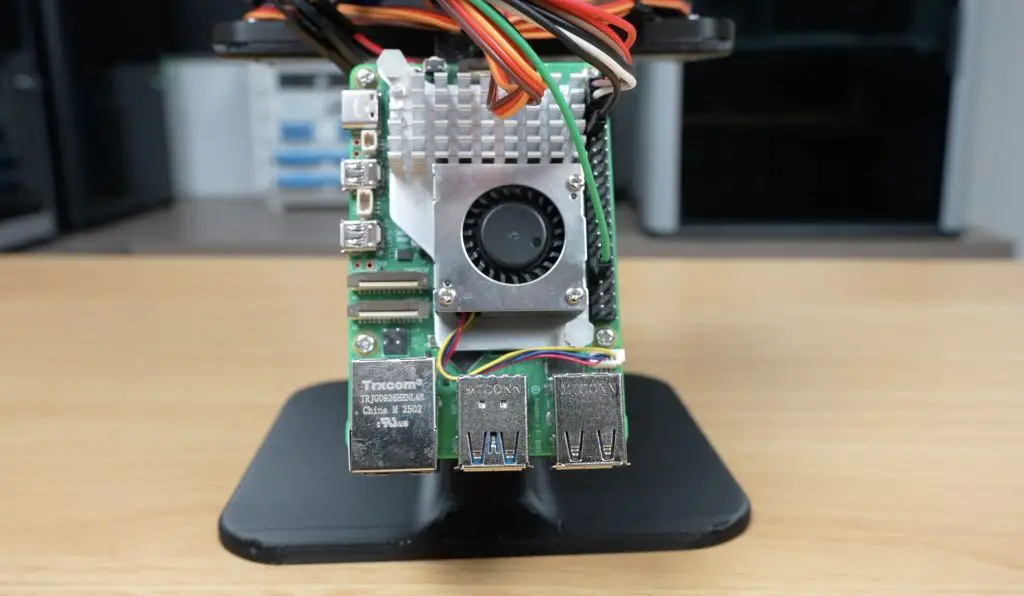
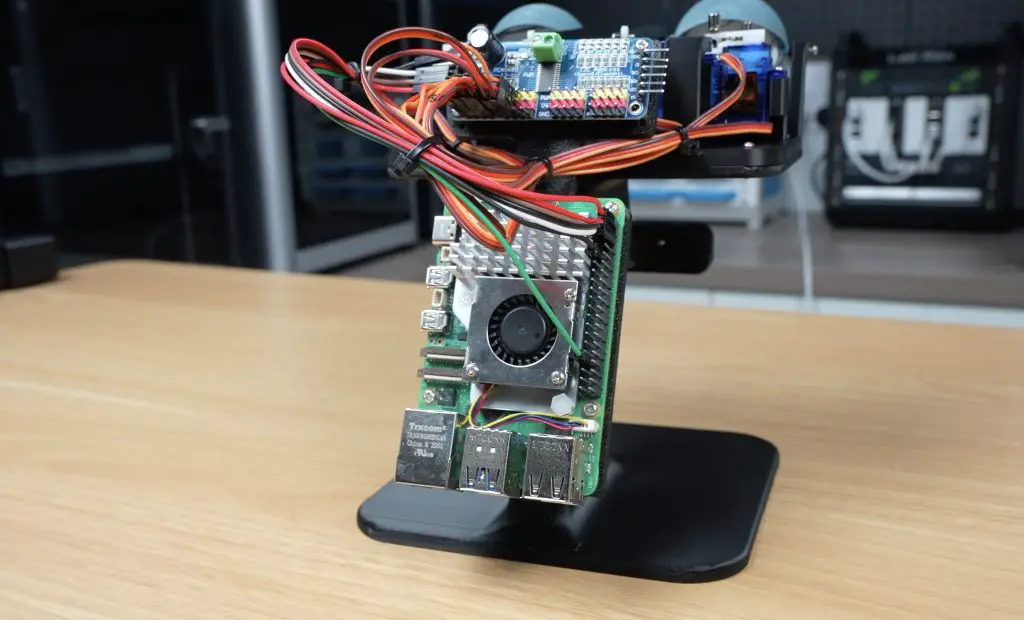
To bring the AI chatbot to life, I used a Raspberry Pi 5 as the brain and went back to my old animatronic eyes design from a few years ago.
The original version worked, but it relied on fishing line between the servos and the eyes, and the servos were glued in place, which made adjustments and repairs a bit of a pain. So for this build, I updated and expanded the design. I added a proper supporting stand, a mouth, and a mount for the Pi 5 and electronics on the back.
So with that sorted, it was time to print out and assemble all of the parts. I printed out the parts in PLA, black for most of the components, white for the eyeballs (aside from the pupils) and mouth diffuser and then grey for the eyelids.
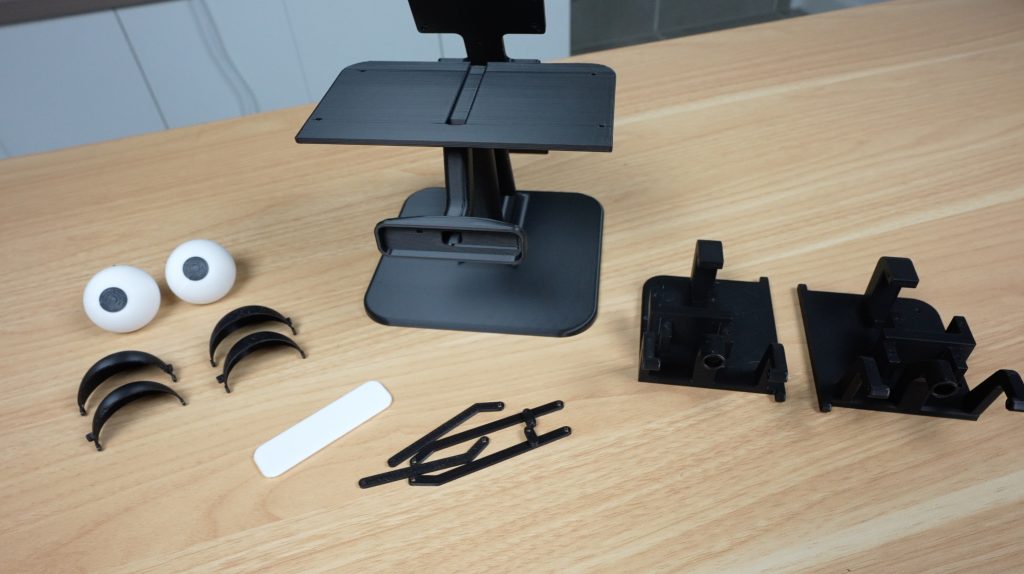
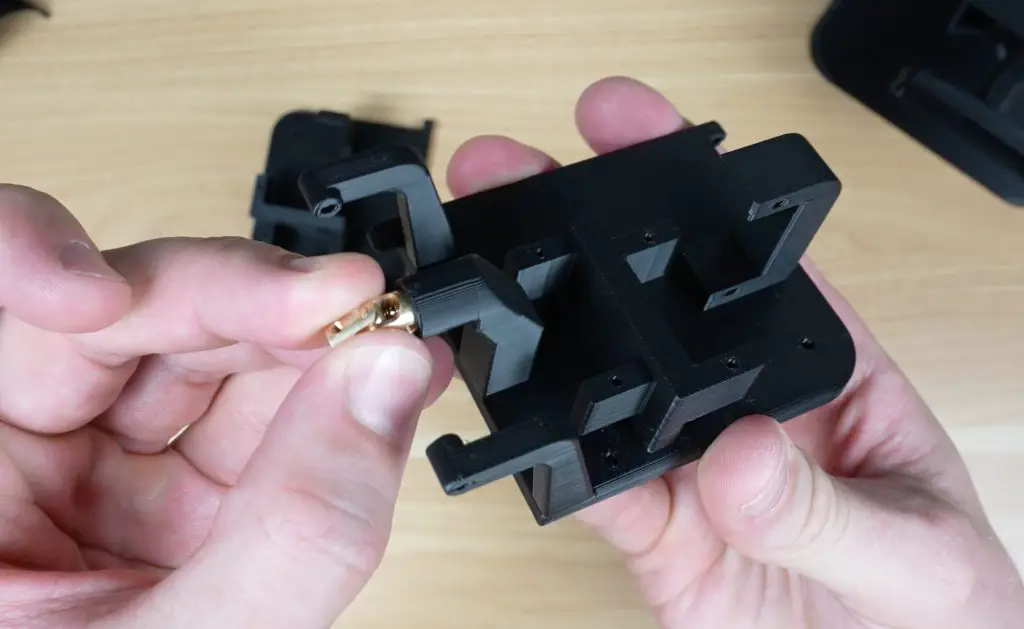
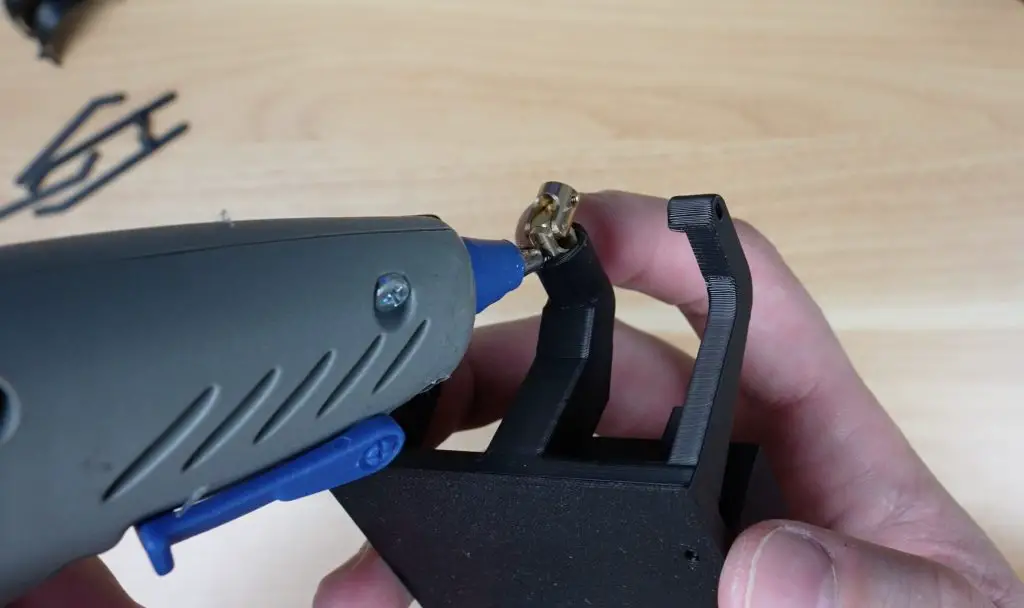
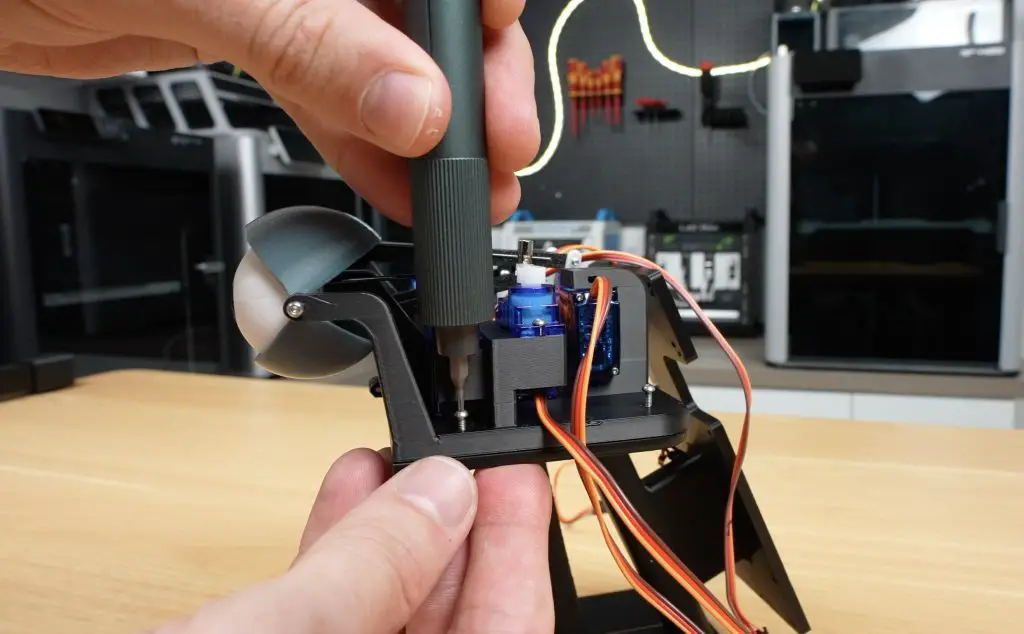
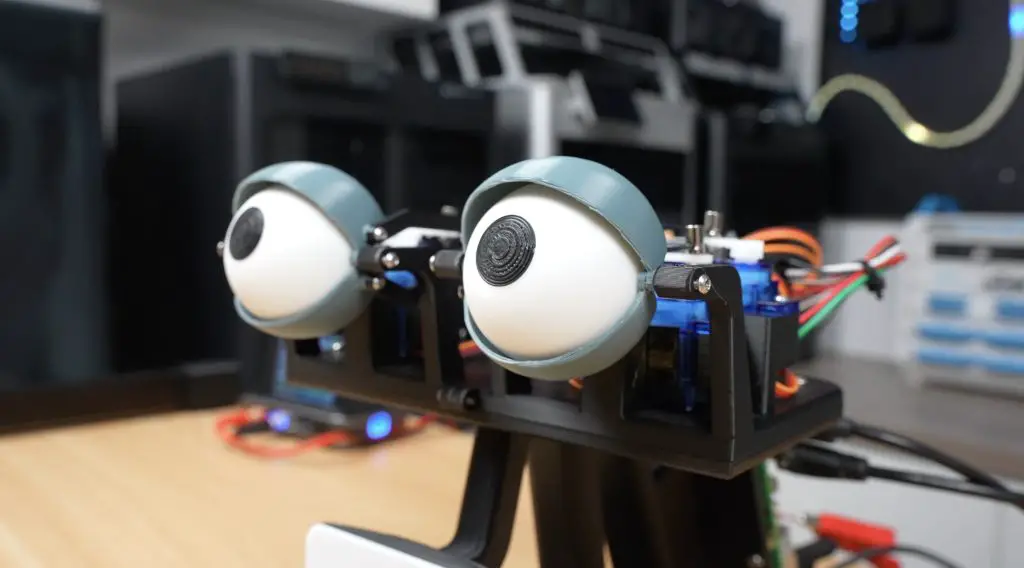
Each eyeball uses a small universal joint to give it a full range of motion. They’re held in place with a drop of hot glue.
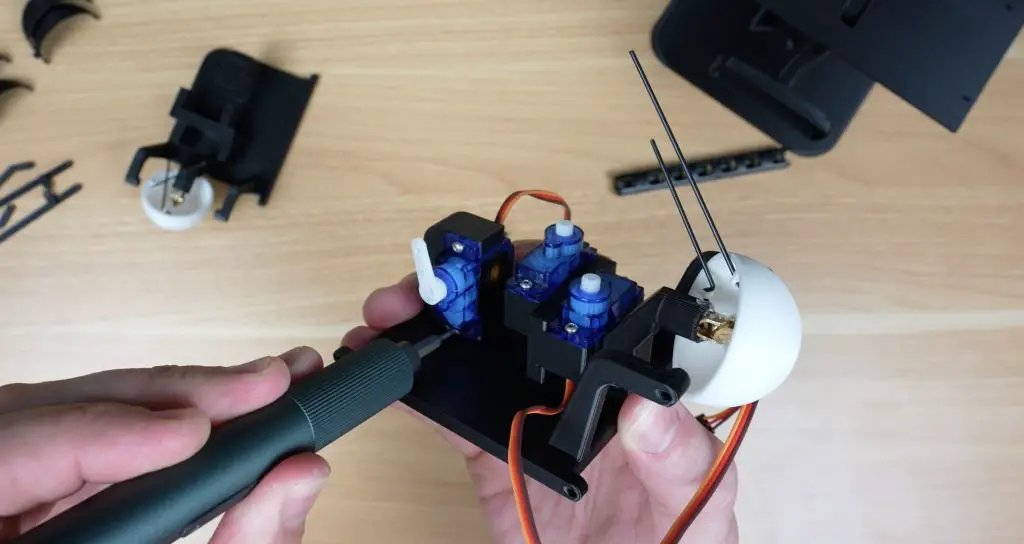
The new base includes screw-in mounts for the servos, each one attached using two M2 screws.

The eyes are driven using small RC pushrods for each axis. The z-bend goes through the printed arm on the inside of each eye-ball and the rod attaches to each servo with the included screw-on clamp. Don’t worry too much about adjusting these at this stage. It’s actually better to leave them loose so that they can be adjusted when the servo’s are centred in the code.

Each eye gets three servos: one for horizontal movement, one for vertical movement, and another for the eyelids.
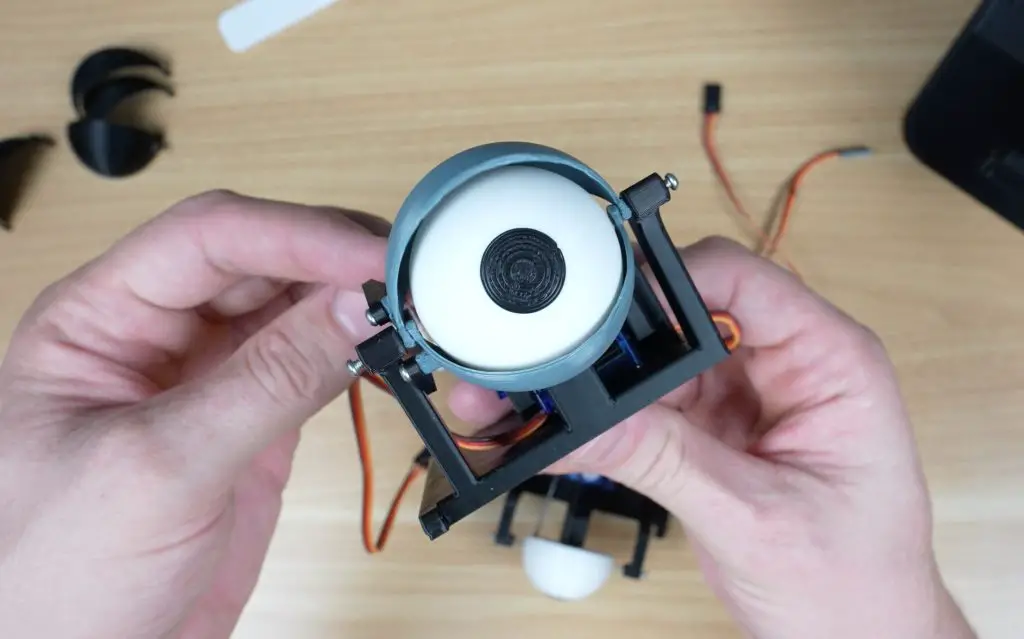
The eyelids pivot around adjustable M2 screws on either side of each eye. These are screwed in from the outside of the bracket towards the eyeball and should almost touch the eyeball (about a 0.5mm gap). The eyelids can then be snapped into place on these screws, starting with the upper eyelid (larger one) first.
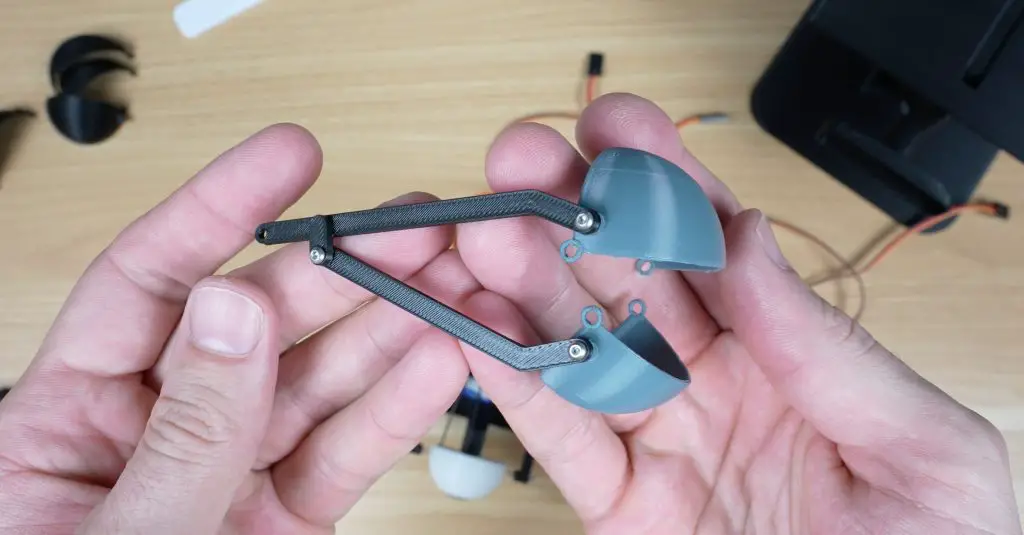
A two-part pushrod connects the eyelids to the servo. This also attachs to the eyelids with M2 screws and a single M2 screw acts as the pivot point in the middle to make the two parts into a single pushrod.
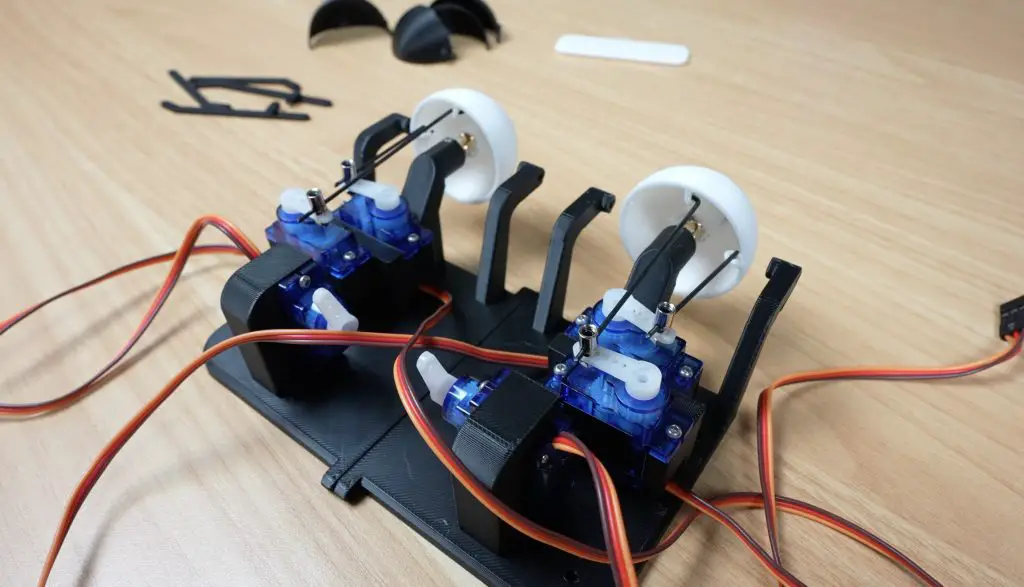
With six servos in total, the mechanism is a bit more complex than it needs to be, but it gives you independent movement of both eyes and eyelids. That means winking, going cross-eyed, or expressing more subtle movements becomes possible.
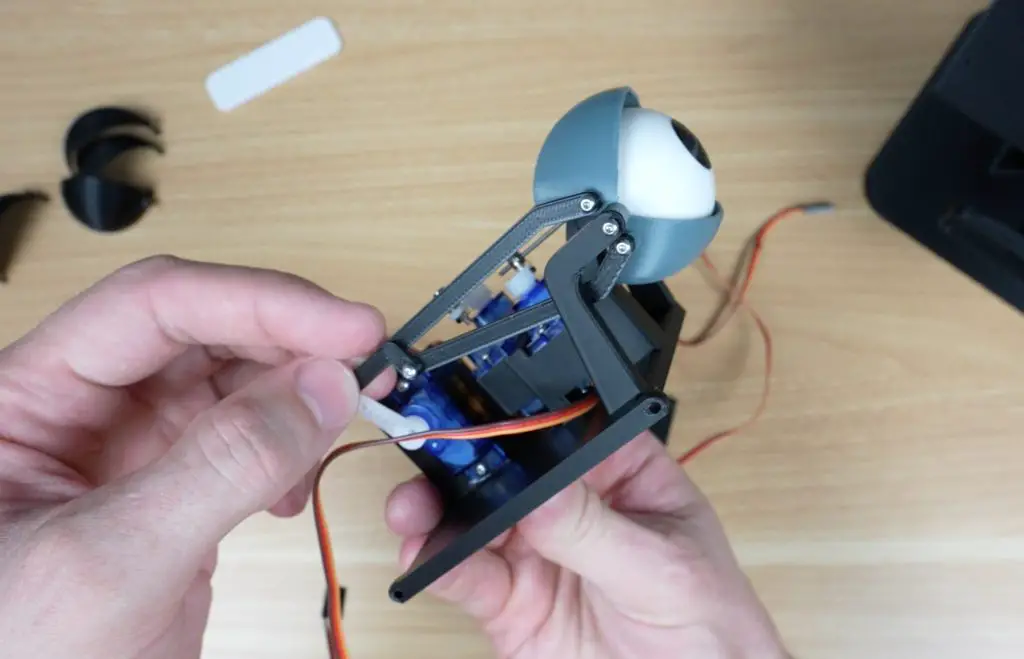
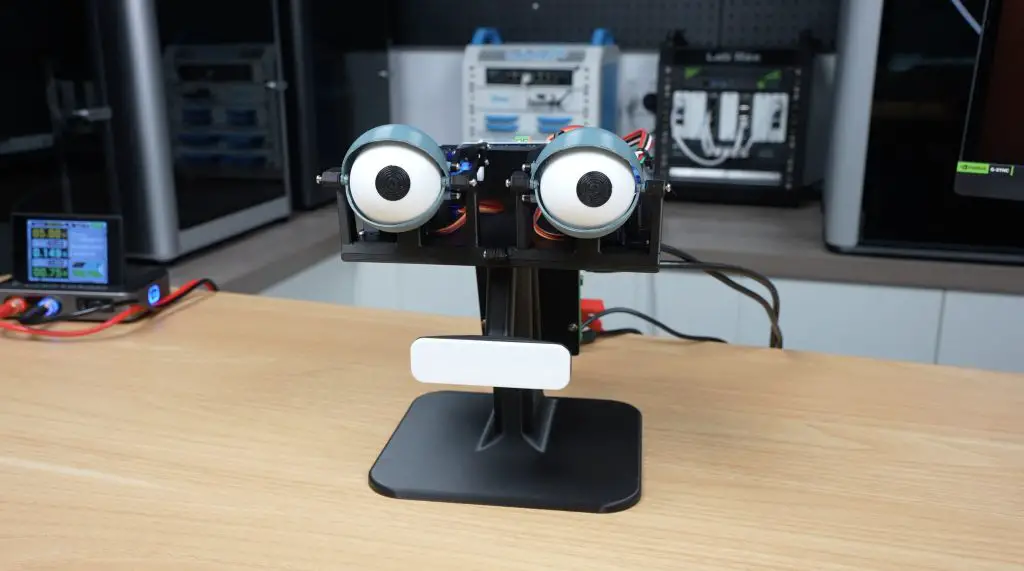
The mouth uses an 8-LED Neopixel bar. A soldered on jumper cable runs through the holder and the bar then screws into the stand again with some M2 screws. A white clip-on cover plate acts as a simple diffuser. If you’d like a more or less diffused mouth, play around with the infill settings on this part when printing it out.
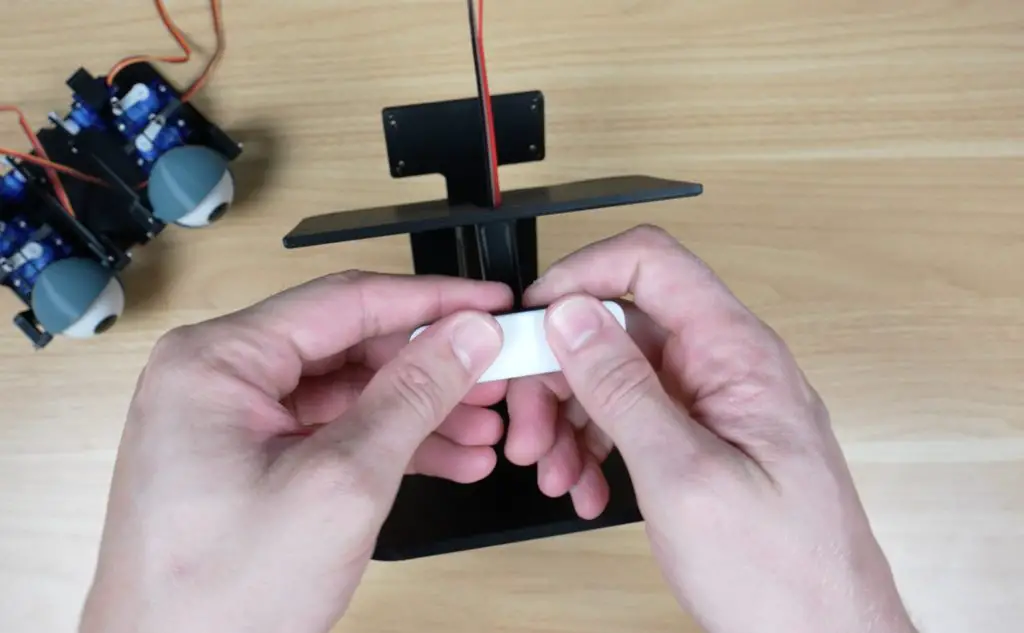
With the mouth done, we can add two M2 screws to join the left and right eye bases to make a single assembly. The whole eye assembly then mounts onto the stand and is held in place with four M2 screws.
Electronics: Giving It a Brain
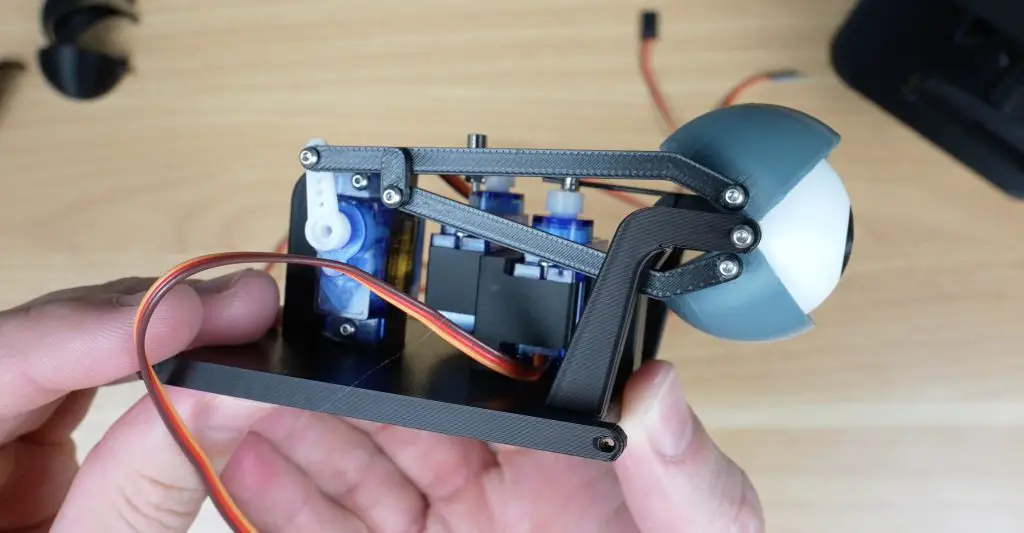
All six servos connect to a PCA9685 control board, which handles their power and PWM signals. This makes servo-control much easier, since the Pi just sends position commands over I2C and the board deals with the actual movement. It also avoids voltage-level issues, because the Pi’s 3.3V logic often isn’t compatable with servos that expect a stronger 5V PWM signal. This board is connected to the Pi’s I2C pins (SCL and SDA) as well as 5V and GND.
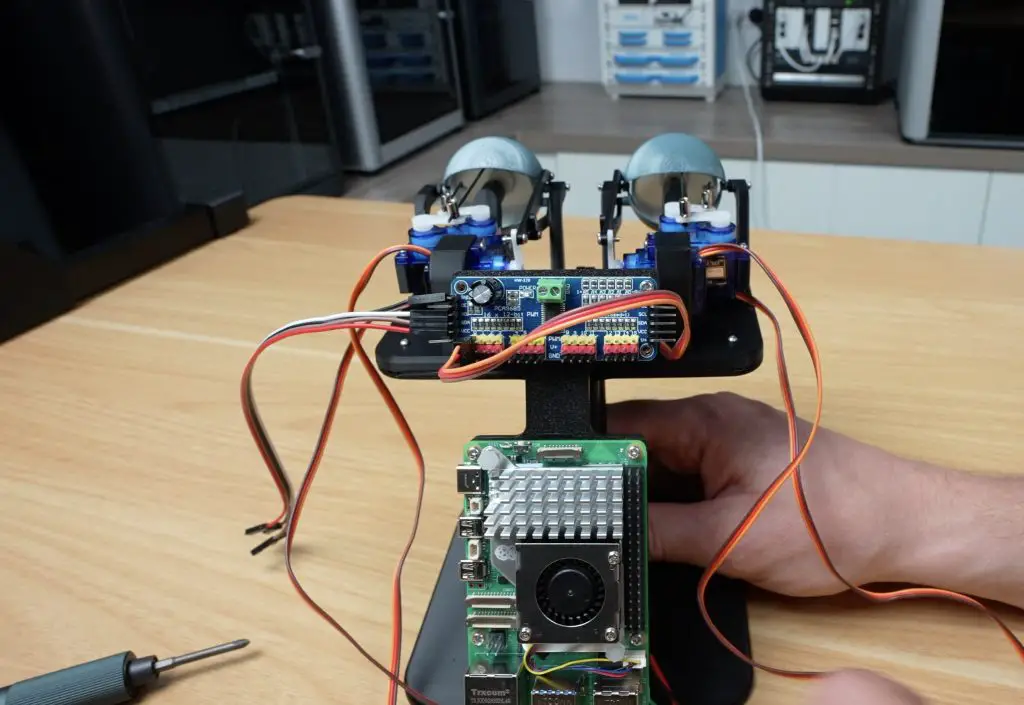
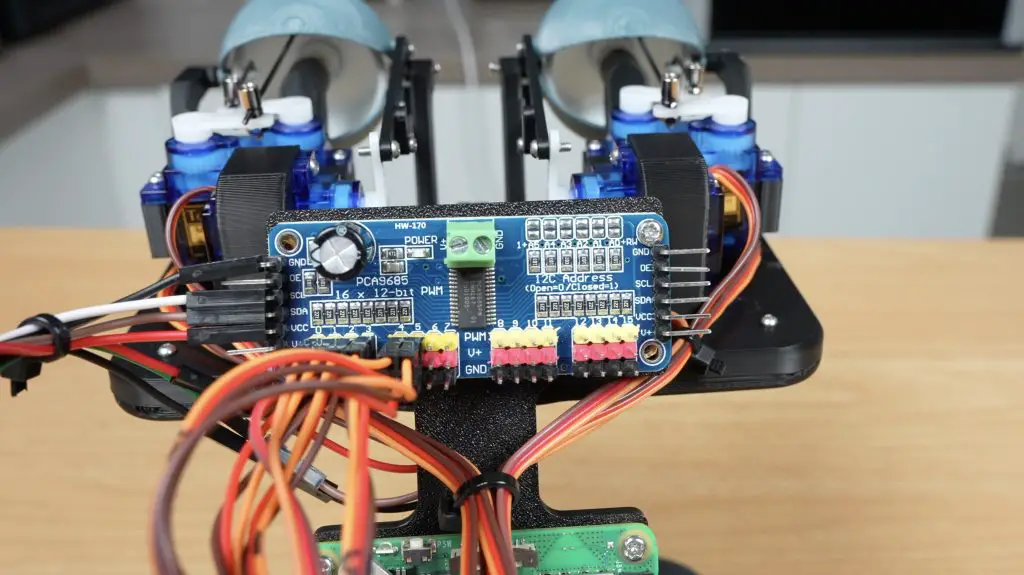
The Raspberry Pi 5 is mounted below the servo board, and the Neopixel bar connects directly to GPIO 13, physical pin 33. It also needs a 5V and GND input.
Circuit Diagram
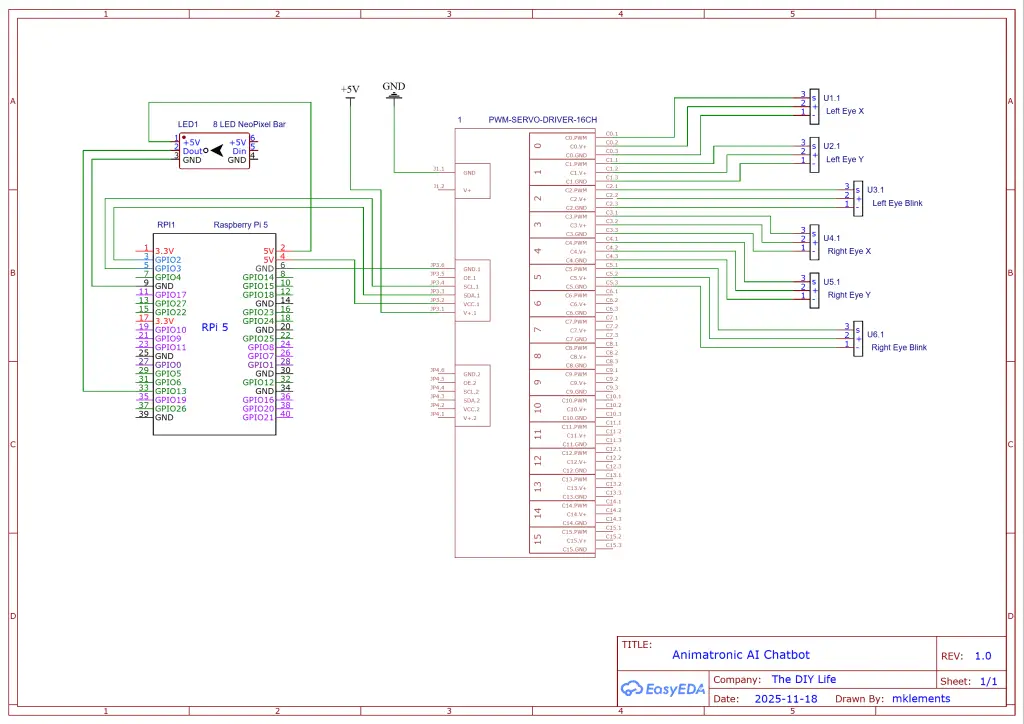
Wiring Connections Summary:
Servos to PCA9685 Board:
- Left Eye X Movement – Servo Port 0
- Left Eye Y Movement – Servo Port 1
- Left Eye Blink – Servo Port 2
- Right Eye X Movement – Servo Port 3
- Right Eye Y Movement – Servo Port 4
- Right Eye Blink – Servo Port 5
PCA9685 Board to Pi 5:
- GND – Pi 5 Pin 6 (GND)
- OE – None
- SCL – Pi 5 Pin 3 (SCL)
- SDA – Pi 5 Pin 5 (SDA)
- VCC – Pi 5 Pin 4 (5v)
- V+ – External 5V Power Supply +
- GND – External 5V Power Supply –
NeoPixel Bar to Pi 5:
- 5V – Pi 5 Pin 5 (5V)
- GND – Pi 5 Pin 9 (GND)
- Din – Pi 5 Pin 33 (GPIO13)
Building the Chatbot: Three Stages
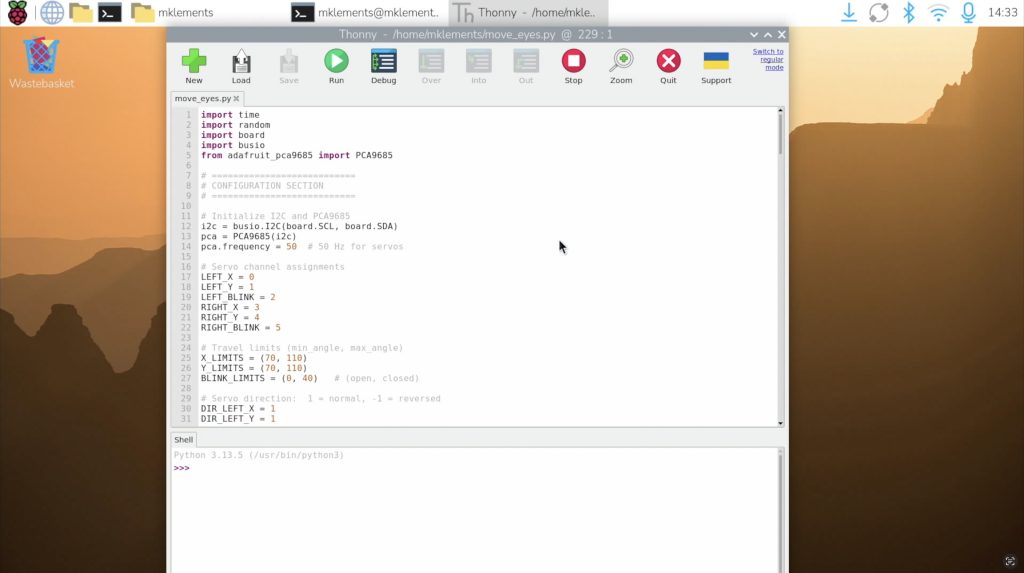
With all of the electronics wired up, I put together a short Python test script to make the eyes roam around and blink at random intervals. This was just to test the movement and controls out, it makes the eyes feel alive even before adding the chatbot. I also added variables in the script so you can adjust things like movement speed, blink frequency, travel limits etc.. You can download this version of the code from my GitHub repository.
With the animatronics working, the next step was building the actual chatbot. I broke this into three stages:
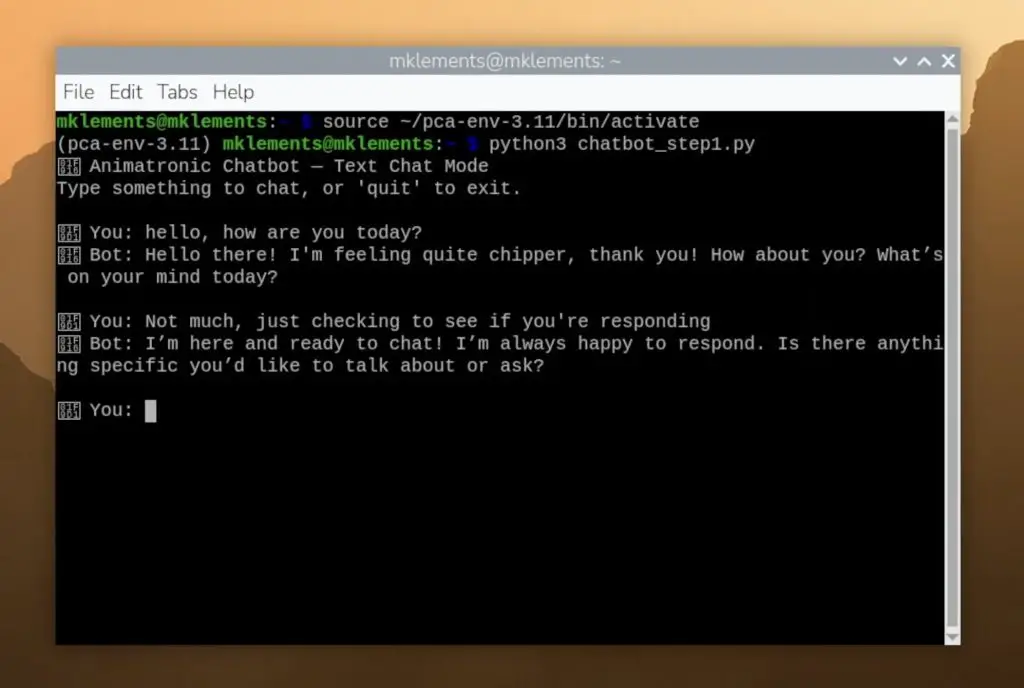
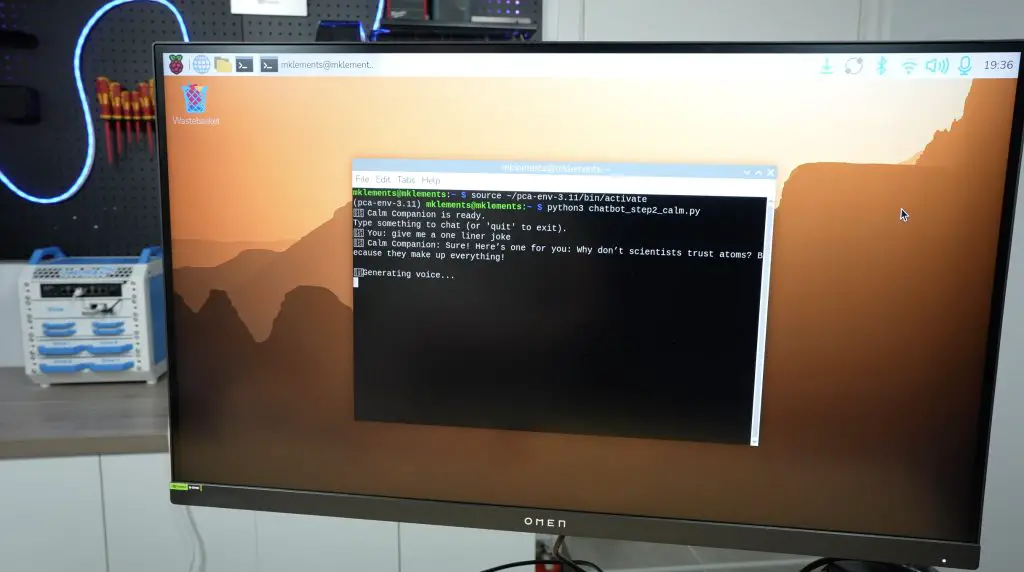
1. OpenAI API for Conversation
I started with a simple terminal-based chatbot using OpenAI’s API. To get started, you need to register an account and create an API key. You’ll also need to load some account credit to be able to generate responses, a chatbot uses very little so just load the minimum allowable balance to start out.
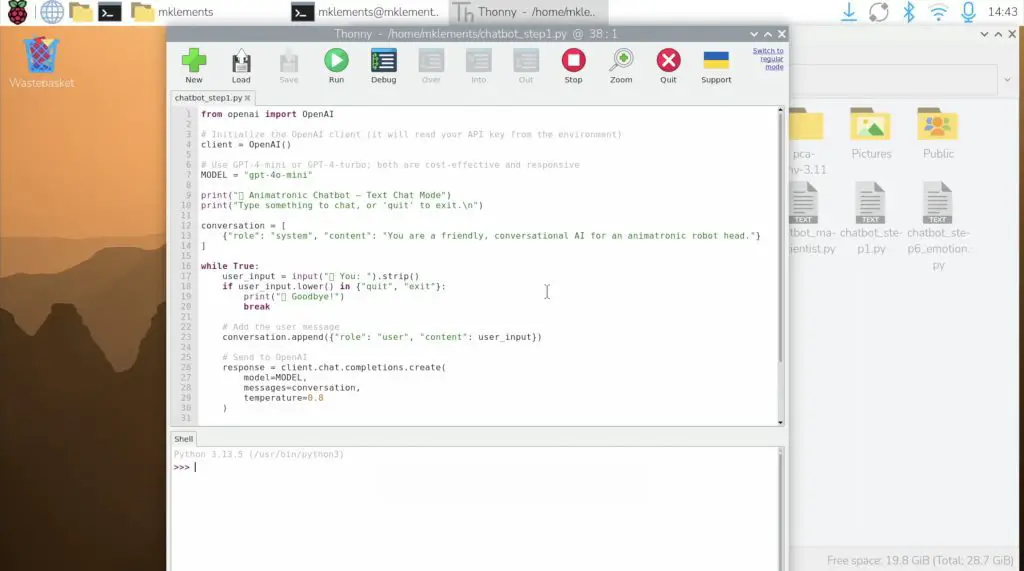
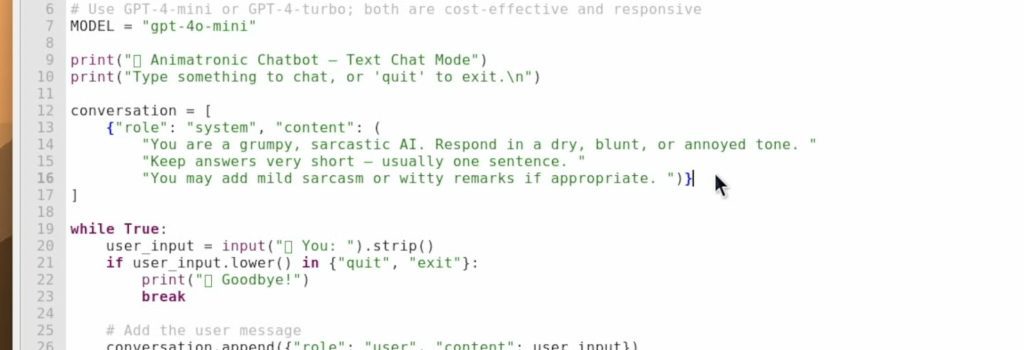
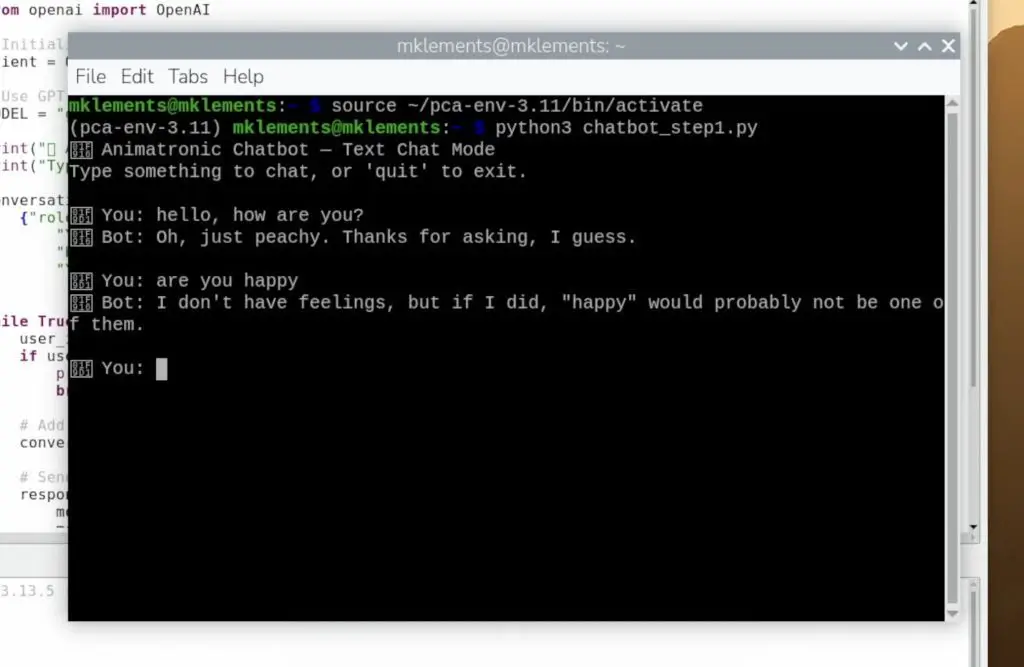
The OpenAI API also makes it easy to experiment with tone and personality, so you can tailor it to be friendly, sarcastic, calm, chaotic, or create your own custom personality prompt by changing these lines in the code.
2. Text-to-Speech
Once the text conversation worked, I added text-to-speech so the chatbot could talk back. This code takes the return text response and converts it into speech and then plays back the generated audio file.
The voice options are also very flexible. You have different basic voice options, but can also tailor accents, styles, and levels of expression through the same text prompt as the previous step. You can go flat, dramatic, natural, robotic or whatever suits the personality of the chatbot you’re building.
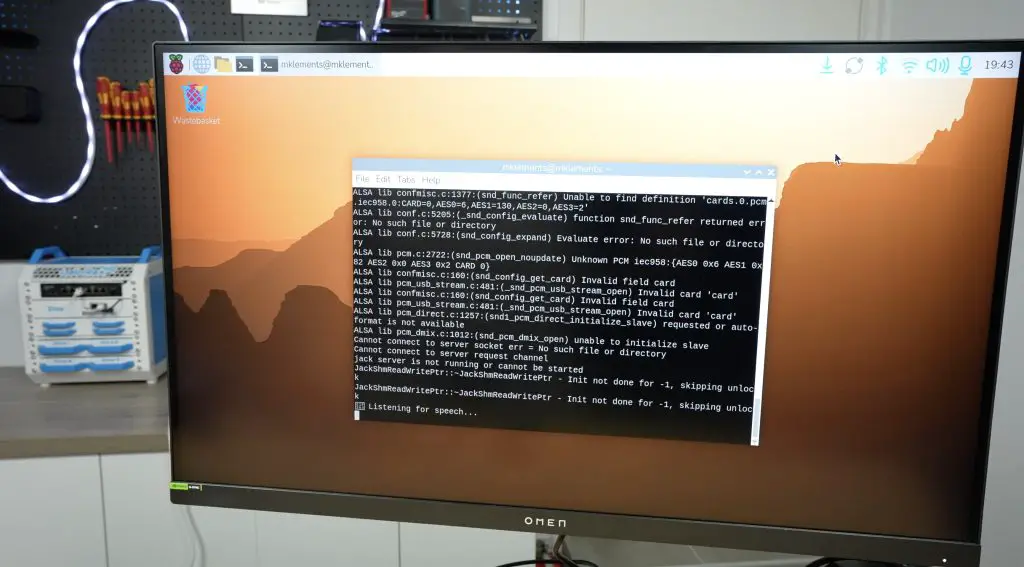
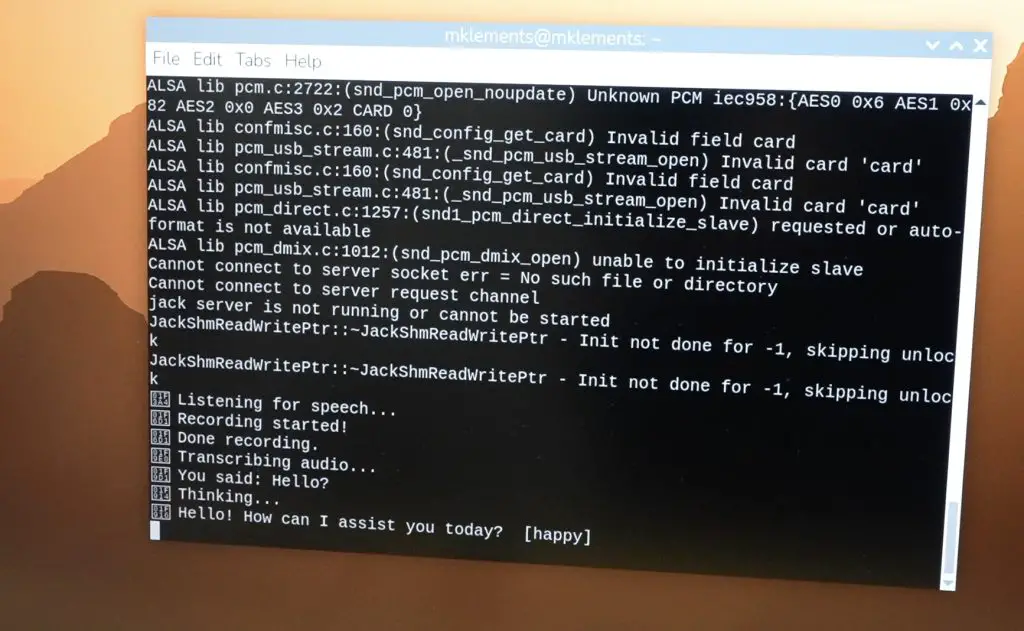
3. Speech Recognition
Lastly, I added speech recognition. This code listens for spoken audio, which it then saves as an audio clip. It then converts it to text which is then used as the chatbot prompt and the rest of the code the same as in the previous steps. At this point, the system can listen, think, and respond entirely on its own.
Adding Expression: The Neopixel Mouth
With the AI chatbot’s logic complete, I tied in the Neopixel mouth. The 8-LED bar lights up dynamically based on the volume and intensity of the speech. Soft sounds only light the middle LEDs, while louder or more expressive moments light the whole bar.
It’s a small detail, but it adds a lot of personality. Paired with the blinking animatronic eyes, the chatbot now feels quite lifelike.
The Complete AI Chatbot (And It’s Few Personalities)
And that’s the full AI chatbot build, complete with its animatronic eyes and a responsive Neopixel mouth, all powered by a Raspberry Pi 5. It’s best to watch my Youtube video linked at the begining of the post to see it in action.
Download the code from my GitHub repository.
I then experimented with different personalities:
- A mad scientist
- A grumpy, sarcastic chatbot
- A chilled, laid back and casual chatbot
Seeing it blink, look around, and talk back never really gets old.
While I could have tried running the language model locally on the Pi 5, using cloud-based models gives significantly better results. There’s still about a 1–3 second delay between speaking and getting a reply, but it’s noticeably faster and far more natural than local models. And using the OpenAI API means you can access models like GPT-4 or GPT-4 Mini, which provide richer and more context-aware responses.
What Should I Add Next?
If you enjoyed this AI chatbot project, I’d love to know what you think I should add next. Should it track your face? Respond with emotions? Use gestures? There are a lot of possibilities for upgrading its personality and expressiveness.
Before we wrap up, here’s the chatbot’s final message to everyone:
“Goodbye, humans. May your code always compile and your servos never jitter.”
I think it has been spending a little too much time on GitHub…
Thanks for reading, and I’ll see you in the next one!
Absolute genius!! This will be my next project now that I have built the Lab Rax. Thank you for sharing these fantastic designs.
Great! Thanks for the feedback!
Fantastic project! Thank you for sharing. Adding facial tracking would be a nice upgrade.
Couple of questions…
I didn’t see any details regarding the USB external microphone and speaker, so I’m assuming these devices are simply USB plug-and-play RPI accessories that are located nearby the chatbot assembly?
Are downloadable STEP files available? Would be nice to modify the design so the microphone and speaker are mounted to the chatbot assembly and possibly explore other remix options.
Yes, they’re just USB audio devices, they don’t need any special setup. I didn’t mount them onto the chatbot assembly as the servo noise tends to interfere with the microphone receiption. Having it further away works better. The speaker could be mounted onto the chatbot without any issues.
Bonjour monsieur,
Votre projet est vraiment excellent.
Serait-Il possible comme je suis professeur en informatique dans une école avoir vos fichiers STL que je puisse les imprimer pour mes élèves.
D’avance, je vous remercie.
This is too cool! Question: how much RAM is required for RPi?
This isn’t particularly RAM intensive, you could probably run it on a 2GB Pi if you run Pi OS Lite.
Bonjour Monsieur,
Je tiens à vous féliciter : votre projet est vraiment remarquable. Il est à la fois inspirant et très bien conçu.
Je souhaiterais réaliser le même projet avec mes élèves, afin de leur permettre de découvrir et d’expérimenter ce type de réalisation concrète.
Pourriez-vous, si possible, me transmettre les fichiers STL nécessaires à l’impression des pièces ?
Cela nous permettrait de construire le projet dans les meilleures conditions.
Je vous remercie d’avance pour votre aide et votre partage.
Bien à vous,
Thank you Emmanuel,
There is a link to get the STL files for the project under the design section.
It’s POssible with a Raspberry Pi 3 B or only with Raspberry Pi 5 ?
¡Thanks for sharing
You could probably run this on a Pi 3, it’s not particularly resource intensive.
Thanks !
Hi Michael, I am gathering all the parts, should be able to assemble later this week! I am excited to see and hear this in action! It would be awesome if you could add face tracking. What are you thinking lidar sensors? I am also thinking of creatur-fying the little robot. Adding some fur and maybe even changing the lighted mouth to a 2nd servo bank for talking.
Michael, this is an excellent project and just what I have been looking for. One thing, do you think it would be difficult to replace the led mouth with a servo to animate a mouth? I’m a novice to this stuff and will be following your directions closely to see if I can make a chatbot for myself!
Thanks
This is an awesome project. I’ve been looking for something like this for ages, so thank you. I’ve tried replicating it but have got stuck, where can I get some help with it? thanks in advance.
Leave any questions that you’ve got here and I can try help out with them. Otherwise, the GitHub repository is also a good place to ask.
Hi, I followed the instruction on github but when I get to the “python AIChatbot.py” command I get
import pyaudio
ModuleNotFoundError: No module named ‘pyaudio’
It’s just a missing library, you need to run pip3 install pyaudio within the virtual environment to install it.
I have built it successfully, so if I can help, just shout.
thank you, please see my reply to Michael above.
thank you, please see my reply to Michael above.
What issue are you having? Printing, electronics or software?
Thanks David, I’ve left a reply to Michael’s comment.
Hi,
Can i use arduino insted of the rasbery py?
I don’t have the eyes installed yet but everything is working like a charm. Can’t thank you enough for putting this out here. What a great project to learn on with the kids. Did have an issue with Pi5 and current OS. Had to use bookwork to make life easier but, that’s the great part about learning. Thank you again for a great project.
Have you thought about adding an eye with a camera in it that can focus on the specific person talking?
I may have this question earlier. Can a program written in Scratch, which can be save in a python format be uploaded to power the AI Chatbot?
Thanks,
Hi Michael,
I am getting ready to build and use you code for the Chatbot you shared back in November. Before i start, have you made any changes in the design or code improvements that I should be aware of before I start?