Are you tired of taking hours to wrap all of your Christmas presents for friends and family? This video from Japan’s Takashimaya Department shows how an employee, using a few tricks, is able to wrap a gift in just under 12 seconds. Spending just 12 seconds on each present means you could be done with all of your presents in a couple of minutes.
Have a look at the video:
Next time you wrap your presents, make sure that the paper is roughly the right size for the gift, avoid trimming the edges and trying to get the pattern to line up, work with the corners of the wrapping paper sheet along the edges of the gift’s box and you’ll have a much easier and quicker wrapping experience.
With this tip, obviously preparation is key. You need to have your tape on a suitable tape dispenser or pre-cut and lined up on the table’s edge. In addition to this, pre-cut sheets of your wrapping paper into roughly the correct size. It helps to arrange your gifts into a small, medium and large pile and then cut sheets to suit each pile size. Keep irregular or difficult objects for last as there is no shortcut for them.
Are you looking for the perfect gift for a friend or family member this year? Have a look at our top 5 tools for DIYers this year or take on a challenge and make your christmas gifts, here’s a list of 10 DIY Christmas gift ideas.
I think it is safe to assume that most people have experienced the frustration of spending an hour untangling their Christmas lights only to plug them in and find that they are not working. Non-functioning Christmas lights can be extremely frustrating to repair if you don’t have the right tools. Save yourself the frustration and buy a globe tester, they are really inexpensive and are sold online along with the Christmas lights and decor.
What You Will Need To Repair Your Christmas Lights
Light Bulb Tester
Possibly A Replacement Fuse
Possibly A Couple Of Replacement Bulbs
How To Repair The Christmas Lights
First Check The Fuse
Your first check should always be the fuse, this is usually hidden away in a small box near the plug or in the plug itself behind a plastic cover. Some larger strings of lights may have two or three fuses. Check the fuses for and darkening or blackened glass. In a working fuse, you should be able to see through the glass and see a thin silver or gold wire connecting the two silver end caps. If you can see the wire then the fuse has likely blown and needs to be replaced.
Test The Bulbs
After checking and replacing any blown fuses, check to see if the string now works. If the lights are still not working then one or more of the bulbs is likely blown. The easiest way to check the bulbs is with an inexpensive bulb tester although you can go through the string and replace each globe with a new one and try turning the string on to see if it works again. You run into trouble with this method if more than one bulb has blown as the string still won’t turn on.
Plug the string of lights into the power and turn them on. Now, depending on the type of tester, you need to either insert each bulb into a hole or hold the tester up against each bulb. The tester will then indicate with a sound or light whether the bulb works or not.
Swap out any bulbs which are faulty, turn off the power while swapping the bulb. Once your have worked through all of the bulbs on the string, power it on and all of the bulbs should light up.
Pack Your Lights Away Carefully
This year, pack your lights away carefully. The strings of lights used on trees are made inexpensively and are not very durable. Don’t pull hard or twist any of the wires and keep the bulbs reasonably well protected in storage. If possible, try to save the original packaging and pack them into this container when you are done with them rather than bundling them up and stuffing them into another container.
Next time you buy new lights, try to get the LED variety, these bulbs last much longer and are generally non replaceable and therefore a bit more reliable.
Do you have any tips and tricks for repairing or storing your Christmas lights? Let us know in the comments section below.
No DIYer ever has enough tools, there is always something new and something better. We’ve put together a list of some of our favorite picks for this years Christmas list.
Cordless Glue Gun
Black and Decker have remodeled their popular glue gun and made it into a 20V more industrial version which boasts a heat-up time of 90 seconds. Using their standard lithium ion battery pack, it has a running time of up to three hours. Really useful for running cords or cables, sticking up odds and ends and for crafts.
More Work Space
All DIYer’s have a compromise to make, more works space means more floor space required for bulky tables and benches. The Centipede is a new multi legged fold out base which is really versatile. It folds out in seconds to function as a work bench, stand, table or a saw horse. Its perfect anywhere you need a stable or portable work surface. It comes in two sizes, 2x4ft and 4x8ft which can hold 1,500lbs (680kg) and 3,000lbs (1,360kg) respectively.
A Brushless Drill / Driver
Brushless motors are becoming the trend and provide for longer run times and more powerful response. Milwaukee have launched a range of brushless drills and drivers with lights, power meters and belt hooks, all the bells and whistles really. The come with a removable battery pack which fit a range of their battery power tools.
Battery Power In The Garden
Battery powered garden tools haven’t been too well received, mainly due to their sluggish performance and lack of power. Echo, Ryobi, Oregon, Kobalt, Craftsman, Stihl and Greenworks have now started launching their 80V ranges. These new 80V garden tools have enough power to run mowers, snow blowers and chain saws which have comparable performance to their gas engine powered relatives. Cordless tools cost a bit more upfront but you can’t beat the convenience, single button start and quiet operation.
The Hole Saw Re-Invented
A hole saw is not the type of tool you would typically associated with innovation but Spyder have come up with a hole saw which addresses some of the challenges typically experienced with traditional ones. The Spyder hole saw has a feature which they call Rapid Core Eject which allows you to eject the drilled core from the tool with the push of a button. Another useful feature is its ability to widen already drilled holes. Simply install the smaller hole saw into the larger one and the smaller saw acts as a guide to centralise the new larger hole saw.
Do you have any recommendations for our list? Let us know in the comments section below and we will add them on.
Have you ever struggled to remove red wine, coffee or tomato sauce from your carpet after a spill? Doing the right thing as soon as possible makes all the difference and most spills can be restored completely by following these steps.
What You Will Need To Get Wine Off Your Carpets
Vacuum Cleaner
Clean Cloth for Dabbing
Carpet Cleaner / Dish Soap & Warm Water
Clean Cloth for Wetting
Clean Water
Suck Up The Red Wine
Start off by removing as much of the liquid as possible, place the end of the vacuum hose with no attachments over the stained area and leave it in place for a few seconds before moving onto the next small patch. Don’t rub the hose on the carpet, pick it up and spot vacuum as many times are required to pick up as much of the liquid as you can. Remember to put your vacuum cleaner into wet mode and remove the paper filter before you start.
Pour On A Carpet Cleaner
Use a store bought carpet cleaner, mix some up (usually with warm water) and apply the foam generously to the stained area. If you don’t have carpet cleaner then mix up some dish soap and warm water, pour a little into spray bottle and spray it onto the area. Let the cleaning product soak into the fibers for a few minutes.
Blot Up The Cleaner
Start with a clean white cloth or towel and blot up the carpet cleaner starting at the outside of the stain and working your way towards the centre. Fold the towel over as you go so that you are always blotting with a clean section. Do not scrub or stamp on the towel when blotting, do it gently with your hands. If there is still excess cleaner when you are done blotting then use the vacuum again to suck it up.
Rinse Off The Cleaner
Finally, you need to rinse off any excess cleaner which may be left behind. Use a bowl of clean water and a cloth or brush to gently apply clean water to the stained area. Vacuum up the water and repeat until there is no more cleaner residue left behind, usually two to three repetitions. Once the area is clean then leave it to dry off completely before walking over the area again.
When your carpet is dry again, you’ll want it to smell good, try our homemade carpet deodoriser to give your carpet new life and make your home smell great. If you have a stubborn mark or cigarette burn which just won’t come out, try our guide for repairing a cigarette burn in a carpet.
Do you have any tips and tricks for removing stubborn stains from your carpets? Let us know in the comments section below.
Freshen up you Christmas tree’s look this season with one of these popular and inspiring trends for 2016.
Warm Metals
Copper and rose gold are the new trendy metals to look for in your Christmas decor. Pack the silver away and add some colour to your tree with copper and rose gold coloured balls, stars and other ornaments. These two metals go well with other decorations in pastel pink, pale yellow and champagne. Complete the look with a set of flashing white LED lights.
A White Christmas
White is back and white decor pops up against the dark green needles of a fresh fir tree. A white pallet is perfect for those homemade paper decorations and fluffy white pom-poms. Finish it off with warm white lights and a hint of gold tinsel.
Natural & Fresh Cut
Showcase the natural beauty of pine this year with au naturel decor. Go for pine cones, acorns and birch bark, complete the look with twine and burlap. Give your cones a hint of sparkle with some gold spray paint and light it up with warm white lights.
Retro & Colourful
Go back to your youth with a colourful and fun tree. Pick up old brightly coloured ornaments at your local thrift store or online. You’re looking for bold colours such a red, green, teal and pink. Fill in the gaps with brightly coloured tinsel and light up the tree with a string of multicolored flashing lights.
Go Minimalist
Minimalist is still trendy, pick a single colour and stick to it. A simply decorated tree with a single highlighted colour in a small range of ornaments can still make a statement. Choose similar shapes in a range of textures (think glossy and glittered etc) and complete the look with a single string of tiny white lights.
There’s not much worse than putting all of your free time into making your garden look amazing only to find out that it has been overrun by pests. Bugs and insects can be extremely destructive in a garden, from eating leaves and flowers to killing off whole plants and trees. While you need to find a solution, it is also important that you are not damage the environment or the plants which you are trying to protect. Here are some of the easiest home pesticides which you can make to naturally keep pests away and protect your plants.
It is best to try and spray your plants early in the morning or late afternoon to prevent the sun from burning the leaves. Also remember to only spray the plants and areas which are infected as these pesticides will still kill off some of the good insects which are vital to keeping your garden healthy.
Try One Of These Pesticides
Soap Spray
Perfect for: Aphids, mites, white flies, thrips & ants
What You Will Need:
Spray Bottle
Water
1 1/2 Tbsp Biodegradable Dish Soap
10 Drops of Essential Oil (Citrus works best)
Add the dish soap and essential oil into the spray bottle. Fill up to the full line with water and then shake well to combine. Spray your plant thoroughly ensuring that you cover both the top and the bottom of the leaves.
Oil & Soap Spray
Perfect for: Soft body insects, mealy bugs & aphids
What You Will Need:
Spray Bottle
Water
1 1/2 Tbsp Biodegradable Dish Soap
1 Tbsp Canola or Sunflower Oil
Add the dish soap and canola oil into the spray bottle. Fill up to the full line with water and then shake well to combine. Spray your plant thoroughly ensuring that you cover both the top and the bottom of the leaves, the oil sticks to the bugs and insects and smothers them.
Chili Garlic Spray
Perfect for: Japanese beetles, borers, leaf hoppers and slugs. Also deters rabbits.
What You Will Need:
Soap Spray Made As Above
1 Tbsp Chili Powder
1 Tbsp Garlic Powder
Add the chili and garlic powder into the bottle and allow to steep overnight. The mixture will keep for up to two weeks. Spray onto plants and leaves as directed above.
Do you have any natural methods to keep bugs and pests out of your garden? Let us know in the comments section below.
Since writing up our project on how to make an Arduino Solar Tracker which makes use of a single or multiple PWM servo(s) to actuate the panel, we have had a number of requests to modify the design and code to allow for a linear actuator to be used to move a heavier load; a large panel or array of panels.
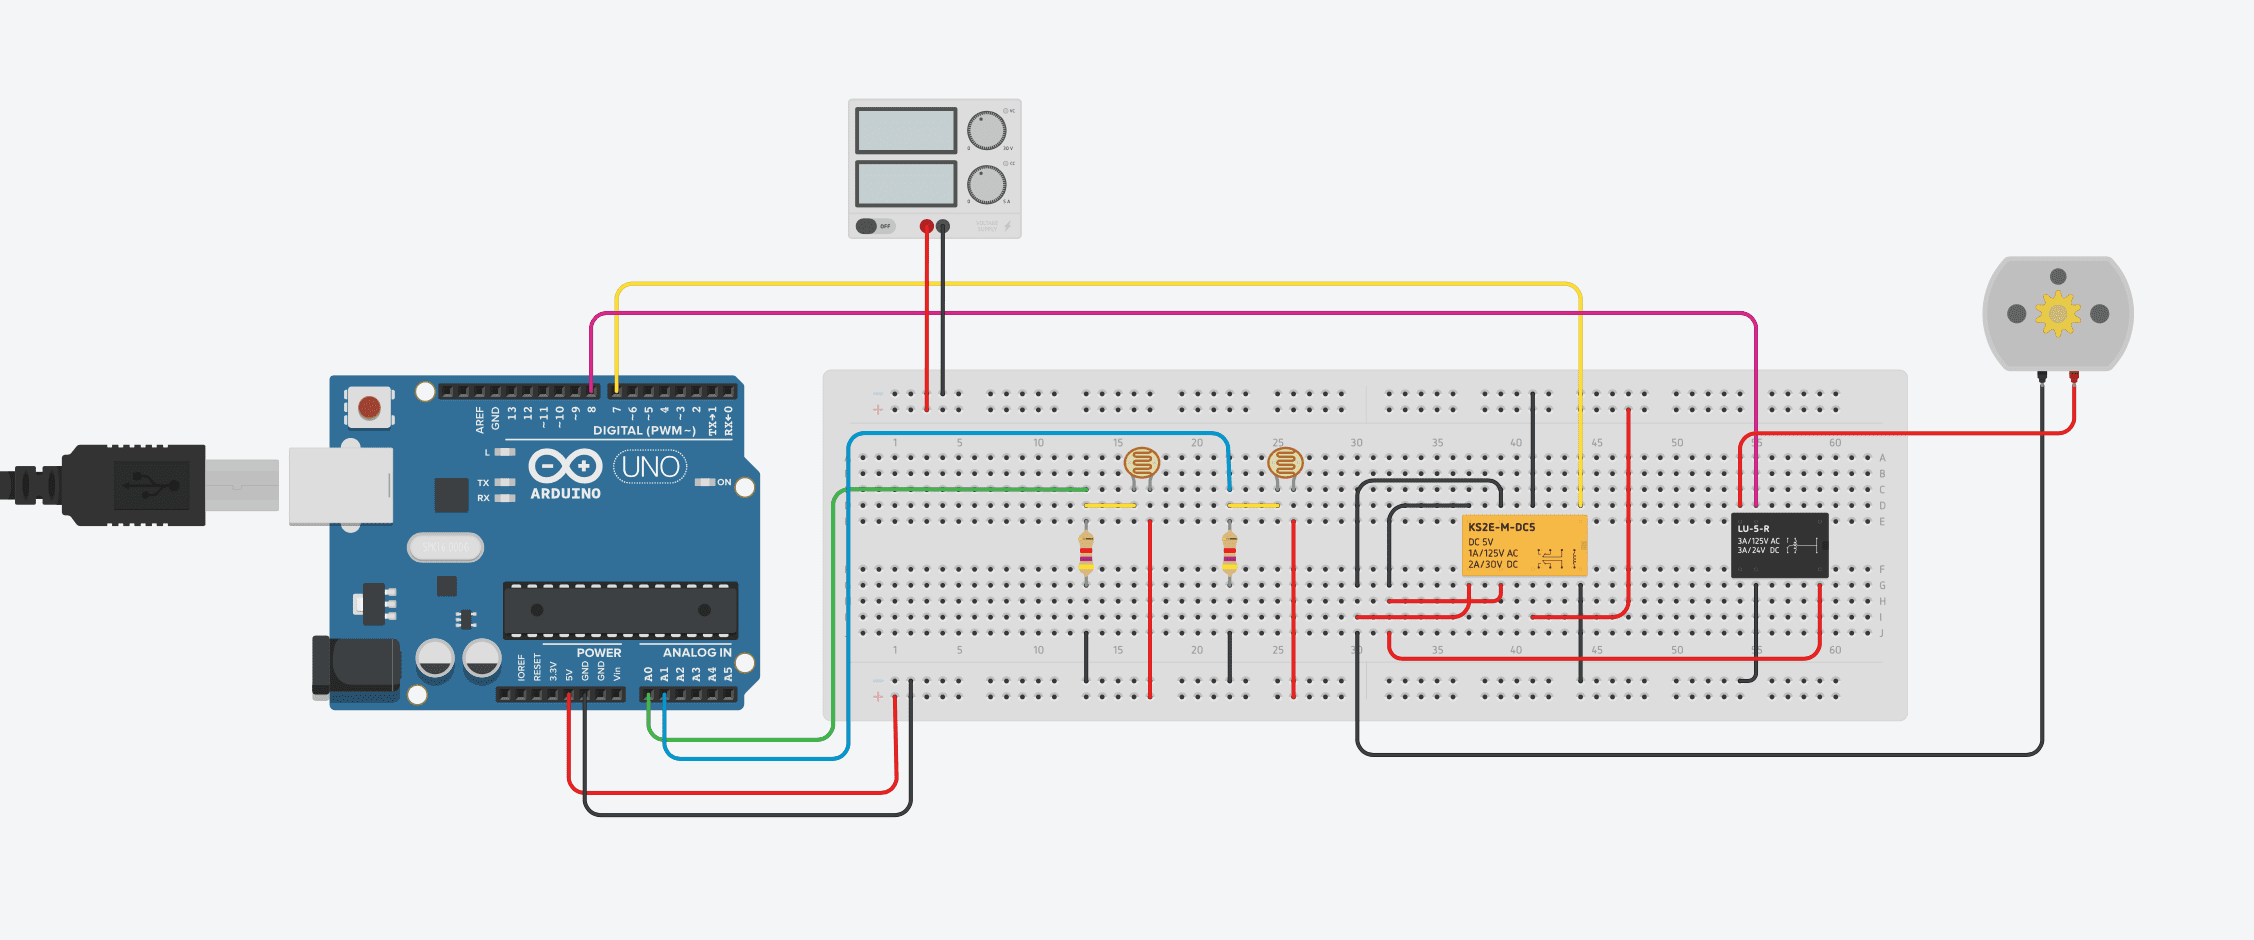
The circuit for the light detection remains the same as the original solar tracker while the servo is now replaced by a 12V DC linear actuator which is supplied by a 12V battery or power supply and controlled by two relays. Alternately, you can also drive the tracker with a stepper motor which is also controlled by the Arduino
This project is not a stand alone project but is meant to supplement our original Arduino Solar Tracker project. You will need to follow this guide in conjunction with the original guide in order to produce the linear actuator solar tracker.
What You Will Need For A Linear Actuator Solar Tracker
The parts required are as for the Arduino Solar Tracker without the PWM servo. The additional components required are:
12V DC Linear Actuator (Sized to suite the weight of your array) – Buy Here
12V DC Power Supply (Rating sufficient for your actuator) – Buy Here
5V DC Double Pole Relay (Current rating sufficient for your actuator) – Buy Here
5V DC Single Pole Relay (Current rating sufficient for your actuator) – Buy Here
How To Make The Control System
Again, the light sensor part of the control system is the same as in the Arduino Solar Tracker.
The breadboard diagram for this circuit is shown below:
The design and code are both slightly more complex with a linear actuator as the Arduino needs to control the actuators movement duration and the direction.
A 5V DC double pole relay is used to reverse the polarity of the supply to the linear actuator. This enables the actuator to move forwards and backwards. The second 5V DC single pole relay is used to switch the movement of the actuator on and off, when activated the actuator will move. The linear actuator is represented by a DC motor in the above circuit diagram, a DC motor drives the actuating arm in your assembly.
Upload the Sketch
Now you can upload your sketch onto your Arduino, if you haven’t uploaded a sketch before then follow this guide on getting started.
//The DIY Life
//10 October 2016
//Michael Klements

int eastLDRPin = 0;  //Assign analogue pins
int westLDRPin = 1;
int reverserPin = 7;	//Assign the digital pins
int motorPin = 8;
int eastLDR = 0;   //Create variables for the east and west sensor values
int westLDR = 0;
int error = 0;
int calibration = 0;  //Calibration offset to set error to zero when both sensors receive an equal amount of light
int trackerPos = 180;

void setup()
{
  pinMode(reverserPin,OUTPUT);
  pinMode(motorPin,OUTPUT);
  digitalWrite(reverserPin,LOW);
  digitalWrite(motorPin,LOW);
}


void loop()
{
  eastLDR = calibration + analogRead(eastLDRPin);    //Read the value of each of the east and west sensors
  westLDR = analogRead(westLDRPin);
  if(eastLDR<350 && westLDR<350 && trackerPos<180)  //Check if both sensors detect very little light, night time
  {
    digitalWrite(reverserPin,LOW);
    digitalWrite(motorPin,HIGH);
    while(trackerPos<180)  //Move the tracker all the way back to face east for sunrise
    {
      trackerPos++;
      delay(1000);
    }
    digitalWrite(motorPin,LOW);
  }
  error = eastLDR - westLDR;          //Determine the difference between the two sensors.
  if(error>15&&trackerPos<180)        //If the error is positive and greater than 15 then move the tracker in the east direction
  {
    digitalWrite(reverserPin,LOW);	//Change motor direction to east
    digitalWrite(motorPin,HIGH); 	//Move the tracker to the east
    trackerPos++;
    delay(1000);
    digitalWrite(motorPin,LOW);
  }
  else if(error<-15&&trackerPos>0)  //If the error is negative and less than -15 then move the tracker in the west direction
  {
    digitalWrite(reverserPin,HIGH);	//Change motor direction to west
    digitalWrite(motorPin,HIGH); 	//Move the tracker to the west
    trackerPos--;
   	delay(1000);
    digitalWrite(motorPin,LOW);
  }
  delay(1000);
}
The calibration of the sensor error, the tracker stand and the tracker in operation details and videos can also be found on our Arduino Solar Tracker project.
If you’ve installed solar panels on a camper van to provide you with electricity on your camping trip or at home to supplement your electricity usage or take your home completely off grid then you probably know that the panels work the best when they are aligned directly towards the sun. This sounds simple enough, except that the sun moves throughout the day. This is why there are now a number of different mechanisms which work on a range of principles with the purpose of aligning your panel or array of panels directly towards the sun, called a solar tracker.
There are two principle types of trackers, single and duel axis trackers. Single axis trackers are adjusted every month or so account for seasonal changes in the suns position, the single axis is then used to track the daily movement of the sun across the sky. Duel axis trackers eliminate the need for monthly adjustment by using one axis to track the suns daily movement and another axis to track the seasonal movement. A single axis solar tracker improves solar output by around 25% and a dual axis tracker by around 40% according to this article on Altestore.
This solar tracker control system is designed to take light measurements from the east and west (left and right) side of the solar panel and determine which way to move the panel to point it directly at the source of the light. A servo is used to actuate the panel tracker; these are available in a broad range of sizes and can be scaled according to your panel size. Although this tracker is single axis, the two sensors and servo can simply be duplicated to provide dual axis control.
This project assumes you know the basics of Arduino programming, otherwise read our article on getting started with Arduino.
You could also take this project further by building your own solar panel as well, here is our guide on how to build a solar panel at home. If you are thinking of switching some or all of your homes power requirements to solar power, read our article on switching to solar power first.
Update: After numerous requests to include information on the modifications required to the circuit as well as to the code needed to drive a linear actuator for heavier panels or arrays of panels, the article is now available – Arduino Solar Tracker – Linear Actuator
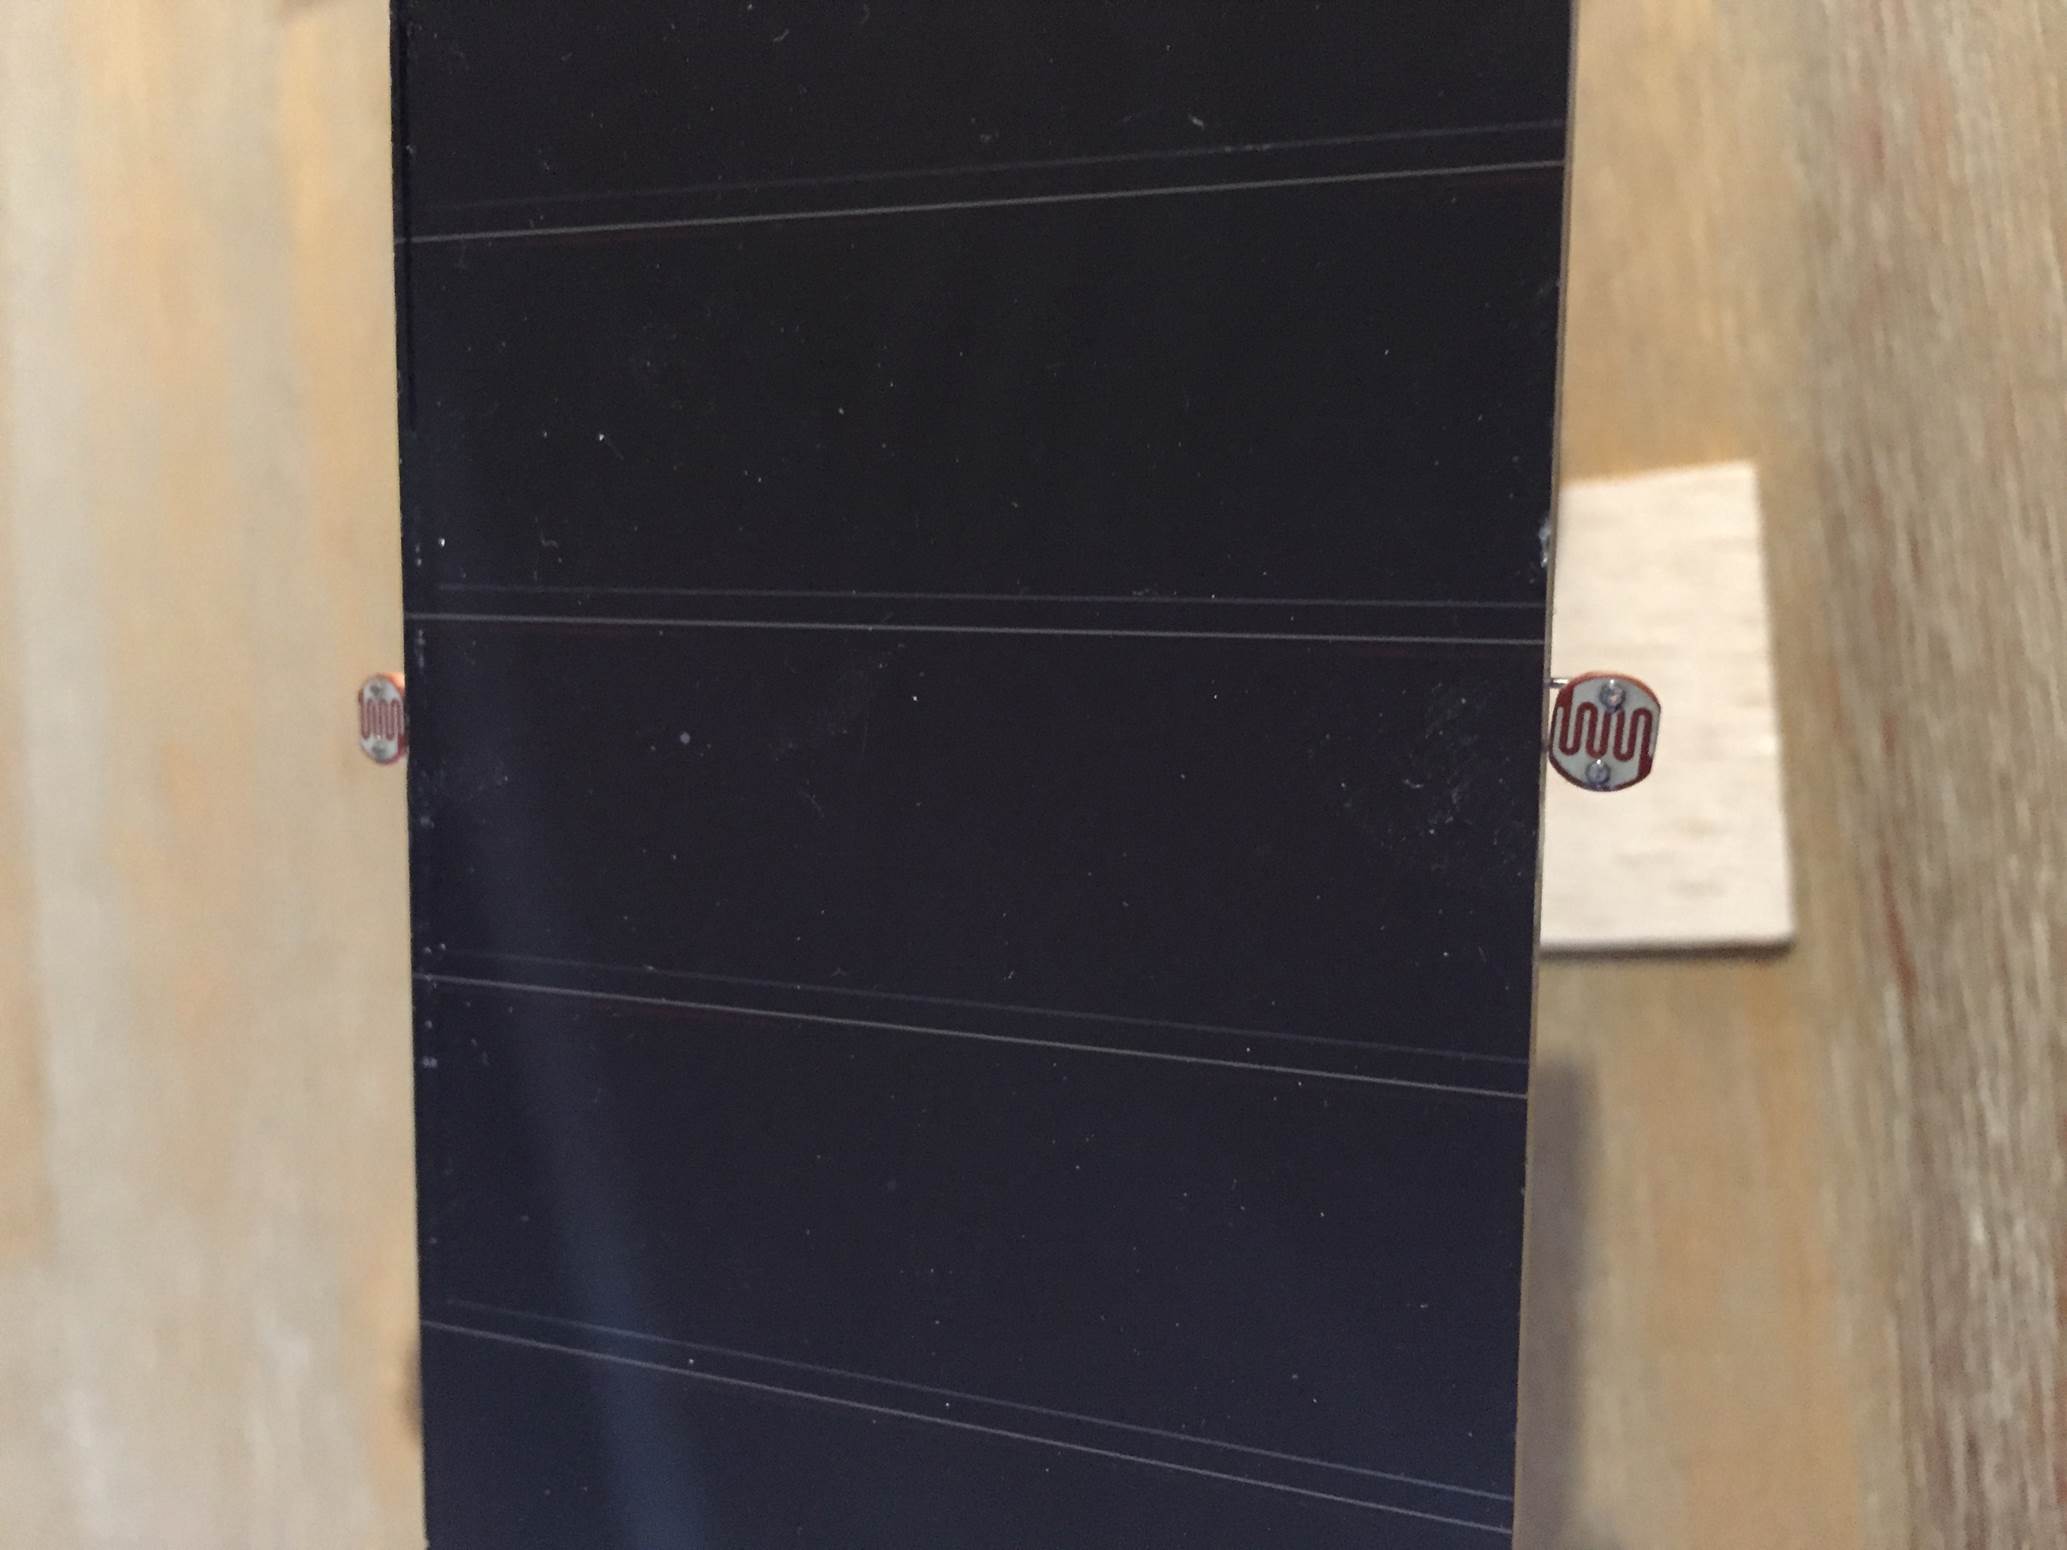
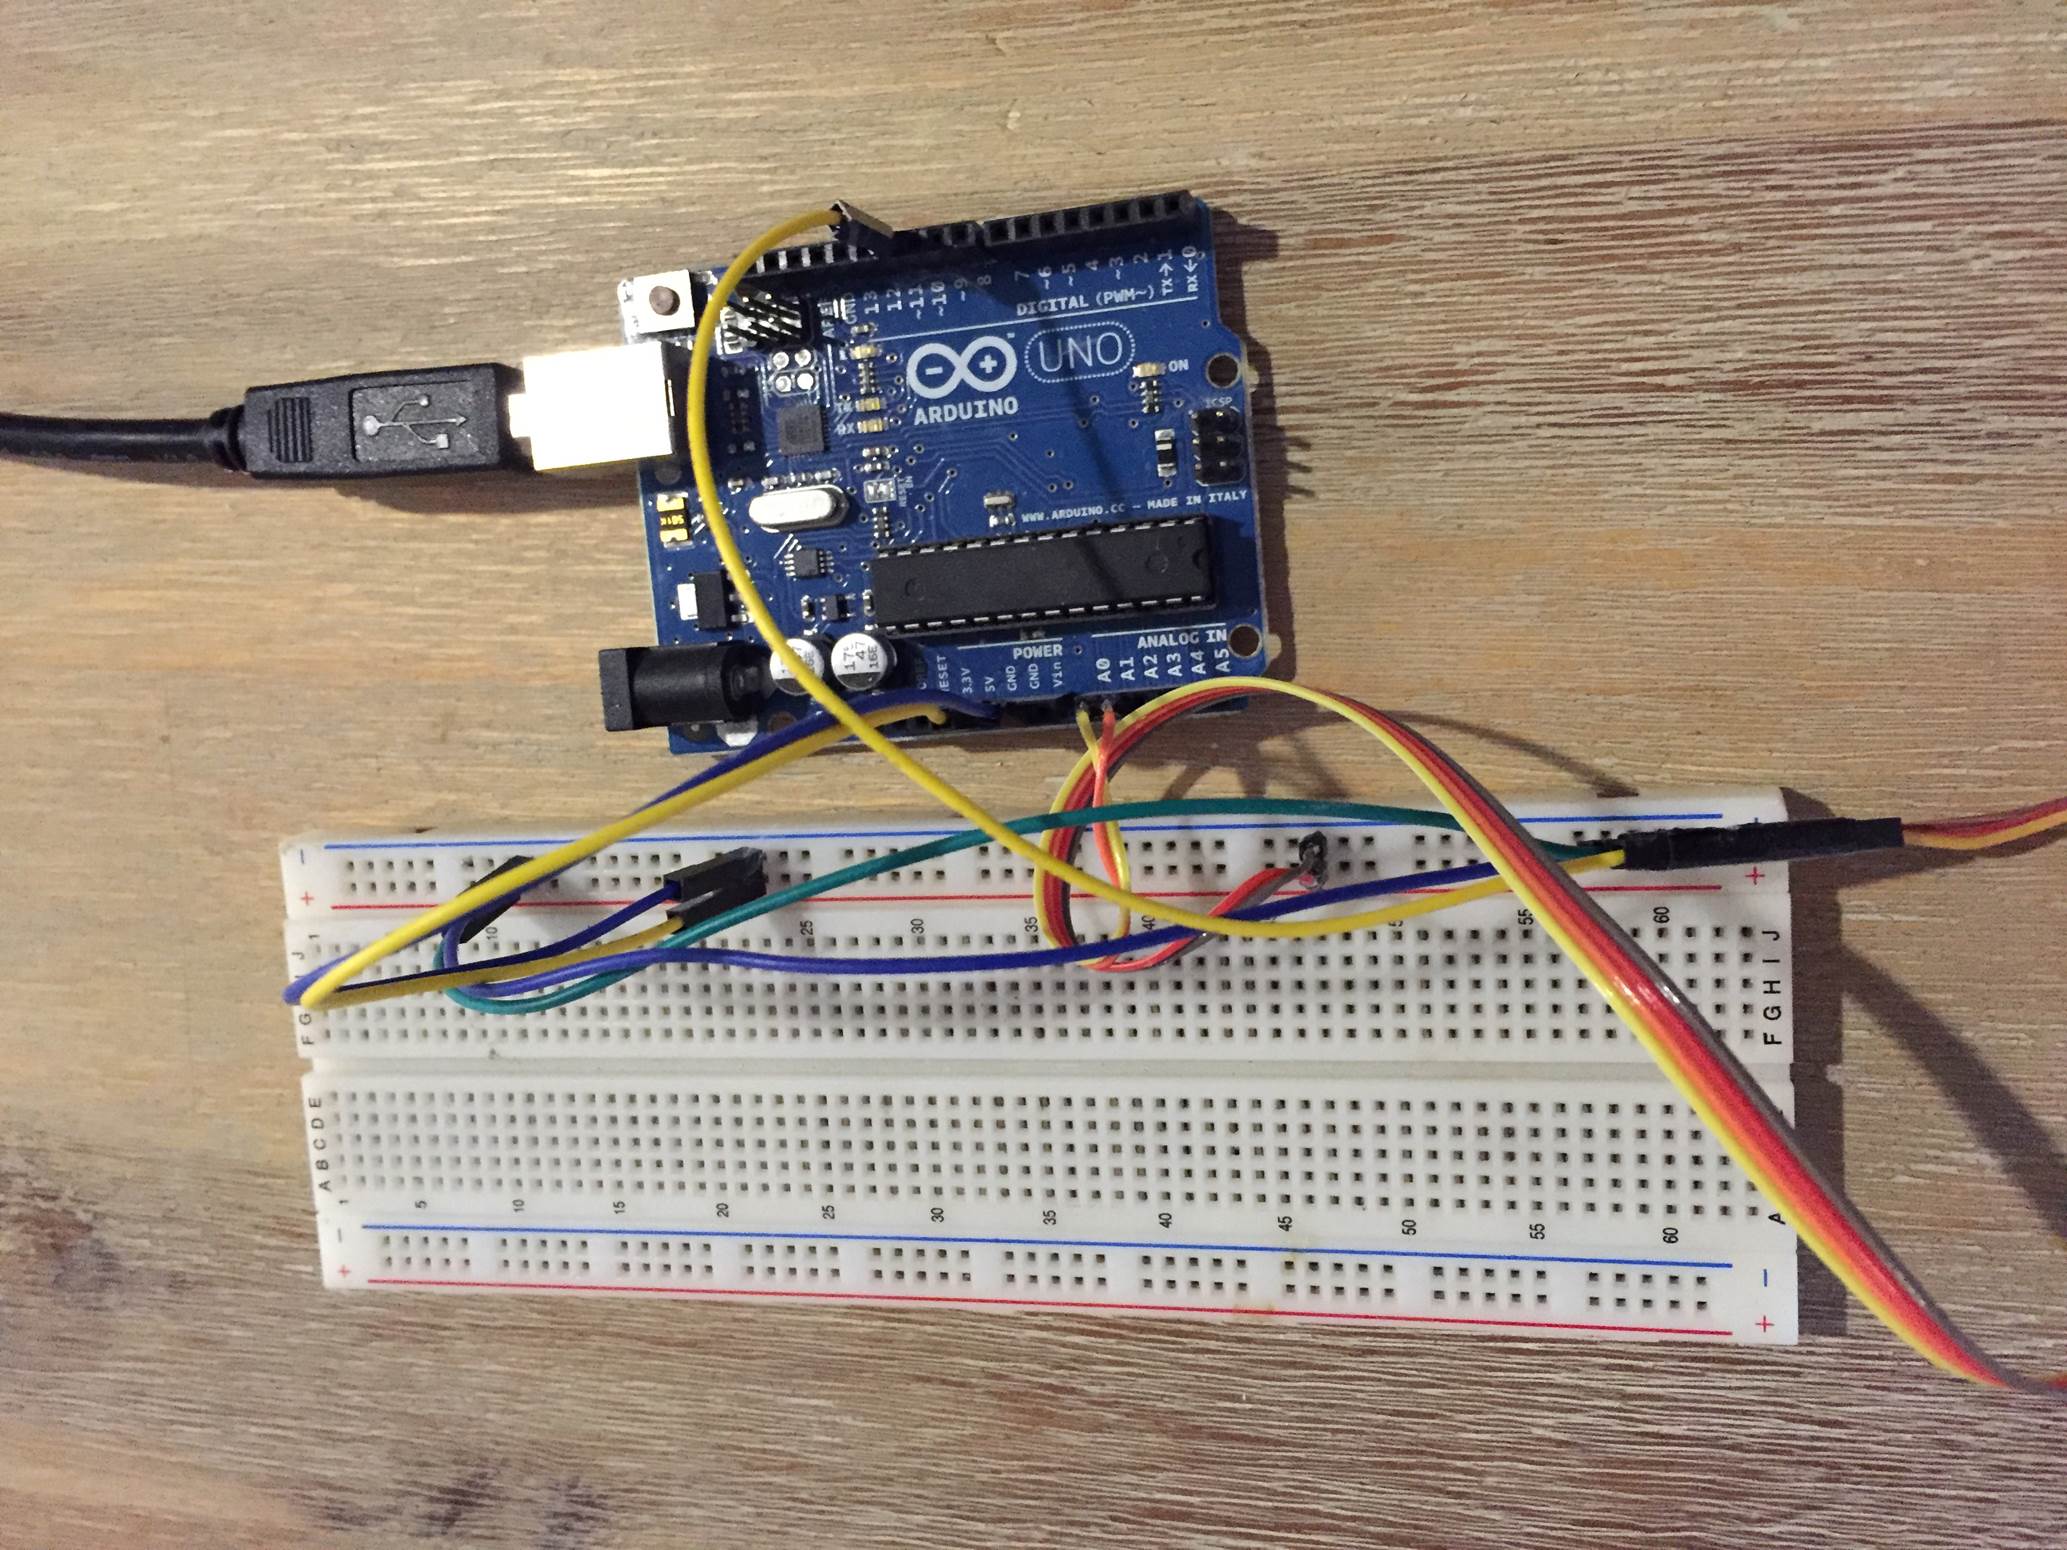
First you need to start by assembling the components onto your solar panel, or breadboard. The LDRs (light dependent resistors) or PRs (photo-resistors) change resistance with changing light, therefore they need to be connected in such a way that the changing resistance is converted into a changing voltage signal which the Arduino understands. The servo is controlled through one of the Arduino’s PWM outputs.
Assemble the Components
If you are going to be installing the solar tracker permanently then you may want to solder the resistors and LDRs together so that they cannot come loose. If you are simply trying this project for fun then a breadboard is perfect.
The basic circuit for the connection of the LDRs and servo to the Arduino is shown below:
A breadboard connection diagram is shown below:
The resistors R1 and R2 are each 4.7K, the PR1 and PR2 are the two LDRs and the servo can be any PWM hobby servo. If you are using a servo larger than 9 grams then the Arduino will probably not be able to supply it enough power to achieve its full torque capability, you will need to supply the servo directly with its own 5V power source.
If you are making this a permanent installation, then it is best to solder the resistors right up near the LDRs on the panel. This way you can run a single 4 core wire from the control box up to the sensors on the panel, the four cores will be 5V, Gnd and then signal 1 and 2 from the LDRs. Once your LDRs and resistors have been soldered together, you can mount them on your solar panel. Mount the LDRs on the east and west (left and right) sides of the panel facing towards the sun. Make sure that they are not shaded in any way by the frame and have an unobstructed view of the sun.
A breadboard has been used in this project purely to distribute the Ardunio’s 5V power supply to both the resistors and the servo.
The servo needs to be sized according to the size of your solar panel. The panel used in this example is small and relatively light; a small servo was therefore used and is powered by the Arduino. For a larger servo (anything above 9 grams), you will need to power the servo externally as the Arduino doesn’t have sufficient capacity for it. Make sure that you connect the external power sources ground to the Arduinos GND as well otherwise the PWM control signal to the servo will not work.
Upload the Sketch
Now you can upload your sketch onto your Arduino, if you haven’t uploaded a sketch before then follow this guide on getting started.
//The DIY Life
//10 October 2016
//Michael Klements

#include <Servo.h>

Servo tracker;  // create servo object to control a servo
int eastLDRPin = 0;  //Assign analogue pins
int westLDRPin = 1;
int eastLDR = 0;   //Create variables for the east and west sensor values
int westLDR = 0;
int error = 0;
int calibration = 204;  //Calibration offset to set error to zero when both sensors receive an equal amount of light
int trackerPos = 90;    //Create a variable to store the servo position

void setup()
{
  tracker.attach(11);  // attaches the servo on pin 11 to the servo object
}


void loop()
{
  eastLDR = calibration + analogRead(eastLDRPin);    //Read the value of each of the east and west sensors
  westLDR = analogRead(westLDRPin);
  if(eastLDR<350 && westLDR<350)  //Check if both sensors detect very little light, night time
  {
    while(trackerPos<=160)  //Move the tracker all the way back to face east for sunrise
    {
      trackerPos++;
      tracker.write(trackerPos);
      delay(100);
    }
  }
  error = eastLDR - westLDR;          //Determine the difference between the two sensors.
  if(error>15)        //If the error is positive and greater than 15 then move the tracker in the east direction
  {
    if(trackerPos<=160)  //Check that the tracker is not at the end of its limit in the east direction
    {
      trackerPos++;
      tracker.write(trackerPos);  //Move the tracker to the east
    }
  }
  else if(error<-15)  //If the error is negative and less than -15 then move the tracker in the west direction
  {
    if(trackerPos>20)  //Check that the tracker is not at the end of its limit in the west direction
    {
      trackerPos--;
      tracker.write(trackerPos);  //Move the tracker to the west
    }
  }
  delay(100);
}
Here is the link to download the Solar Tracker code.
Calibrate the Sensor Error
Because of differences between the LDRs, resistors and the resistance of the wire used, there will be a difference between the signal received from both sensors even when they are receiving the same amount of light. This is taken into account by introducing a calibration offset into the calculation, this number will need to be adjusted in your code according to your setup. Adjust this calibration factor where it is declared in the code,
Line 13: int calibration = 204.
The most accurate way to determine this factor is to shine a light equally between both sensors and then use the Serial monitor on your computer to read the values output by the east and west sensor. The difference between these two values will be the calibration offset. The LDRs are very sensitive so the tracker only moves when the difference between them is greater than 15 in the code otherwise it would be continuously tracking forwards and backwards and wasting power.
If you are not familiar with the Serial interface then you can play around with this value until the tracker remains still when a light is shined equally onto both sensors.
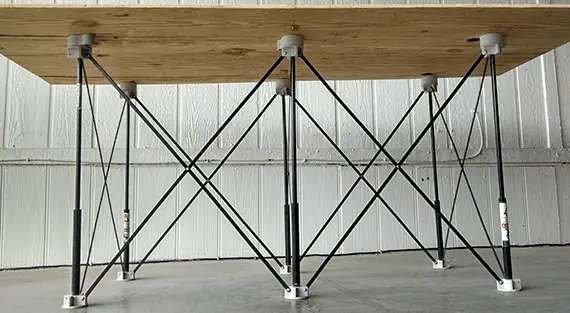
Making A Single Axis Tracking Stand
While this article is not intended to detail making a tracking stand because of the extremely diverse range and size of panels available, here is a brief outline on the design along with some key pointers.
Your stand should look something like this when it is complete:
Ideally the stand should be made from aluminium angle as it is strong, durable and suitable for outdoor use but it can also be made from wood, plywood or PVC piping.
The stand is essentially made in two parts, the base and the panel support. They are joined around a pivot point on which the panel support rotates. The servo is mounted onto the base and the arm actuates the panel support.
The panel should protrude from the panel support as little as possible to keep the out of balance load on the servos to a minimum. Ideally, the pivot point should be placed at the centre of gravity of the panel and panel support together so that the servo has an equal load placed on it no matter which direction the panel is facing although this is not always practically possible.
Two servos may be used for heavier panels, one on each side of the panel. The geometry needs to be the same and the servos need to be the same type/model. You can then duplicate the servo code in the software so that both servos are given the same reference position and move together to actuate the panel.
For very heavy panels or for solar arrays, the servos will need to be replaced with stronger stepper motors. The stepper motors will need to be driven by a driver board such as this one.
The stand used in this guide to test the concept and the code has been made up using a camera pan and tilt bracket which was then glued onto a wooden base. Here are some close up photos of the stand.
The Solar Tracker In Operation
Here is a video of the solar tracker in operation indoors with a torch being used to simulate the movement of the sun:
Would you like to learn more about this project? Are you interested in projects similar to this one? Then Practical Arduino Projects is the book for you, available now on Amazon as an eBook or in Print form.
Have you tried out making your own solar tracker? Let us know your experiences, tips and tricks in the comment section below. We would love to see your project as well.
Christmas is one of the best times of the year for going all out decorating your home. Here are some ideas to decorate your home, wrap your gifts and make your own cards for your family, friends and loved ones.
Custom Gift Wrap
Wrap up your gifts this year and give them a personal touch with your own custom gift wrap.
DIY Gift Cards
Send out your own homemade gift cards this year, they are really easy to make and are a great holiday project for children
Melting Snowman Cookies
Do you enjoy baking? Try out this recipe for melting snowman cookies, they are a perfect treat for your family or when guests come over for a warm winter’s coffee.
Christmas Themed Food
Are you thinking of throwing a party this year or are you have the family over for Christmas? Here are twenty themed recipes to try out and surprise your guests with. You could also try our recipe for an easy pumpkin pie.
Joy Door Hanger
Combine two wooden letters and a homemade or store bought wreath to form a Joy door hanger to welcome guests to your home.
Pine Cone Wreath
If a joy door hanger is not your thing and you would prefer something a bit more traditional, make a pine cone wreath to hang on your front door. Just remember to collect some pine cones during fall.
DIY Decorations
Fill your home with Christmas decor without breaking the bank with these 35 DIY decor items your can make on a budget.
Christmas Scatter Cushions
Are you looking to bring some colour and Christmas cheer to your lounge or family room? Try making these decorative scatter cushion covers, they can be fitted over your existing scatter cushions and they make excellent gifts.
Hang Something On The Tree
Make these little snowmen to hang on your tree with existing ball ornaments and some old socks to turn into hats.
Get The Christmas Fragrance
Lastly, fill your home with that Christmas fragrance, warm cinnamon and pumpkin spice. Wrap some pillar candles in cinnamon sticks, the warmth will release the fragrance in the cinnamon sticks or you could try making our pumpkin spice simmer pot to leave on the stove.
What else have you made for Christmas? Let us know in the comment section below, we would love to add it to our list.
If you’ve done renovations to your home then chances are that you have considered moving a door or window or removing one of the internal walls. Removing some of the internal walls can really transform your home by creating a large and spacious living space out of a previously separated kitchen, lounge, dining room etc. Unfortunately, in houses and apartments, a number of the internal walls form an integral part of the structure of the house, called load bearing walls and removing them may compromise the integrity of the structure and ultimately lead to sections of walls or the roof collapsing.
Types of Internal Walls
Some internal walls are purely there to divide a room into smaller sections while others are load bearing. The dividing walls which do not support any load can safely be removed without any risk. Load bearing walls may be supporting the ceiling and roof, an upstairs wall, the floor above or all three of these. Before demolishing a wall, it is essential that you find out which of the walls are load bearing and which are not.
Non load bearing walls can be removed without any consideration for the surrounding walls and structure while load bearing walls need to be unloaded by supporting the above weight with props, additional supports and lintels will have to be installed and finally the wall may be removed.
How To Find Out If A Wall Is Load Bearing
Finding out if a wall is load bearing is not a simple as it may seem, it is almost impossible to determine from the outside of the wall whether it is load bearing. There are a number of tests one can do to determine whether a wall or section is load bearing and to determine its function.
You can start by taking the back end of a mallet or hammer and tapping along the section of the wall. If the wall sounds like it has hollow sections with dull sounding sections between them then the wall is most likely a stud partition made from timber and plasterboard. If this wall is non load bearing then it will be really easy to remove and can be taken down without risk of collapse. It is however difficult to determine as some older houses used the timber sections in these walls as structural supports for joists.
Non Continuous Walls
If the wall sounds solid when tapping it then it is probably a brick or building block wall. This in itself is not enough to determine whether it is loading bearing. To find out, you need to look at the section whether the wall goes into the ceiling. If you go into the roof, you should be able to see the top of the wall. If the wall is not supporting a wall above it, a concrete slab or a main truss in the roof then it is likely not a structural wall and you should be able to remove it without any risk. If the wall runs underneath the floor above it, lift some of the floor boards to see how the wall interacts with the floor, if it is not supporting the floor joists or slabs then it should be able to be removed. This is clear when the wall sits in between two floor joists without touching them.
Continuous Walls
If the wall runs up and into the room above it then it is most likely a structural load bearing wall. This doesn’t mean that it cannot be removed however some plan will need to be made, probably within the floor boards, to support the wall above.
Types of Supports
There are three primary supports which can be installed to take up the load which was placed on a structural wall.
Concrete Lintels
These come in a number of standard sizes and are made in a factory by encasing stressed steel wire in concrete to form a strong support.
Concrete Beams
These are the same as concrete lintels in concept but are much larger and usually made on site. Concrete is poured around steel reinforcing rods to create a strong beam.
Steel Joists
Steel joists which are usually in the form of an H or I, commonly known as I-beams are rolled out in a number of sizes and lengths to suite different spans and loads.
It is also important that when the above mentioned supports are installed, they are installed correctly so that the reinforcing rods and wires take up the strain correctly or these too will fail.
The size and type of support to use requires some level of expertise, there are calculations to be done and a number of considerations to take into account.
It is important to consult an expert in the form of an architect, surveyor or structural engineer before proceeding with the removal of any sections of wall in your home. They will be able to give you professional advice on the walls you are able to remove as well as the supports required where structural walls are involved. Do not attempt any structural modifications to your home before consulting an expert and finding out about your local regulations.