If your watch has a metal strap then it’s likely not easily adjustable, it has set size links which need to be added or removed in order to resize it. The good news is that you don’t need to take it to the manufacturer or a jeweler to resize, you can do it yourself with just a couple of tools you’ve likely already got. Its actually quite an easy process once you know what to do.
To start with, you’ll need to find the original spare links which should have come in your watch’s box when you bought it. Although you’ll only need the actual links if you’re making your watch strap larger, the spare pin(s) are going to help you to remove the pins which are currently installed in your strap if you don’t have a watch tool kit.
If you can’t find the original links or you don’t have a loose pin with them because the pins are also installed in the replacement links and are not easily removable then you’ll need to find a thin and strong piece of wire (a thin paperclip would work), small screw driver or blunt needle to push the pins out with.
You need an edge to place the strap over and tap the pin out of the bottom. Try use the edge of a strong box, a piece of soft wood or the spin of a book. It needs to be strong enough to support the watch strap while tapping but not too hard or rough that it scratches or scuffs your watch.
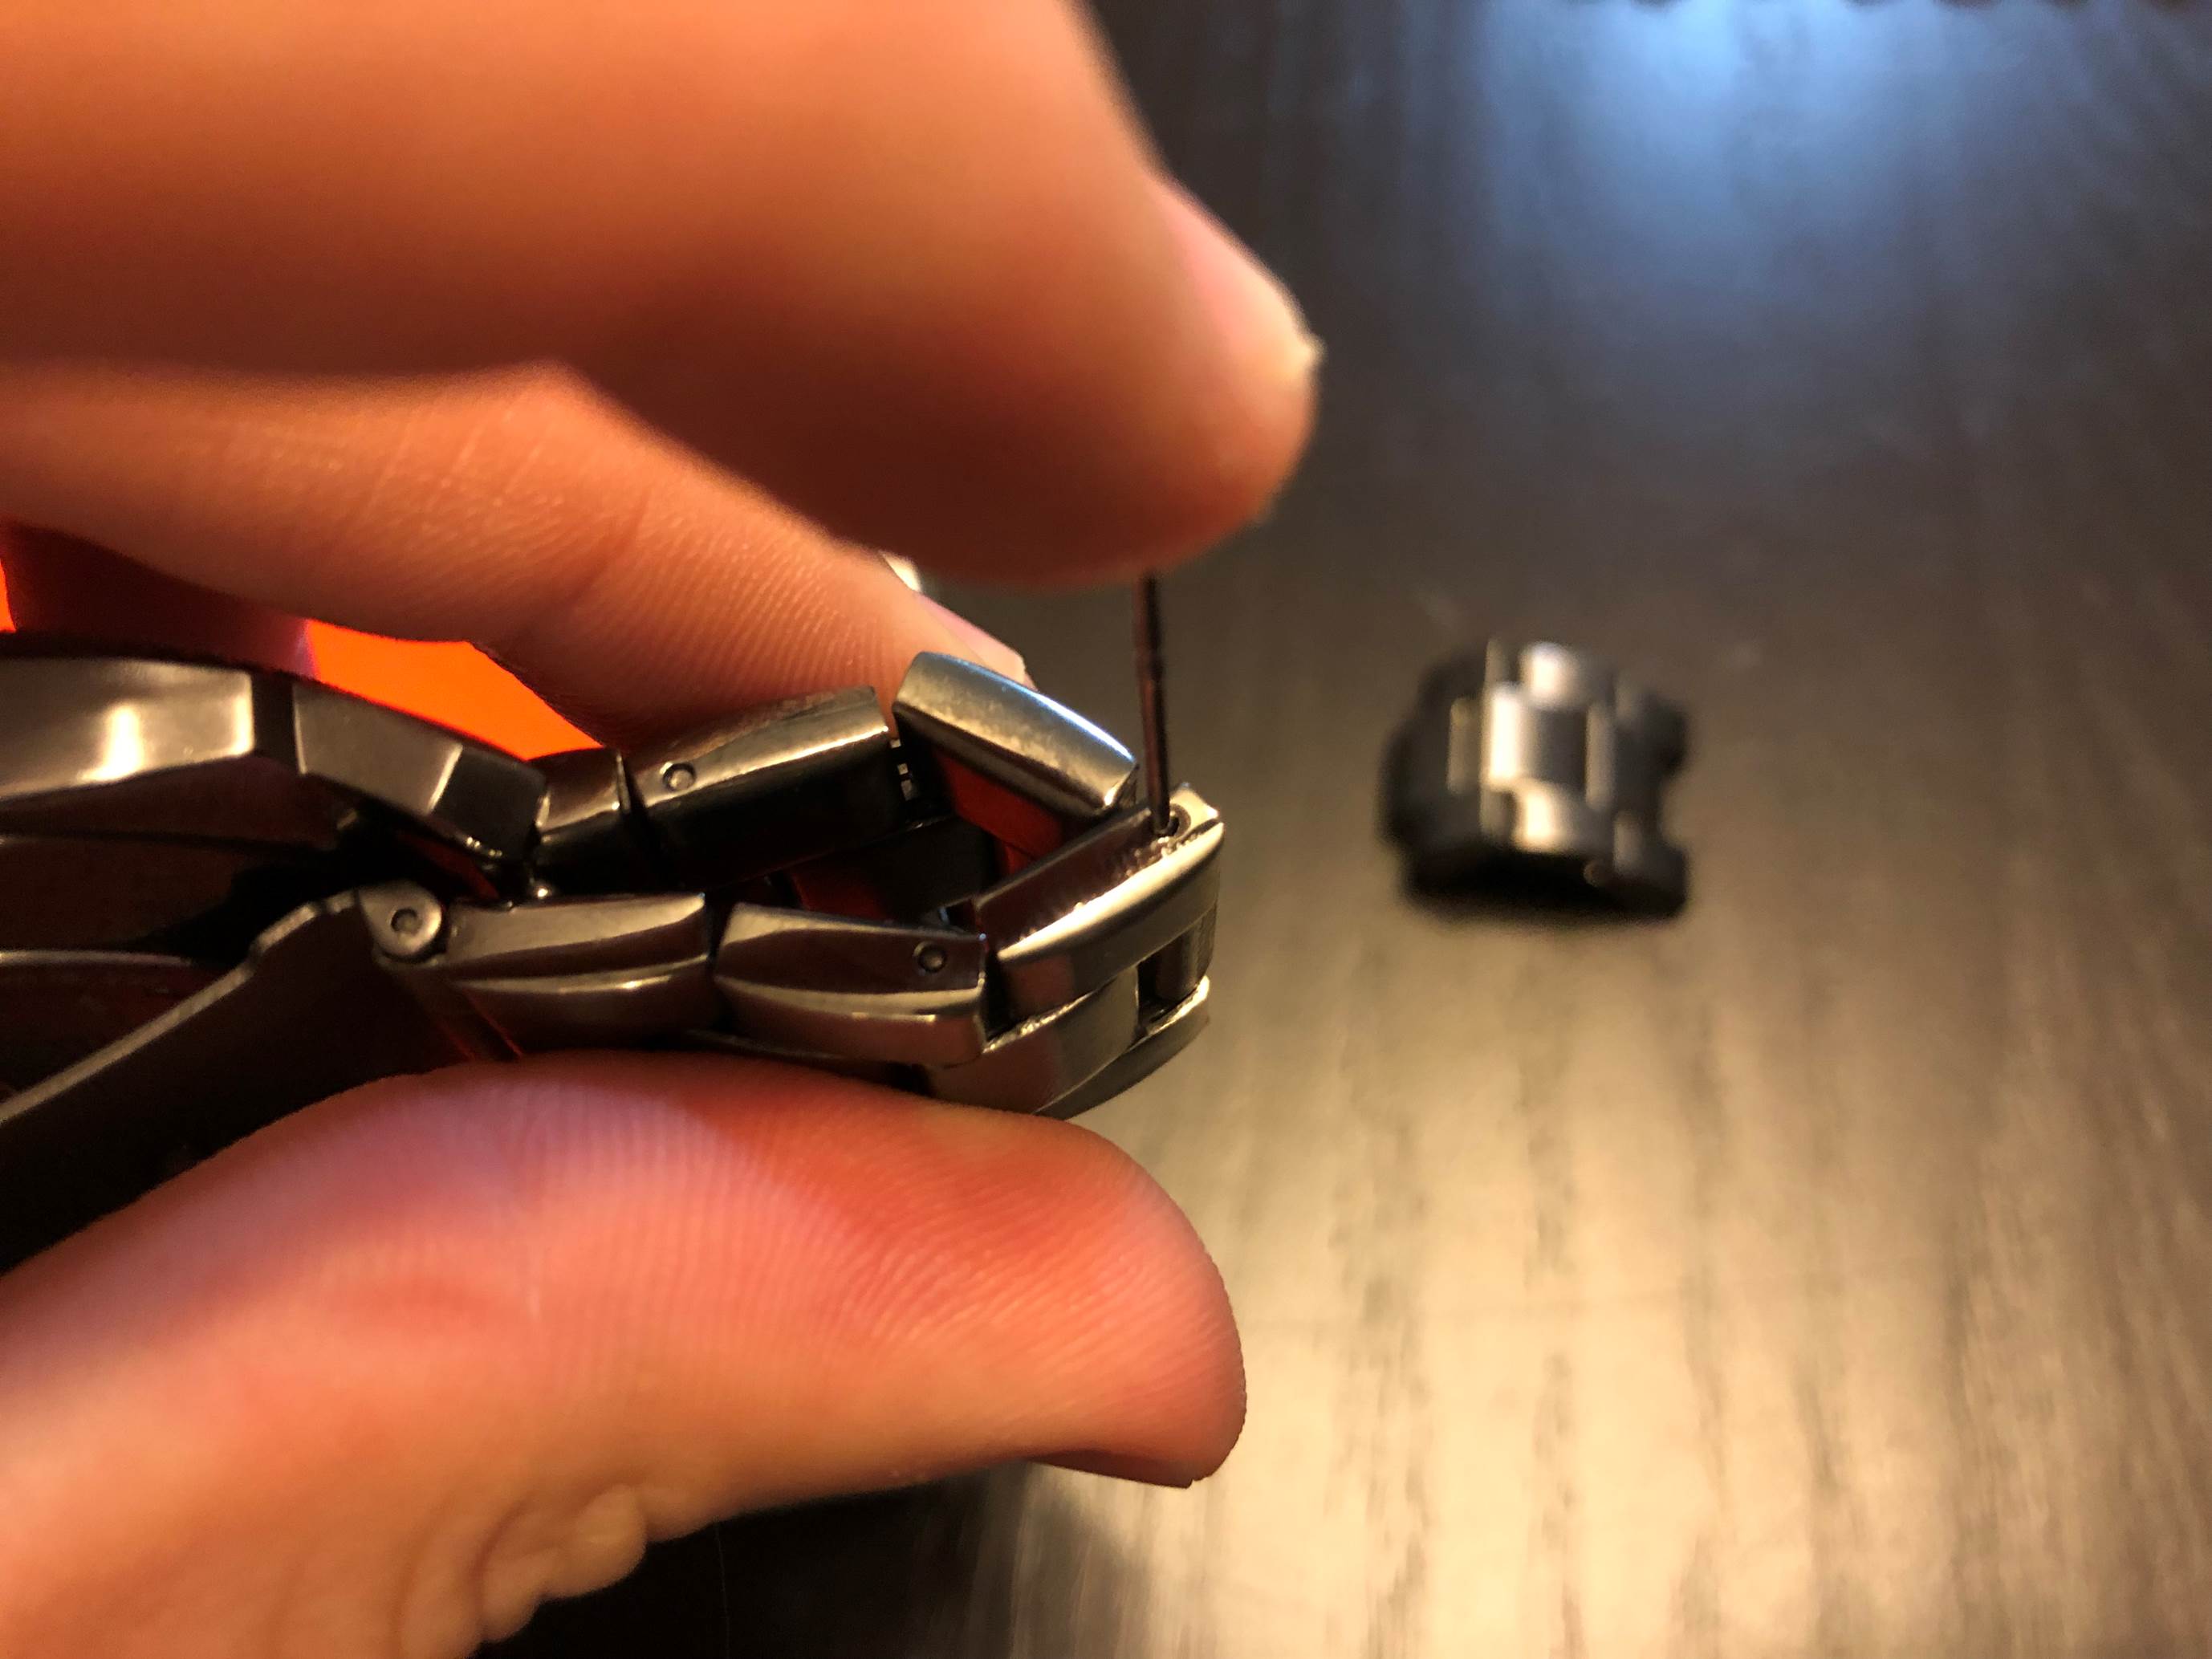
Place the pin which you’re trying to remove over the edge and then line up one of the loose pins or your thin wire with the tip of the pin in the small hole on the side of the strap.
Most watches use solid round pins but there are a few which use split pins which have a bulging rounded end and the other end has two folded over half circles. With these type of pins, you cannot push the rounded end through the strap, you’ll need to tap on the split (two piece) side to push the pin back out the way it was pushed in. Likewise, when re-installing it, you’ll need to push the end with two piece in first.
Once you’ve got it lined up, gently tap the back of the loose pin with a hammer or solid object to push the pin out of the other side of the strap.
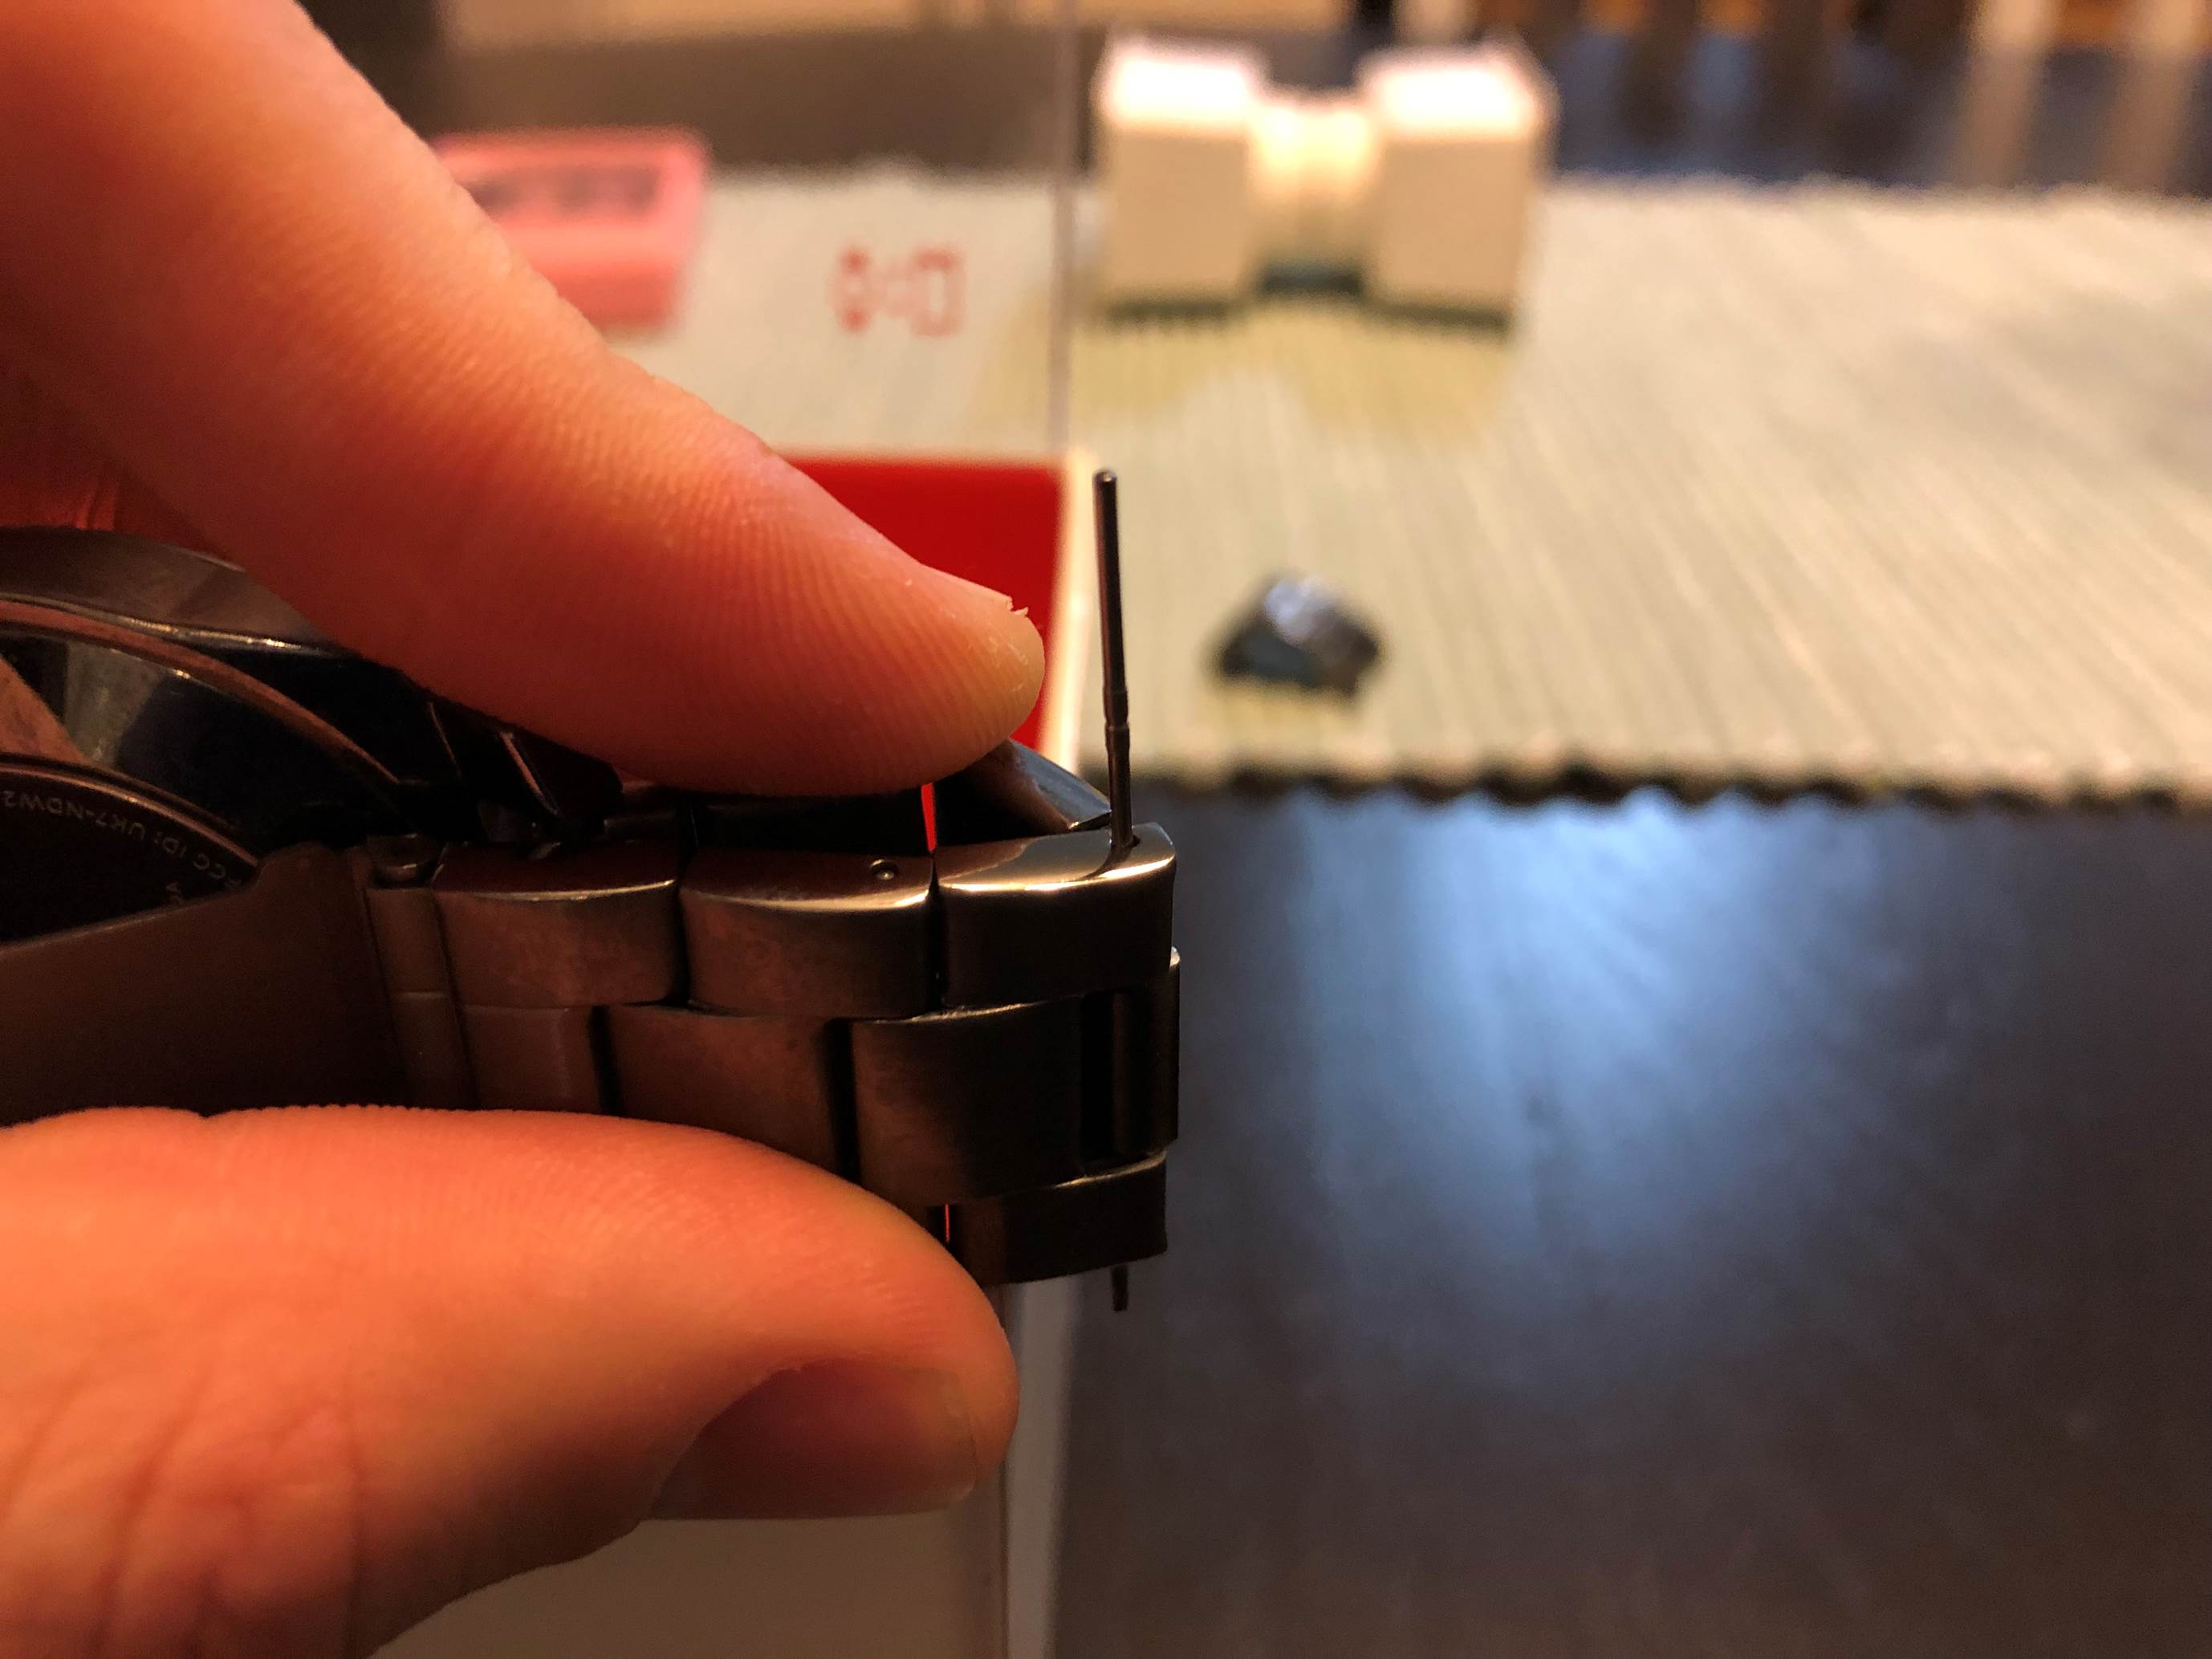
You don’t need to push it the entire way out or you’ll then struggle to get the loose pin out. Just tap it enough so that the end of the pin protrudes enough to grab it with your pliers and pull it out the rest of the way.
Now that you’ve got the pin part of the way out, grab it with your pliers and pull it the rest of the way out.
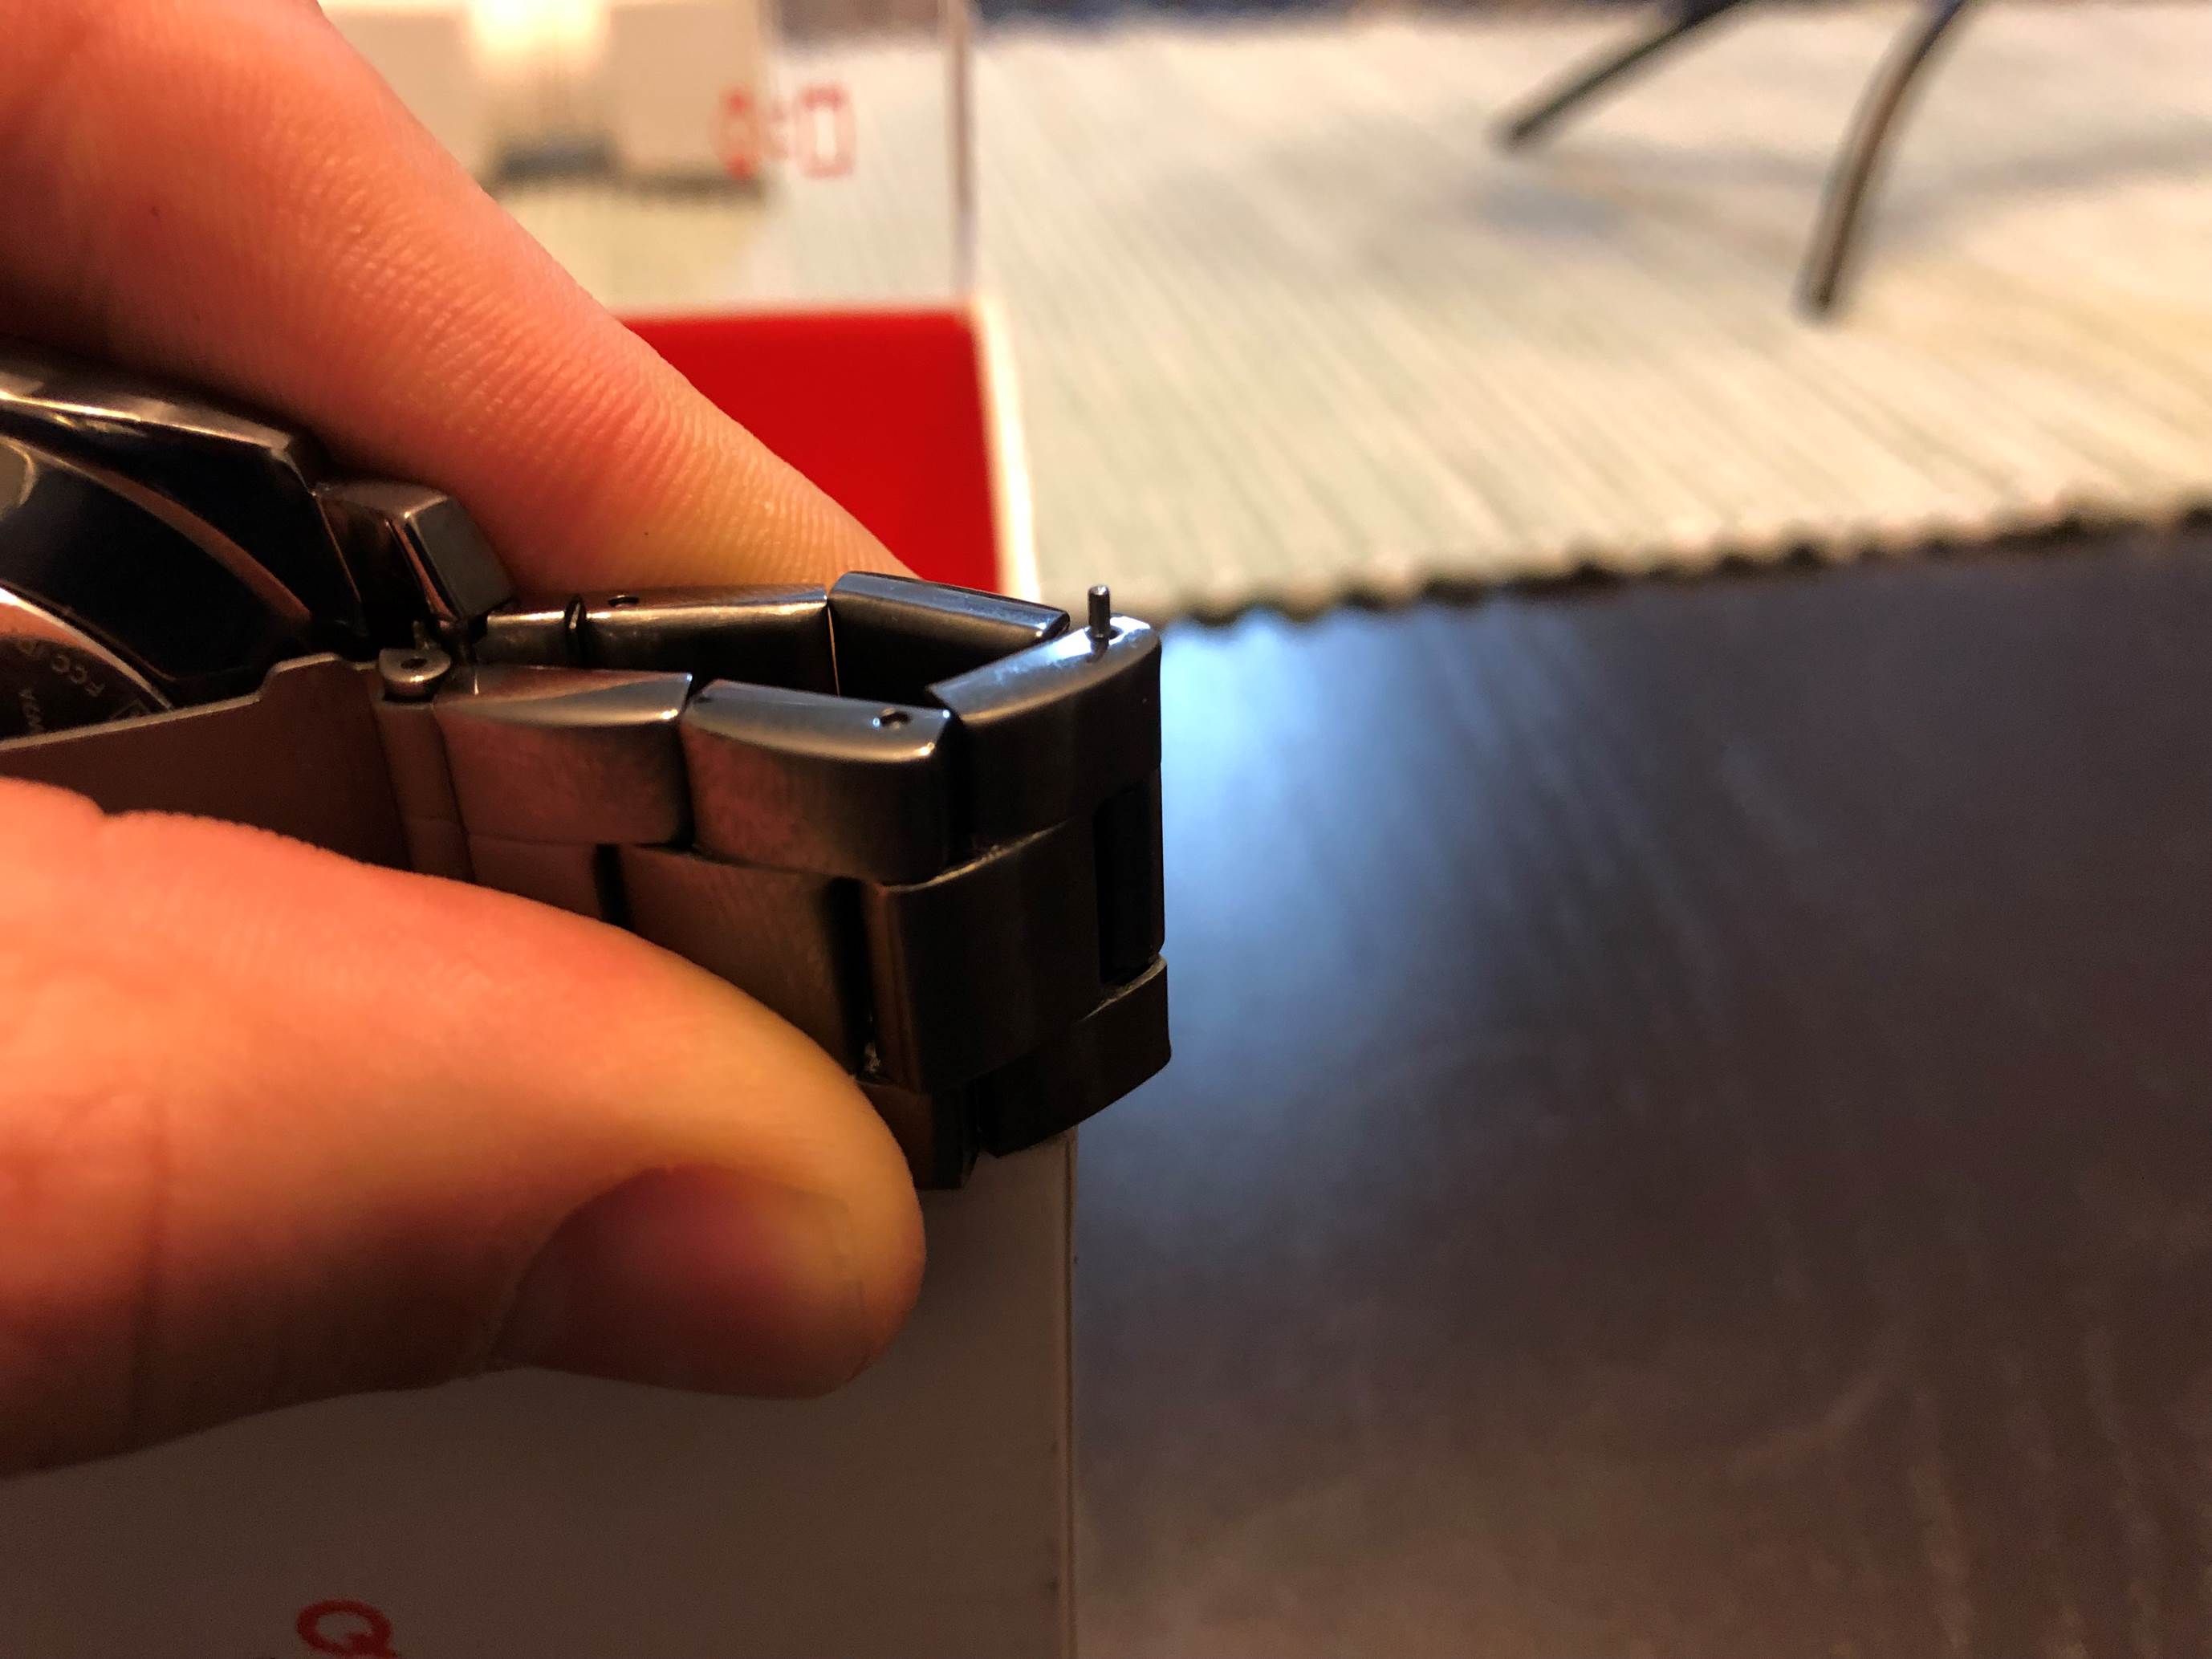
Your watch strap should now come apart at the links where where you’ve just removed the pin.
You now need to decide how many links you need to add or remove. Remember that if you are going to be removing multiple links, always try to remove an even number from each side of the clasp so that the clasp stays on the opposite side of your wrist to the face of the watch. If you add or remove too many links from one side then you’ll land up with the clasp on the side of your wrist instead of on the bottom of your wrist. Obviously if you’re only adding or removing a single link then it doesn’t matter which side you remove it from.
To remove links, repeat the above process, tapping the pin of the adjacent link out such that the link comes completely free from the strap.
To add links, get your replacement links ready and follow the below process to re-seat the pins, adding the new links into the gap you’ve created in the previous steps.
To replace the pins. Align the two links on your strap.
Now gently feed the pin into the hole until it goes tight, this should only happen for the last third or so of the pin’s length. You may need to wiggle the links around a little to get the holes aligned properly for the pins to go through. You shouldn’t need to force the pin until the last portion, applying excessive force to the pin may result in damage to the pin or the strap.
Once the pin is most of the way through and has become tight, place the strap onto your edge again and gently tap the pin with your hammer until it is seated all the way into the hole. You can even tap it slightly further with one of the loose pin so that the end it not protruding from the strap.
Repeat the above above for both sides of any links you’re adding and then you’re done. You’ve now managed to resize your own watch strap without having to take it in.
Let us know in the comments section below if you’ve tried resizing your own watch strap.
You’ve just prepared some delicious food for the party tonight and now it’s time to clean up and set the table. You’ve done all you can but you just can’t seem to get rid of the kitchen smells in your house. Lingering smells can ruin your first impression, especially during holidays when there’s so much food to prep and so little time to clean up. Cooking smells can be the worst to deal with. Who likes to welcome people into a stinky house!
Kitchen smells can get really tricky. While some odors may be delightful such as baked cookies and cakes, others may force you to open the windows and turn on the fans.
The easiest way to reduce smells would be to follow an organized kitchen layout, because this will give you a head-start for cleaning up. A good start is by getting yourself high quality, affordable kitchen supplies in Dubai. Cleaning up spills instantly from the floor and counter tops makes sure the smells don’t diffuse in the air. Turn the fan on while you’re cooking and take the garbage out regularly. Also, periodically clean the garbage can on the inside as well. Keep your sink clean and dispose of any sponges or rags which smell. Here are a few inexpensive DIY tricks to ward off those horrible cooking smells.
Lemon
For a refreshing scent in your sink, let citrus be your friend. Lemon can do wonders for removing bad smells. Store leftover lemon rinds and citrus peels in the fridge and use twice a month or whenever the sink starts to stink.
Take some lemon rinds and toss them in the sink. Now turn on the faucet and the garbage disposal switch and let the rinds save the day. The citric acid in the rinds breaks down the gunk that was causing the smell and produces a pleasant lemon fragrance.
If there’s a food odor in the kitchen that doesn’t seem to go away, put lemon rinds and cinnamon in water and let it boil for 5 to 10 minutes. Turn the heat off and let the pot stay there all day. The lemon and cinnamon fumes will neutralize all other bad smells and refresh the atmosphere.
Lemon can also help you ward off that cringing fish odor from your hands. Just take a lemon half and squeeze out the juice over your hands. Now rub them together and rinse them off.
Vinegar
No matter how much you love to cook fish for a party, the stinky, pungent odor makes you to have second thoughts. Although the best way to avoid fish smells is to not cook it in the first place, vinegar can help you out here. As soon as you bring fish in your home, set out some bowls of vinegar in the kitchen. This will absorb the fish smell and neutralize the atmosphere. Once you’re done with cooking, wipe off the countertops and stove with some distilled white vinegar to get rid of any clingy scents.
Another good DIY cleanup is creating a vinegar mist. Take a saucepan and fill it with 3 tbsp of vinegar and 1 cup of water. Turn on the heat and let it boil for 5 to 10 minutes. The steam coming from the saucepan will diffuse in the air and counteract those nasty smells.
Baking Soda and Coffee Grounds
Baking soda is already well-known for deodorizing the atmosphere. Put some baking soda in mason jars and poke holes in the lid. Set them around the kitchen while preparing your meal. For a fragrant scent, you can also add some essential oils to it. For stronger smells put a bowl of coffee grounds on your kitchen counter and leave it overnight. This will alleviate any smells from the day before.
Baking soda can also be used to remove smells from the fridge. The first step would be to clean any spills that you see and check all the leftovers and expiry dates on products. Clingy odors may still persist, so keep a little bowl of baking soda at the back of your fridge. If the smell still seems strong, put some fresh dry coffee grounds in the fridge for a couple days. There’s no way this won’t work!
Baking soda is incredibly efficient for stinky drains. Take a cup of baking soda and dump it in the drain. Now pour boiling hot water into the sink. The baking soda will flush out all the foul smells with it. Baking soda and vinegar also make a good team. The chemical reaction might even help in unclogging the drain. Dump about a half cup of baking soda directly into the drain and chase it with a half cup of vinegar. Allow it to sit for at least 15 to 20 minutes and then flush out.
DIY Aromatherapy
Conquer bad smells with other great cooking smells. Spices like cinnamon and cloves, when simmered with water on a stove, can produce fresh natural fragrances that overpower all other lingering odors. Create your own DIY recipes and make your kitchen the best smelling part of your home. Here are a few DIY simple recipes you can try:
If your kitchen smells like garlic or onions, put some cinnamon powder, butter, and brown sugar into a pan and bake it for a couple hours. Your kitchen will smell like a baked dessert or cookies.
Boil some cloves in water and leave it on the stove for a few hours.
The smell of roasting coffee beans is a treat for all. Grinding fresh coffee can also do the trick.
Prepare a homemade mist with simple ingredients. Take an 8oz spray bottle and pour in a ¾ cup of water. Add 2 tbsp of rubbing alcohol or vodka and 20 drops of any essential oil like lavender, peppermint or any other oils you like. Shake well and store it under the kitchen sink cabinet. Spray whenever you need to freshen up the place.
Soak cotton swabs in vanilla essence and place them in the corners of your counter tops.
Make a mixture of all of your favorite essential oils with equal amounts of each and pour it into a spray bottle. Use this to spray around your stove top and vents. Turn the fan on for a few minutes and let it diffuse in the air.
Good Ventilation
Proper ventilation has to be the most important factor in controlling bad odors. While you’re cooking make sure there’s a good flow of air around your kitchen. If you have an exhaust fan or a vent over your stove, don’t forget to open it. If you don’t have one, keep your windows open or set up a fan that pushes air out of the window.
A good exhaust fan can make a huge difference if positioned correctly. Fans pull odors from the air and stop them from hanging in the atmosphere. If you don’t have a fan, consider installing one as this could be your first line of defense against lingering smells.
If you’re cooking something that makes too much smoke, have a plan to pull it out from the house beforehand. Keep all the kitchen doors and windows open so that the smoke has a place to escape. Turn on a portable fan and set it by the windows and door. Make sure the fan faces the door or windows. Doing this will clear out all the smoke in a matter of minutes.
If you can afford, invest in an electric chimney. Electric chimneys come with special filters which gather grease and fumes very efficiently. It might be an expensive option but it will save you a lot of hassle in the long run.
The kids’ room, for you as a parent, is probably one of the most important rooms in your home since you want to provide the little ones with an enjoyable space where they can do their activities. The kids’ room should immediately give out an inviting and playful vibe. You have probably put a lot of thought into it and maybe you have done a lot already, like painting and choosing the furniture yourself.
Lighting is also an important aspect of the children’s room – the room needs to be bright so they are able to safely do activities such as reading or drawing in the evenings. You can turn the hunt for the perfect lighting fixtures into a family DIY lighting project. Here are some cool ideas that you can do with your tiny humans, make them feel the satisfaction of accomplishing something but also spend some quality time together.
Unique Hanging Lights
The average superstore lampshade or chandelier is definitely not something unique. Why not turn a hanging light into something fun? Sit down with the kids and ask them for ideas about what they want to see in their bedroom. Let their creativity go wild and think of what can be executed. One idea could be a cloud hanging light which looks absolutely awesome.
To make a cloud light, you would need simple white paper lanterns and batting. Clouds clearly come in all shapes and sizes so you don’t have to worry a lot about doing something wrong, which is why this is a great project to do with the kids. Use a glue gun to stick the batting onto the paper lanterns and make them as fluffy as possible. You can mount the paper lantern onto an existing light or you can even create your light entirely by using fairy lights.
Additionally, you can create a matching DIY lighting bedside lamp in a similar way – get a circular shaped lamp and replace its shape with the cloudy paper lantern or simply place some fairy lights on the end table and place your cloud on top.
Use Old Toys
If you have old action figures lying around that the kids no longer play with, you can turn them into a part of a unique lighting fixture. Make sure you consult the kids before making a decision to use the action figures because you don’t want them to be mad at you for doing so!
This is an incredibly easy way to create a masterpiece – grab a few smaller action figures and spray paint them in a metallic color. Spray the existing lamp with the same spray paint and simply attach them using a hot glue gun.
Alternatively, if you have some semi-transparent toys, you can create a light fixture by simply opening the toys at the bottom and placing battery powered lights into them.
Customize the Shades
If your kids have a creative flair, you can get simple white lamp shades and let them go wild with them! They can draw on them, add stickers or cut-outs – literally whatever they wish and turn the lampshades into their own masterpieces.
Experiment With Neon
Neon is a hot trend in interior design at the moment. Neon lights are the perfect addition to the children’s bedroom since they bring a funky vibe and surely the little ones will love them! Making a neon light is possible – technically it is a faux neon light using an EL wire and tubes. The EL wire comes in different colors so you can choose the one that suits your idea. What you would need to do is insert it into a soft plastic tube that you can then bend to form the shape you want. It does look great, yet it will lack the luminosity of a real neon light. If your kids would like to have their own unique light, you can choose to go for a custom neon light that will light up their world.
Creating something unique for the kids’ bedroom can be an enjoyable activity for the entire family. For the kids, the DIY lighting will be like a trophy for their imagination which they will get to keep in their room and admire each day.
With springtime in full swing and summer just around the corner, it is the perfect time to start thinking about giving your home a fresh exterior paint job. A well done paint job is able to completely transform the appearance of your home, it’s like getting a brand new home quickly and without breaking the bank. Painting your home, especially painting the exterior of your home, protects the walls and building materials, adds personality and character, making it way more pleasant to look at. Paint is also one of the most important mechanisms for defense against harsh weather conditions, pesky insects, and so on.
Above all, it is a crucial aspect of home maintenance that every homeowner should consider sooner rather than later. Of course, one may consult with professionals and get the job done, but this article is for the people who would rather do things by themselves. If you do choose to do things yourself, make sure to bring yourself up to speed on the correct painting procedures and any local regulations which may be applicable in your area! Let’s read on and get to business.
1. Get Into Preparation
Before you start painting your home, make sure you do proper preparation work. The preparation work may take a bit longer but it will ensure that your paint job looks professional and lasts long.
Start off by carefully washing the exterior of your home, remembering to clean all of the areas which you’re going to be painting. One of the best ways to do this is by getting your hands on an affordable pressure-washer. This option is quite affordable and will save you a lot of time and effort instead of doing everything by hand. Don’t use any detergent, just use straight up water without any additives. If there are any visible patches of mould, then use a strong mould cleaning product which will be able to remove it without any problems. After you have finished, let your home dry for a day or two before proceeding with the next steps. Water may soak into the wood or between trim so it is important to give it time to evaporate completely before carrying on.
Once your home is properly dry, grab a good scraper and scrape away any old paint. This step will ensure that the new paint adheres to a solid surface and doesn’t flake off in a few month’s time. Finally, get your hands on a quality oil-based primer and apply it to any bare or exposed areas.
2. Gather The Tools And Materials
Next, pull out everything you will need for the actual painting job. A large bucket and paint stirrer are essential for big jobs like these, you should always stir the paint thoroughly before applying it to the walls. You’ll also need a large brush, preferably an angled sash paintbrush if you are dealing with painting trim. A smaller brush is also necessary as it will give you more control, and keep the edges and finer areas looking clean and perfect. Next, you’ll need to get out of your regular clothes and wear something that you do not mind ruining.
One last thing to keep in mind is the fact that there are a lot of places that are hard to reach with a regular ladder. So before you start painting be sure to have a safe way to reach even most difficult places. A lot of people get hurt trying to paint the difficult to reach places. To ensure that risks are minimized, it is recommended to consult with companies like Universal Mobile Tower Hire. This way, you will not have to worry about any accidents occurring, and the overall job will be completed quicker.
3. Get A Caulking Gun
Another must have is a caulking gun, which will help seal up any cracks around the windows and the doors, helping you to properly insulate your home. Skipping this important step before painting the exterior of your home puts your home at risk of water leaking into the interior and mould developing. Do not assume that if you have caulked your home a while ago, it will be okay to skip this step before painting. Experts recommend going over your caulking with another coat every time you repaint to make sure that everything is sealed and primed.
4. Start Painting
After you have gathered everything and chosen your color palettes, it is time to move on to the actual job itself. The most frustrating part of the whole process is definitely painting the exterior trim, it is a slow process and can be quite time-consuming without showing results, especially for new homeowners.
It is important to push through the frustration and to have patience with the tiny details. Believe it or not; it will pay off in the end! A helpful tip to speed up the process is to start working from the top and head to the bottom. Think of gables, eaves, gutters and porches. After you have finished with these, make sure to scrape off any paint drips! Also, remember that doors are much easier to paint if the knobs and fittings are removed. Even better is to remove the door from its frame and have it painted one side at a time. Finally, get to the walls and make sure not to leave any primed surface unpainted!
Painting your home can seem like a huge job, but it is certainly not a difficult one. Make sure to take some time to do it well, and you will end up with a beautiful paint job which will last for years.
Have you tried painting your home yourself? Let us know your experiences, tips and tricks in the comments section below. We’d love to hear your thoughts.
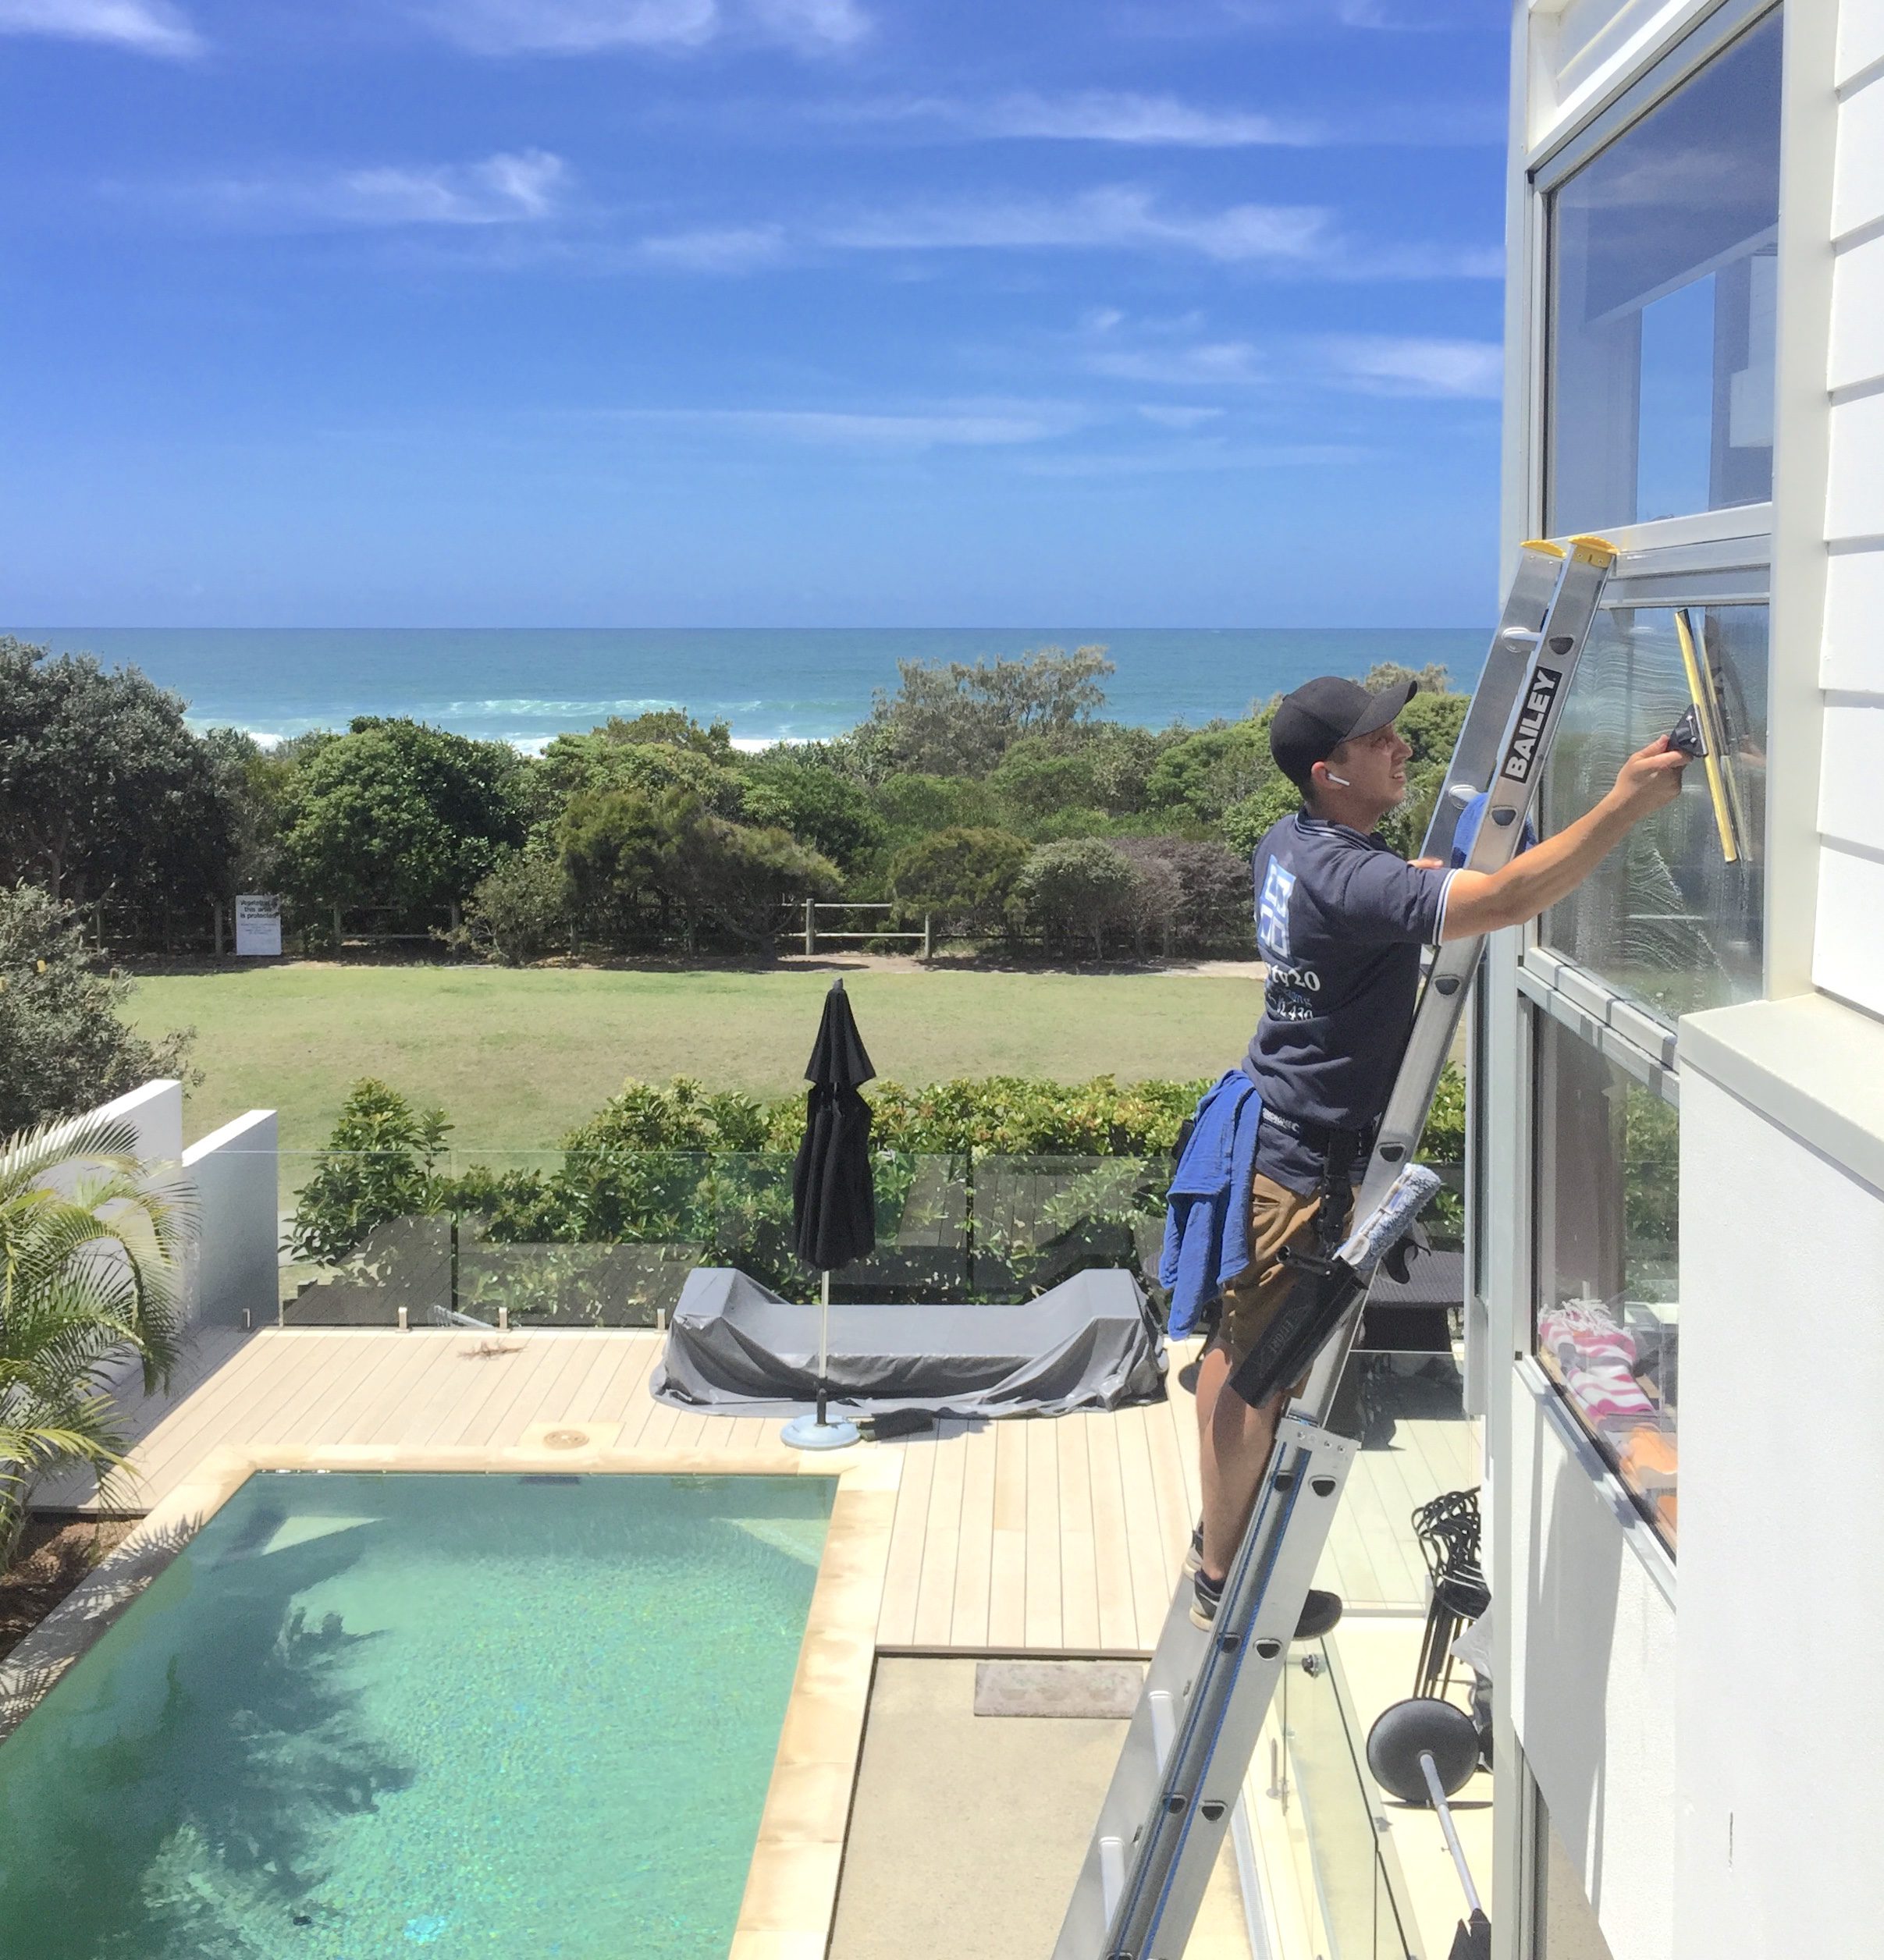
As a window cleaner one of the most common things we hear from our clients is, “how do you make that look so easy?” The truth is that many homeowners find washing windows a real chore, requiring time and energy that they simply don’t have. It’s a task that’s easily put off until it seems almost impossible to see out of the windows. Windows look great after being professionally cleaned, but it might be hard to incorporate into your budget on a regular basis. This article is designed to break down your home window cleaning into an easier, more efficient and, I believe, more enjoyable task. To start with we will take a look at what tools to use to make cleaning windows easier, then we will outline the easiest methods to carry out the job.
You’ve probably heard the old saying, use the right tool for the job. It’s no different with window cleaning, the tools that you use will make or break the job.
For example, hosing your windows off might seem like the easiest way to clean your windows. However, leaving tap water on the windows leaves a mineral residue that can etch into the glass. This can leave what is called “hard-water stains”, similar to what a damaged glass shower screen looks like.
You may also be tempted to use a spray-on window cleaning product, which are often touted as the best way to take off marks and smears. However, these products take far longer to use than a traditional squeegee and also leave a film of residue that attracts dust and moisture, meaning you have to clean your windows more often.
The best tool for cleaning glass is a good quality squeegee, or this one from Amazon. A squeegee does the hard work for you and is non-abrasive, leaving the surface of the glass clean and damage free. Once you learn to use the squeegee it also makes the job a lot quicker. Basically, you will get the best results in a shorter time.
After you’ve acquired your squeegee of choice, you will need something to scrub the windows with. As a window cleaner we use an “applicator mop”. This is a quick, efficient tool to scrub the windows with. You could simply use a sponge or rag, basically anything that you can apply your window cleaning solution and do a little scrubbing with.
It is helpful to have a few microfiber cloths or some old rags to be used as “detailing” cloths. You don’t need anything fancy, just something that can soak up water.
Finally, before you get started you will also need water – warm is preferred – in a bucket to carry around from window to window. At this point you will need to add the magic window cleaning solution! It is, wait for it, wait for it . . . dishwashing detergent! Dishwashing detergent is the best cleaning solution for washing windows. When you prepare your bucket, give it a good long squirt of your dishwashing liquid for best results.
How To Clean Your Windows
Okay, now you are all kitted out with your window cleaning gear. You’ve got your bucket with soapy water, a squeegee, something to mop water onto the glass with, and a few rags. You are ready to do some serious window cleaning. Let’s go through a simple technique, that will mean you can clean windows with your squeegee quickly and efficiently.
First, take whatever you are using to soap up the windows and give the glass a good wash, scrubbing where you need to. Your window should be left completely covered and dripping with water.
Now it’s time for some squeegee action. Take the squeegee and from the top of the glass pane or window use the squeegee rubber to drag all the dirty water down to the bottom of the pane. Take a dry rag and wipe the squeegee rubber reasonably dry.
Repeat the last step, moving over to where there is still water left on the window, drag the water down to the bottom of the window or pane. To squeegee like a real professional, angle the squeegee down so that the dirty water streams out the back end of the squeegee.
After repeating this process a few times, your window should be completely dry and clear of water. If you have angled the squeegee correctly there shouldn’t be any streaks.
You may however have a few beads of water where the pane meets the frame, the sides, top and bottom. Taking a dry part of your rag on the end of your index finger to detail the pane by running your finger along the edges.
The bottom of the pane should have quite a lot of water run-off from your handy squeegee work. Using a rag, mop this water up. You can also take this opportunity to use the water run off and the rag to clean out your window tracks, sills or sliding door runners.
Now move to your next window! You will get faster and faster as you master the squeegee.
If you are feeling really confident with the squeegee you can actually squeegee from side to side on the glass pane, snaking the water down as you go. This is how professional window cleaners get even less streaks.
This is more or less the same method that we use as professionals, just with a few little tweaks. Check in at Twenty20 Window Cleaning’s blog for more window washing tidbits. There’s no doubt that cleaning windows can be hard work. However, by following this short guide it should be quicker, you will get a better finish, and your windows will stay cleaner longer! It’s a win all round! If window cleaning is your type of chore it can even become therapeutic. Just imagine wiping that dirty water off the glass with your squeegee is like wiping away all of the grime and dirt out of your life, leaving you with clear vision and a clear head!
If you’re a small business owner, that means you have a lot of weight on your shoulders. But the amount of that weight which you carry is determined by how you manage your small business, and so is the success of it. Being a small business leader doesn’t mean you can’t be a good and successful one, it all starts with good business management.
In order to become a great business leader, you need to be able to motivate your team, and for that, you need strong management practices. Great business management doesn’t lie in strong finances or a lot of employees, but in smart thinking – it’s a way to get the best results from your employees using the available resources and the least amount of effort. When this is accomplished, every struggling business, no matter how small, can be turned into a clockwork system timed for success.
The Trick Behind it All
We all know that a good management team is a foundation stone of every successful organization. The task of managers is not only to supervise employees, but they’re also the ones who make important decisions which directly affect the business as a whole. You may think that big corporations have a much better chance of developing a good management team since they can hire more managers. But, again, the trick is not in numbers – it’s in the understanding the qualities which make up good management. It’s true that big corporations can have consultants involved, but you as an owner can easily utilize the skills of best business management consultantsout there. It’s all about understanding the characteristics of good business management so you’ll be able to make smart hiring decisions and educate your managers who will turn it into a great one.
Interest and Attention
Nowadays workers are not looking for jobs with much interest and attention for a certain position. There are much more of those whose primary goal is to get a paycheck and advance their own interests which, suffice to say, don’t have to go hand in hand with interests of your small company. That’s how you end up with employees who don’t care much about performing their jobs, not to talk about giving their best. That’s why the first thing you need to do is to spark their interest and get their attention. In other words, to make them care about your company’s vision. Once you engage them, it will immediately increase their enthusiasm and productivity, and much more than that. You will get a responsible workforce without the trace of passivity, which will automatically attract fresh talents to your company.
Authority and Appreciation go Hand in Hand
The most common mistake of business owners is that they think saying ʽthank youʼ undermines their authority. In fact, the truth is quite the opposite – appreciation of their work will motivate your employees to achieve even more, and it’s the foundation stone of company loyalty. On the other hand, there is no living being who doesn’t have a problem with the fact that their work goes unrecognized. So wherever there are effort and achievement,there has to be a reward. Of course, that reward doesn’t have to hold any monetary value – a simple thanks for a job well done can make employees feel valued. There are few things that can measure with a positive impact which appreciation is able to create.
Meetings Are Not Routine
If we were asked to pinpoint a process, activity, or action that is central for creating a healthy organization, that would be the meeting. The core values of your business, no matter how firm they seem, won’t survive without a regular forum. Meetings should be places where all members of the team are allowed to give their perspective on business practices and that way realign their principles. In order to achieve this, it’s not enough just to schedule meetings, you need to plan them smartly. When it comes to business planning, there’ s a difference between strategic and tactical one, which means there need to be separate meetings for both. There’s no point in assessing a tactical agenda if the team hasn’t reviewed its progress against goals. You need to hold the meeting when people are not tired or craving to go to lunch – it’s mandatory that there’s enough time for debate and clarification so that major issues can be truly resolved. Besides office meetings, you should also hold outside ones quarterly in order to review what’s happening in the team, the company, and the industry.
Lead the Way, But Encourage Initiative
It’s normal that you have a clear vision when it comes to your company, but that doesn’t mean that this vision can’t be upgraded. The worst thing you can do is to create an atmosphere where your employees fear to speak their minds. That creates distrust and conflict and it’s almost impossible to find common ground. If your team falls in such state of perpetual ambiguity group discussions will become pointless since no clear goals and strategies will be able to emerge. This is how productivity stifles and how poor decisions are made. In order to be able to lead, first you need to create an atmosphere in which conflict is not feared, but welcomed. It is just an indicator of the initiative, and the only thing which is able to shape a clear goal are differing perspectives.
As you can see, it all revolves around basic human needs and behavioral characteristics. No matter how many people are in your team, no matter how much resources you’ve got, great business management will always depend upon proper motivation, appreciation, and shared opinions. This is a chain where every link is connected – when you engage your workers and reward them properly for their efforts they’ll want to take initiative. Without hearing everyone’s opinion there can’t be a clear goal, and then there’s nowhere for a leader to lead, is there?
For homeowners who are planning to sell their house, spring is often considered the best time to put their property on the market. This is because the bright, lovely weather makes homes look more appealing so they can easily catch the eye of interested buyers. Since spring is also the time for spring cleaning, your home will be cleaner and tidier which will contribute greatly to creating a positive first impression on potential buyers. Additionally, many people want to buy a new home in spring so that they can be done with moving and settle in when summer arrives. Due to these reasons, you will have a higher chance of selling your home faster and for a better price during this season as well.
Spring Moving Tips
Once you make the decision to sell your home and move to a new one this spring, you need to start making the necessary preparations.
Hiring a trusted provider of interstate moving servicesis a good start. However, you still have a lot of things to do if you want to be out of your old home and into your new one before your buyer officially moves into your current address.
Below are five tips that will help you experience a successful, stress-free move this spring:
1. Book your removalist as soon as possible
Once you have chosen your moving company, arrange your move with them immediately. By doing so, you can choose the best day and time for your actual move. And this means you won’t have to worry about your movers not being available on your preferred moving schedule.
By hiring your mover early, you may even be able to save some moneysince many moving companies offer more competitive rates during slow season.
2. Prioritize purging during spring cleaning
Whether you’re just starting or already in the middle of spring cleaning, take the time to declutter and get rid of unnecessary items from each room.
Keep in mind that you will be wasting time, packing supplies, and money if you decide to take all the items you have in your home now to your new place. As such, don’t make the costly mistake of moving dead weight and wondering where and how to store them in your new home.
When purging, prepare four boxes or piles; one each for items to keep, sell, donate, and throw away.
For the “to donate” pile, bring them to any local charity or ask if they can arrange for staff to pick them up. For the items that you are throwing away, make sure they will all be collected as soon as possible so that you can have some time to tidy up your home and leave it clean for the next owner.
3. Hold a garage sale
One of the biggest benefits of moving during spring is that you can take advantage of a time-honored tradition: the garage sale.
By holding a garage or yard sale, you will generate a little income from the items you don’t want to bring with you. It will also help reduce your worries about what to do with the items you have to leave behind.
To have a successful garage sale, advertise it heavily through social media and traditional means. Make sure you choose the best date and time to hold your garage sale as well. Saturdays and the day after payday are usually safe bets.
4. Organize your move
To avoid all the hassles and stress of a last-minute move, start preparing for the big day as soon as you have decided to sell your home.
Start by creating a personal and customized moving calendar. Be as detailed as possible: jot down all the tasks that have to be completed per day and week. Here’s a great moving timeline chores calendar to help you list important tasks and prioritize them accordingly.
If you will be investing in home packing services, make sure to ask your removalists if they offer this service. Arrange the date and time they need to be in your home as well.
In case you will be handling all the packing details, ensure you create a schedule for working on all rooms. Be sure to have adequate packing supplies with you as well.
Don’t forget to transfer all utilities in advance. These include phone, cable, and internet services. If you need to close your accounts, do them before the big move, too.
5. Prepare for other factors that will affect your preparation and the actual move
Finally, make sure you have plans for dealing with the different factors that may affect your pre-move activities.
For starters, if you have allergies, be prepared to manage the symptoms. This means keeping a stock of your anti-allergy medication and face mask so that you can go through your activities even if pollen is all around you.
Additionally, weather can sometimes be unpredictable during spring. Because of this, prepare plenty of plastic wrap to protect furniture and appliances in case it rains on moving day.
It is also best to dress in layers so that you can easily control your body temperature whether it gets cold or hot during moving day.
To experience a smooth, successful move this spring, consider working with the best interstate removalists from start to end.
The most reputable movers offer a wide range of services guaranteed to keep away the stress and hassle when relocating to another city or state.
The most commonly used Arduino board, the Arduino Uno, only has 12 available digital IO pins, so you may find yourself quickly running out of available pins on larger projects or projects requiring a number of buttons or a keypad. In this tutorial we’re going to be looking at how you can set up a large number of buttons to run on a single Arduino analog input, using resistors to differentiate between buttons. With this method, you should be able to reliably connect up to 50 push buttons to a single Arduino analog input. We’ve also been able to connect a standard 4×4 keypad to a single Arduino analogue input.
To improve your understanding of this concept, we’re going to be going through the connection of a single push button to your Arduino, then the usual connection of multiple buttons to their own digital IO pins and finally multiple buttons to a single analog pin.
This project assumes you know the basics of Arduino programming, otherwise read our article on getting started with Arduino.
Here is the video guide for Method 2 below, if you don’t want to read through the guide.
5 Push Buttons (Or As Many As Required) – Buy Here
A Selection of Resistors (1K, 2K, 3K, 5K and 10K Used For Method 1) – Buy Here
A Selection of Resistors (220 Ohms Used For Method 2) – Buy Here
Another Resistor With Higher Resistance Than The Highest Used Above (100K Used Here)
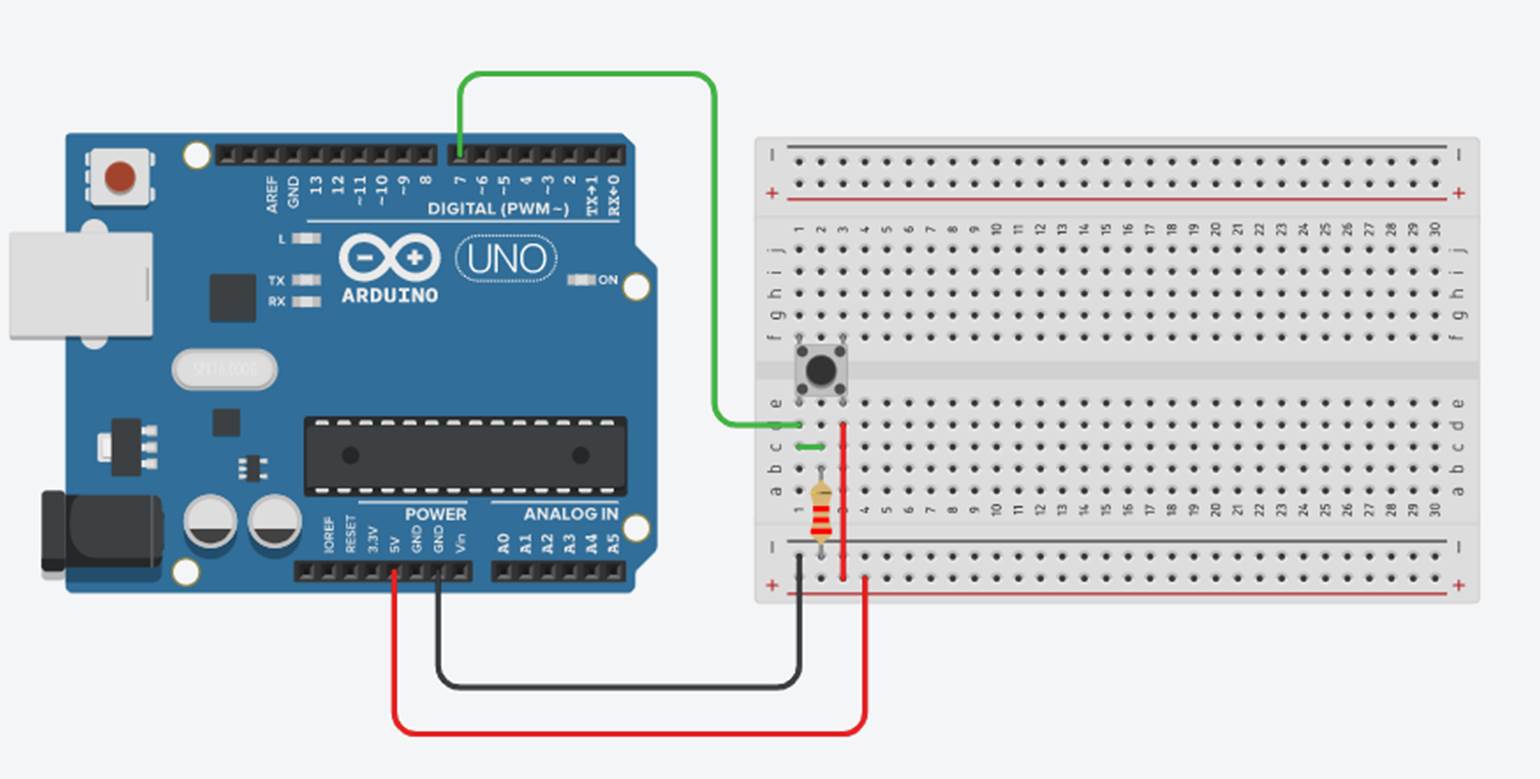
Connect A Single Push Button to A Digital Input Pin
To start off, lets look at connecting a single push button to a single digital input pin, Pin 7, on your Arduino and use it to turn off the built in LED on Pin 13.
Connect your push button and 2K resistor as shown in the breadboard diagram below.
Now lets have a look at the code required to turn the LED on Pin 13 off when the button is pushed.
//Michael Klements
//The DIY Life
//17 May 2019

int ledPin = 13;    // choose the pin for the LED
int inputPin = 7;   // choose input pin 7 for the push button

void setup()
{
  pinMode(ledPin, OUTPUT);  // declare LED as output
  pinMode(inputPin, INPUT); // declare push button as input
}

void loop()
{
  int pushed = digitalRead(inputPin);  // read input value
  if (pushed == HIGH) // check if the input is HIGH
    digitalWrite(ledPin, LOW);  // turn LED OFF
  else
    digitalWrite(ledPin, HIGH);  // turn LED ON
}
As you can see from the above connection diagram and code, it is quite simple to connect a single push button and use it to drive other IO or settings in the code on your Arduino.
Connect Multiple Push Buttons To Multiple Digital IO Pins
The problem comes in when you need to use multiple buttons. A 10 digit keypad for example uses 12 inputs, 10 digits from 0 to 9 and then a further two for the * and # keys. Let have a look at how we’d connect 5 push buttons using the standard digital IO method.
If you’re specifically looking to connect a 4×4 keypad to a single Arduino input, take a look at the linked guide as they are typically wired a little differently to the below example and you’ll need to make some adjustments to your circuit.
Try connecting up 5 push buttons and 5 2K resistors each connected to a separate IO pin on your Arduino as shown in the breadboard diagram below.
Let’s now have a look at the code required to turn off the LED on Pin 13 if any of the push buttons are pushed. I have created a function which runs through the input checking code to avoid code duplication, follow this link if you’d like to read up more on using functions to simplify your Arduino code and make it more efficient.
//Michael Klements
//The DIY Life
//17 May 2019

int ledPin = 13; 	 // choose the pin for the LED
int input5Pin = 7;       // define push button input pins
int input4Pin = 6;
int input3Pin = 5;
int input2Pin = 4;
int input1Pin = 3;

void setup()
{
  pinMode(ledPin, OUTPUT);   // declare LED as output
  pinMode(input5Pin, INPUT); // declare push button inputs
  pinMode(input4Pin, INPUT);
  pinMode(input3Pin, INPUT);
  pinMode(input2Pin, INPUT);
  pinMode(input1Pin, INPUT);
}

void loop()
{
  for(int i=3 ; i<=7 ; i++)
    checkPush (i);
}

void checkPush(int pinNumber)
{
  int pushed = digitalRead(pinNumber);  // read input value
  if (pushed == HIGH) // check if the input is HIGH (button released)
    digitalWrite(ledPin, LOW);  // turn LED OFF
  else
    digitalWrite(ledPin, HIGH);  // turn LED ON
}
Now, when you push any of the buttons, your LED should turn off.
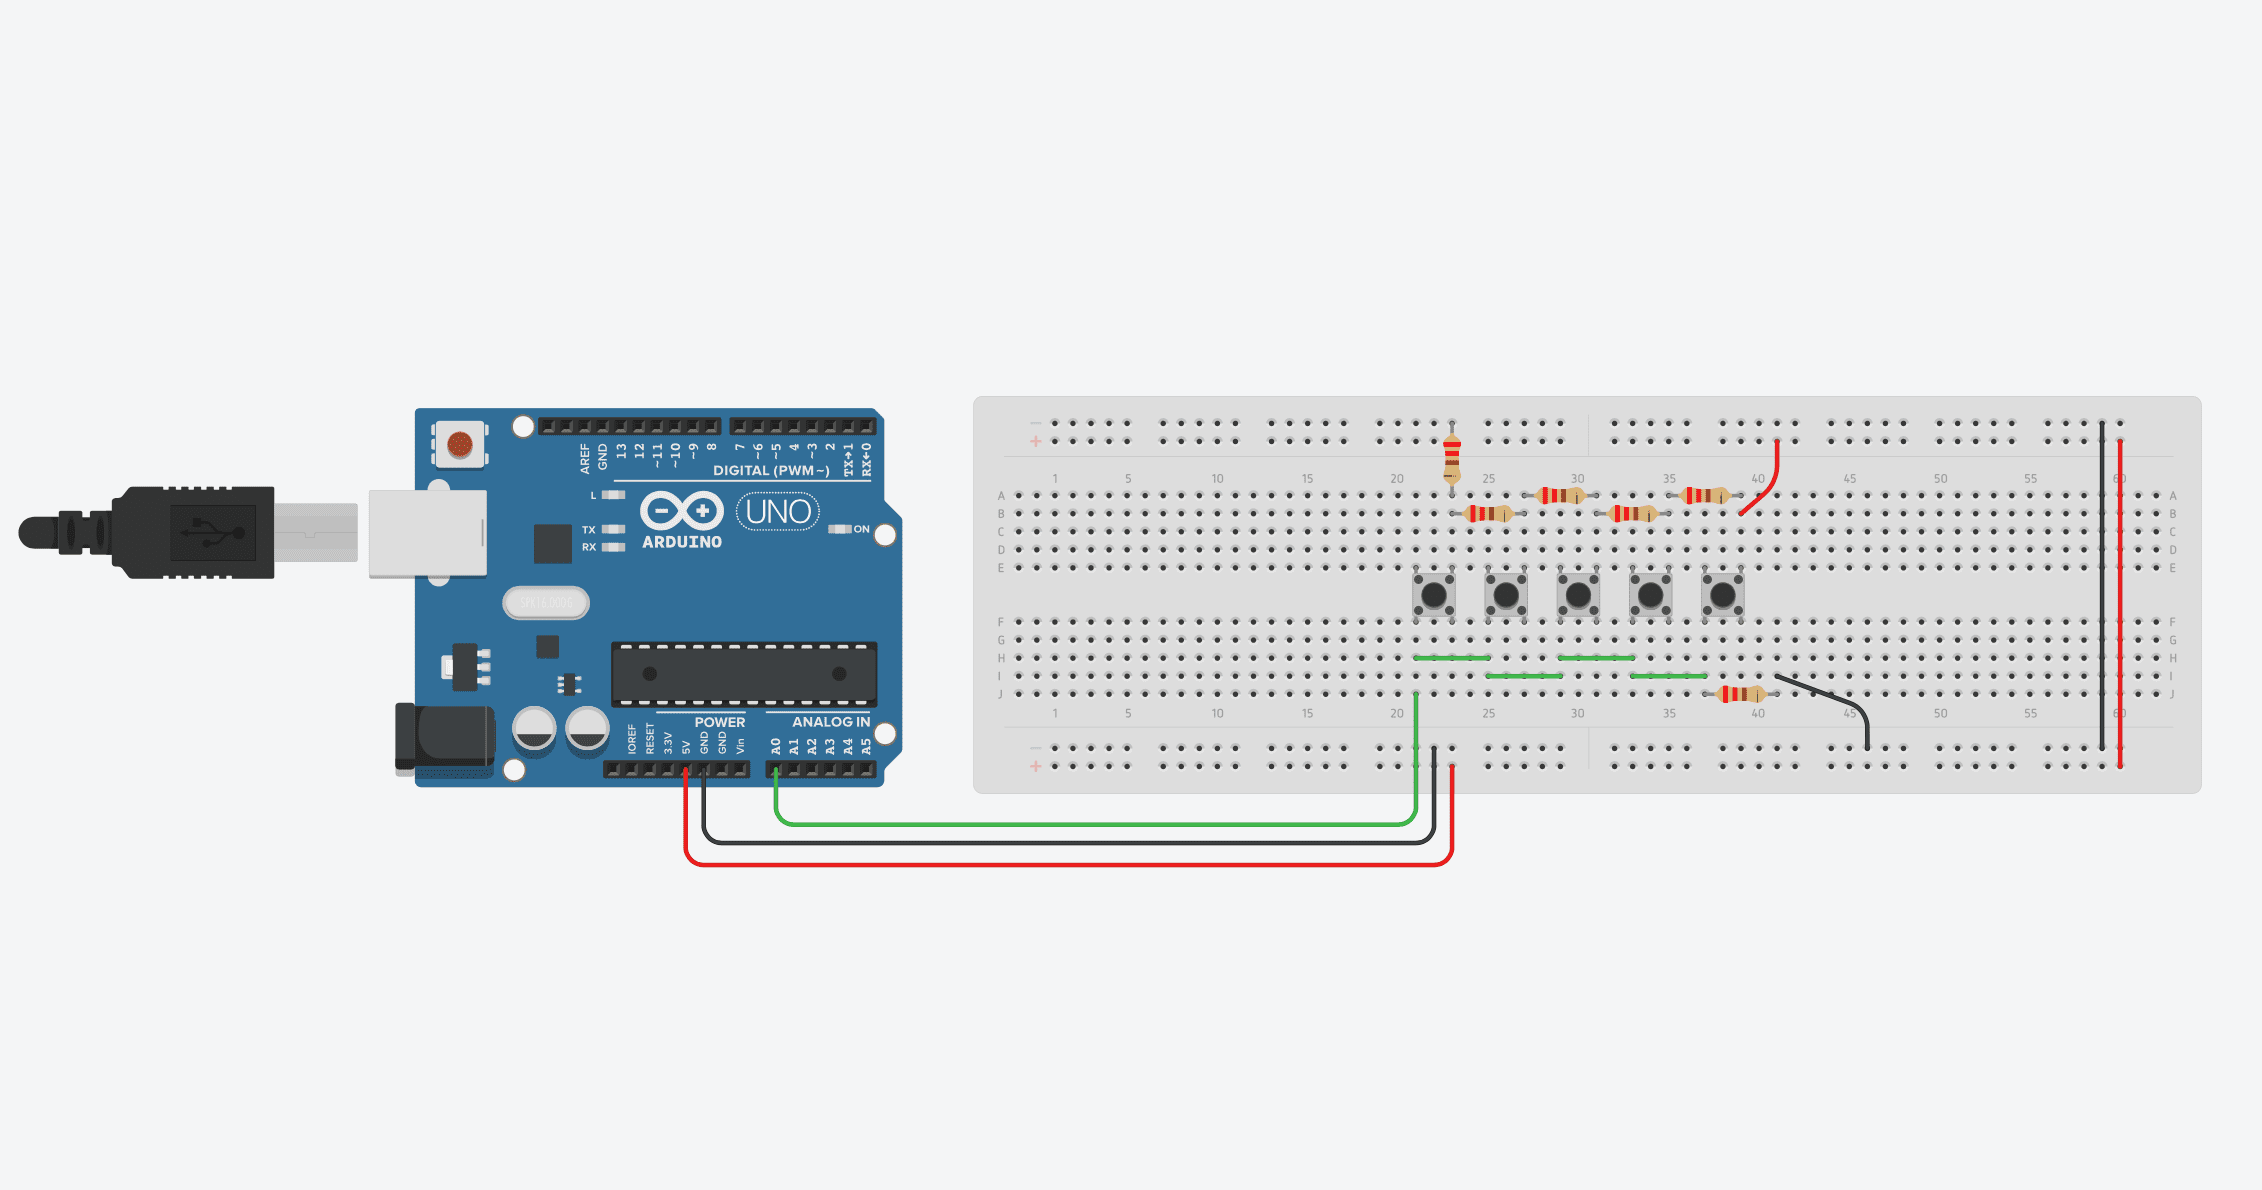
Connect Multiple Push Buttons To A Single Analog Input
Now that we’ve looked at how we would typically connect up multiple buttons to multiple Arduino inputs, lets see how we can make the wiring, code and use of inputs more efficient by making use of a single analog input to drive inputs from multiple push buttons. We’ll again be using 5 push buttons in this example but you can reliably connect up to 50 push buttons to a single Arduino analog input.
Method 1
The concept used in this example is quite simple. We assign a different value resistor to each push button so that the analog input will receive a different value (between 0 and 1023) for each button, allowing us to recognise which button has been pressed.
Let’s have a look at the breadboard connection diagram.
We connect a single 100K resistor between GND and the analog input, with the analog input also connected to one leg of all of the push buttons. We then connect different resistors between the 5V and the second leg of each of the push buttons. It is important that each of these resistors are different values so that you get different voltages on the analog input, enabling you to identify each button.
You can already see that the connections required to the Arduino are much simpler in this example than in the previous one.
Now lets have a look at how we write the code to differentiate between the push buttons.
//Michael Klements
//The DIY Life
//17 May 2019

int ledPin = 13; 	 // choose the pin for the LED
int buttonValue = 0;

void setup()
{
  pinMode(ledPin, OUTPUT);   // declare LED as output
}

void loop()
{
  buttonValue = analogRead(A0);  //Read in the button value
  if (buttonValue>=1009 && buttonValue<=1020)  //Switch the LED on if button is pressed
    digitalWrite(ledPin, HIGH);
  if (buttonValue>=999 && buttonValue<=1007)
    digitalWrite(ledPin, HIGH);
  if (buttonValue>=984 && buttonValue<=997)
    digitalWrite(ledPin, HIGH);
  if (buttonValue>=953 && buttonValue<=982)
    digitalWrite(ledPin, HIGH);
  if (buttonValue>=910 && buttonValue<=951)
    digitalWrite(ledPin, HIGH);
  else
    digitalWrite(ledPin, LOW);  //Switch the LED off if button is not pressed
}
You can already see that the code is much simpler using the analog input as you are not required to define and set up your IO for analog pins. The statements required to check which button is pressed are slightly more complicated than with digital IO.
Essentially your Arduino will read a value between 0 and 1023 on the analog pin and will need to compare this value to a particular range in order to identify which button has been pressed. We use a range rather than an absolute value because the analog input and resistors are very sensitive to external influences such as temperature. A value may be right on the limit between 1012 and 1013 so it will be measured as 1012 when the resistor or room temperature is cold but 1013 when it is warmer.
You will need to set up the range in your code for each push button and the values you use can be worked out in three different ways.
Before writing your actual code, write a simple program to use the serial monitor to display the value read on the analog input for each different button press. Record these values and add a bit (5 to 20) on either side of each value to get your overall range for each button.
Measure the voltage put on to your analog input when each button is pressed and scale this voltage to a number between 0 and 1023. For example, if you measure 4.75V on your input, 4.75 / 5 * 1023 = 972. Add a little above and below the number and your range could be 965 to 980.
Calculate the voltage put onto your analog input by each push button using the known resistance values of your one overall resistor and each individual resistor. Map this voltage to an analog input range as done in option 2.
Obviously the greater the number of buttons you use the smaller your range for each button.
Method 2
The second method is quite similar to the first, with the difference being that you can use a number of the same resistors to make up the circuit. This is useful if you have a pack of similar resistors, such as the 220 ohm ones commonly used for LEDs.
You’re going to connect these up in series to create a voltage divider, for which each pushbutton brings up another resistor in the series connection, allowing you to differentiate between them. This is the method shown in the video in the introduction, so it may be worth watching for more information.
Let’s have a look at the breadboard connection diagram.
Now lets have a look at how we write the code to differentiate between the push buttons.
//The DIY Life
//Michael Klements
//20 March 2020


int buttonPin = A0;     //Button and LED pin numbers
int ledGreen = 2;
int ledRed = 3;
int ledBlue = 4;


void setup()
{
    pinMode(ledGreen, OUTPUT);    //Define LED pins
    pinMode(ledRed, OUTPUT);
    pinMode(ledBlue, OUTPUT);
    Serial.begin(9600);           //Serial monitor used to determine limit values
}

void loop() {
  int temp = analogRead(buttonPin);   //Read the analogue input
  Serial.println(temp);               //Display the read value in the Serial monitor
  if (temp < 100)                     //Lower limit for first button - if below this limit then no button is pushed and LEDs are turned off
  {
    digitalWrite(ledGreen, LOW);
    digitalWrite(ledRed, LOW);
    digitalWrite(ledBlue, LOW);
  }
  else if (temp < 150)                //First button limit - if below this limit but above previous limit then the first button is pressed
  {
    digitalWrite(ledGreen, LOW);
    digitalWrite(ledRed, HIGH);
    digitalWrite(ledBlue, HIGH);
  }
  else if (temp < 250)                //Second button limit
  {
    digitalWrite(ledGreen, HIGH);
    digitalWrite(ledRed, HIGH);
    digitalWrite(ledBlue, LOW);
  }
  else if (temp < 350)                //Third button limit
  {
    digitalWrite(ledGreen, LOW);
    digitalWrite(ledRed, LOW);
    digitalWrite(ledBlue, HIGH);
  }
  else if (temp < 850)                //Fourth button limit
  {
    digitalWrite(ledGreen, LOW);
    digitalWrite(ledRed, HIGH);
    digitalWrite(ledBlue, LOW);
  }
  else                                //If none of the previous buttons are pressed, then the fifth button must be pressed
  {
    digitalWrite(ledGreen, HIGH);
    digitalWrite(ledRed, LOW);
    digitalWrite(ledBlue, LOW);
  }
  delay(100);                         //Delay for stability
}
You now know how to connect all of your push buttons to a single analog input and free up your IO for larger projects. I hope that you enjoyed this tutorial, let me know how it went for you in the comments section below.
Here are 30 of our best energy saving tips to reduce your home’s energy consumption and save on your utility bills. Running an energy efficient home can save you between 50% and 75% on your utility bills, saving you hundreds of dollars a year.
General Home Energy Saving Tips
Use energy saving lighting. LED lighting uses up to 90% less electricity than old incandescent light bulbs.
Use a power strip for your related audio visual appliances so that you can save on phantom loads and turn them all off with one switch when not in use. Appliances in standby mode still use some electricity to keep running.
Seal up any air leaks with caulk. Keeping your home sealed keeps the warm air out in summer and the cold air out in winter, saving energy on heating and cooling.
You can avoid having to use your iron by folding clothes neatly as they come out of the tumble dryer.
Paint your home in light colours, darker colours absorb the light which requires more lighting energy to achieve the same amount of light.
Make sure that your air conditioners are appropriately sized for your living rooms and bedrooms. An air conditioner which is too large or two small uses more electricity than one which is correctly sized. You should also have your air conditioners’ filters cleaned out regularly to reduce the load on the motors and ensure that they are running efficiently.
Make sure that your home’s central heating system makes use of a good quality central heating pump to ensure that the water in your central heating system is evenly and effectively distributed to all of the rooms in your home.
Entrance & Garden
Don’t leave your lighting on while you are not at home. Use timers or smart home lighting systems to control your lights, some even have location based services to turn your lights off when you leave home and back on again when you arrive at home.
Use day/night switches on outdoor security lighting which you leave on so that they are not left on during the day.
Use motion sensor lights on path ways and around your entrance doors so that they are only in use when required.
Close your curtains during summer when you are not at home, they block out the sun and help to keep your home cool. Conversely, keep them open in winter to let the most sunlight in and help to keep your home warm.
Limit your pool filtration pump’s running time to 6 hours a day and try to set it on a timer during off peak times.
A solar blanket or thermal cover for your pool retains your pool’s heat, making it warmer to swim in and significantly reduces water loss due to evaporation as well as algae buildup due to direct sunlight.
Water your garden in the early morning or late evening to avoid evaporation.
Kitchen
Replace your old appliances with energy star certified appliances as they fail. These appliances are designed to save energy and often pay for themselves in savings over the life of the product.
Use sunny days to dry your clothes outside, but if you need a tumble dryer, invest in one with electronic humidity control, these tumble dryers will turn themselves off when your clothes are dry.
Use a pressure cooker to cook food which takes a long time to cook to reduce the cooking time.
Avoid using your microwave to defrost food. Rather take your food out of the freezer the night before and place it into the refrigerator to defrost throughout the day.
Use a single larger refrigerator and freezer rather than multiple smaller ones.
Let hot foods cool down to room temperature before putting them into the refrigerator.
Do not fill your kettle if you only need a cup or two of boiling water. Always heat up the amount of water you are actually going to use.
A gas stove or cooker is much more energy efficient than an electric one, costing you less to run. This is especially true if you live in an area with piped utility gas.
Bathrooms
Lower your home water heater’s temperature to the lowest setting you can still enjoy a hot shower with, 55°C to 60°C is ideal. By just using the hot water when you shower, you save a lot of energy consumed in keeping a large amount of water stored at a high temperature.
Even better than the above tip is to replace your existing water heater with an inline gas heater or a solar water heater. An inline gas water heater instantly heats the water up as your need it instead of keeping a large volume of water hot, and a solar heater uses energy from the sun to heat your water instead of electricity.
Use infrared bulb heaters in your bathroom as a more energy efficient alternative to bar or fan type heaters.
Install water saving shower heads to limit the amount of water consumed when you shower. Have a look at how easy it is to replace your shower head.
If you do alterations to your bathroom, ask your plumber to plumb your bath water drain to an outdoor tank which can then be used to water the garden.
Study or Home Office
Turn off your computer and printer or copier when they are not going to be used. Although standby modes save power, they still use some electricity to keep running.
Use a laptop instead of a desktop computer. In order to run on a battery, a laptop is designed to be more energy efficient than a desktop computer.
Use a small LED desk lamp for reading rather than having to put on multiple larger ceiling lights to provide the same amount of light on your work surface.
What are some of the tips and tricks you’ve used around your home to save energy? Let us know in the comments section below.
There is something very calming and inviting about Asian-style interior design. It reminds us of the harmony and wisdom that the eastern cultures nurture and value above all. However, that’s not all. oriental home décor can also bring the luxury and the unique charm of the orient into any living space with its vibrant colours and beautiful artistic details. If you think your home looks too ordinary for your taste and you want to make some changes towards eastern elegance, here are some wonderful ideas to guide you.
Colors as Inspiration
Oriental design is a bright and colorful one. Colors such as red or yellow, which remind of the sun and symbolize things like vitality, energy, passion and life itself are an essential part of any eastern home. However, these colors should be incorporated into your living space with some consideration and care. They are strong and if there are too much detail in these colours or they cover surfaces which are too big, the space can seem overwhelming and even chaotic. This is why you should pick one or two details, such as a lighting fixture, an interesting curtain or a large vase and turn them into a focal point of your orientally-styled room.
Oriental Prints with a Neutral Background
Fabric in eastern styles often feature beautiful and ornamental patterns or images depicting nature and everyday life. They come in various combinations of colors and textures and can add a breath of orient into your living room and bedroom alike. However, when you layer too many textiles with these prints, no matter how appealing and lovely they look, they can strip away the calming effect you were going for and leave you rather confused. So, to achieve some balance, introduce these prints as an element of Asian design in a room where the walls and the majority of the furniture are in neutral colors. The luxury will still be there, but it won’t be screaming at you from the moment you step into the room.
A Dash of Chinoiserie
As the northern world started embracing everything Asia had to offer with regards to décor, a new style called chinoiserie arose. It relies on furniture and other decorative pieces inspired by the Chinese, Japanese and generally all Asian cultures to bring the desired sophistication and elegance into often modern western homes. This is something that could help you with decorating your own home as well. Wooden chairs, tables, cupboards and a chest of drawers with elaborate drawings in hues of golden brown, white and yellow are one way to go. However, if you don’t want to replace your existing furniture, you can enrich your rooms with graciously beautiful chinoiserie cushions. You can simply place them on the sofa or bed you already have as the perfect chinoiserie accessory and make your living room or bedroom instantly cozier and more welcoming.
Enable Uninterrupted Energy Flow
Another thing that’s typically Asian are the open floor plans they often opt for in their homes. This is because they believe that positive energy, as an important part of life, should flow freely through their whole living space. It’s a form of Zen design which they cherish and make an effort to create harmony by placing objects in exactly the right spots. This energy and its effects are then increased by using natural material and design elements, such as bamboo or wood. And if you want to separate the rooms at any moment, consider investing in several folding screens. They can give you the privacy you seek and add some more of the oriental style you’re aiming for. Plus, they’re easily removable and can be placed in any other part of your home when the need arises.
Mix the Oriental with the Modern
This is actually even easier than it sounds, since these styles have something in common. They both lean towards simplicity and are minimalist in function and form, meaning that you don’t have to infuse the space with too much chinoiserie and other Asian decorative details. It’s enough to add some modern chairs or stools made of bamboo or a few pots with orchids near your windows. By choosing more subtle elements of Oriental décor and by sticking to neutral tones and natural materials, you can make your home more tranquil and pleasant. One nice idea is to find a low table and round cushions around it instead of a regular dining room table, where you and your family can have meals together and bond in a relaxing atmosphere.
Introducing pieces of eastern culture and style into your home can give it a whole new look and allow you to feel more energetic, cheerful and relaxed there. And with ideas as good as these, you’ll have no trouble with enhancing your home appearance as soon as today.