If you’ve done renovations to your home then chances are that you have considered moving a door or window or removing one of the internal walls. Removing some of the internal walls can really transform your home by creating a large and spacious living space out of a previously separated kitchen, lounge, dining room etc. Unfortunately, in houses and apartments, a number of the internal walls form an integral part of the structure of the house, called load bearing walls and removing them may compromise the integrity of the structure and ultimately lead to sections of walls or the roof collapsing.
Types of Internal Walls
Some internal walls are purely there to divide a room into smaller sections while others are load bearing. The dividing walls which do not support any load can safely be removed without any risk. Load bearing walls may be supporting the ceiling and roof, an upstairs wall, the floor above or all three of these. Before demolishing a wall, it is essential that you find out which of the walls are load bearing and which are not.
Non load bearing walls can be removed without any consideration for the surrounding walls and structure while load bearing walls need to be unloaded by supporting the above weight with props, additional supports and lintels will have to be installed and finally the wall may be removed.
How To Find Out If A Wall Is Load Bearing
Finding out if a wall is load bearing is not a simple as it may seem, it is almost impossible to determine from the outside of the wall whether it is load bearing. There are a number of tests one can do to determine whether a wall or section is load bearing and to determine its function.
You can start by taking the back end of a mallet or hammer and tapping along the section of the wall. If the wall sounds like it has hollow sections with dull sounding sections between them then the wall is most likely a stud partition made from timber and plasterboard. If this wall is non load bearing then it will be really easy to remove and can be taken down without risk of collapse. It is however difficult to determine as some older houses used the timber sections in these walls as structural supports for joists.
Non Continuous Walls
If the wall sounds solid when tapping it then it is probably a brick or building block wall. This in itself is not enough to determine whether it is loading bearing. To find out, you need to look at the section whether the wall goes into the ceiling. If you go into the roof, you should be able to see the top of the wall. If the wall is not supporting a wall above it, a concrete slab or a main truss in the roof then it is likely not a structural wall and you should be able to remove it without any risk. If the wall runs underneath the floor above it, lift some of the floor boards to see how the wall interacts with the floor, if it is not supporting the floor joists or slabs then it should be able to be removed. This is clear when the wall sits in between two floor joists without touching them.
Continuous Walls
If the wall runs up and into the room above it then it is most likely a structural load bearing wall. This doesn’t mean that it cannot be removed however some plan will need to be made, probably within the floor boards, to support the wall above.
Types of Supports
There are three primary supports which can be installed to take up the load which was placed on a structural wall.
Concrete Lintels
These come in a number of standard sizes and are made in a factory by encasing stressed steel wire in concrete to form a strong support.
Concrete Beams
These are the same as concrete lintels in concept but are much larger and usually made on site. Concrete is poured around steel reinforcing rods to create a strong beam.
Steel Joists
Steel joists which are usually in the form of an H or I, commonly known as I-beams are rolled out in a number of sizes and lengths to suite different spans and loads.
It is also important that when the above mentioned supports are installed, they are installed correctly so that the reinforcing rods and wires take up the strain correctly or these too will fail.
The size and type of support to use requires some level of expertise, there are calculations to be done and a number of considerations to take into account.
It is important to consult an expert in the form of an architect, surveyor or structural engineer before proceeding with the removal of any sections of wall in your home. They will be able to give you professional advice on the walls you are able to remove as well as the supports required where structural walls are involved. Do not attempt any structural modifications to your home before consulting an expert and finding out about your local regulations.
I was walking through the hardware store the other day and I walked past an energy meter which clips onto your home’s electricity mains and then provides you with information on your power consumption and cost estimates for the month. I thought it looked really cool until I saw the price, it was almost five times what I thought it would be! So I decided to try and build my own and Arduino was the perfect platform for it.
I had a look around online at what others had done but they all seemed to be a bit over complicated for a simple home application. Sure, for perfectly accurate measurements you need to monitor both the supply voltage and current but for simple household monitoring which gives estimates cost to the closest few cents, why not keep things simple.
So this meter measures the supply current to your home through a CT (current transformer) and then does a couple of calculations to give you your current, power, maximum power and kilowatt hours consumed. Its also really easy to add your local tariff and display the cost of electricity used to date.
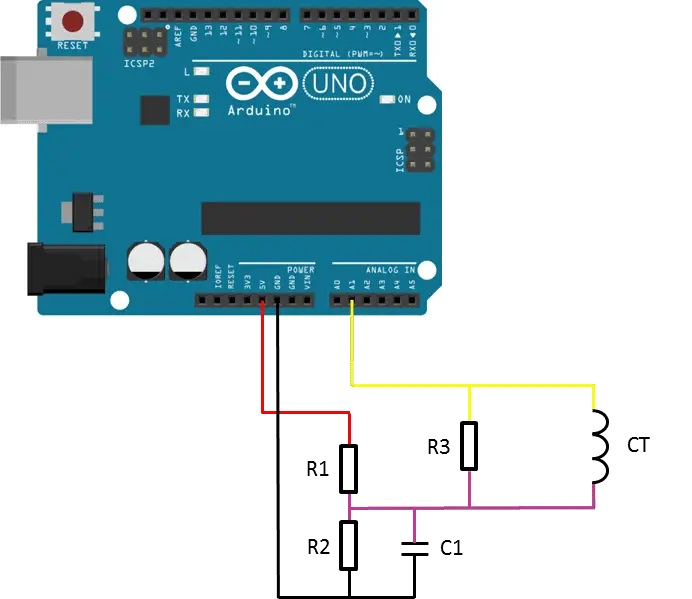
First you need to start by assembling the components onto the CT or onto your breadboard in order to create your current sensor which produces a signal which your Arduino can understand. An Arduino only has analogue voltage inputs which measure 0-5V DC, so you need to convert the current output from the CT into a voltage reference and then scale the voltage reference into a 0-5V range.
Assemble the Components
If you are going to be installing your power meter somewhere permanently then you may want to solder the resistors and capacitor directly onto the CT so that they cannot come loose. If you are simply trying this project for fun then a breadboard is perfect.
The basic circuit for the connection of the CT to the Arduino is shown in the diagram below:
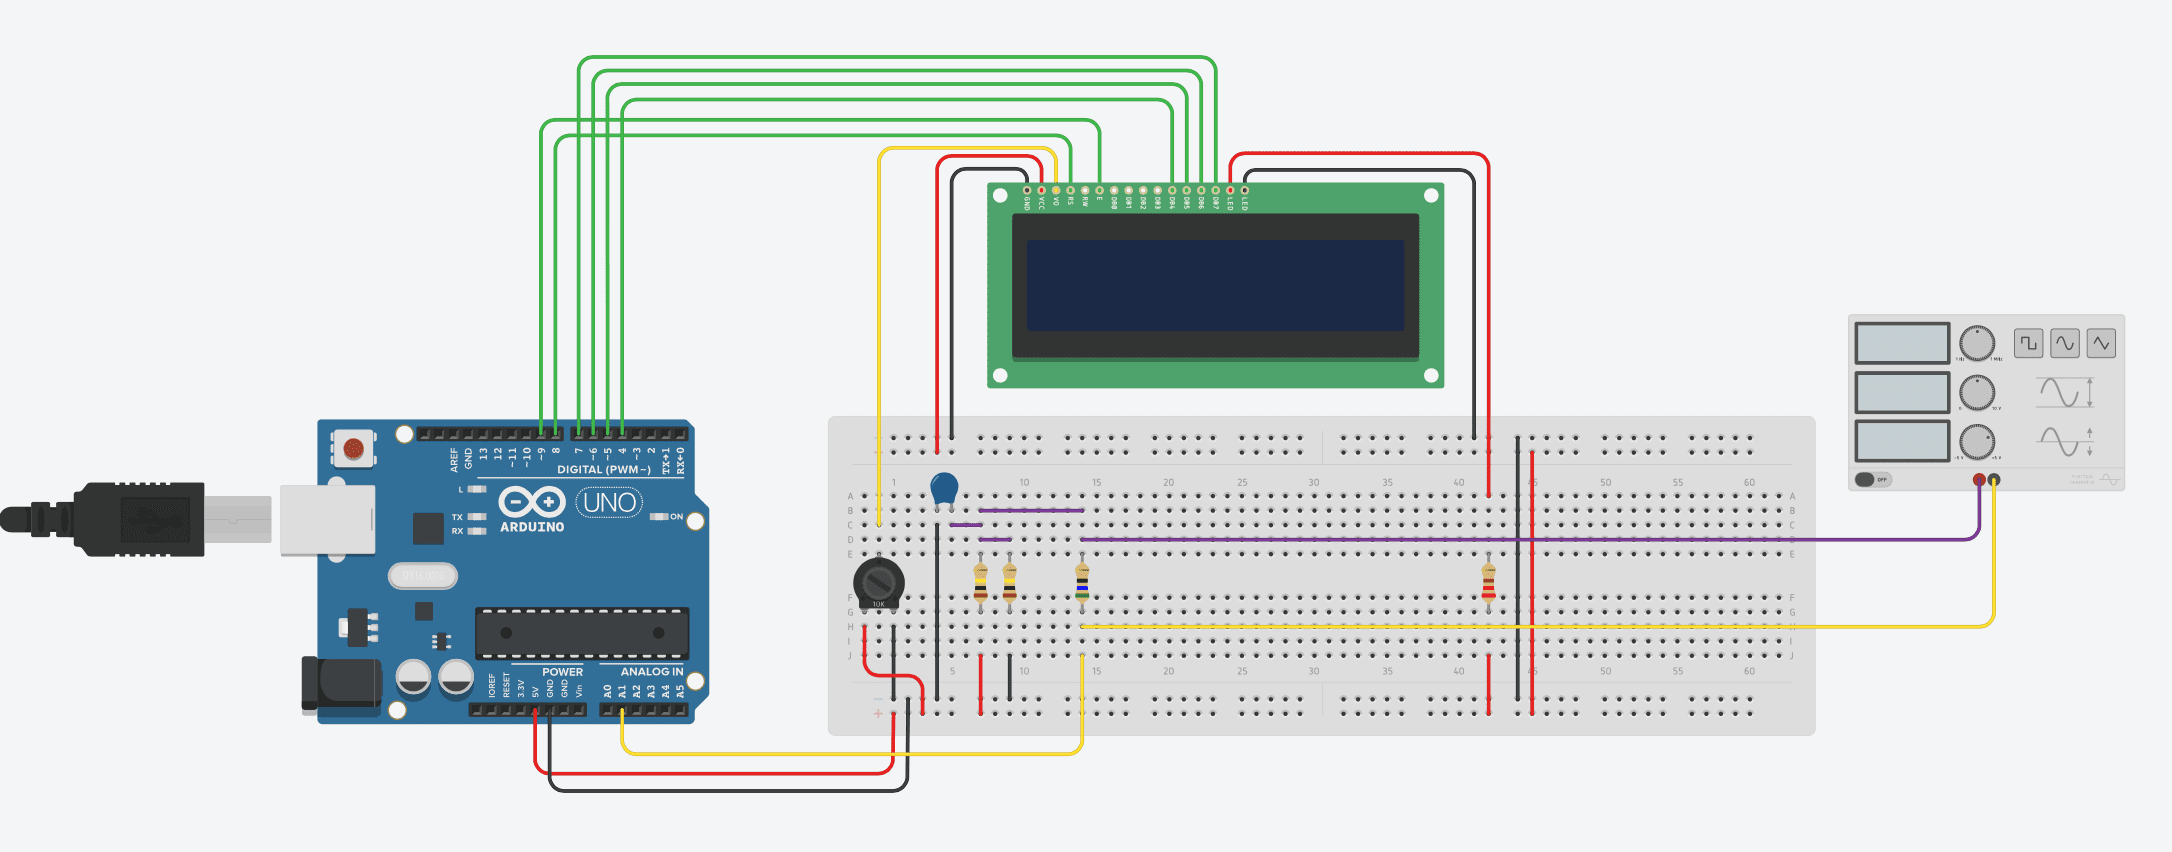
A breadboard circuit layout is shown below. Please note that TinkerCAD doesn’t support a current transformer. A signal generator has therefore been used to generate an example signal:
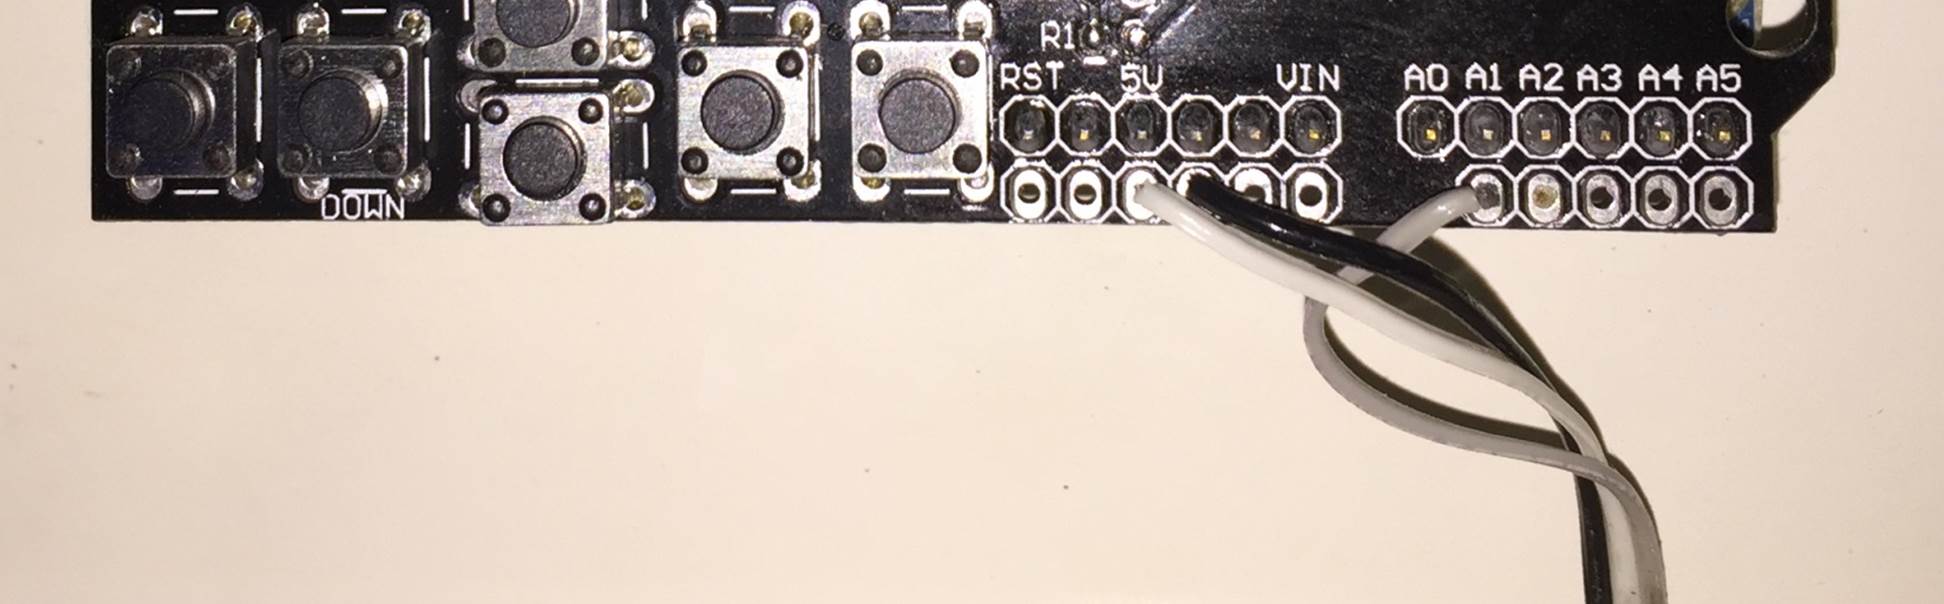
The LCD screen shield already picks up on the analogue inputs but only A0 is used by the shield. Simply solder the three leads from your current sensor onto the pin headers on the shield and use A1 as your sensor input as shown below.
Once you have connected all of your components, you need to connect your sensor onto what you want to monitor. If you are wanting to monitor a couple of appliances then you should connect the CT onto the input lead of a multi-plug, anything you plug into the multi-plug with then be counted.
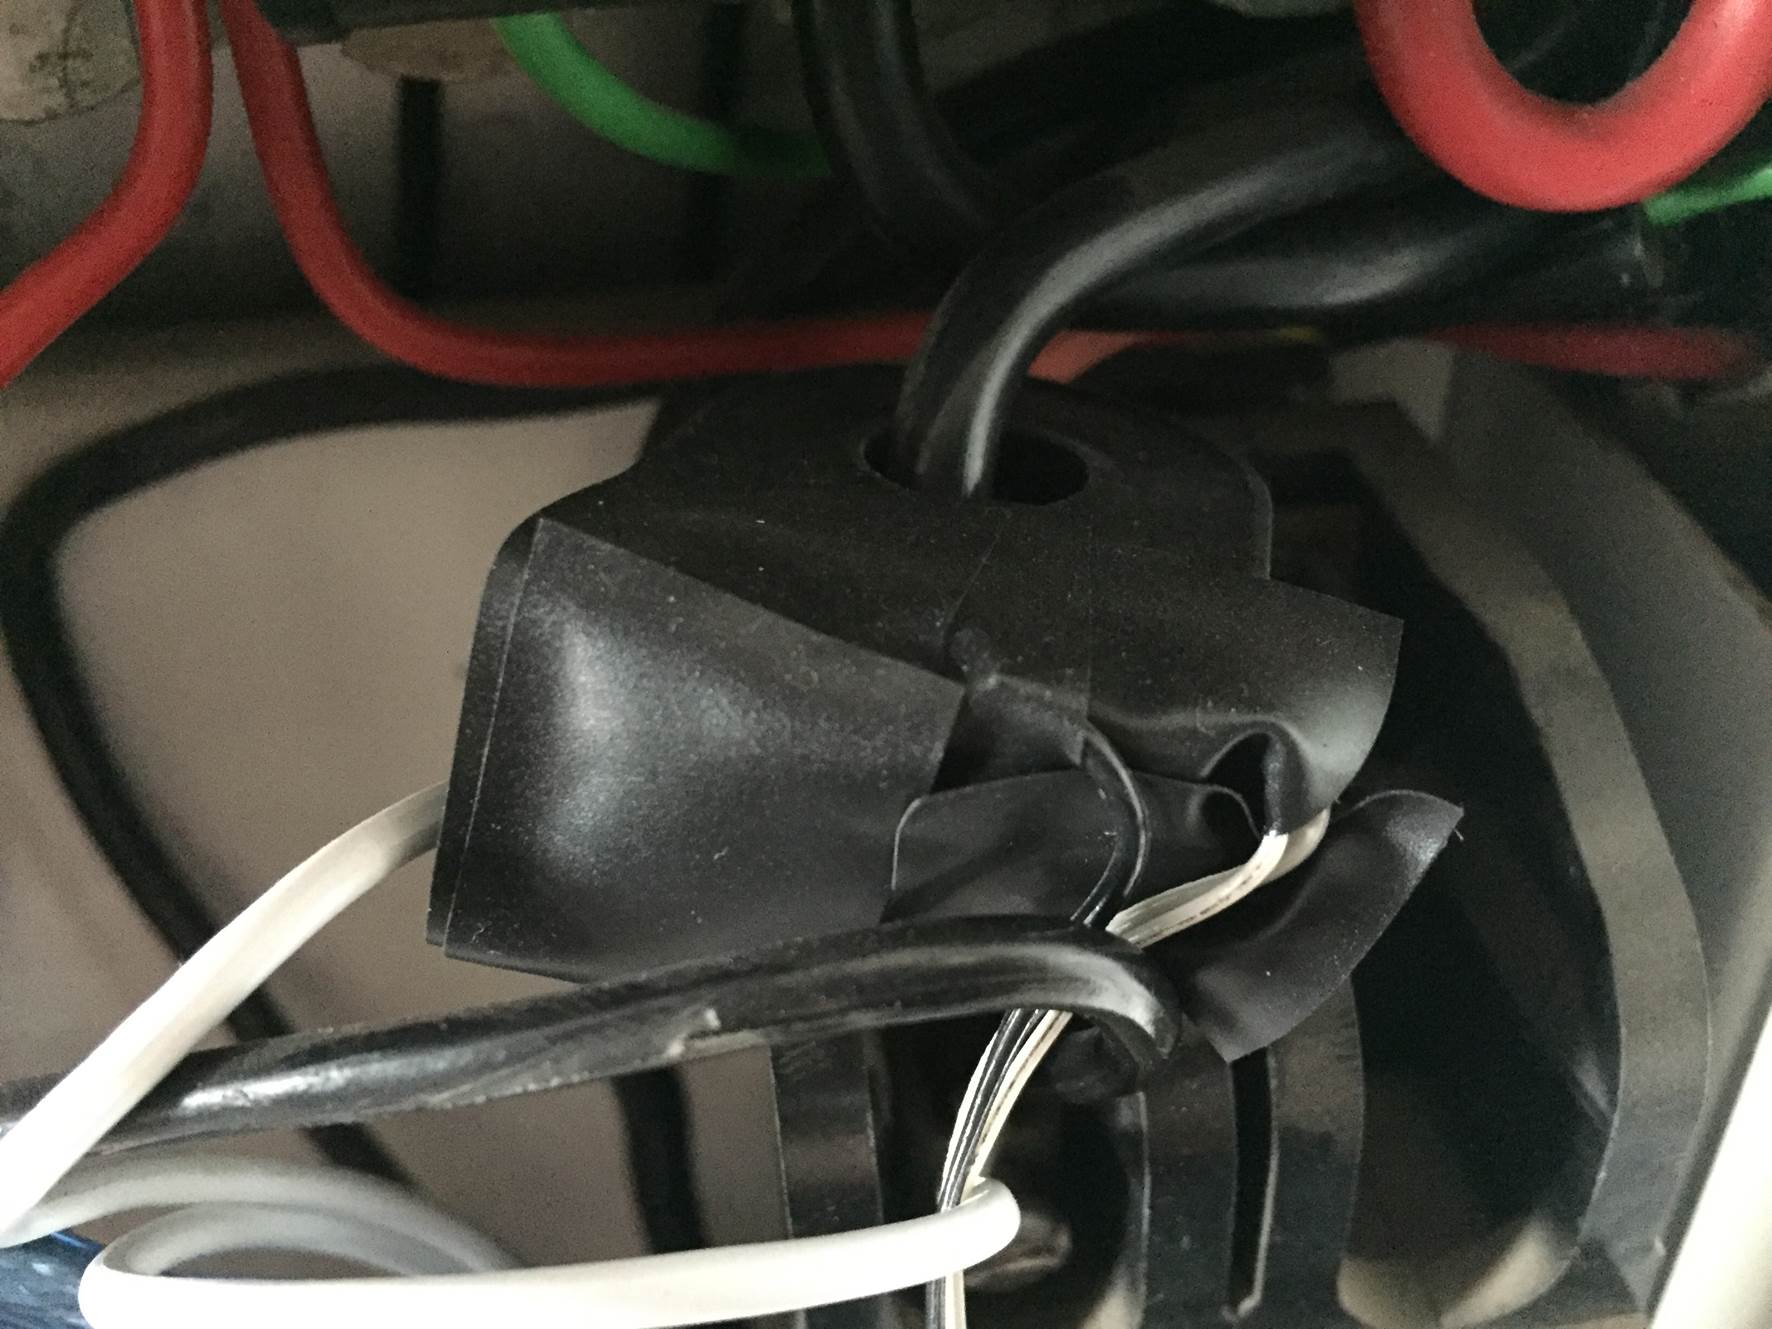
Alternately, you can connect the CT directly onto your home’s mains supply and monitor the whole houses usage as has been done here. Either way, you need to put the CT around one of the supply cables, preferably the red “live” cable. Be sure to only put it around 1 as it will not work if it is around both and it can’t be connected around the earth wire (yellow, green stripped wire) as energy is not drawn through this wire. If you are connecting it to your mains, connect it to one of the output wires after the main breaker as shown below.
NB – Be careful when connecting the power meter to you homes mains and make sure that the power to your board is switched off before doing anything in the mains box. Do not remove any wires or remove any screws before checking with your local authority, you may require a certified electrician to install the CT for you.
Choosing Different Components
There are essentially four components which need to be chosen or correctly sized for you energy meter.
Choosing A Current Transformer
The first is the CT or current transformer. The one used here is the Talema AC1030 which can sense 30A nominal and 75A maximum current. At 220VAC, it can theoretically sense up to 16.5kW for short periods of time but it is sized to continuously sense 6.6kW which is suitable for a small household. To calculate how many amps yours needs to sense, take the maximum continuous power your are expecting to sense and divide that by your voltage (usually 110V or 220V depending on your country).
Sizing The Burden Resistor
Next you need to size your burden resistor R3, this converts your CT current into a voltage reference. Start by dividing your primary current (the maximum as used above) by your CT’s turns ratio (available on the data sheet). This should be around 500-5000 to 1. This article worked on 42A with a turns ratio 0f 1000:1 giving a secondary current of 0.042A or 42mA. Your analogue reference voltage to the Arduino is 2.5V so to determine the resistance you use R=V/I – R=2.5/0.042=59.5Ω. The closest standard resistor value is 56Ω, so this was used.
Here are some options on different CTs and their ideal burden resistors (in standard sizes):
Murata 56050C – 10A – 50:1 – 13Ω
Talema AS-103 – 15A – 300:1 – 51Ω
Talema AC-1020 – 20A – 1000:1 – 130Ω
Alttec L01-6215 – 30A – 1000:1 – 82Ω
Alttec L01-6216 – 40A – 1000:1 – 62Ω
Talema ACX-1050 – 50A – 2500:1 – 130Ω
Alttec L01-6218 – 60A – 1000:1 – 43Ω
Talema AC-1060 – 60A – 1000:1 – 43Ω
Alttec L01-6219 – 75A – 1000:1 – 33Ω
Alttec L01-6221 – 150A – 1000:1 – 18Ω
CTYRZCH SCT-013-000 – 100A – Built In Burden Resistor – Buy Here
The capacitor used is 10µF which should be sufficient for most CT ranges for household applications.
Finally you need two dividing resistors to get the 2.5V reference voltage from the Arduino. They must be the same value, so R1=R2 and we don’t need much current so this articles uses two 100K resistors.
Upload the Sketch
Now you can upload your sketch onto your Arduino, if you haven’t uploaded a sketch before then follow this guide on getting started.
Update – The code has since been modified to make use of the millis() function, see end of section for updated code.
//Michael Klements
//The DIY Life
//27 October 2014

#include <LiquidCrystal.h>

int currentPin = 1;              //Assign CT input to pin 1
double kilos = 0;
int peakPower = 0;
LiquidCrystal lcd(8, 9, 4, 5, 6, 7);  //Assign LCD screen pins, as per LCD shield requirements

void setup()
{
  lcd.begin(16,2);              // columns, rows.  use 16,2 for a 16x2 LCD, etc.
  lcd.clear();
  lcd.setCursor(0,0);           // set cursor to column 0, row 0 (the first row)
  lcd.print("Running");
}

void loop()
{
  int current = 0;
  int maxCurrent = 0;
  int minCurrent = 1000;
  for (int i=0 ; i<=200 ; i++)  //Monitors and logs the current input for 200 cycles to determine max and min current
  {
    current = analogRead(currentPin);    //Reads current input and records maximum and minimum current
    if(current >= maxCurrent)
      maxCurrent = current;
    else if(current <= minCurrent)
      minCurrent = current;
  }
  if (maxCurrent <= 517)
  {
    maxCurrent = 516;
  }
  double RMSCurrent = ((maxCurrent - 516)*0.707)/11.8337;    //Calculates RMS current based on maximum value
  int RMSPower = 220*RMSCurrent;    //Calculates RMS Power Assuming Voltage 220VAC, change to 110VAC accordingly
  if (RMSPower > peakPower)
  {
    peakPower = RMSPower;
  }
  kilos = kilos + (RMSPower * (2.05/60/60/1000));    //Calculate kilowatt hours used
  delay (2000);
  lcd.clear();
  lcd.setCursor(0,0);           // Displays all current data
  lcd.print(RMSCurrent);
  lcd.print("A");
  lcd.setCursor(10,0);
  lcd.print(RMSPower);
  lcd.print("W");
  lcd.setCursor(0,1);
  lcd.print(kilos);
  lcd.print("kWh");
  lcd.setCursor(10,1);
  lcd.print(peakPower);
  lcd.print("W");
}
Because your setup, CT , resistors and input voltage may be different, there is a scaling factor in the sketch which you will need to change before you will get accurate results, see below for calibration. If your LCD is connected to the same pins as used here and your CT is connected to the same input pin, you should at least get the screen populated with some figures although these will most likely be incorrect and some may be negative.
If you don’t want to use or don’t have an LCD screen, you can also modify the sketch to output to the Arduino IDE’s serial window as shown below.
//Michael Klements
//The DIY Life
//27 October 2014

int currentPin = 1;              //Assign CT input to pin 1
double kilos = 0;
int peakPower = 0;

void setup()
{
  Serial.begin(9600);            //Start serial communication
  Serial.println("Running");
}

void loop()
{
  int current = 0;
  int maxCurrent = 0;
  int minCurrent = 1000;
  for (int i=0 ; i<=200 ; i++)  //Monitors and logs the current input for 200 cycles to determine max and min current
  {
    current = analogRead(currentPin);    //Reads current input and records maximum and minimum current
    if(current >= maxCurrent)
      maxCurrent = current;
    else if(current <= minCurrent)
      minCurrent = current;
  }
  if (maxCurrent <= 517)
  {
    maxCurrent = 516;
  }
  double RMSCurrent = ((maxCurrent - 516)*0.707)/11.8337;    //Calculates RMS current based on maximum value
  int RMSPower = 220*RMSCurrent;    //Calculates RMS Power Assuming Voltage 220VAC, change to 110VAC accordingly
  if (RMSPower > peakPower)
  {
    peakPower = RMSPower;
  }
  kilos = kilos + (RMSPower * (2.05/60/60/1000));    //Calculate kilowatt hours used
  delay (2000);
  Serial.print(RMSCurrent);
  Serial.println("A");
  Serial.print(RMSPower);
  Serial.println("W");
  Serial.print(kilos);
  Serial.println("kWh");
  Serial.print(peakPower);
  Serial.println("W");
}
The original Energy Meter code made use of a fixed time period for calculating the kilowatt hours consumed, this was based on a 2050ms cycle time and was fairly accurate.
The code has since been modified to make use of the built in millis() function which calculates the exact cycle time for each cycle in order to improve the accuracy. It only makes around a half a percent improvement in the accuracy of the calculation but its the better way to do it.
Here is the improved code:
//Michael Klements
//The DIY Life
//26 February 2017

#include <LiquidCrystal.h>

int currentPin = 1;              //Assign CT input to pin 1
double kilos = 0;
int peakPower = 0;
unsigned long startMillis;
unsigned long endMillis;
LiquidCrystal lcd(8, 9, 4, 5, 6, 7);  //Assign LCD screen pins, as per LCD shield requirements

void setup()
{
  lcd.begin(16,2);              // columns, rows.  use 16,2 for a 16x2 LCD, etc.
  lcd.clear();
  lcd.setCursor(0,0);           // set cursor to column 0, row 0 (the first row)
  lcd.print("Arduino");
  lcd.setCursor(0,1);           // set cursor to column 0, row 1 (the second row)
  lcd.print("Energy Meter");
  startMillis = millis();
}

void loop()
{
  int current = 0;
  int maxCurrent = 0;
  int minCurrent = 1000;
  for (int i=0 ; i<=200 ; i++)  //Monitors and logs the current input for 200 cycles to determine max and min current
  {
    current = analogRead(currentPin);    //Reads current input and records maximum and minimum current
    if(current >= maxCurrent)
      maxCurrent = current;
    else if(current <= minCurrent)
      minCurrent = current;
  }
  if (maxCurrent <= 517)
  {
    maxCurrent = 516;
  }
  double RMSCurrent = ((maxCurrent - 516)*0.707)/11.8337;    //Calculates RMS current based on maximum value
  int RMSPower = 220*RMSCurrent;    //Calculates RMS Power Assuming Voltage 220VAC, change to 110VAC accordingly
  if (RMSPower > peakPower)
  {
    peakPower = RMSPower;
  }
  endMillis = millis();
  unsigned long time = endMillis - startMillis;
  kilos = kilos + ((double)RMSPower * ((double)time/60/60/1000000));    //Calculate kilowatt hours used
  startMillis = millis();
  delay (2000);
  lcd.clear();
  lcd.setCursor(0,0);           // Displays all current data
  lcd.print(RMSCurrent);
  lcd.print("A");
  lcd.setCursor(10,0);
  lcd.print(RMSPower);
  lcd.print("W");
  lcd.setCursor(0,1);
  lcd.print(kilos);
  lcd.print("kWh");
  lcd.setCursor(10,1);
  lcd.print(peakPower);
  lcd.print("W");
}
Here is the link to download the updated Millis Meter code.
For those of you who have read that the millis() function goes into overflow after about 49 days, the code deals with the rollover automatically by making use of the unsigned long variable. For example, if the overflow happens at 10000, the start millis was 9987 and the end millis was 2031, the difference would be 2031-9987=-7956 but the value can’t be negative as it is unsigned so it becomes -7956+10000=2044 which is the correct duration.
Calibrate the Current Reading
As mentioned above, because your setup, CT , resistors and input voltage may be different, there is a scaling factor in the sketch which you will need to change before you will get accurate results.
To calibrate your energy meter, your need to be sure that the current that your meter says is being drawn is what you expect is actually being drawn. In order to do this accurately, you need to find a calibrated load. These are not easy to come by in a normal household so you will need to find something which uses an established and consistent amount of power. I used a couple of incandescent light bulbs and spot lights, these come in a range of sizes and their consumption is fairly close to what is stated on the label, ie a 100W light bulb uses very close to 100W of real power as it is almost entirely a purely resistive load.
Plug in a small light bulb (100W or so) and see what load is displayed. You will now need to adjust the scaling factor uses in the calculation line:
In this case it was 11.8337, it may be higher or lower depending on your application. Either use linear scaling to calculate this figure or, if you’re not good with math, play around with different values until the load you have plugged in is shown on the energy meter’s screen.
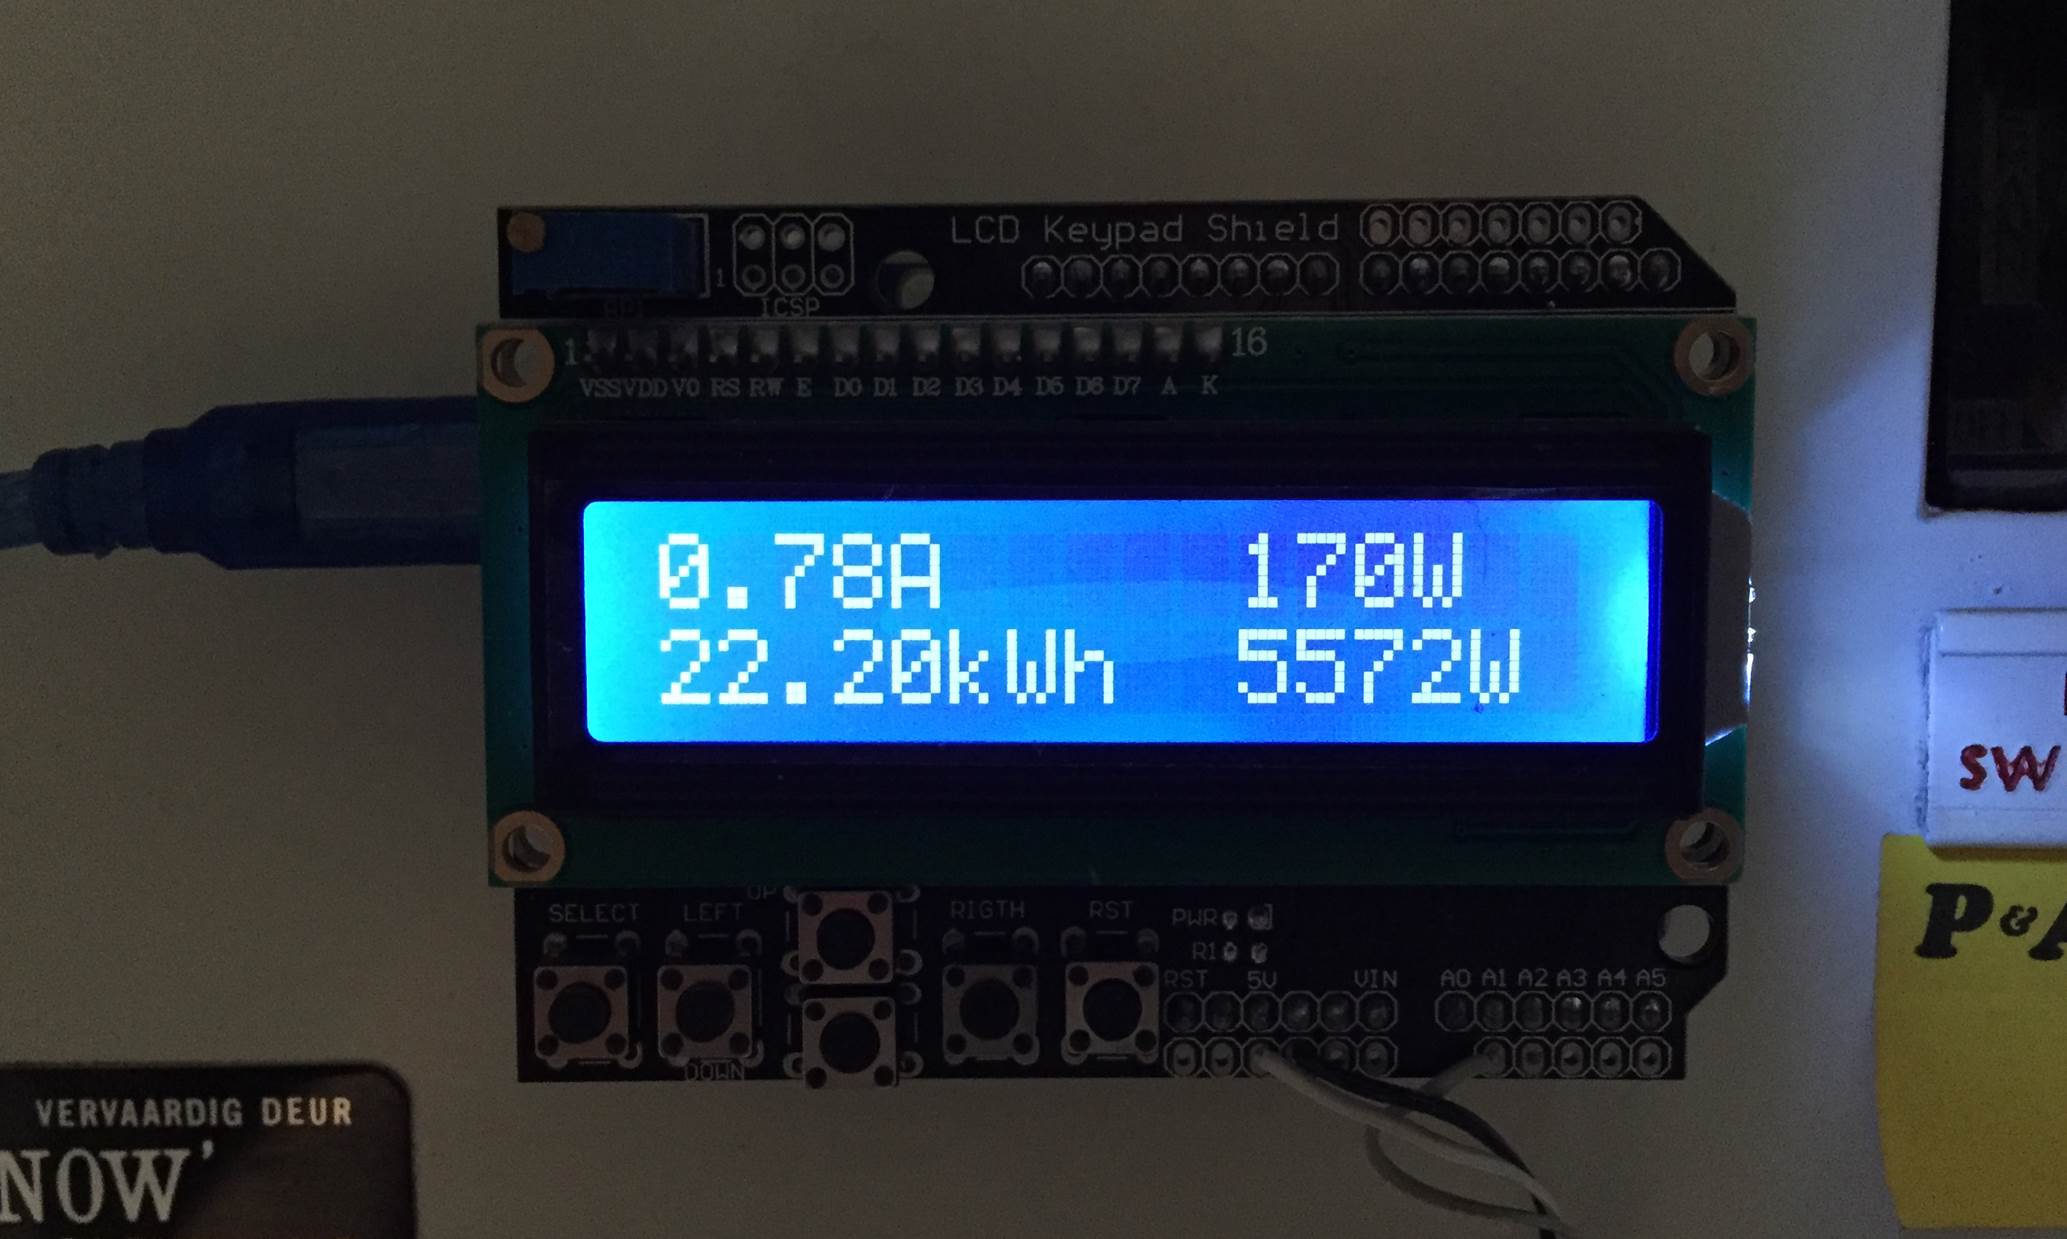
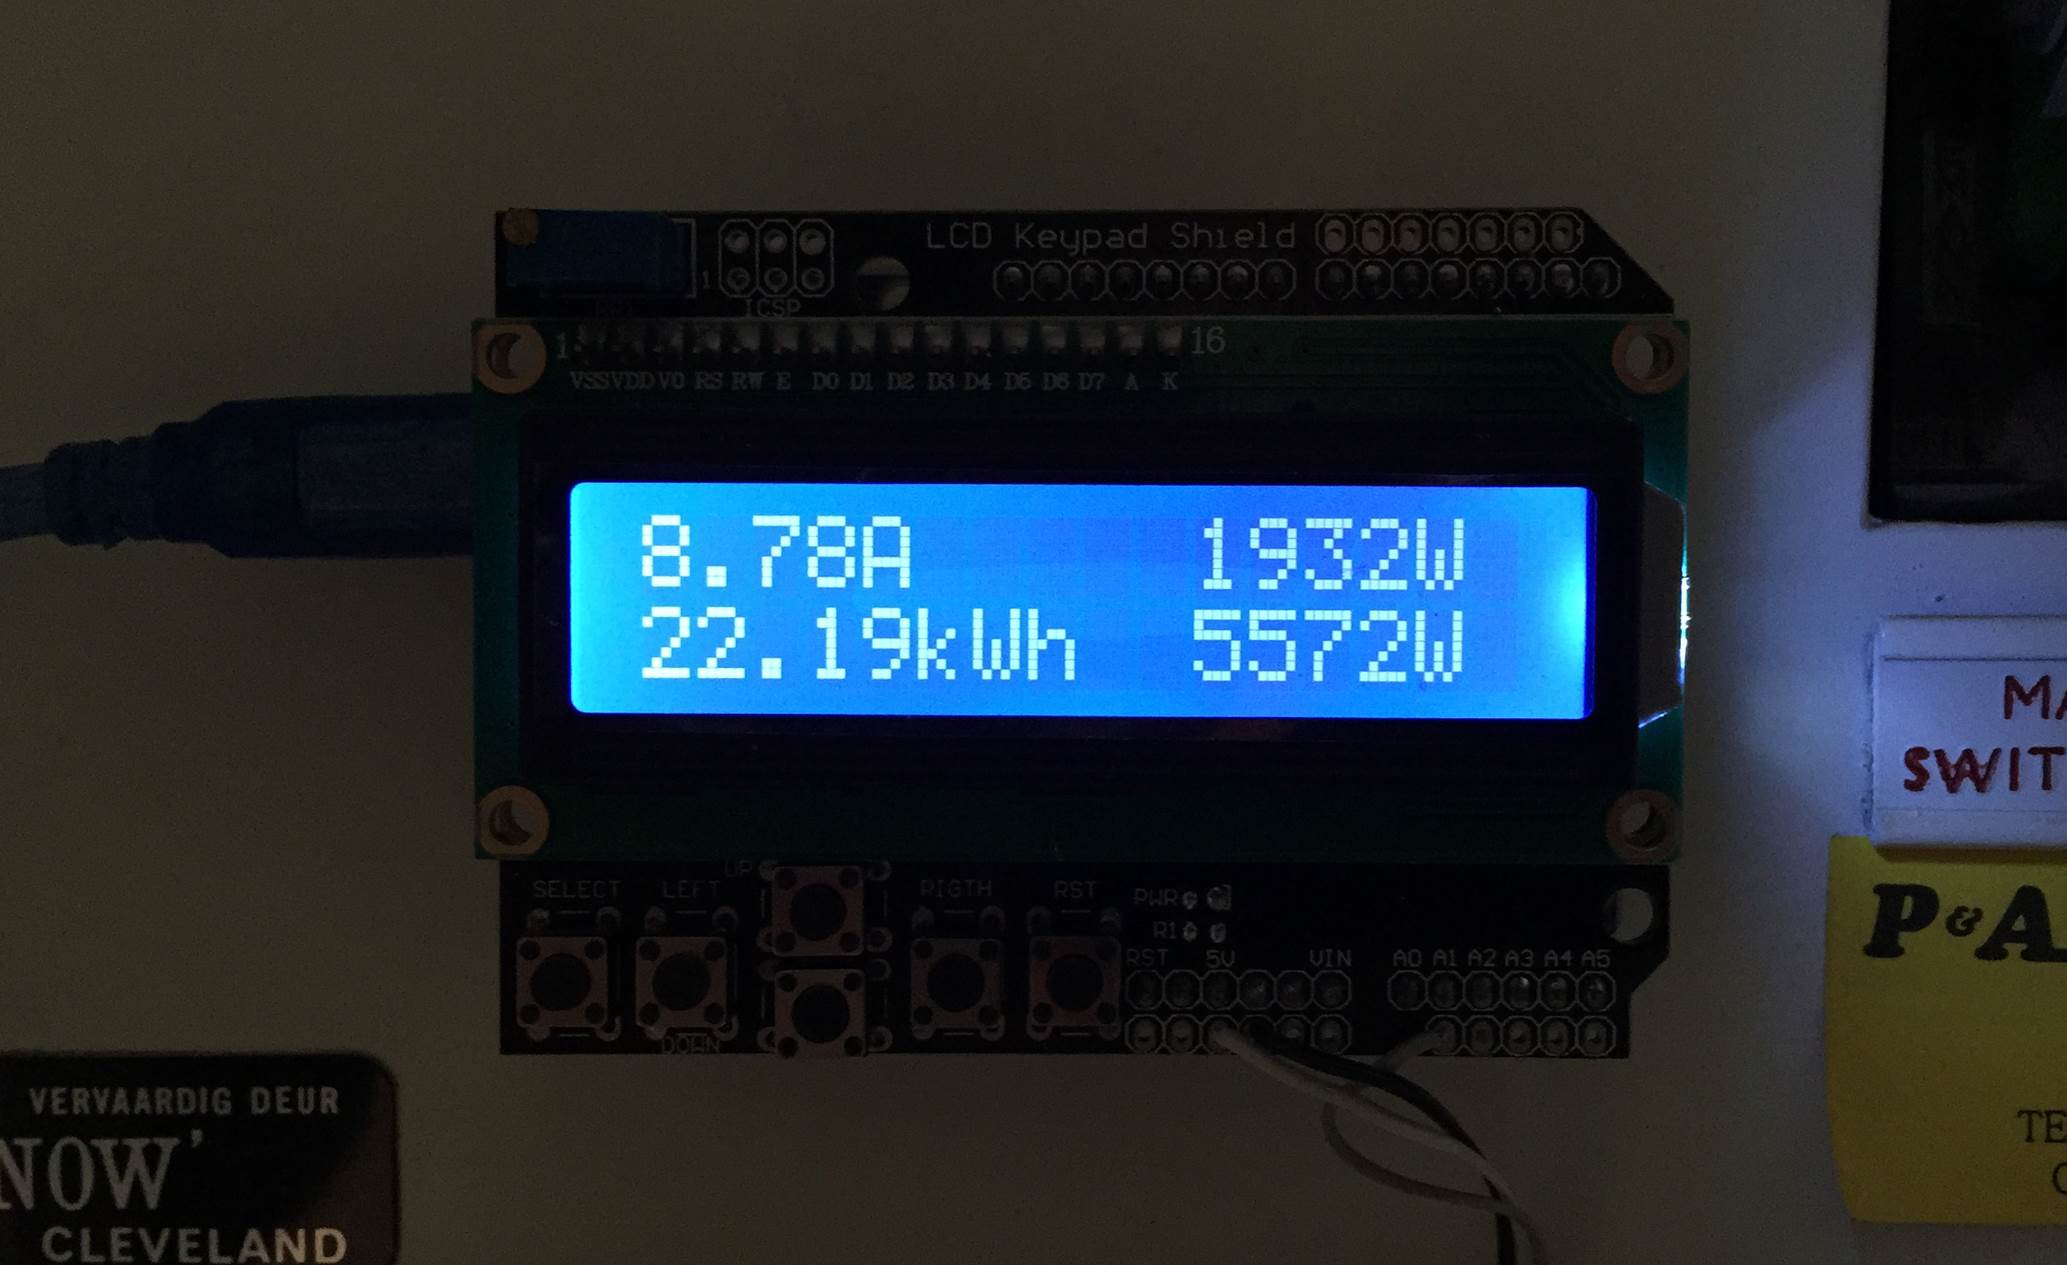
Once you have your energy meter calibrated, you reset it and leave it to do its job. Below are two images of it in use, both with a low power input and a high power input.
The first number displayed is the instantaneous current followed by the instantaneous power. On the bottom line, the kilowatt hours used since reset and then the maximum recorded power since reset.
And a video of startup:
Video Guide
How did this project go for you? What have you used it to monitor? Let us know in the comments section below, we may even put some of your work into our article to help others. Also feel free to post any questions or queries you may have, if you are asking, chances are someone else is wondering as well.
Taking your watch to the store to get the battery changed might not be an expensive trip but they usually charge you five to ten times more than what the battery itself costs, for a five minute job. Next time your watch dies, try changing the battery yourself, you’ll save money and learn a new trick while you’re busy, it really is a quick and simple job.
NB – If your watch is still under warranty then please check with your supplier whether they allow you to do your own work on it. Some manufacturers will not honour the warranty if the watch has been opened by others.
What You Will Need To Change Your Watch Battery
A Blunt Knife or Small Flat Screwdriver
Replacement Battery (Get this using the old one as a sample, details in steps below)
A Magazine or Newspaper
Changing the Watch Battery
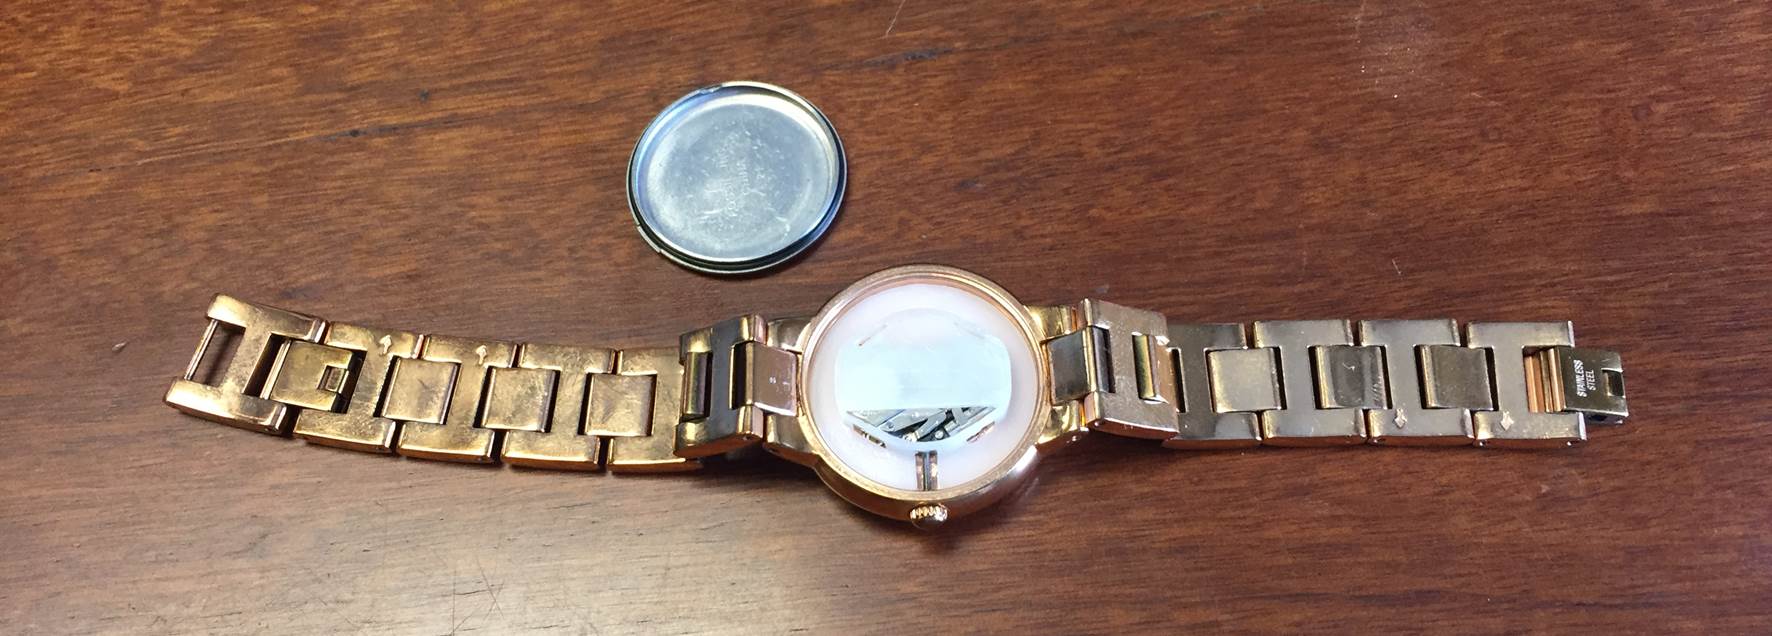
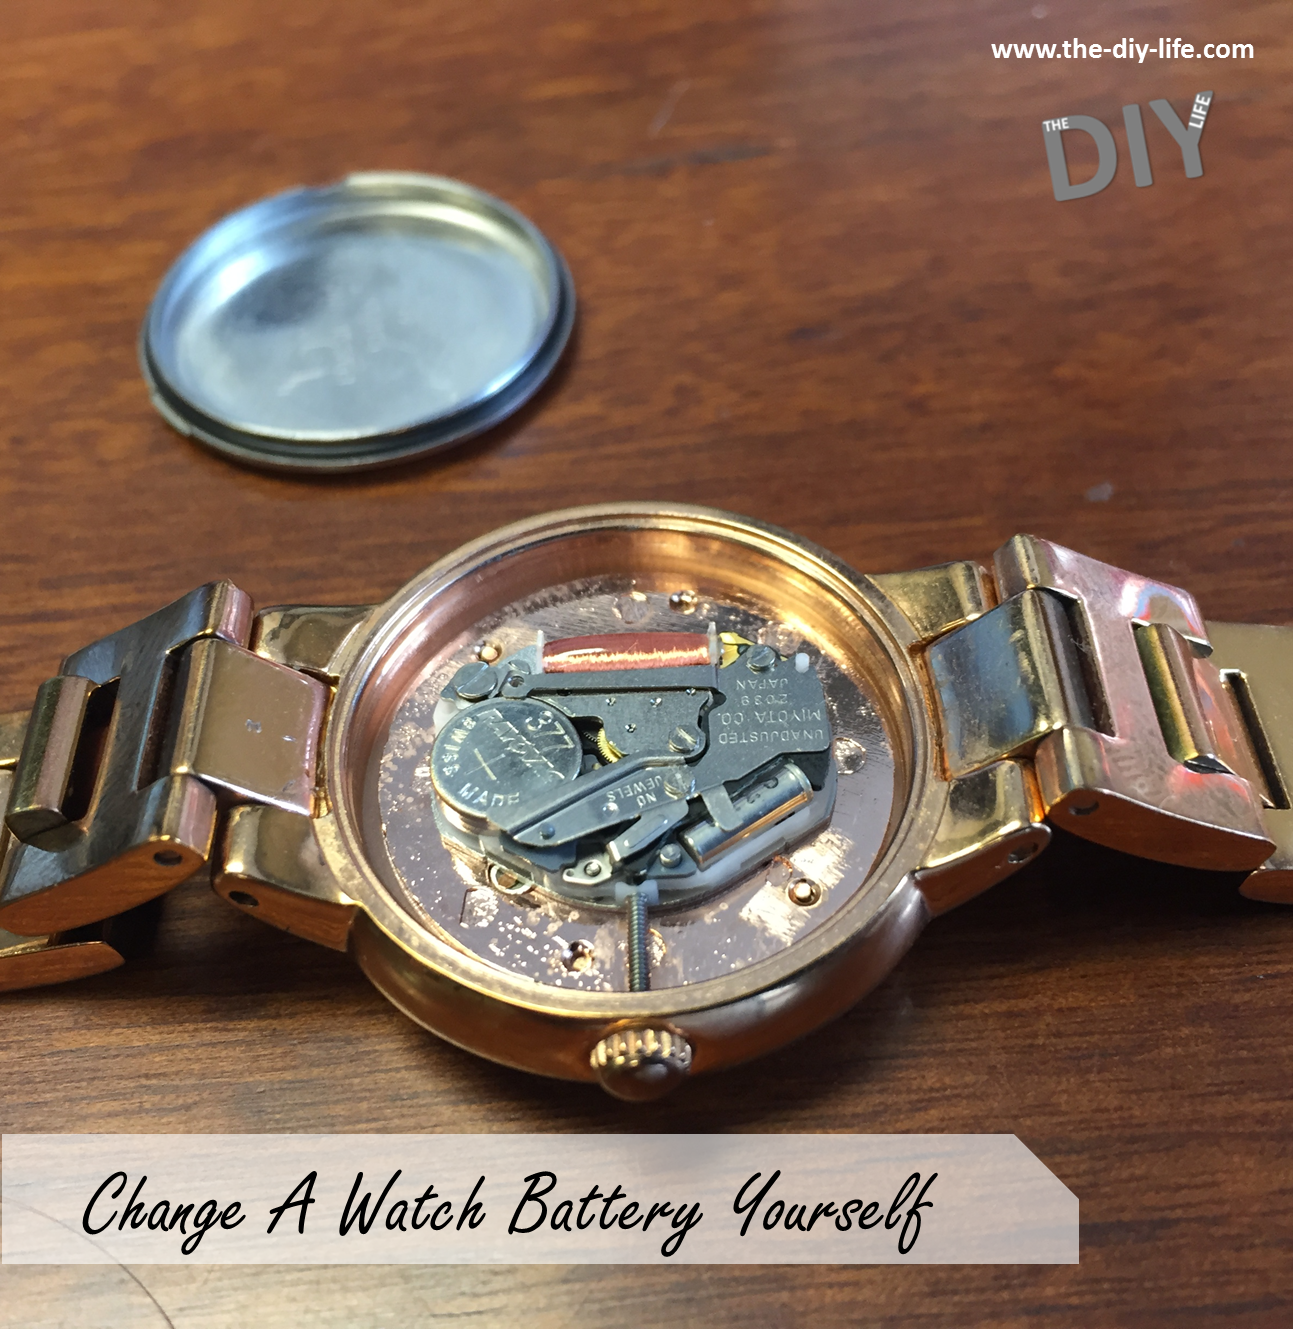
Start off by placing your watch face down on a magazine or newspaper, the paper will prevent the screen from getting scratched while you work on it.
The images here are shown with the newspaper removed as the print distracts from the detail of the image.
Watches typically have one of three types of covers, covers secured with screws, a screw on cover (the whole back cover turns into place) or a snap on cover. Snap on covers are by far the most popular covers on modern watches as they’re generally cheaper for the manufacturer to produce, followed by screw on covers.
You can tell the difference by looking at the back cover of the watch. Covers secured with screws will obviously have a number of screws around the perimeter. Screw on covers usually have a pattern of notches (typically 6-8) equally spaced around the outer perimeter of the cover which allows a tool to grab the cover and turn it. Snap on covers have a small overlap or lip somewhere around the perimeter under which a tool is used to lift the cover off.
This tutorial will focus on snap on covers since these are the most common. To remove a cover with screws, use a small screw driver to remove all of the screws and the cover should come free. To remove a screw off cover, a long nosed pliers can usually be used, put the two tips of the pliers into opposite notches and press the watch down to grip the cover and then turn the cover off. With the correct technique, it is also quite easy to remove these covers.
For a snap on cover, you’ll first you need to locate the lip on the back cover. Now use a very small flat screwdriver or a blunt knife and wedge the tip or blade underneath the cover and push down, as a lever, to snap it up.
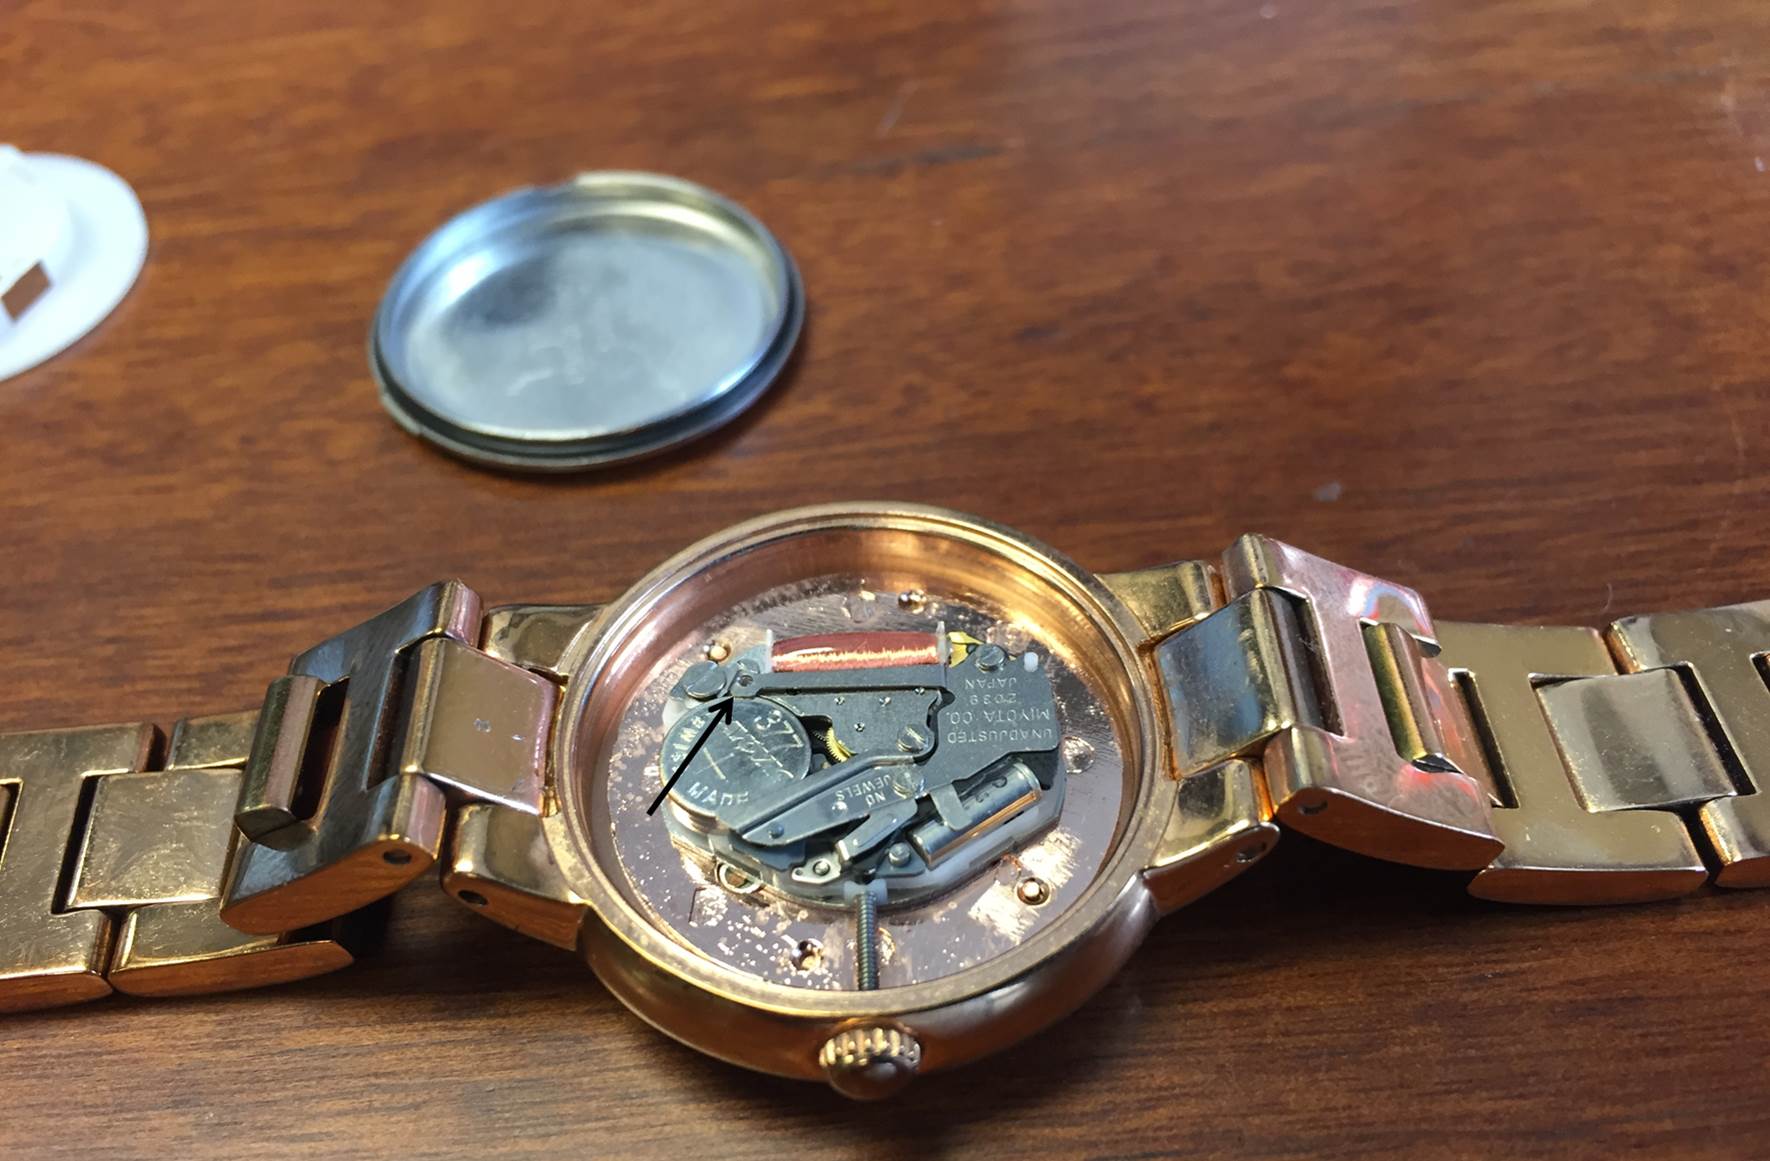
You will now see a plastic spacer/protection cover which is used to absorb shock and prevent the mechanism from moving around within the case. This cover fits snugly over the mechanism and can be pulled off using the tip of a knife, screwdriver or tweezers, being careful not to touch any part of the mechanism or you may damage it. Pick the cover up near the edges and be careful not to break any portion of the mechanism when you lift it up.
The battery should now be clearly visible. It will be held in place with two metal clips overlapping its edges. One of these clips is part of the mechanism cover and is fixed and the other will be able to move away from the battery in order for it to pop out. Again, with the tip of a knife or tweezers, pull the clip away from the battery so that it pops free and then pull it out of the mechanism. The arrow in the picture below shows the moving catch.
Take the battery with you to your nearest hardware store or often a pharmacist to get a replacement. Alternatively write the number on the top of the battery down and they should be able to identify it from that, for example 377 etc. The number is usually the biggest number stamped onto the top (flat) face of the battery.
Once you have a replacement battery, pull the battery clip back again and insert the battery into the mechanism. The watch should now be ticking again. If it is not ticking then the battery is either installed incorrectly (possibly upside down) or the mechanism is broken. Make sure that you battery is installed in the same orientation it was before you took it out, typically with the flat side or side with the + on it facing outwards towards the back cover.
Now replace the plastic insert, check that the slot in the insert aligns with the adjustment screw. Be gentle when replacing it to ensure that you don’t damage any part of the mechanism.
Finally you need to replace the back cover. The cover just needs to be seated correctly and then snapped into place. With some watches, this can simply be done by pressing it in with your thumbs while others will require more force. If you can’t push it together with your fingers then lie the watch face down on newspaper, place the flat part of a rubberised spanner arm over the back cover and press down slowly with your body weight until you hear it pop into place. Make sure that the cover is in the correct position before applying pressure onto it otherwise it might get bent or permanently damage the lip of the cover.
Reset the time and your watch is ready now to wear again.
Was this guide helpful? Do you have any tips and tricks which we haven’t included? Let us know in the comments section below and we’ll include them.
There’s been a growing trend towards eating a more carb-conscious or low carb diet and a number of stores and restaurants have climbed onto the band wagon offering everything from low carb pizza bases to mashes to pastas. Zucchini noodles or zoodles as some call them are an easy way to produce a low carb pasta which can be topped off with almost any sauce which works well with traditional pasta, think tomato and basil, bolognaise or gorgonzola. Its quick and easy to do with a manual or automatic spiraliser.
What You Will Need
Makes 3-4 Servings, Preparation Time 15 minutes, Cooking Time 2-3 Minutes
6-8 Medium to Large Zucchini
Manual or Automatic Spiraliser (Kitchen Aid Make an Attachment)
1/2 Tsp Salt
Pot of Boiling Water
Making the Zucchini Noodles/Zoodles
Place a bowl underneath your spiraliser attachment or device, insert a zucchini and let the machine do the rest, unless of course you have a manual one, then it will require some cranking.
You can spiralise the entire zucchini, skin and all. The skin adds some crunch and texture to the final pasta, if you don’t enjoy this then peel the zucchini first.
Take the zucchini spirals out of the bowl and lay them out on a piece of paper towel to dry. These veggies hold quite a lot of water which you want to try and dry off otherwise you’ll land up with soggy pasta. Lightly sprinkle the laid out zucchini spirals with salt.
Now its time to cook your zucchini and its important that you don’t overcook them. There are three methods you can use for this. The method I have used here is to blanch them quickly (1 or 2 mins) in a pot of boiling water, then drain them off and serve. You could also steam them in a covered bowl in the microwave for 2 minutes or lightly pan fry them for about 3 minutes until they are soft.
Once they have been drained, you can serve them up with your favorite sauce.
Do you have some free time on the weekends when you’re left wondering what to do? Here some quick and easy weekend projects that almost anyone can do to give your home a face lift and seriously add value.
Does your lounge or living area have an existing built in coal or wood burning fireplace? Chances are you don’t use it as much as you should as fires are a pain to start, clean up after and buy fuel for. Consider swapping it out for a gas fireplace, they are much more economical, safer and cheap to run. All you need to do is pull out the old steel work and install the new built in gas unit. The chimney doesn’t even need to be unblocked. Remember to call in an expert when it comes to connecting up the gas as there are bound to be gas regulations in your area.
Lighting is one of the first things people notice when they walk into your home. Add some ambient lighting to your home to really give it a warm and homely feel. Consider installing down lights, strip lights or a simply replace a light fitting with a new chandelier.
There is an increasing trend to get your home more eco-friendly and efficient. It may be a bit late to get ahead of the game but switching your lighting to LED lighting will definitely increase its appeal and save you money. Whats even better is that most of the new LED bulbs are made to simply replace the CFL or incandescent bulbs.
Up your homes curb appeal this weekend by giving your entrance and front door a fresh look. Its as easy as a coat of paint to your windows and doors and some new plants for your pathway. Your can even go the extra mile and replace the doorknobs and light fittings. If you’re on a budget, add faux paneling to your door to still get that expensive look.
Get a nice modern side table or refurbish and old piece to add a stylish storage space to your homes entrance. The table top is the perfect place for a large vase or ornament and the drawers can be used as functional drop areas for keys, wallets and other items on the go.
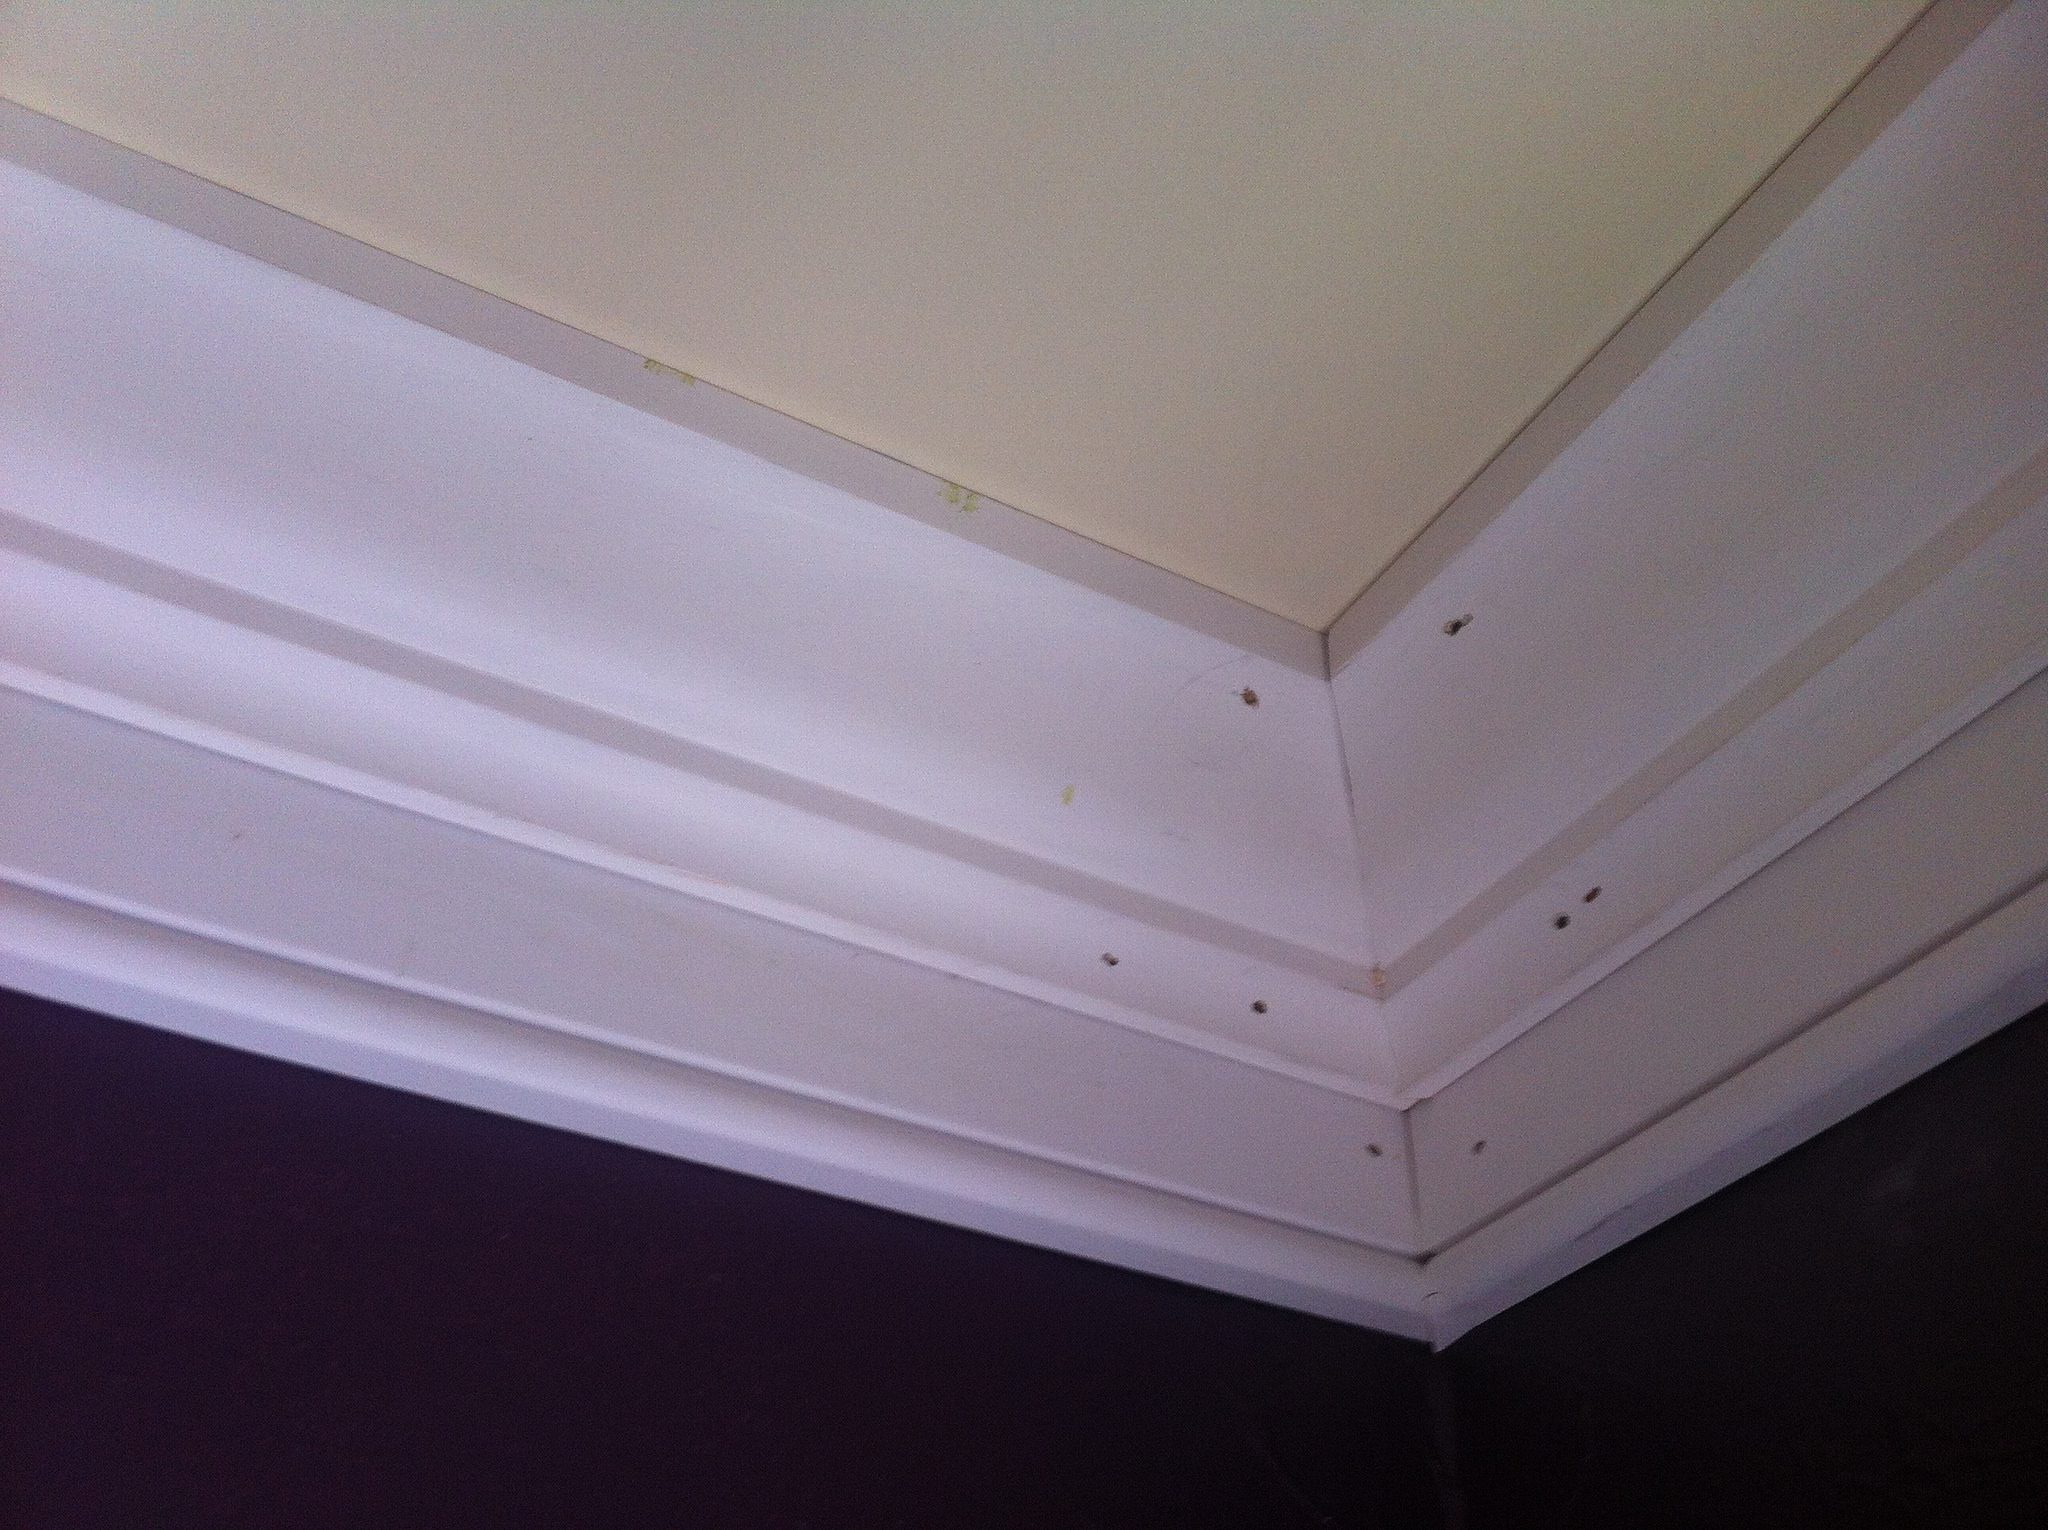
Crown moulding and base boards tend not to be the focal point of a room but make quite a big difference when they are missing. Modern crown moulding is really easy to cut and install and is a cheap weekend project.
Do you have stuff lying around on all of your shelves and counter tops? Get your home in order by making a place in a cupboard for everything causing clutter. You can also make it easier to reduce clutter up by following these tips and tricks for keeping a clutter free home.
Taps and fittings are usually one of the first things to date in a bathroom or kitchen. The good thing is that they are also really easy to change. They usually just have a flexible connection to a hot and cold water supply and a nut or two holding them on. Swap them out for some modern stainless steel mixers, bring the old ones along to ensure that they will fit in the existing holes.
Over time, shower heads become blocked up with mineral deposits and generally start to look outdated. Clean up your shower head or replace it with a new and more modern one to match your new faucets. You can even get a low flow eco-friendly shower head to save water.
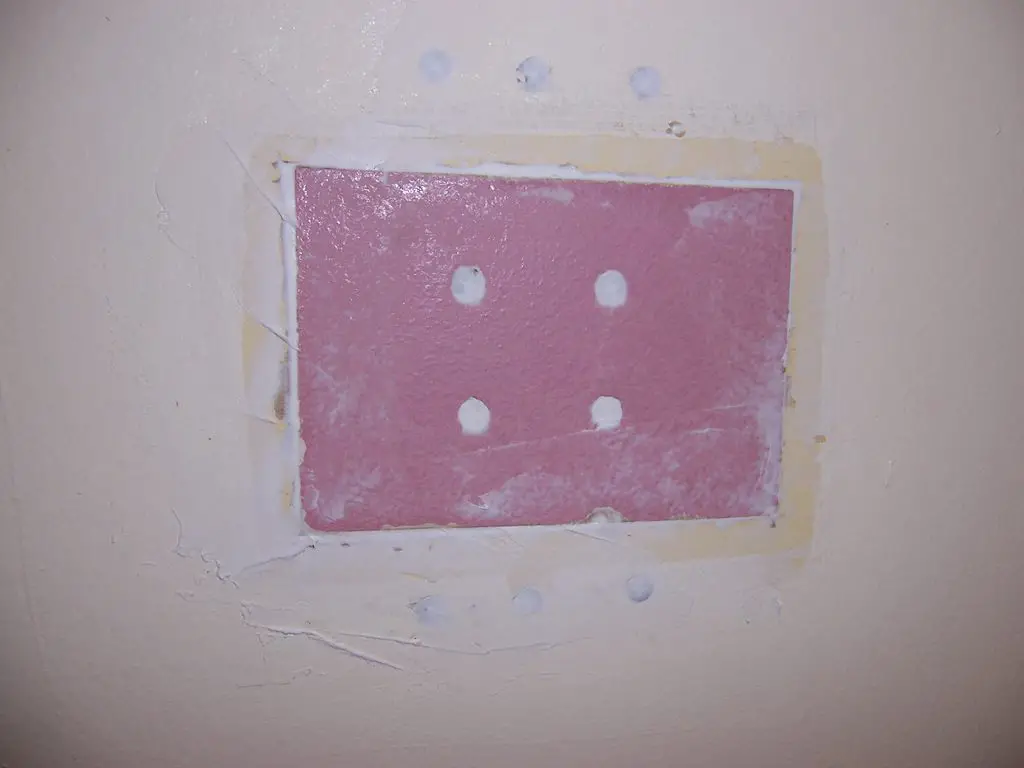
A hole in the wall may seem like a pain to get fixed but it really reduces your homes value. It’s actually quite easy to patch drywall yourself and if you are not up to the challenge then a handyman will do it for you in less than a day.
Here are five DIY home remedies for your hair which actually work.
Remove Product Build Up
If your hair is left permanently greasy due to a build up of hair product which wont come out with normal shampoo, try washing it with dish-washing liquid. The strong de-greasers in the dish-washing liquid will strip all of the excess product. Don’t do this too often though as the liquid will also remove the natural oils from your hair.
Homemade Dry Shampoo
Do you have darker hair in which the white residue left over from traditional dry shampoos shows up in? Try making your own, suitable for brown and red. Mix up a batch with 2tbsp corn starch, 2 tbsp cocoa powder and a half teaspoon of cinnamon powder. Apply and shake through for an instant cleanse.
Get Rid of Dandruff
Do you have any expiring ibuprofen (Nurofen) lying around? Crush it up and put it into your normal shampoo for an easy anti dandruff shampoo. The jagged edges in the crushed tablets will assist in improving dandruff removal according to InStyle
Natural Highlights
This is an age old trick, but it still works well and is a lot cheaper than a trip to the salon. Squeeze out the juice of a lemon into a cup and use a toothbrush to apply it to the strips you want highlighted. Now go and sit in the sun for a while (with sunscreen), around twenty to thirty minutes usually works best. Do this for a few days and lightened streaks are as easy as that. To lighten your whole head, pour some of the juice through all of your hair before sitting in the sun.
Remove Hair Extension Glue
Are you stuck with trying to remove the glue left behind after taking out extensions? Try soaking the gluey bits in olive oil for around 15 minutes. The oil will help to soften the glue and allow it to come out easily.
Do you have any more tips and tricks for your hair? Let us know in the comments section below and we’ll add them onto our list.
Let’s be honest, your Halloween decorations aren’t complete without a carved pumpkin. Carving a basic face into a pumpkin is actually quite easy and doesn’t take more than half an hour to do. They key is to get it right the first time and this is made easy by using a marker to draw on the pumpkin before you start cutting. So grab a pumpkin, a marker and a knife and lets get started.
What You Will To Carve Your Pumpkin
A Pumpkin (Obviously), Bigger Is Better
A Marker Pen
A Small Sharp Knife
Two or Three Tealight Candles
Carving Your Pumpkin
Firstly you need to draw on your design, there are literally hundreds of ideas on sites like Flickr and Pinterest, a quick search and you’ll have an idea of what you want to carve. Now you need a bit of an artistic touch, draw an outline of the design you wish to carve onto your pumpkin, the nice thing about this method is you can wipe it off and make any changes quickly and easily without messing up your pumpkin. It also doesn’t matter if you have a few sketch lines or crossed out lines as we’ll wipe them off afterwards anyway.
Once you have your design drawn on, grab a knife, we need to cut the lid and hollow out the pumpkin. Begin by cutting a circle around the stem of the pumpkin (you can also draw on a circle to guide you) about 10cm (4″) in diameter is fine. Cut lightly at first to mark out your circle and then cut deeply towards the centre of the pumpkin going around the stem. Eventually, if you have cut deep enough all the way around, you’ll be able to pull the “lid” off. Cut the bottom of the lid square and put it aside.
The inside of the pumpkin should already be mostly hollow but it will be stringy and full of pips. Using your hand, pull all of the stringy bits and pips out. You can also use a spoon to really clean up the sides and the bottom well. Scrap as much as you can off without digging into the meat of the pumpkin.
Now its time to get carving. Using your sharp knife, carefully cut along your marked lines. Make shallow cuts initially and slowly get deeper and deeper to ensure that you don’t slip and cut yourself or the wrong part of your pumpkin. Once you have cut a shape along all of its sides, it should be relatively easy to push into or pull out of the pumpkin depending on the angle you held your knife. Wiggle the bits around to see where more cutting is required.
Once you have rough carved your pumpkin, do the finer details and clean up any rough or unclean edges. Once you are happy with your design, it is time to wipe off the marker. The marker should come off with a bit of soap and a cloth but if it is a bit more permanent then you may have to use some nail polish remover and cotton wool to wipe it off.
Your pumpkin is now ready to put on display. Just before it gets dark, place two or three tea light candles into the centre and light them. Put the lid back on and your pumpkin is ready to use. The glowing grimace of a jack o lantern is sure to attract attention on your doorstep or down the driveway!
Have you carved a pumpkin his Halloween? Send us your pictures using the mail link above and we’ll add them to our page or let us know your tips and tricks in the comments section below.
There’s nothing like carving a pumpkin to get you craving a home baked pumpkin pie, try this great recipe to fill your home with the fresh pumpkin spice fragrance.
With Halloween almost upon us and Thanksgiving around the corner, it is almost time for pumpkin pie! Fill your home with that warm nutmeg and cinnamon fall scents with this amazingly good recipe which isn’t too difficult to make.
Makes 1 Pie, Preparation Time 35mins, Cooking Time 1hr 30mins
Ingredients For Pumpkin Pie
750g (1.65 lbs) Pumpkin (Peeled, seeded and cut up into chunks)
1 Roll of Shortcut or Puff Pastry (Depending on your preference)
2 Eggs
2 Tbsp Butter
3/4 Cup of Milk
1/2 Cup of Castor Sugar
1 Tsp Icing Sugar
1 Tsp Ground Cinnamon
1/2 Tsp Ground Nutmeg
Pinch of Salt
Making The Pumpkin Pie
First you need to cook the pumpkin, boil it in a large pot. Cover the pumpkin chunks with water, bring to the boil and then allow to simmer for 15 minutes until it is soft. Drain the water off and allow the pumpkin to cool off.
Now heat the oven to 180°C (360°F). Unroll the pastry and press it into the bottom of a tart tin or dish, trim off the edges for a neat finish. If you have pastry beads then place them in the bed of the pastry before baking to prevent it from coming off the bottom of the dish. Bake the pastry in the oven for 15-20 minutes until golden brown. Remove the dish from the oven and allow it to cool.
In a large bowl, beat the eggs and then add the pumpkin, nutmeg, half of the cinnamon, salt, sugar, butter and milk. Beat until a smooth puree is formed, use a food processor if necessary.
Pour the mixture into the pastry shell and smooth it out. Now bake it in the pre-heated oven for 45-50 minutes until the filling has set.
Remove the pie from the oven and allow it to cool. Dust the remaining cinnamon and icing sugar over the top to finish it off. Serve chilled with whipped cream.
If you love baking then you’ll love our copycat Cinnabon recipe, you’ll also make the neighbours jealous with the delicious baked cinnamon fragrance.
Turn your garden into a paradise for butterflies with these simple steps. Try to focus on attracting some of the native ones to your area, they will be easier to attract and will likely live longer than any exotic species in the wrong environment.
Feed The Caterpillars
Caterpillars are the first stage of a butterflies life so in order to create a home for butterflies, you need to create a home for and feed the caterpillars. Most people don’t want caterpillars in their garden as they eat up the leaves of plants and flowers. Plant some thick greens like milkweed to provide food for the caterpillars and they will leave the other plants and flowers alone.
Butterflies eat nectar from flowers, plant lots of nectar producing flowers in sunny locations around your garden. They especially love bright colours like red, orange, yellow and purple. Try to stagger the planting of your flowers or choose a wide variety of flowers so that there is at least one bed of flowers in bloom at all times. Follow this link to find out what plants are best for which butterflies.
They also love fruit. Put out peels, cores and slices of fruit in an open location for them to feed on.
Avoid Pesticides
This may be an obvious one but you should avoid pesticides and insecticides as far as possible. They are usually not selective and kill off a broad range of insects and their young. If you are trying to get rid of a particular pest, try to research natural methods.
Create A Puddling Area
Butterflies love a puddling area in order to congregate. This only needs to be a shallow pan with some course sand which is kept moist. Butterflies will congregate in this area on the sand.
Do you have any tips and tricks for attracting them to your garden? Let us know in the comments section below.
Cover Image: Butterfly by Bill Staney. All images in this post are used under CC BY 2.0
Everyone knows that they should be cleaning things around their home but how often? Some things get used more than others, some don’t seem to get dirty and some are always dirty. Here is a useful guide and pinup on when to clean what around your home:
Clean Every Day
Make the Bed
Put Dishwasher On
Wipe Kitchen Counters
Wipe Bathroom Counters
If you’re particular about cleaning, then have a look at these 9 things to do daily to keep a clean home for some additional daily cleaning advice.
Twice A Week
Do the Laundry
Mop Tiled Floors
Vacuum Floors & Furniture
Wipe Out TheMicrowave
Every Week
Wipe Down Bath & Shower
Shine Glass Mirrors
Change Bedding
Throw Out Expired Food
Every Month
Dust Blinds
Clean Out Dishwasher & Washing Machine
Dust Light Fittings
Wipe The Inside of the Oven
Twice A Year
Clean Out the Fridge
Defrost & Clean Out the Freezer
Descale Tea & Coffee Makers
Vacuum the Mattresses
Every Year
Sweep or Brush Out the Fire Place
Deep Clean Carpets & Upholstery
Wash Drapes & Curtains
Dust Out Vents
This list is obviously quite generic, if there are only two of your living in your home then you won’t need to run the dishwasher every day and perhaps twice a week is fine. Feel free to adapt it as you see fit in order to accommodate your families routines.
If you think that you can only use the dishwasher for cutlery and crockery, pots and pans, think again. Here’s a list of seven uncommon household items which you can put into the dishwasher. You’ll save yourself loads of time and the dishwasher will probably do a better job at sterilising them than you would have done.
What should we add to this list? Do you have any items which you regularly clean which we have missed? Let us know in the comments section below and we will add them on.