Try out these secret codes for additional functionality on your iPhone! All you have to do is go to the phone screen, type in the numbers and press call.
Hide Your Caller ID
Type #31# and then the number you are trying to call. This code temporarily hides your caller ID so that the person you are calling will not be able to see that it is you calling them.
Get Your IMEI Number
Type *#06#. Your phone has a unique serial number which is programmed into it as an identifier. The number is especially useful if your phone is stolen and you wish to block it from being used.
Get Your Signal Strength As A Number
Type *3001#12345#*. This will bring up a list of options. Don’t select any of the options but rather push and hold the power button. When the slide to power off option appears, push the home button. Your signal strength indicator will now be replaced with a number in decibels. The number is negative so the lower the number, the higher the signal strength. Around -40 is full strength while anything below -120 is very low strength, You can toggle between the number and the circles by tapping on the signal strength.
Call Forwarding
Type *#21#. This will allow you to check to see if you are forwarding calls and to the number they are being forwarded to.
Call Waiting
Type *#43#. This will show you if you have the call waiting service turned on or off. To turn it on, type *43# and to turn it off again type #43#. You will probably have to pay for this service so check with your carrier first.
Do you know how you should be charging your iPhone? Extend your phones battery life by following these iPhone charging tips.
Have we left out any codes that you know about? Let us know in the comments section below.
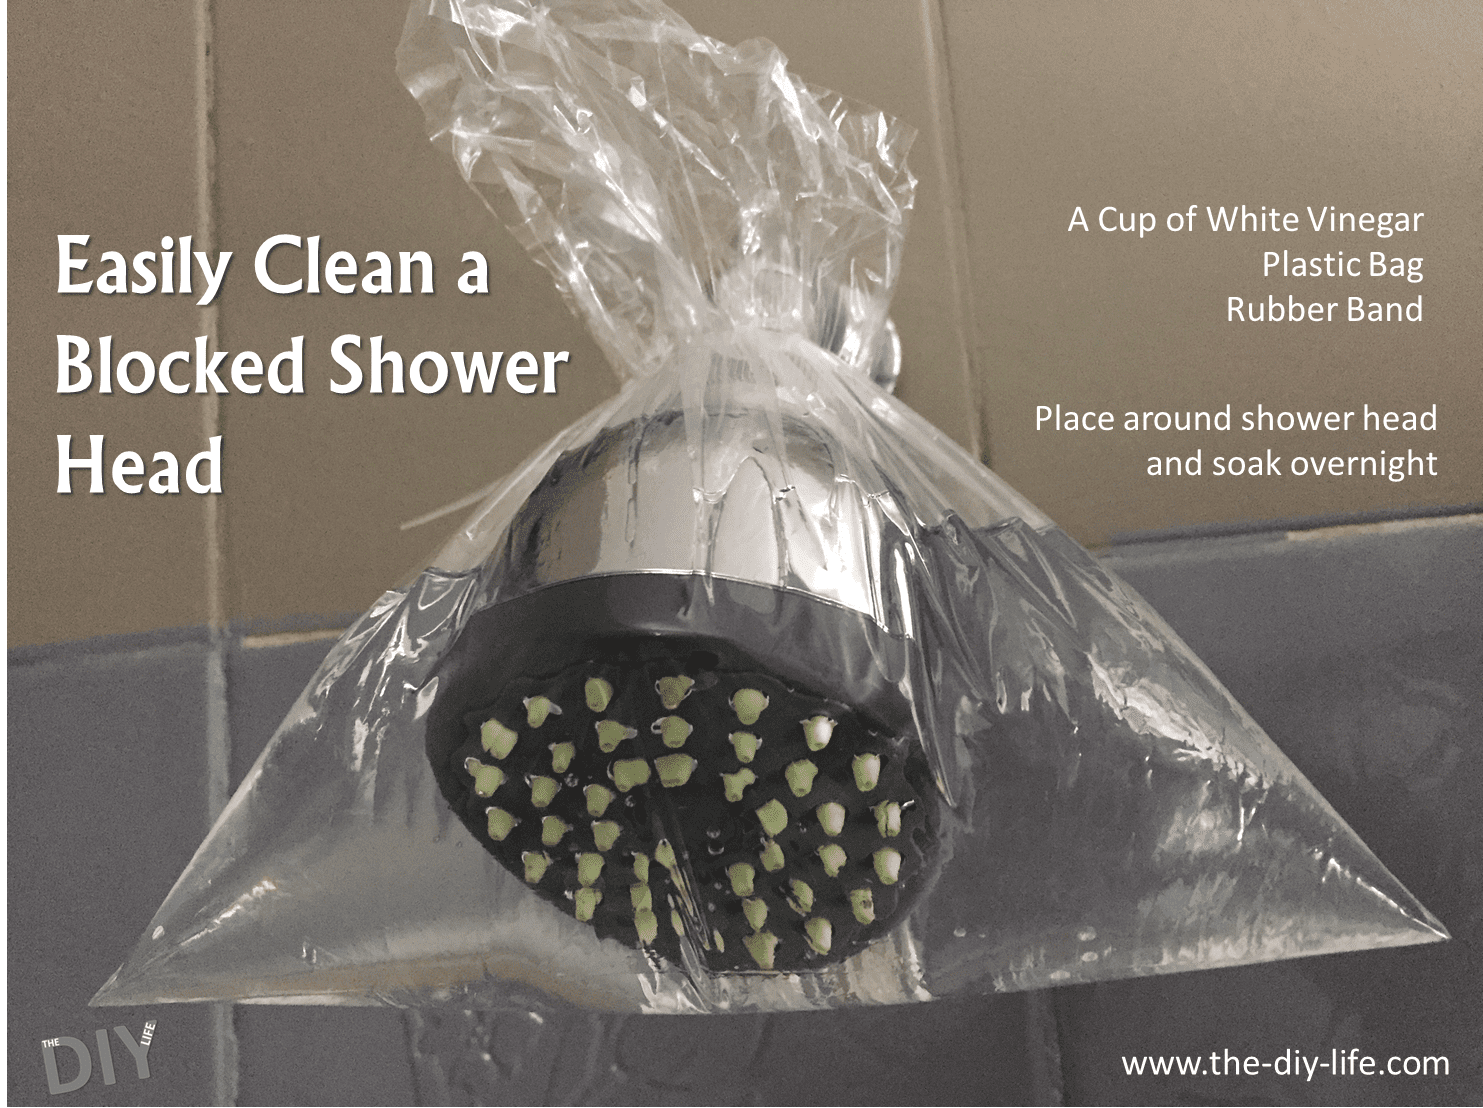
Has your shower head started spraying in different directions or have some holes become blocked. This is due to mineral deposits which have built up and stopped the water from being able to flow freely. Fortunately, there is an easy way to get rid of these mineral deposits which doesn’t require the head to be removed or scrubbing and brushing.
What You Will Need To Dissolve The Mineral Deposits
White Spirit Vinegar
Plastic Sandwich Bag
Rubber Band or Zip Tie
How To Remove The Mineral Deposits From Your Shower Head
If you are using a rubber band then slip this over the shower head first. You may need to loop it around the stem of the shower head a few times so that it is snug. Next fill the sandwich bag halfway with the vinegar. Slip the bag over the shower head so that the head and especially the holes are completely submerged in the vinegar. Slide the rubber band down around the bag to hold it in place. If you are using a zip tie then zip it around the neck of the back onto the stem. Leave the bag around it for a few hours or overnight. Remove the bag and wipe the head down with a soft cloth.
If That Doesn’t Work
If it is still not spraying correctly then there may be dirt trapped inside the head. You’ll have to remove the shower head with a plumbing wrench by unscrewing the nut on the arm. Place a cloth between the wrench and the nut so that you do not scratch the chrome finish. Now spray water backwards through the shower head nozzle. Hold it under a faucet and try to rinse any debris out of each hole. You want the water pressure to be as high as possible. Once this has been done and the head is rinsed out, screw it back onto the stem.
As with our other natural ways to get rid of ants, mice and other pests around your home, there is also a way to control mosquitoes. These plants should be planted in the areas around where you and your guests relax as well as near windows and doors for the best results.
Get Rid of Mosquitoes With These Plants & Herbs
Citronella
Citronella is the first and possibly the most obvious. We’ve all seen Citronella candles being used to repel mosquitoes and other insects, why not try the actual plant. It is a decorative plant which does well in pots and can be moved around into the area it is needed.
Basil is easy to grow on a sunny windowsill or in the garden. It is also a useful herb to use in the kitchen for pasta sauces and fresh summer salads. You can also use basil essential oils to make a natural repellent for your skin.
Mint
Mint is a really easy to grow plant which can be grown from seeds or clippings. Mosquitoes and most other insects hate the smell and taste of it so it is great to use in the garden as an all-round pest control. It is best to plant mint into pots as it can be quite invasive if it is given place to grow.
Like basil, rosemary is also a dual purpose repellent and herb. It is a hardy plant which just requires a little water and an occasional trimming in order to thrive. It can also be used in a number of chicken and lamb dishes.
Lavender
Lavender has a very distinctive smell; it is used in a number of soaps, creams, balms and oils and has amazing natural properties. Plant Lavender as a decorative feature along walls and pathways and your home will be free of mosquitoes. You can also use lavender products and oils as a great natural repellent.
Geraniums
Lastly, Geraniums. You get a variety of Geraniums which are citronella scented. Plant these in and around your patio, porch and areas of your garden where guests would be likely to sit. The leaves can also be crushed into lotions and used as a skin repellent.
Have you used any of these plants or any other plants to naturally repel mosquitoes? Let us know in the comments section below. If you enjoyed this post, have a look at these 8 easy vegetables which can be grown at home.
Cover image: Geranium by Ruth Hartnup. All images used in this post are used under CC BY 2.0.
In this project, we will connect an LCD screen to an Arduino and use it to display some basic text. This covers both the physical connections and the programming required to get an LCD to work. If this is your first project then we recommend that you familiarise yourself with programming an Arduino first.
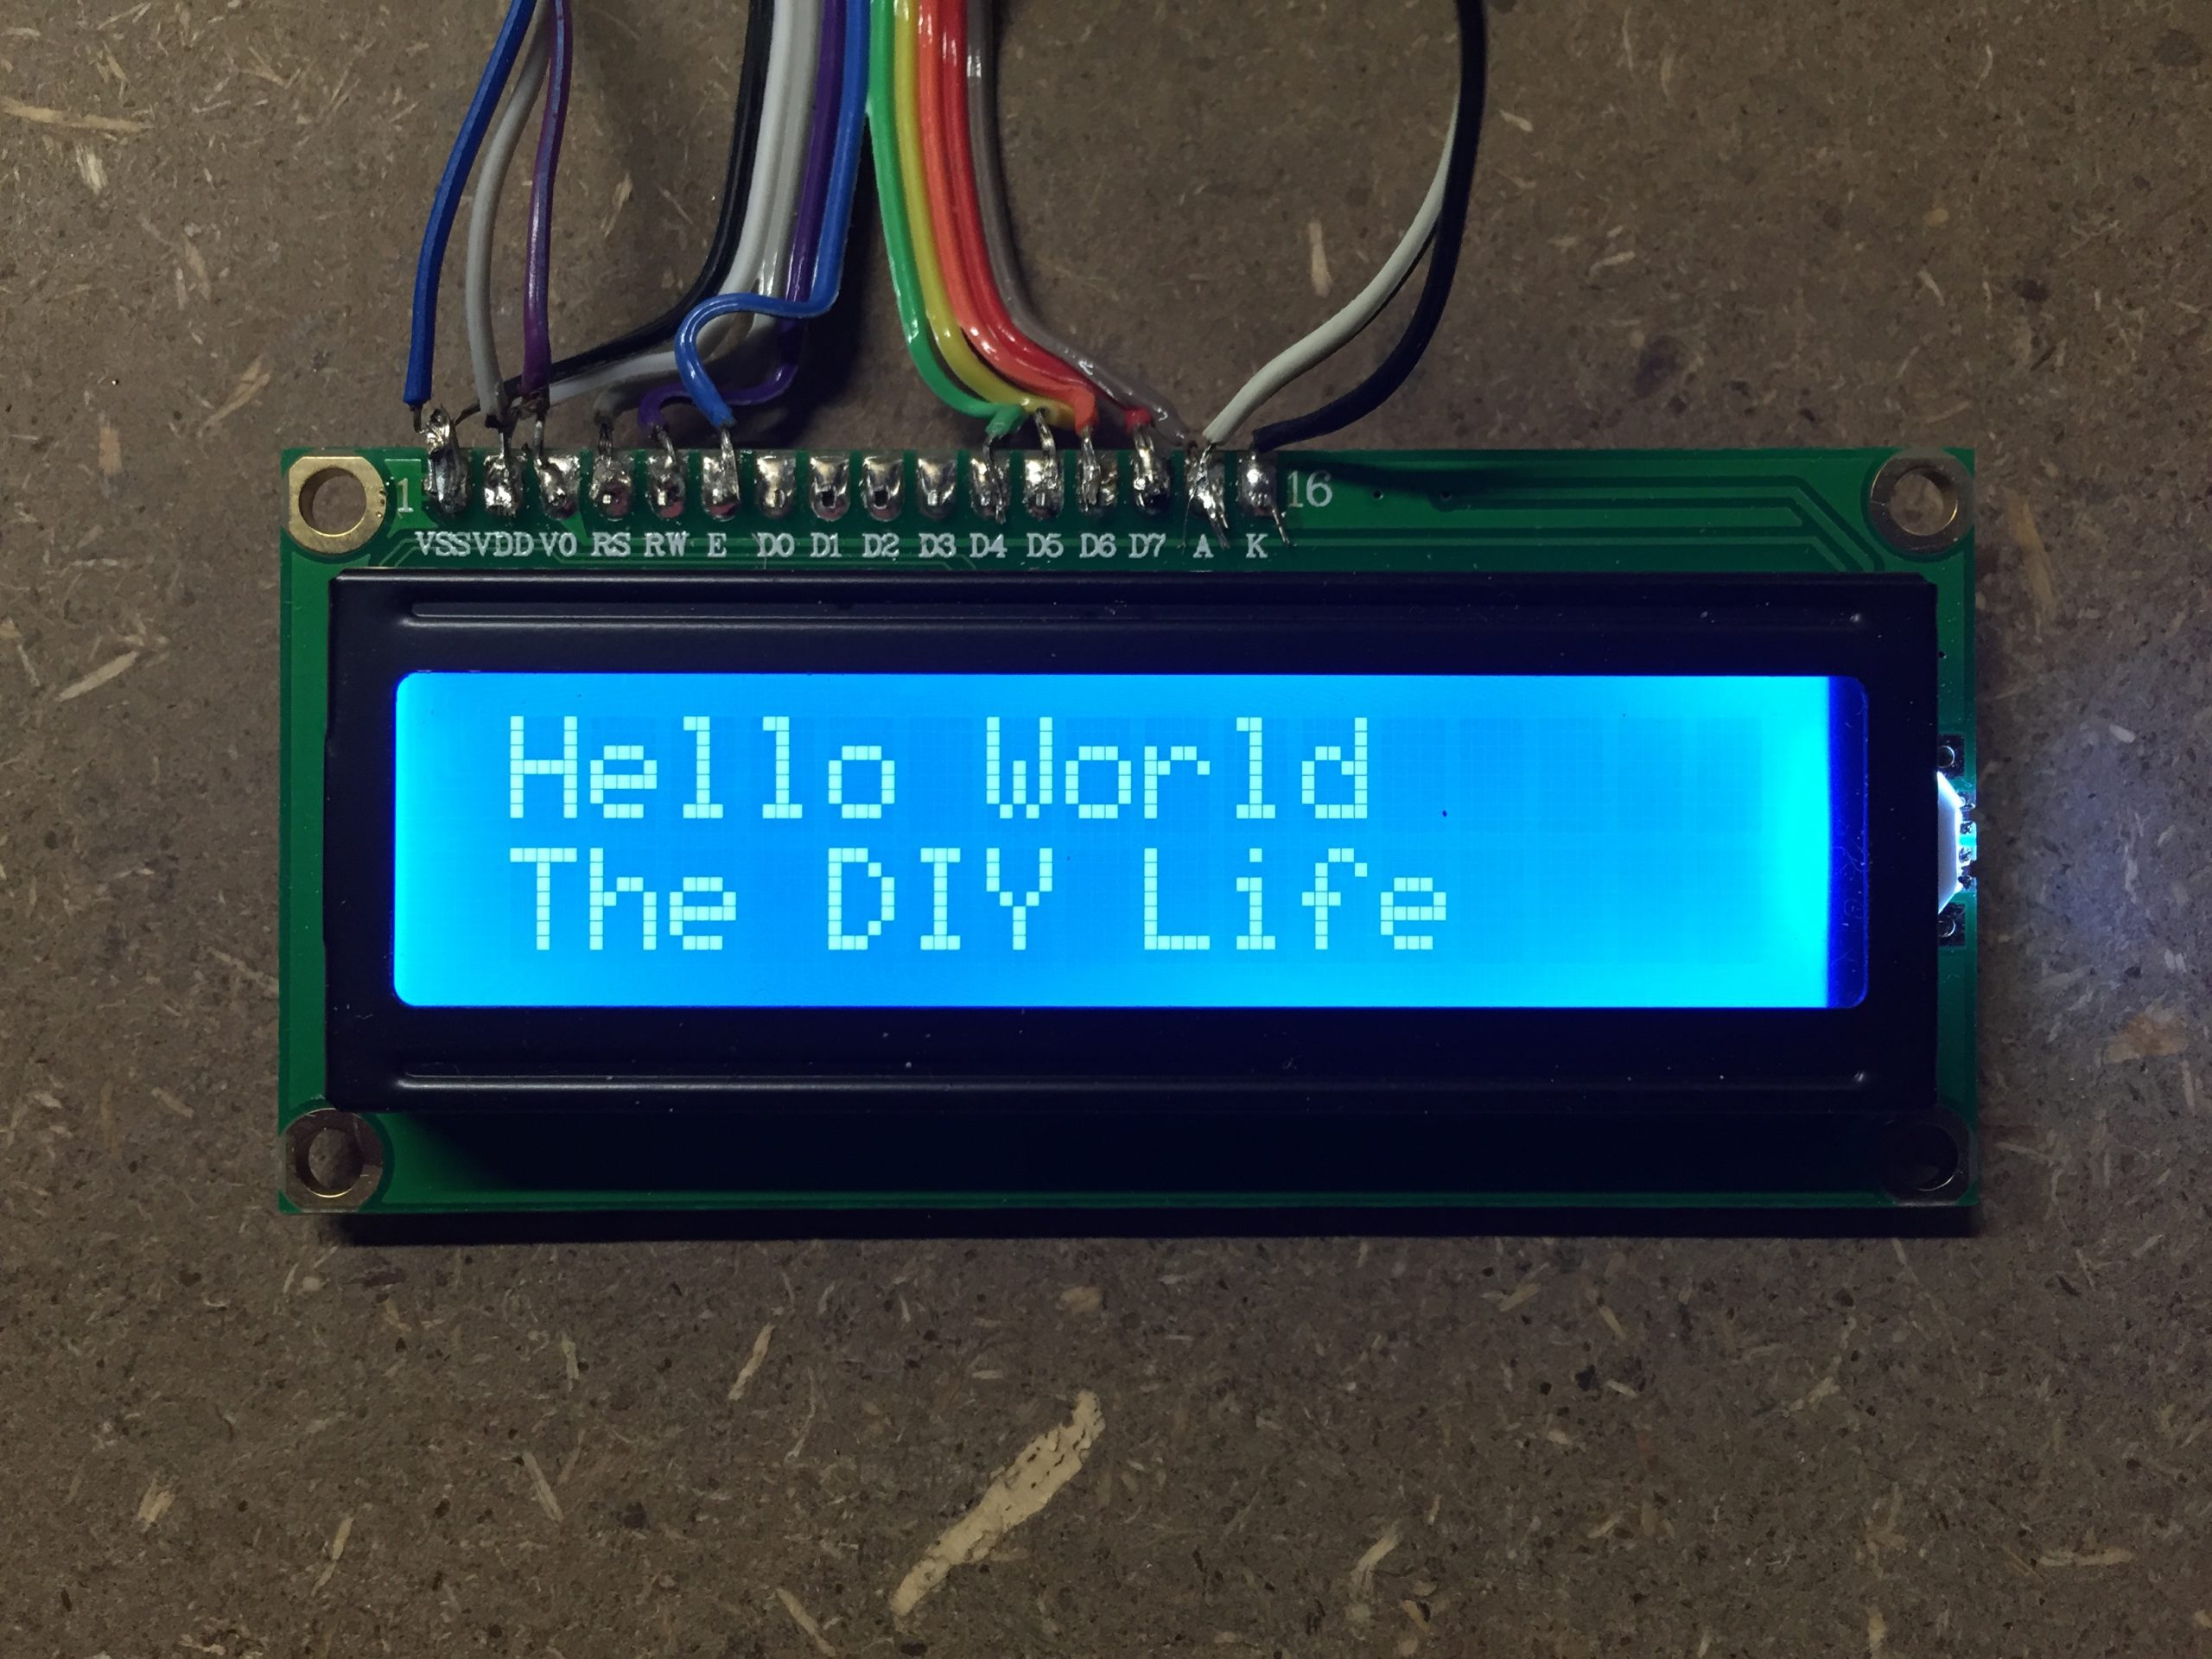
This project consists of two parts, one which prints Hello World, The DIY Life and a second which prints The DIY Life and then prints a seconds since start-up counter on the second line.
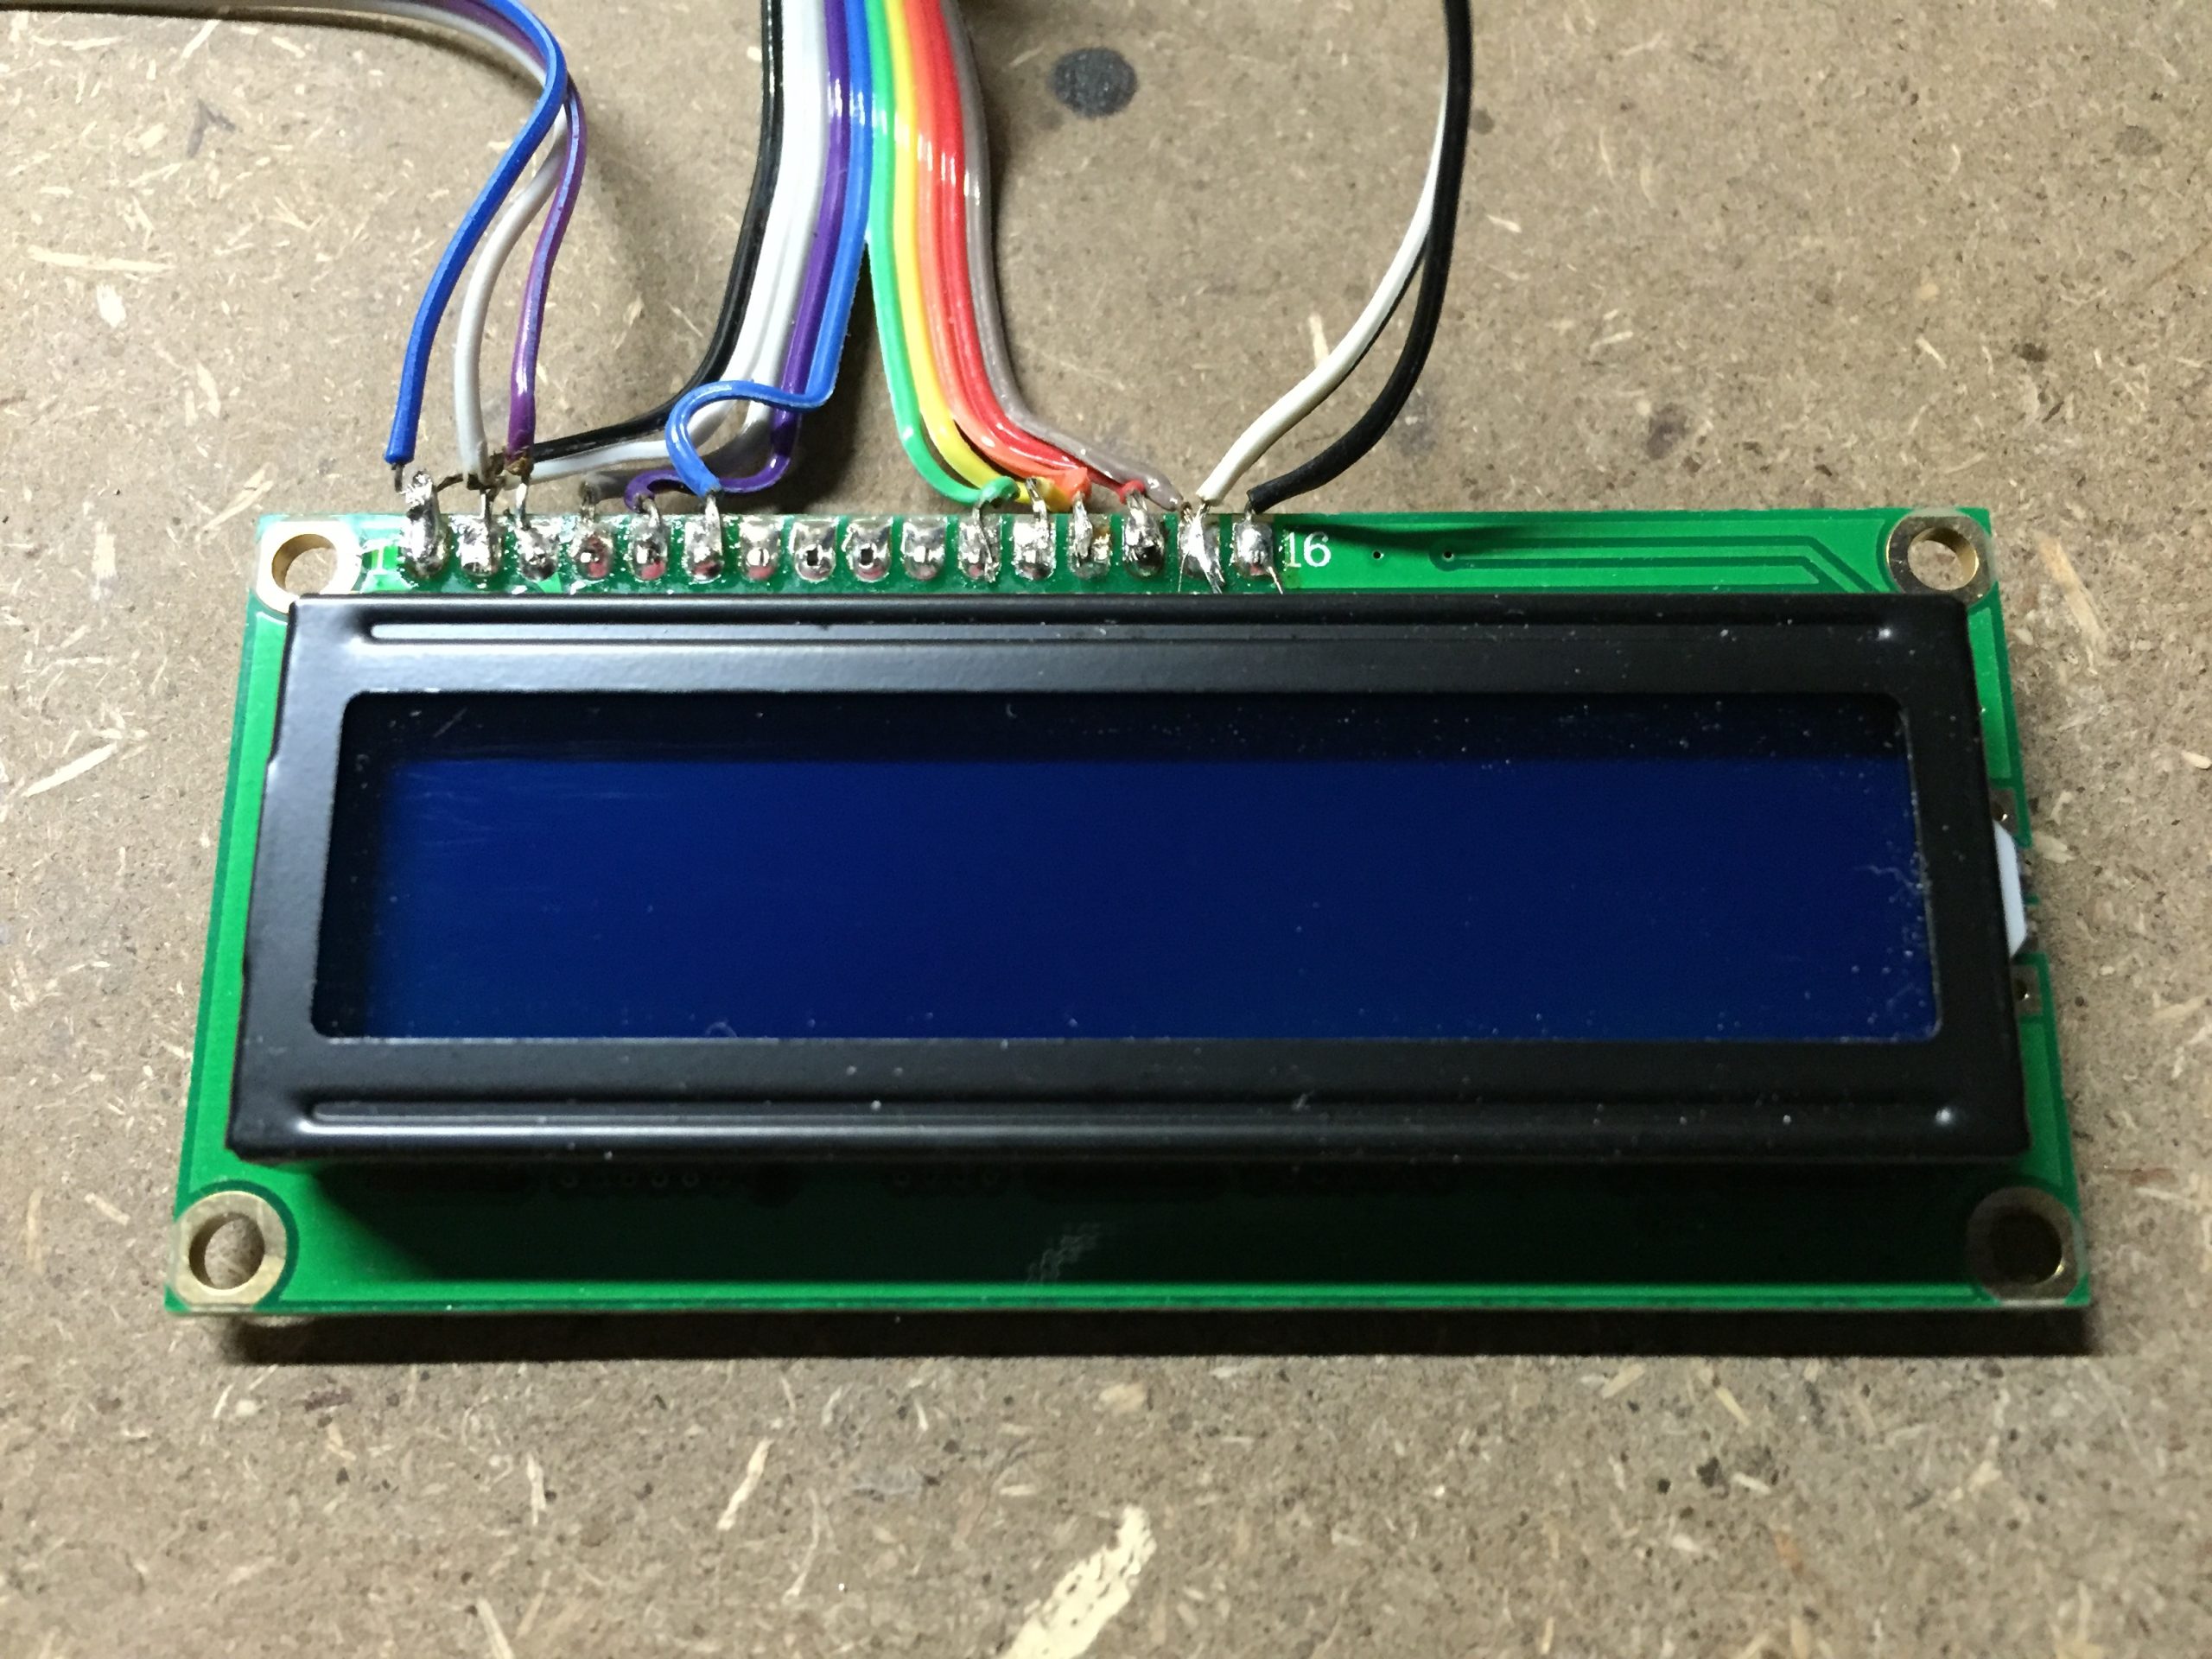
The screens we are covering in this project have 16 pin parallel interfaces, meaning that the Arduino has to send data on multiple pins at the same time in order to change the screen text. Fortunately, the Arduino has a built in library for LCD screens which are compatible with the Hitachi HD44780 driver so we can make use of the built in function library and do not have to manually code functions to control the screen.
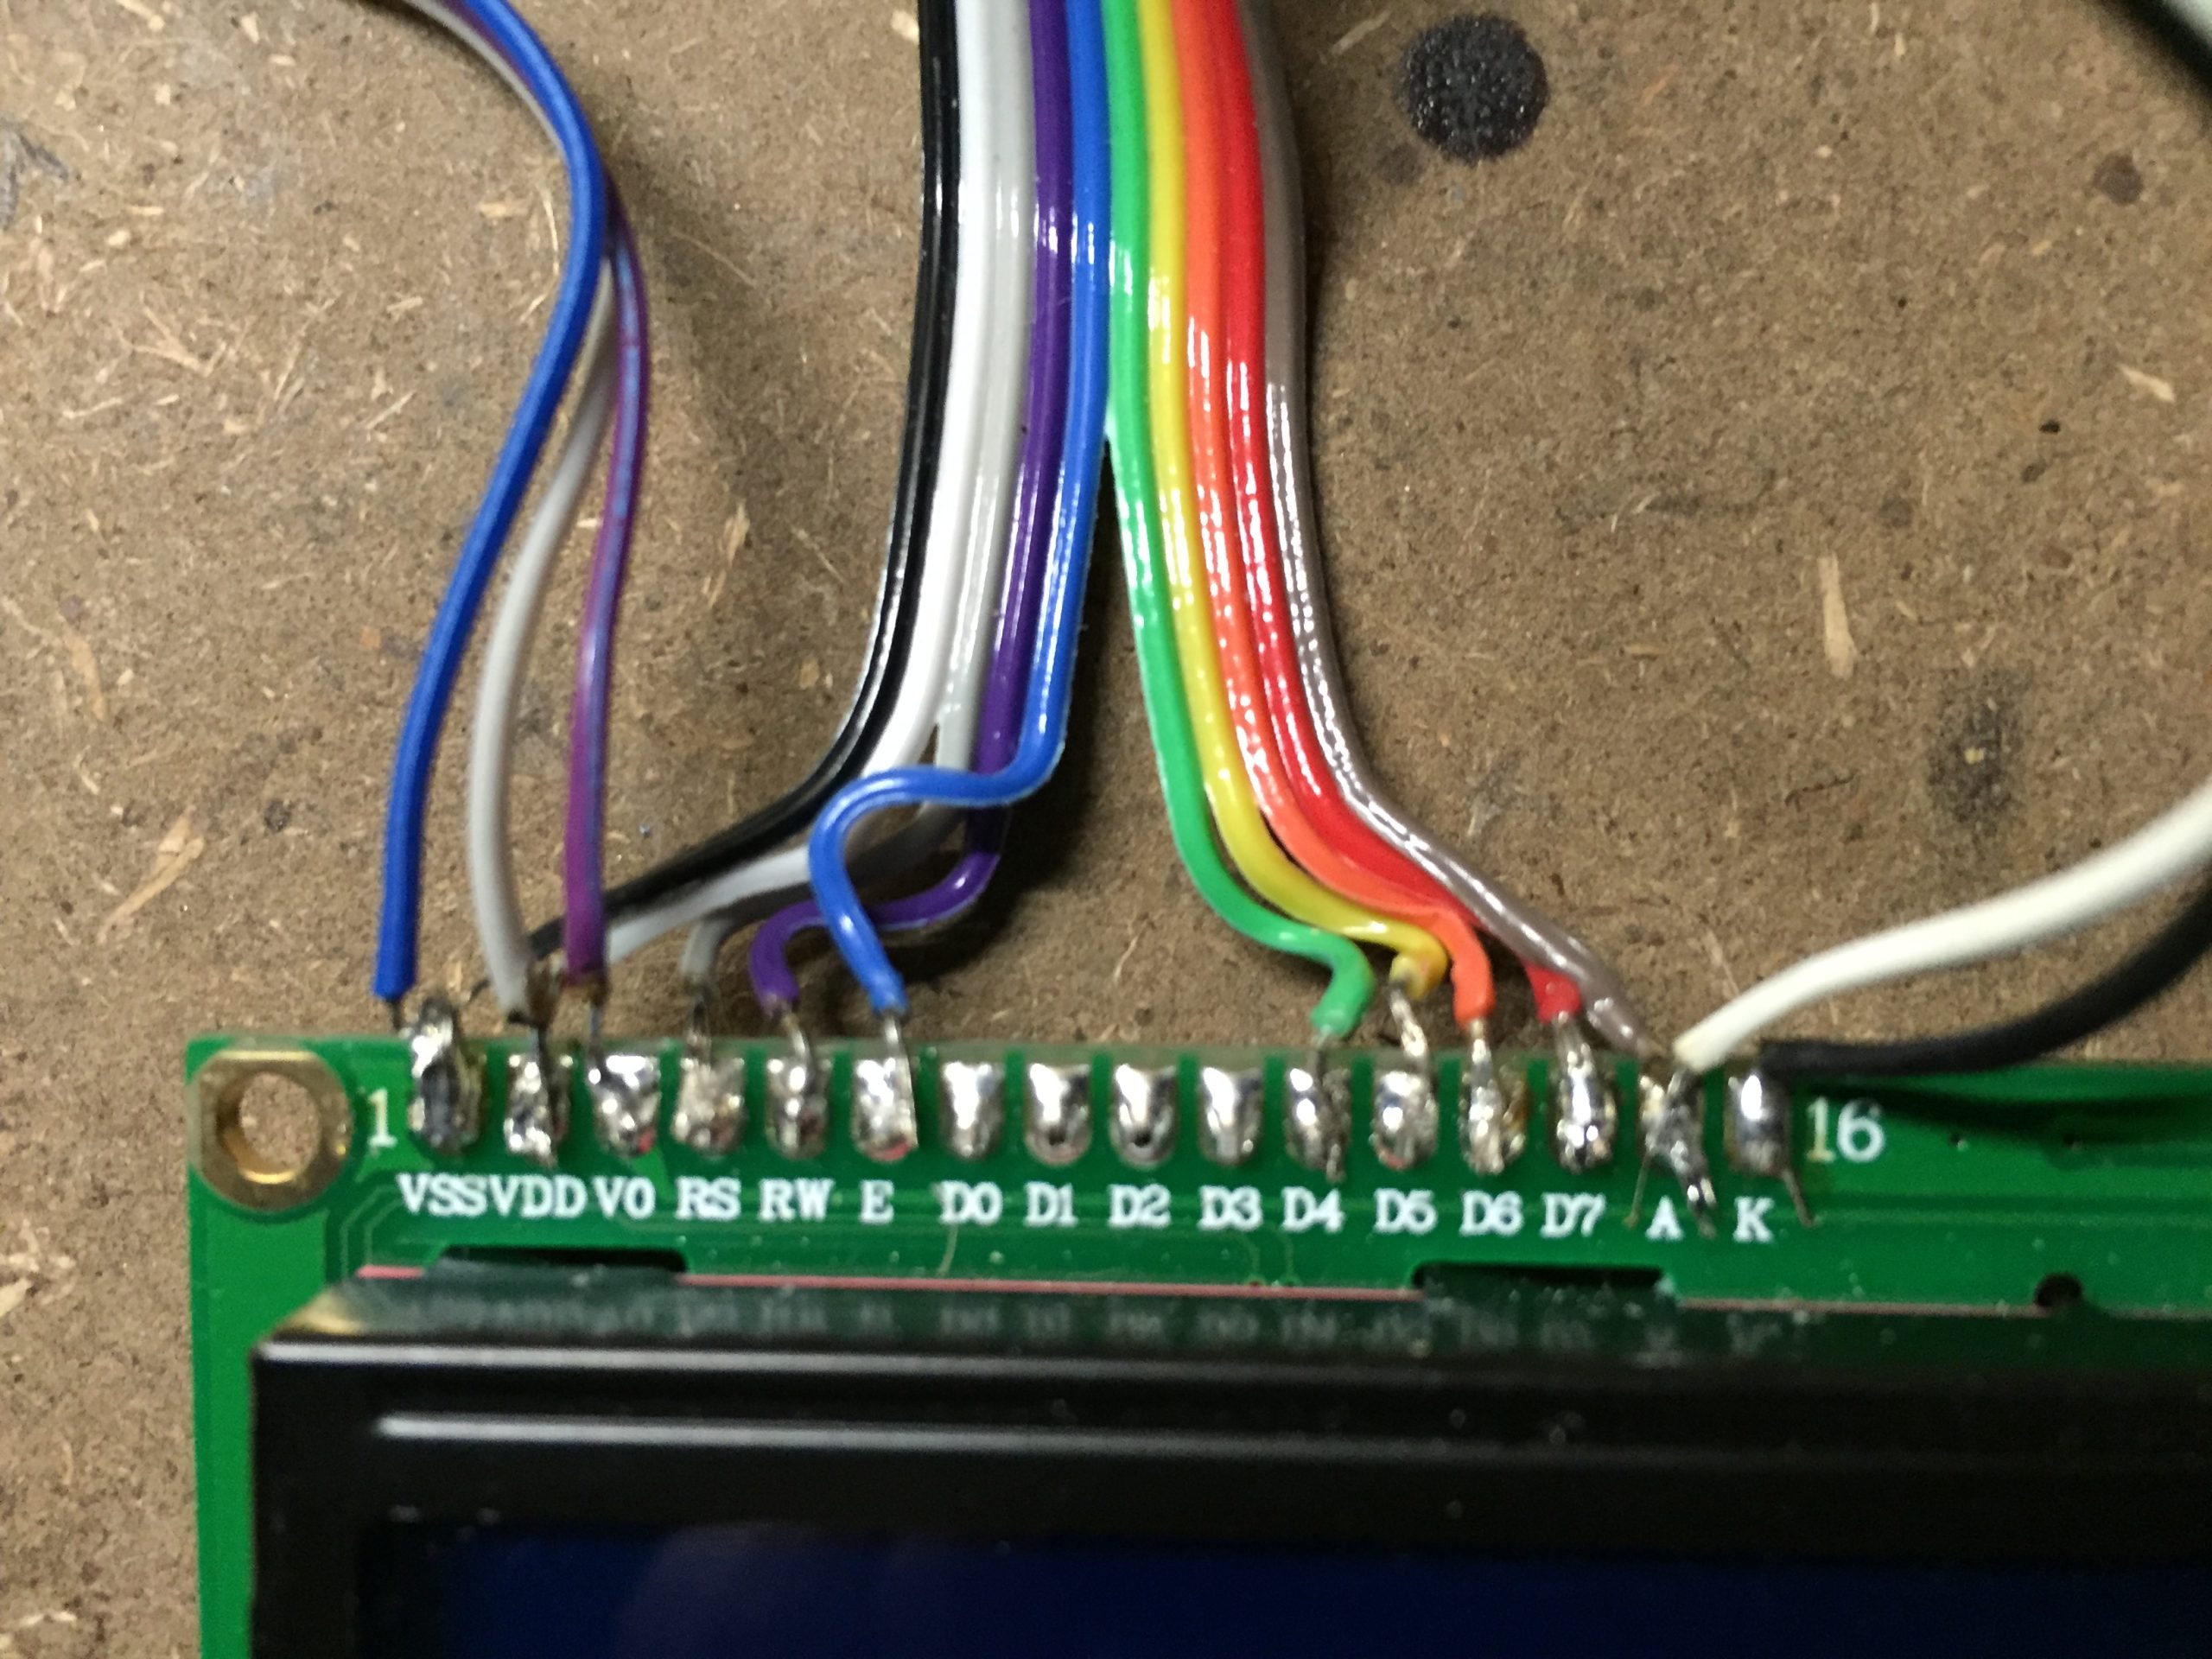
To understand the basic on how the screen is operated, there are three pins which control the registers (RS, RW and E), then 8 data transfer pins (D0-D7) and finally a set of pins to provide power, control the contrast and turn the backlight on and off. For displaying general text you only need to make use of 4 of the data transfer pins as the screen will be running in 4 bit mode.
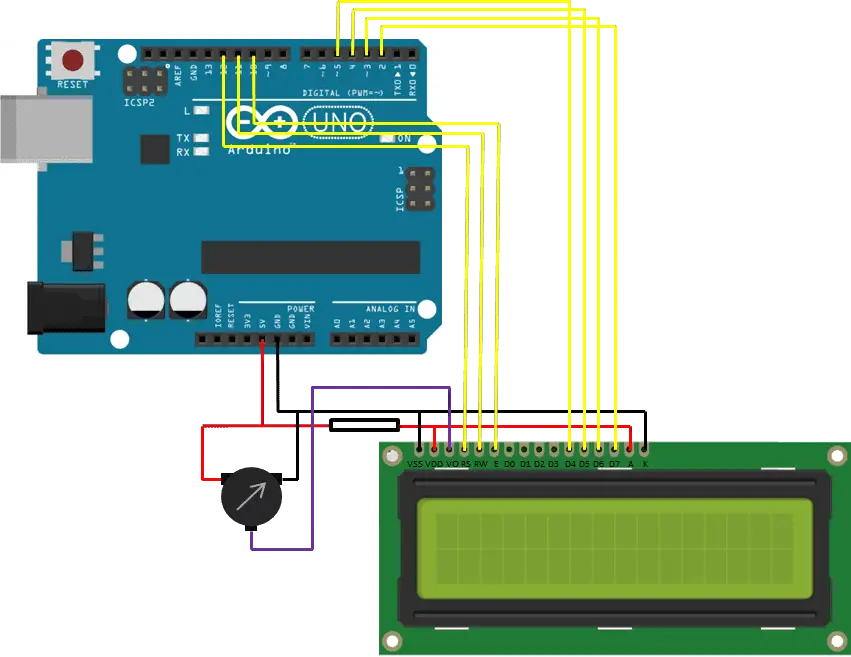
What You’ll Need To Connect An LCD Screen To An Arduino
Firstly you need to connect the screen up as shown in the diagram below. This can be done in one of two ways. You can solder a wire ribbon onto the screen and then pins on to the ends of the wires which then plug directly into the Arduino or you can solder a pin header onto the screen and plug it into a breadboard which you can then connect to the Arduino using jumpers.
The 10K pot is used to adjust the contrast of the screen. The 220Ω resistor is connected along the positive supply for the back light in order to limit the current.
The pin connections to the LCD screen are as follows: Pin 10, 11 and 12 are used to control the registers and are connected to the E, RW and RS pins respectively. Pins 2,3,4 and 5 are the data transfer pins and are connected to d7, d6, d5 and d4 respectively. Be careful when connecting the pins as the numerical sequence on the Arduino pins is the opposite to the screen pins.
Upload the Code to Control the LCD Screen
Displaying Static Text
Now you can begin the coding. For the first example, we will only be using the setup loop as we just need the screen to display “Hello World” and “The DIY Life” on the screen without any further changes.
// Michael Klements
// LED Screen Example
// 25 August 2016
// www.the-diy-life.com

#include <LiquidCrystal.h>

LiquidCrystal lcd(12, 11, 10, 5, 4, 3, 2);

void setup()
{
  lcd.begin(16,2);              // Defines the number of characters and rows
  lcd.clear();                  // Clear the screen
  lcd.setCursor(0,0);           // Set the cursor to first character, first row
  lcd.print("Hello World");     // Display this text
  lcd.setCursor(0,1);           // set cursor to column 0, row 1
  lcd.print("The DIY Life");
}

void loop()
{

}
We begin by importing the Liquid Crystal library. This enables us to use short functions to control the screen instead of having to manually code each letter or cursor movement.
Next we create an object called lcd as an instance of the Liquid Crystal library. Here we also need to assign the pins which we have setup above.
Now we move on to the setup code method. We first tell the lcd object how many columns and rows or characters our screen has. In this case the screen size is 16 x 2. We then clear the screen to ensure that it is blank, set the cursor to the first row and first character, then begin sending the text “Hello World” to the screen. We then tell the cursor to move to the second row of characters and print “The DIY Life”.
If you have connected everything correctly then the screen should now display Hello World on the first line and The DIY Life on the second line. You may need to play around with the contrast adjustment on the 10K pot to make the text visible, this adjustment is shown in the video below:
Displaying A Counter
Now we can move onto using the loop function to constantly change information on the screen. First we remove “Hello World” and move “The DIY Life” to the first row, this is all done in the setup function.
// Michael Klements
// LED Screen Example
// 25 August 2016
// www.the-diy-life.com

#include <LiquidCrystal.h>

LiquidCrystal lcd(12, 11, 10, 5, 4, 3, 2);

void setup()
{
  lcd.begin(16,2);              // Defines the number of characters and rows
  lcd.clear();                  // Clear the screen
  lcd.setCursor(0,0);           // Set the cursor to first character, first row
  lcd.print("The DIY Life");     // Display this text
}

void loop()
{
  for (int i=0;i<=100;i++)
  {
    lcd.setCursor(0,1);           // set cursor to column 0, row 1
    lcd.print(i);                 //Display the number i
    delay(1000);
  }
}
We now create a loop in the loop function which counts from 1 to 100 seconds and displays this in the second row of the screen.
When you run this code you should see The DIY Life in the first row and a counter which updates every second in the second row and runs until 100 seconds. The counter in operation is shown in the video below:
You have now covered the basics on connecting an LCD screen to the Arduino and using the built in control functions to change the text displayed on the screen.
Would you like to learn more about this project? Are you interested in projects similar to this one? Then Practical Arduino Projects is the book for you, available now on Amazon as an eBook or in Print form.
A sugar scrub is really easy to make and can be made into a beautiful gift. The coffee makes it smell delicious, the sugar helps exfoliate and the coconut oil leaves your skin feeling amazingly soft.
Consider making a mini pallet as a base to turn a jar of coffee and brown sugar body scrub into an amazing homemade gift.
What You’ll Need to Make 1 Jar of Sugar Scrub
1/2 Cup of Cocnut Oil
1/4 Cup of Almond Oil
1 Cup of Granulated Sugar
2 Tablespoons of Ground Coffee
Mix all of the ingredients together in a mixing bowl. The recipe can be easily doubled or tripled to fill more jars.
You may wish to adjust the amount of coffee you add depending on how course it is. If the coffee is a similar grind to the sugar granules then you can increase the amount of coffee a bit. If it is finer then you may want to use less coffee.
The coconut oil tends to solidify when it is cold, the almond oil helps to keep the mixture liquid but if it does go solid, some warm water in your hand will help to melt a teaspoon of the scrub. If you live in a cold region then consider adding a little bit more almond oil to the mixture and it will assist with keeping it soft.
Be careful when using this scrub in the shower or bath tub as the oil will make the floor and sides very slippery. This sugar scrub will keep for about three to four months so it makes a great gift for a birthday, Christmas or mother’s day.
It turns out, your dishwasher can be used to clean a lot more than just your dirty dishes. Here is a list of items which can easily be cleaned in your dishwasher, just remember that some of these things should be washed on their own, not along with your dishes.
You’ll be amazed to know that your dishwasher can also be used for cooking! Try out this method for cooking salmon in the dishwasher, it can even be done while your dishes are being cleaned.
Here’s What You Can Wash In The Dishwasher
Sports Mouth Guard: Throw them on the top rack or into the cutlery basket for a good cleaning.
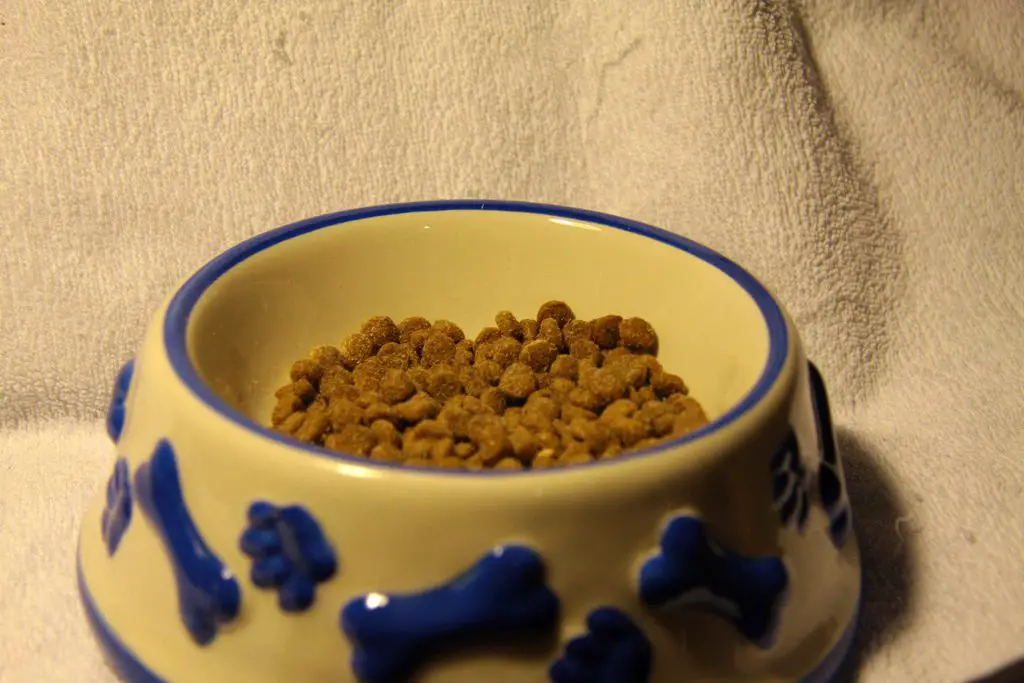
Pet Bowls: Your dog and cat’s bowls can all be washed in the dishwasher. Be careful with the plastic ones on a drying cycle as they may not be heat resistant. Dry off any metal bowls with a towel as collected water will cause rusting.
Fruit and Vegetables: Are you having guests over for dinner? Give yourself some extra time by washing your vegetables and fruit in the dishwasher. Hard fruit and vegetable like potatoes, carrots and apples are well suited. Use a cycle with low or no heat and plain washer to wash them off. This gets rid of dirt and helps with pesticides.
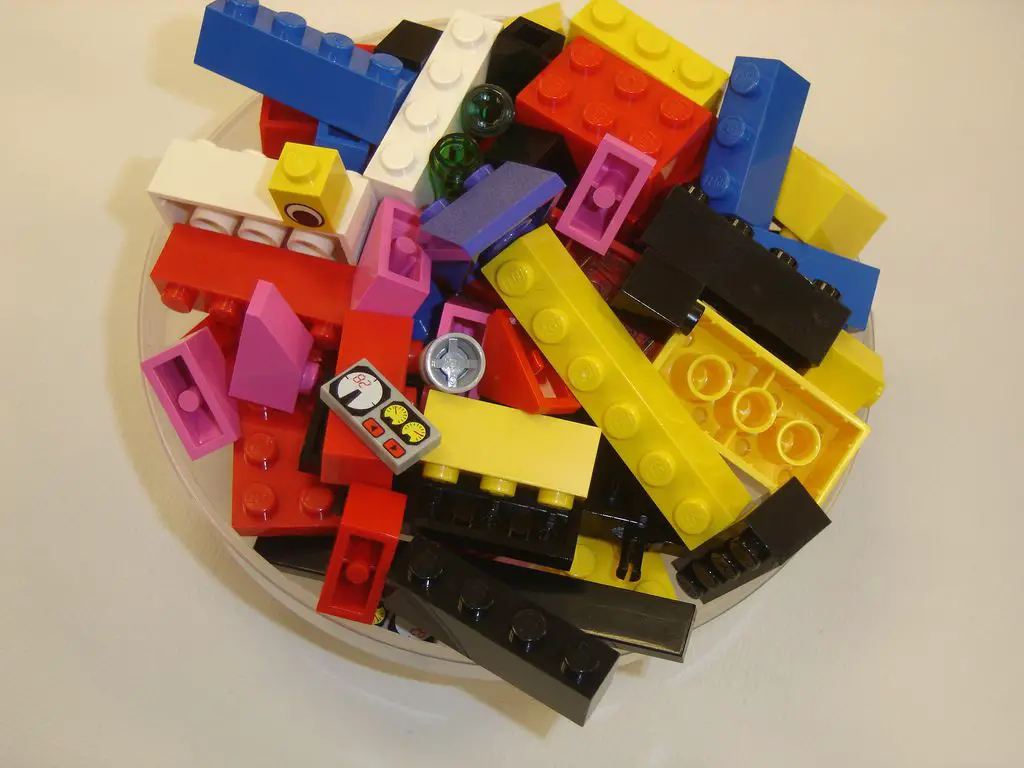
Kids Toys: Use the dishwasher to sanitise your kids toys. Your kids constantly have dirty hands and their mouths on their toys. Things like Legos, dolls, action figures and pretty much any other plastic toy can be washed and sanitised on a regular cycle. Don’t use the drying cycle as the heat may damage the plastic, just open the dishwasher and let it air dry. Place Lego’s in a mesh bag on the top rack for the best results.
Toothbrush: A toothbrush needs a good clean every now and again. Load it into the cutlery basket and run it with your regular dishes. Don’t put your battery operated or electric toothbrush into the dishwasher.
The Kitchen Sponge: Throw your kitchen sponge in with a regular load of dishes, the heat will kill off any bacteria and eliminate any bad smells. Alternately place it in the microwave on high for two minutes for a similar result.
Glass Light Cover and Lamp Shades: Glass covers on lights are a collection point for dust and insects. Give them a quick rinse and then run them through a regular cycle. You’ll be amazed at how clean they come out, or at how dirty they were.
What are some of the items you have used your dishwasher to clean? Let us know your tips and tricks in the comments section below.
Salmon? In the dishwasher? If you haven’t heard that this works then you are in for a surprise, it actually works really well. It sounds too good to be true but give it a try and see for yourself.
The method is quite straight forward, you wrap the fish up tightly in foil, place it on the top rack of the dishwasher and run it through a regular cycle. When the cycle is complete, the fish is perfectly cooked. The temperature that the dishwasher runs at, it turns out, is the perfect temperature for poaching salmon and if you wrap the salmon up well then you can add detergent to the cycle and wash your dishes will you cook.
For One Serving, Preparation Time: 5 minutes, Cooking Time Varies With Dishwasher Type, Usually Around An Hour.
What You Will Need To Cook Salmon In The Dishwasher
A Portion of Salmon
Two Pieces of Light Foil 25cm x 25cm (10″ x 10″)
A Teaspoon of Lemon Juice
A Slither of Butter
Salt & Pepper
How To Cook The Salmon In The Dishwasher
You can cook as many servings in one cycle as you would like to, as long as they form a single layer in the top rack of the dishwasher they should come out fine. Individually prepare and wrap each portion for the best results.
Lay out two sheets of aluminium foil. Place a portion of salmon on each. Season with salt and pepper, add a slither of butter and the lemon juice.
Carefully wrap the fish up in the foil. Be sure to fold the edges over at least three times to create a watertight seal so that no detergent or water gets into the salmon.
Place the wrapped portions onto the top rack, fill the dishwasher with whatever else you need to wash and put it on a regular cycle without a drying cycle at the end.
When the cycle is done, take the salmon portion out and unwrap a perfectly cooked piece of fish. Its as easy as that.
Nobody wants their guests to walk into their home while it is filled with a musty smell. Finish off your cleaning schedule by making one of these simmer pots to bring the air to life and make your home smell amazing. Simply add the ingredients and 4 cups of water to a medium sized pot on the stove and boil it over a low heat to keep your home smelling great. Be sure to top it up occasionally with warm water as it evaporates.
The best thing about simmer pots is that they cost next to nothing to make and you’re using all natural ingredients so there are no harsh chemicals being distributed around your home so they are safe for pets and for children as well.
Orange & Cinnamon Simmer Pot
Boil your old orange peels in water with a half teaspoon of cinnamon or three cinnamon sticks.
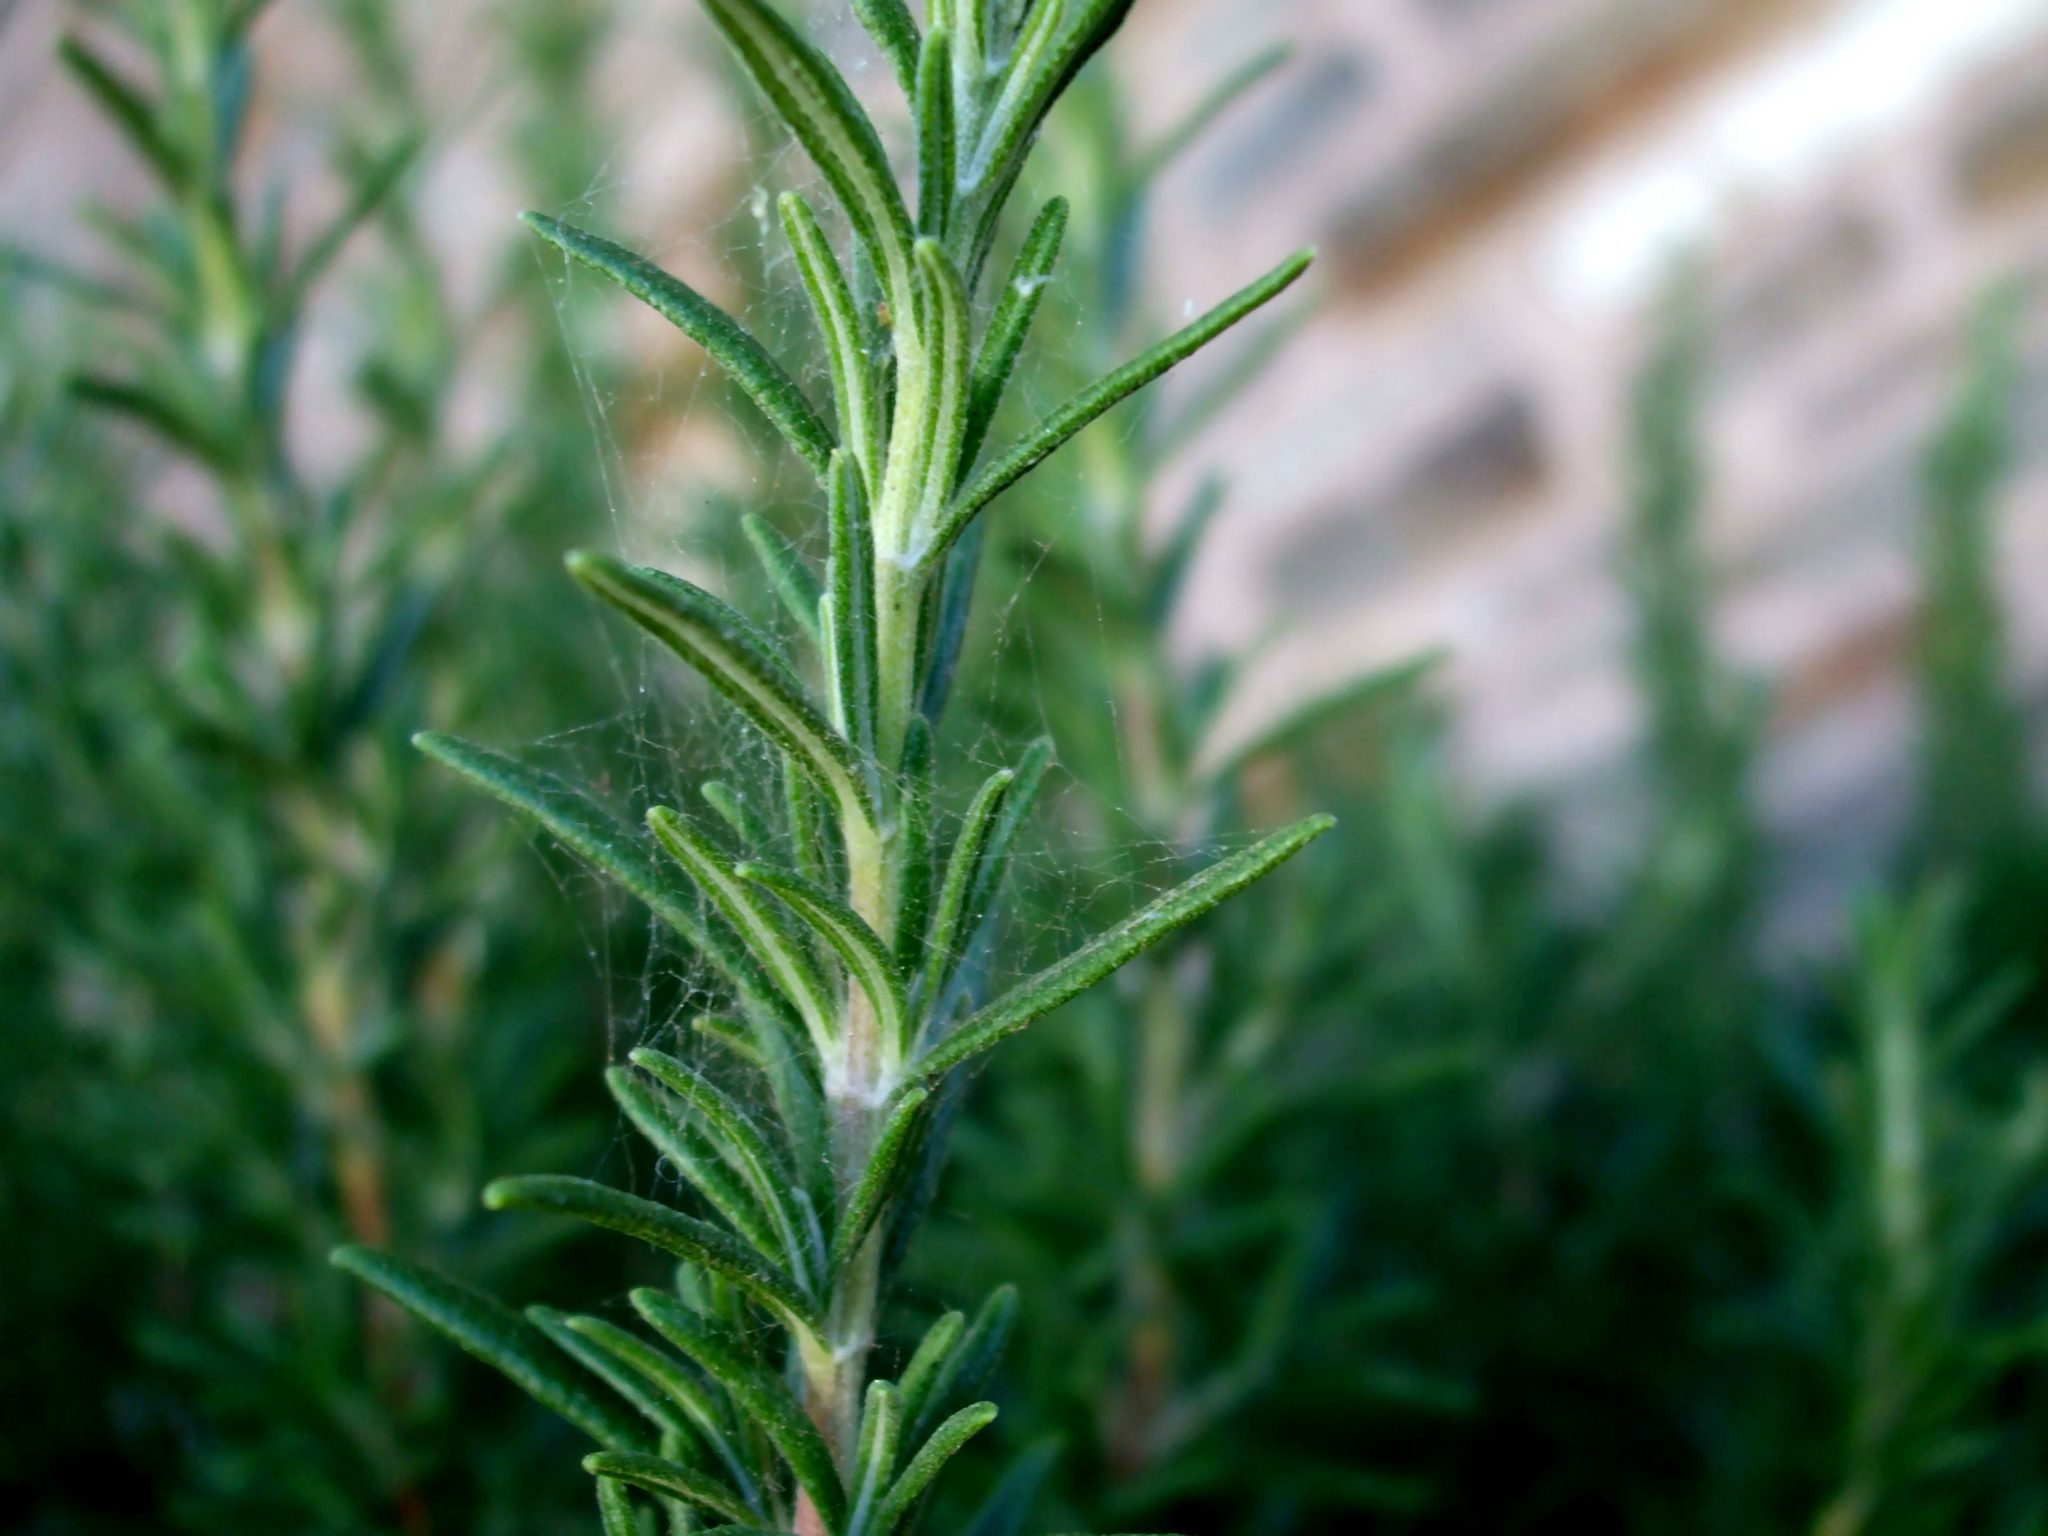
Rosemary and Vanilla Simmer Pot
Simmer two sprigs of rosemary, five slices of lemon and a tablespoon of vanilla extract.
Fall/Autumn Simmer Pot
Simmer two cinamon sticks, a half tablespoon of nutmeg, one orange sliced into quarters and a tablespoon of vanilla extract.
Holiday Season Simmer Pot
Three cups of apple juice, two tablespoons of vanilla extract, two tablespoons of nutmeg, two teaspoons of cloves and three tablespoons of cinnamon. You can leave the water out of this one as the apple juice takes it’s place.
Christmas Simmer Pot
One apple sliced, one orange sliced, three sticks of cinnamon and a tablespoon of cloves.
Remember that you can add and remove your own ingredients as you like. Some people like the smells of certain spices and oils and some don’t, feel free to mix and match.
Have you tried your own simmer pots? We would love to hear your ideas and recipes in the comments section below.
Growing your own veggies is the best way to ensure that you are getting the freshest and healthiest vegetables, you have immediate control over when they are harvested and what pesticides are used. Some veggies are difficult to grow and it can be very time consuming to get them to grow strong and healthy. Here are ten vegetables which require very little effort to grow into strong plants which can be harvested to stock your pantry full of healthy greens.
Tomatoes
Tomatoes are one of the hardiest veggies and can be grown from seeds right in your veggies patch. They require a lot of sunlight and once the plants are a few weeks old, they will require some support for the vine to grow on. Cherry or vine tomatoes are the best for salads while full tomatoes are more suited for cooking and sandwiches.
Green beans are an excellent source of a range of essential vitamins, minerals and fiber. Simply sow the seeds in a patch of soil which receives a lot of sunlight, water them every second day and you’ll soon have a large crop of green beans.
Snap Peas
Snap peas are a great dipping snack for work or school lunch boxes. They don’t need to be cooked and are packed with vitamin C. Snap peas require a cooler spot with plenty of water so it is usually best to grow them in early spring or later summer to avoid the midday heat.
Carrots
Eat your carrots to improve your eye sight! We’ve all heard this tip and it comes from the abundance of vitamin A as well as being packed with beta kerotine. Although carrots take a while to grow to an edible size, they can just be planted, watered and then harvested without any other intervention. Plant them early in spring to ensure that they reach their full size by mid summer.
Here is a great pesto recipe for your unused carrot tops.
Radishes
Radishes are a great low calorie addition to salads and sandwiches. What’s best is that they grow really quickly, they are usually edible in just four weeks. Because they have a shallow root system and are quite tough, they can be grown in a sunny spot indoors all year around.
Chilies
Chilies, red or green need lots of sun and a nice warm spot to thrive. They are best grown in summer, so plant the seeds in early spring. Chilies are rich in vitamin C and are great for flavouring soups, sauces, pickles and stews.
Parsley is en extremely easy to grow herb, sprinkle some seeds among the other plants in your garden or use the plants as a decorative garden edging. Parsley needs a lot of water and sunlight and it will easily grow into a healthy plant.
Basil
Basil is another plant which does well both indoors and outdoors. Basil can be grown all year around and makes a great additional to pastas, salads and can be made into a delicious pesto. Basil needs a lot of sunlight and watering every second day.
Arduino is a versatile open source platform for electronics prototyping. It’s a fun, simple and powerful way for anyone to start experimenting with creating interactive projects. Here’s how to get started writing and uploading your first Arduino program, called a sketch. You can follow this link to download the developer.
What Equipment You Will Need
For this project, you will just be using the components on board and won’t require any wiring or additional electrical components.
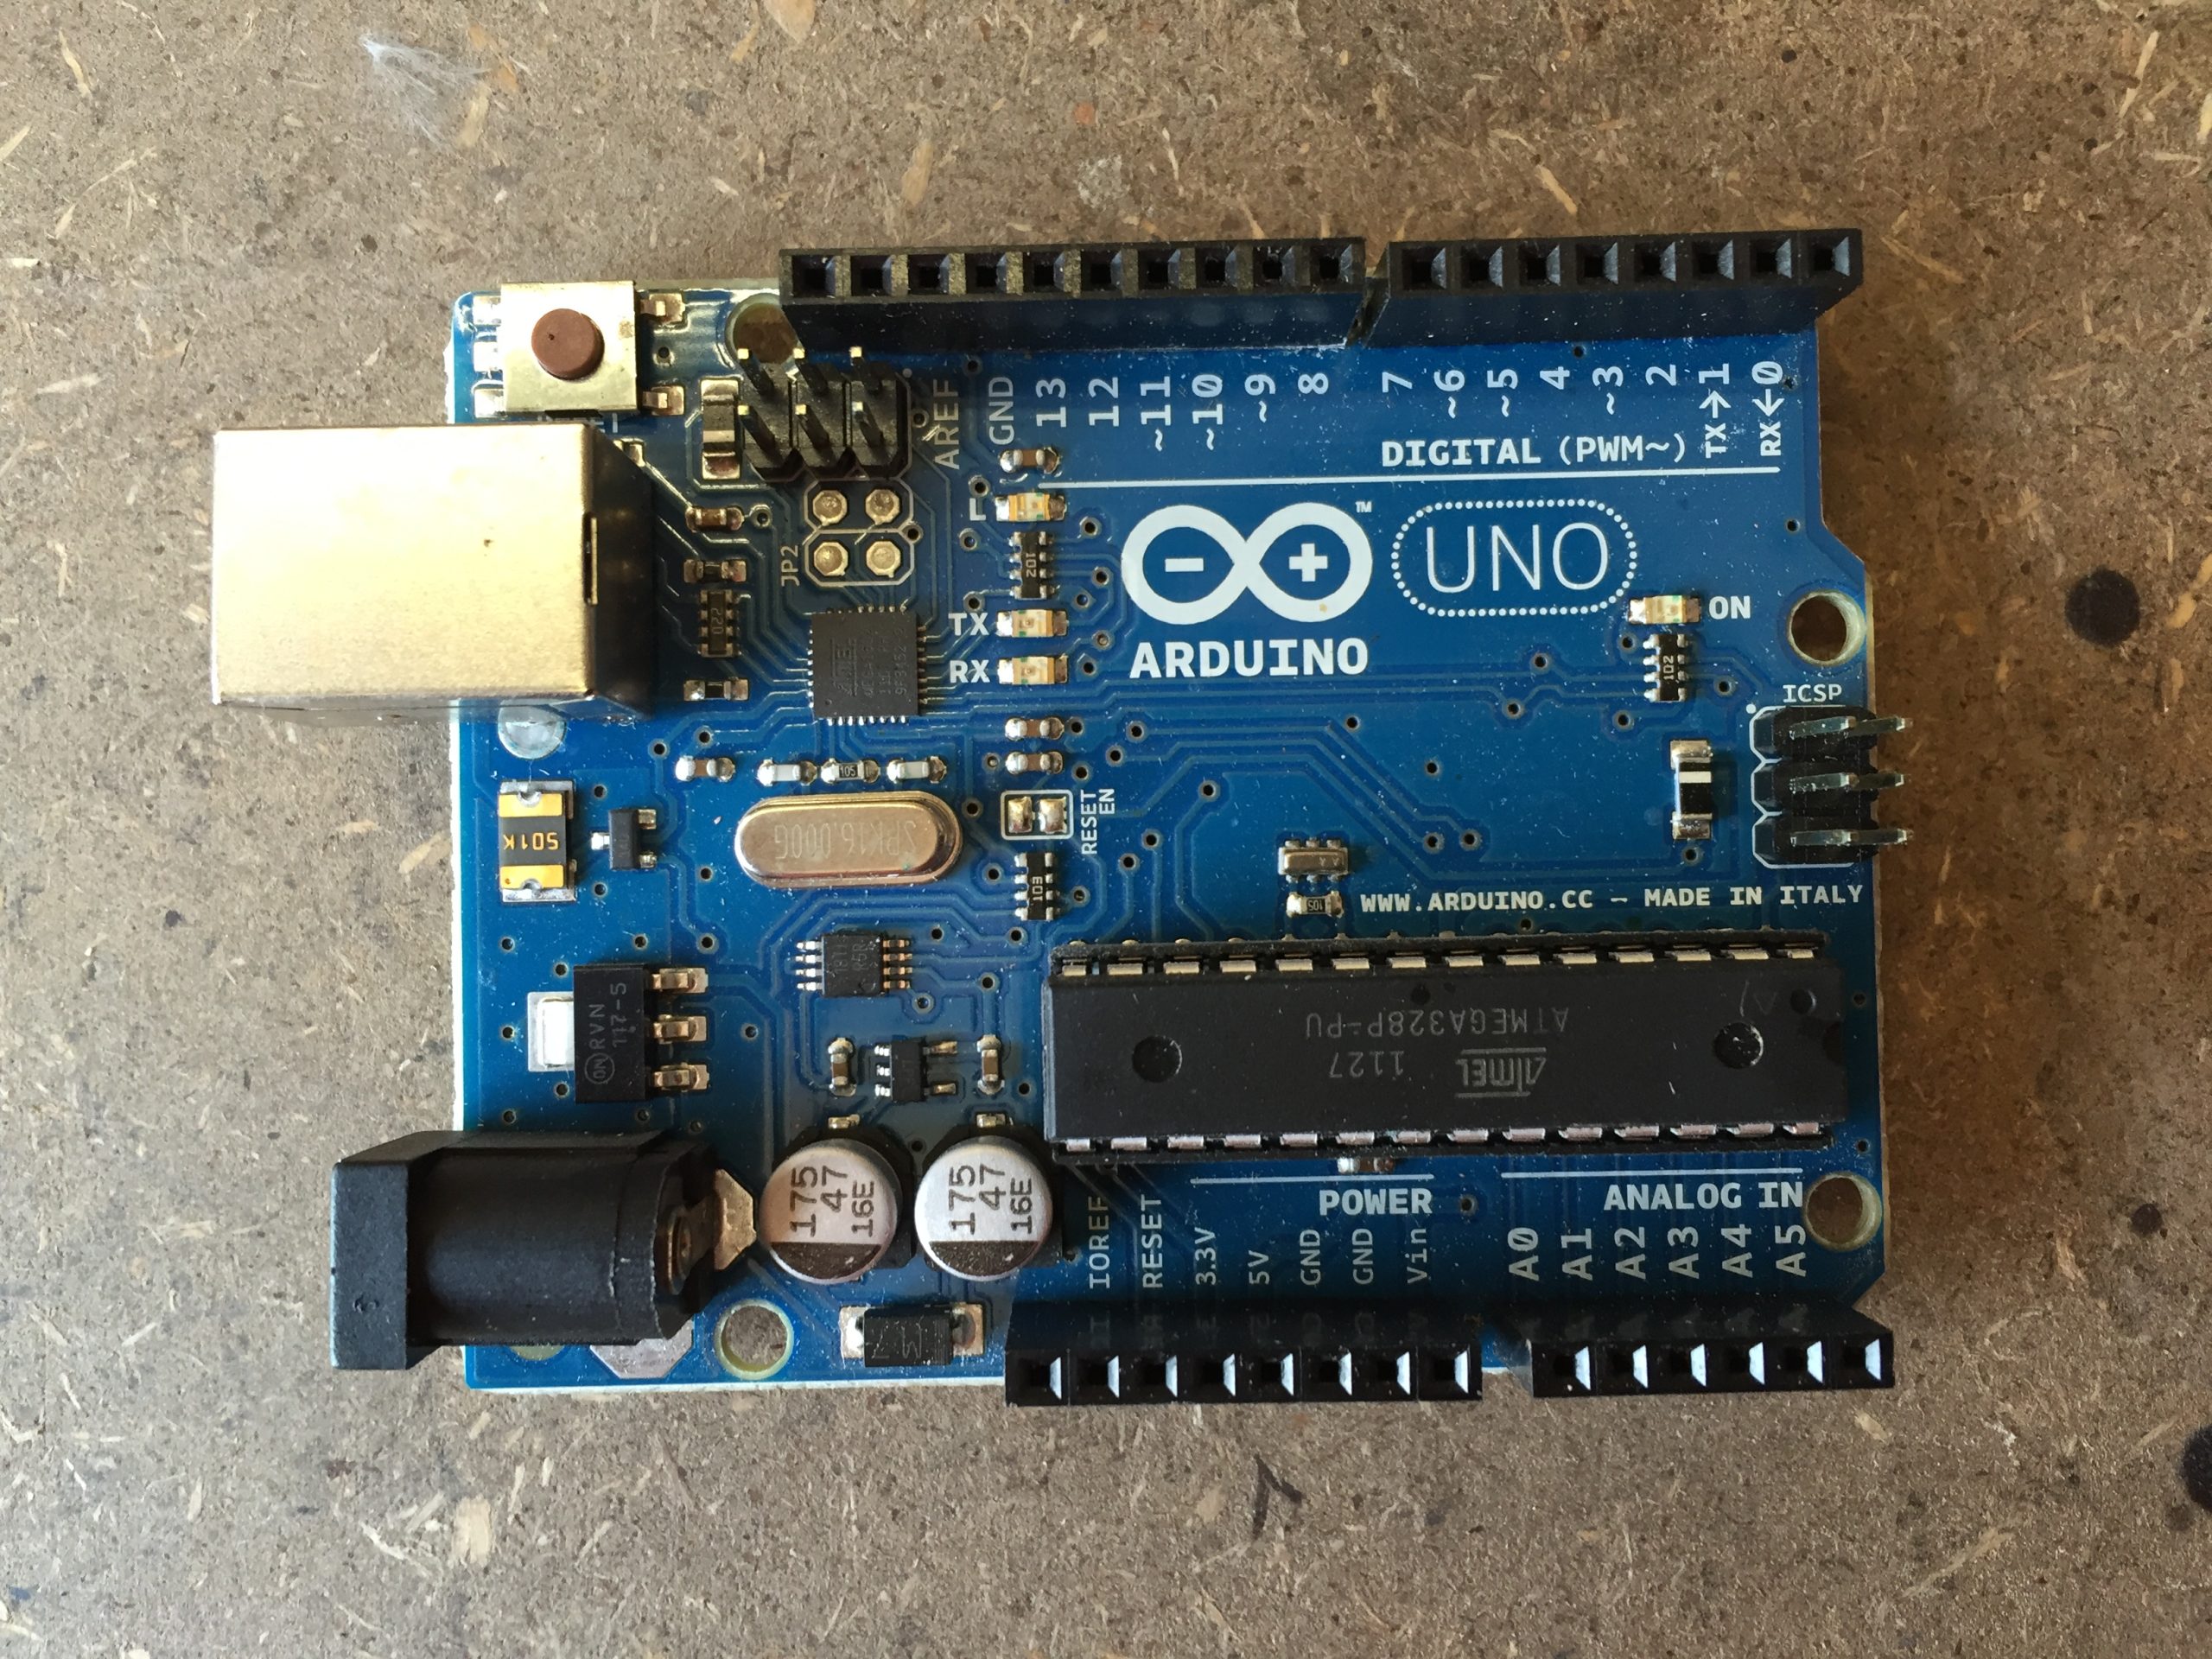
When looking at the board, you’ll notice that there are strips of pin sockets down each side which are numbered. These pins are used by the Arduino to interact with the connected components. On the Uno board, there are 13 digital pins which can be set to on or off and used as input or outputs as well as 5 analogue pins, these are used for proportional inputs like detecting the temperature or measuring something. The remaining pins are for power supplies and then a few other functions you will most likely never need.
The Arduino Uno has a small LED attached to pin 13. As a first program, we will make this LED flash continuously.
How To Use The Arduino Software
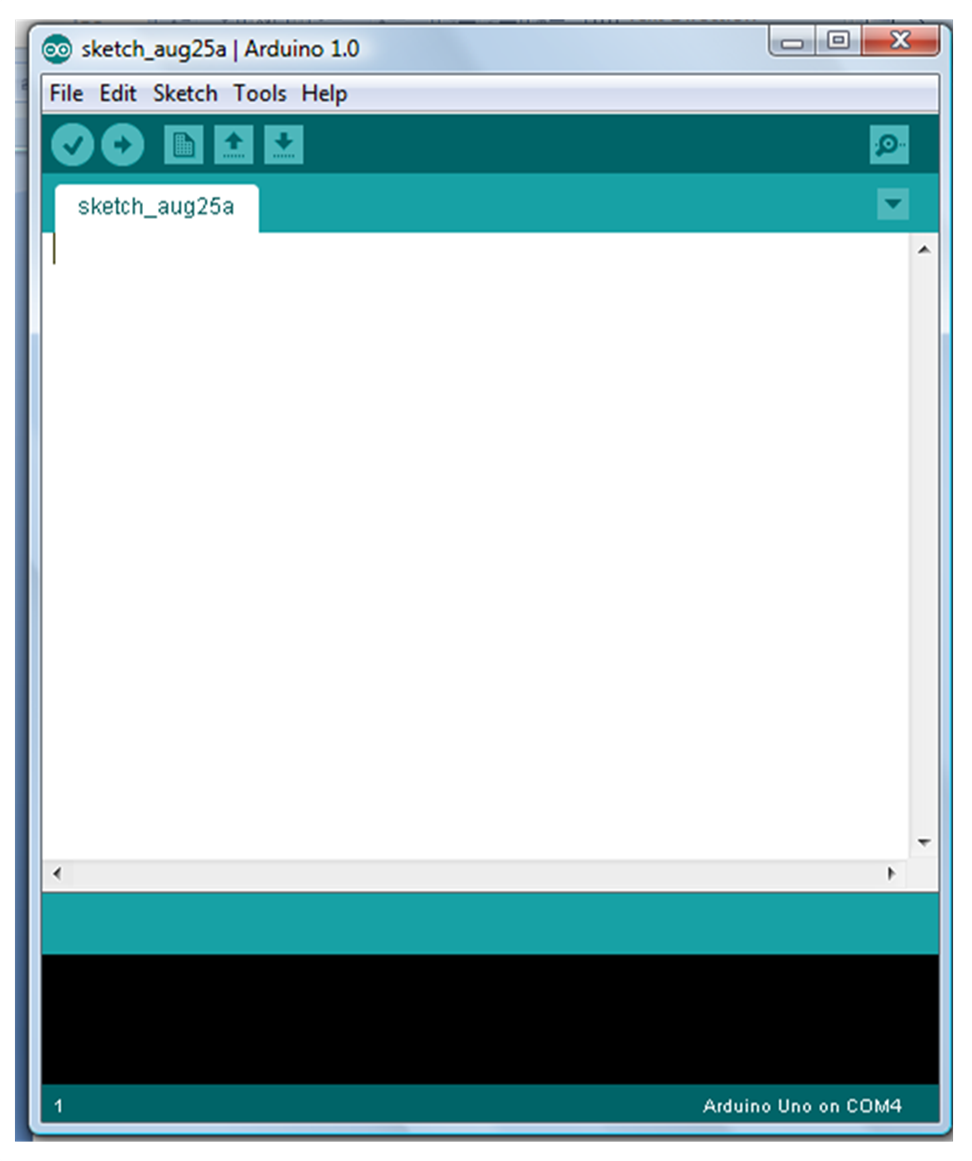
Start by opening the developer:
When you open the developer, you will be presented with a new, blank sketch. A sketch is a program which can be uploaded onto the Arduino in order to tell it what to do.
A basic sketch consists of two primary functions, the setup function which is run once when the Arduino is powered up and the loop function which is then run continuously. The setup function is therefore where you would write any setup steps and the loop function is where you would write the steps which you wish to have repeated.
To get the LED to flash, we start by assigning a pin to each function. In this case we have the LED attached to pin 13 so we declare the variable ledPin as an integer 13. In the setup function we need to tell the processor that the ledPin is an output pin, each digital pin on the Arduino can be assigned as an input or output pin.
Finally we write the loop function. We want the LED to come on, which is done by setting the output of the ledPin to HIGH. Wait one second, 1000 milliseconds and then turn off by setting the output to LOW. We then need to wait one second again before turning the LED back on. The reason we use delays between on and off instructions is that the Arduino can run hundreds of instructions per second, without the delays it would turn the LED on and off so quickly we wouldn’t even notice it flickering. It would just appear a bit dimmer. Try this out once you have the first program running.
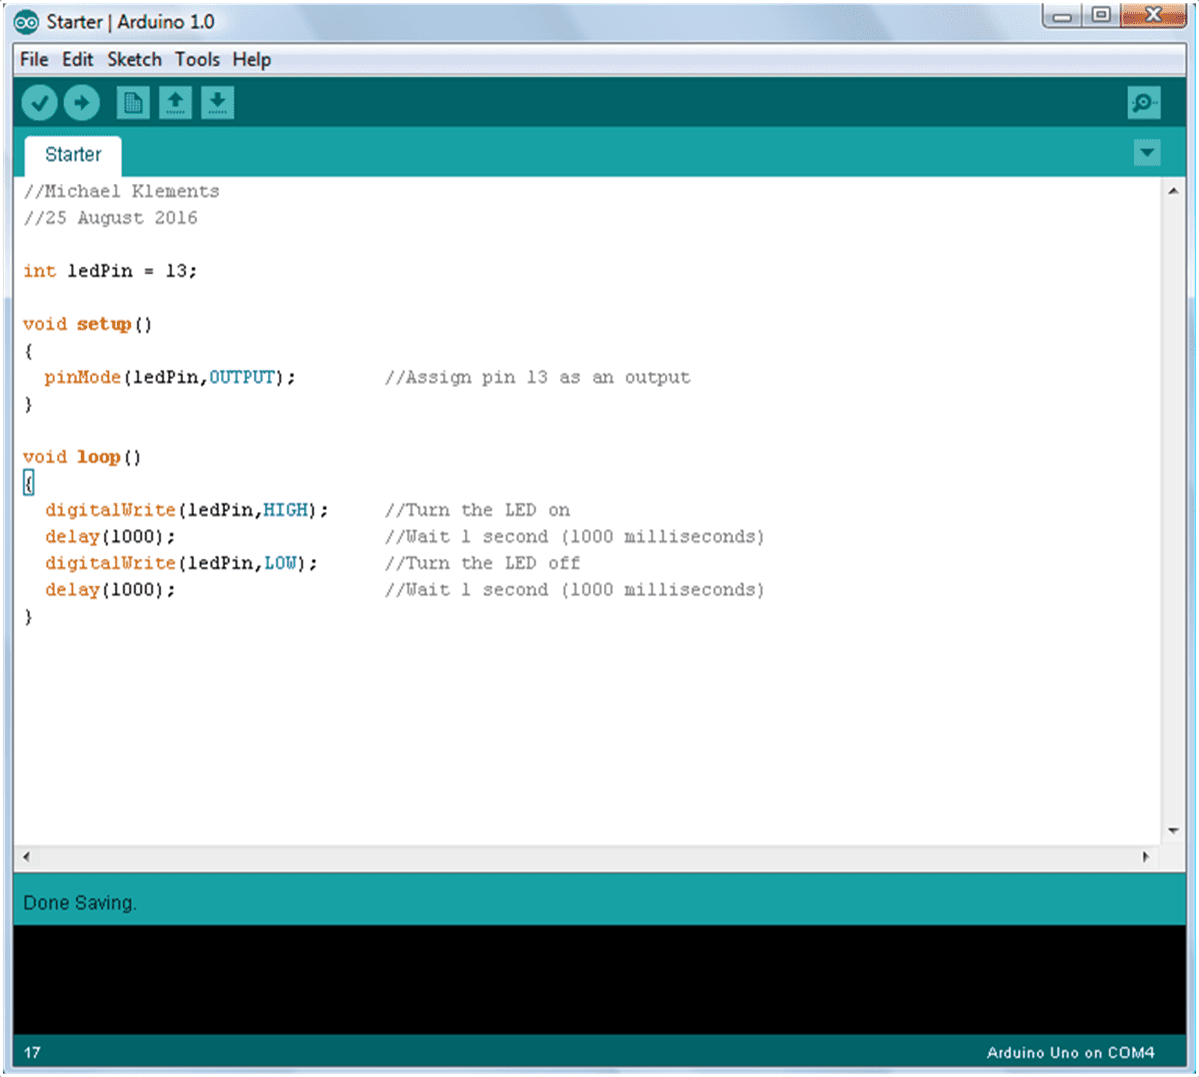
//The DIY Life
//Michael Klements
//25 August 2016

int ledPin = 13;

void setup()
{
  pinMode(ledPin,OUTPUT);        //Assign pin 13 as an output
}

void loop()
{
  digitalWrite(ledPin,HIGH);     //Turn the LED on
  delay(500);                   //Wait 1 second (1000 milliseconds)
  digitalWrite(ledPin,LOW);      //Turn the LED off
  delay(1000);                   //Wait 1 second (1000 milliseconds)
}
You can download the program used in the example here so that you don’t have to write it out: LED Code.
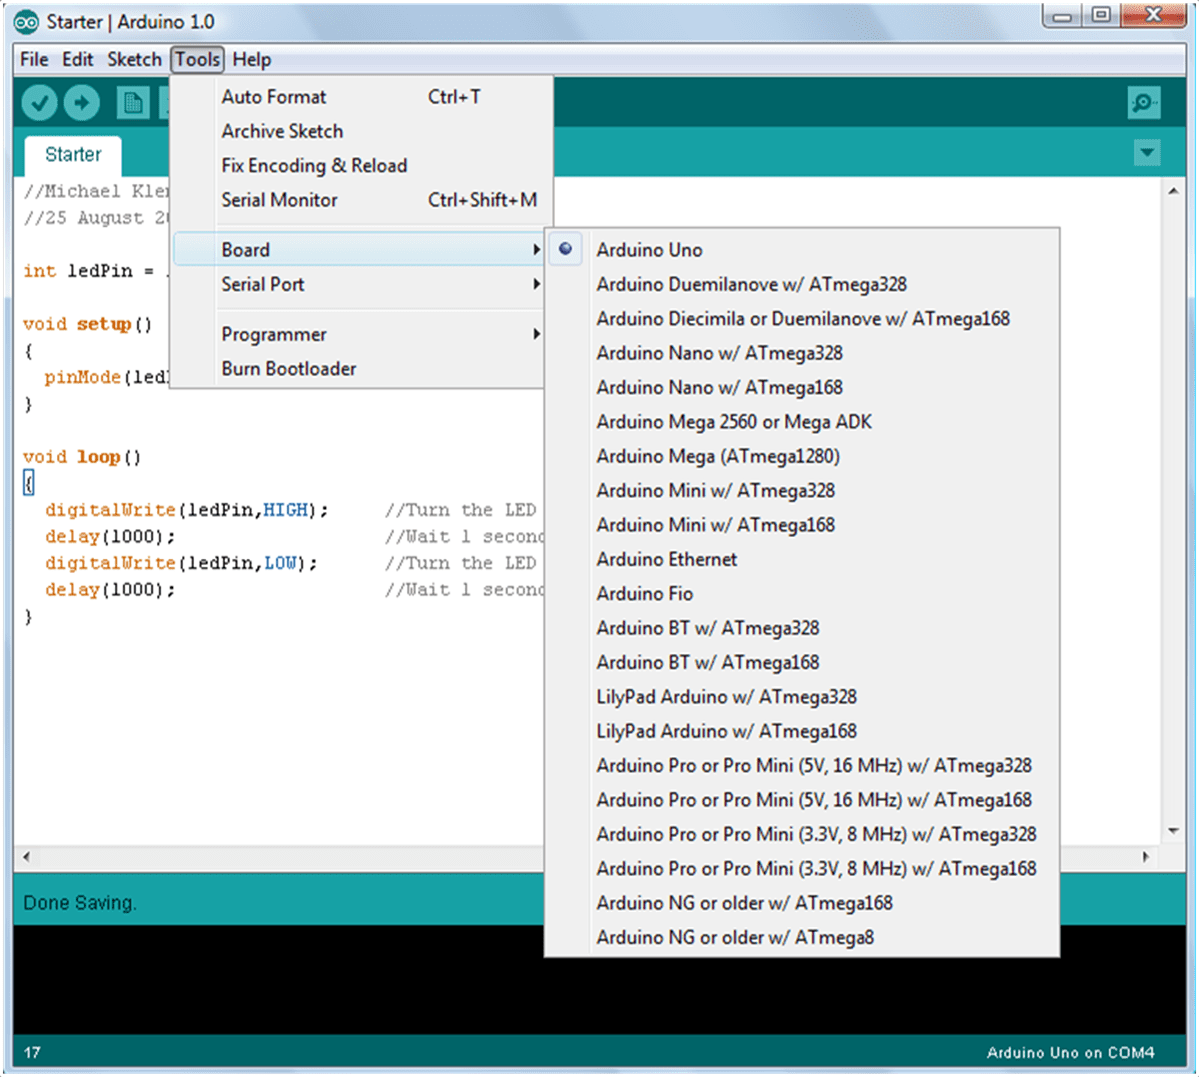
Once the code is complete, you need to upload it onto the Arduino. First go to Tools > Board and make sure that your specific board is selected. In this case the board is the Arduino Uno.
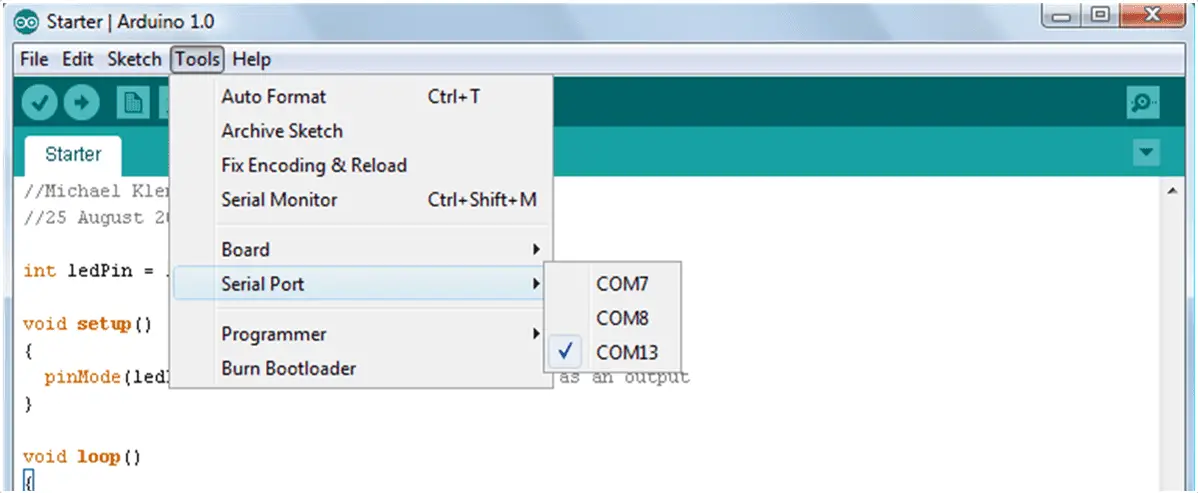
Next you need to plug the board into one of your computers USB ports using a USB A to B cable. Once the device has been detected by your computer, select the serial port on which your board is connected by going to Tools > Serial Port. If you are not sure, start from the top and try to upload the code on each. You will just get an error message about establishing communication if you select the wrong one. Alternately, go to your computers device manager, under com ports it will list your Arduino Uno and in brackets the com port on which it is connected.
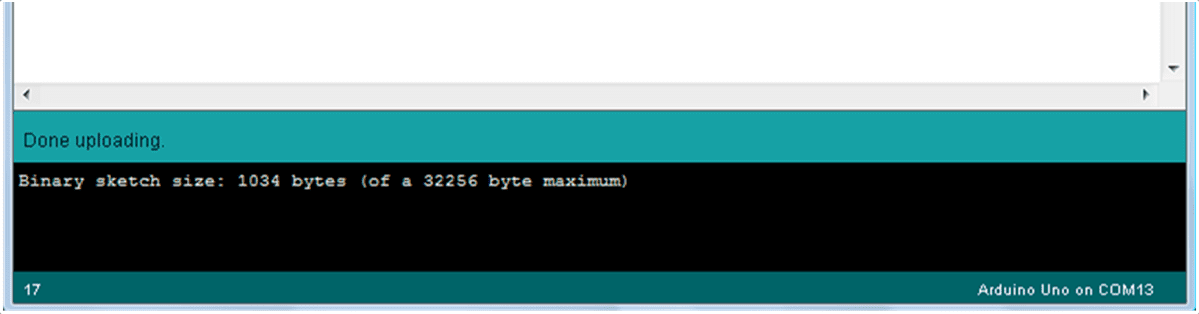
Finally go to File > Upload and your developer should say compiling in the bottom left and a progress bar shows up on the bottom right. In this stage the developer is compiling your instructions into machine code which the Arduino understands. As soon as this is complete (provided there are no errors in your code), the TX and RX lights will flash on your Arduino, the developer will say uploading and the program will be uploaded. If the upload is successful, a message will be displayed in the bottom section of the developer which says Done Uploading.
As soon as the program finishes uploading, it will run the code. The TX and RX lights will go off and you should see the LED on pin 13 turning on and off every 1s.
The TX and RX lights flash during communication with the computer and finally the LED begins flashing as per the code:
Try and play around with different length delays once this program is working.
Congratulations, your just wrote and uploaded your first program onto an Arduino. Let us know if you have any queries or issues in the comments section below, we would love to help you out.