Over the last few years there has been a strong shift in thinking, more and more households are becoming aware of their impact on the environment and are taking steps to reduce their footprint. Going green or going off grid are now trendy terms and can significantly increase you homes value and save you on your electrical bill.
In this article, when we talk about going off grid, we are talking about becoming completely electrically independent, you do not need to rely on any electrical utility provider to power your home. If you are looking at taking your water supply off grid as well, watch this space, we will be covering this next month.
As with a number of things, there is a smart way to go off grid and and easy way to go off grid. We will briefly discuss the easy way however our focus will be on the smart way as this yields better savings in the long run and is the more environmentally friendly option.
The Easy Way To Go Off Grid
The easiest way to take your home off grid is to call up a solar installation company and have them replace your utility power supply with a solar array. They will order a number of panels for you, cover your sunny roof, fill your garage or basement with batteries and you’ll be ready to go, easy right? You could even embrace your inner DIY’er and select, buy and install you own solar installation.
The reason we don’t recommend this is because in the long run, this approach is actually extremely inefficient and can land up being very costly. Unless you live in a home which was designed in the last three to five years specifically to be energy efficient, it was never designed to be taken off grid. Power was cheap and always available so it didn’t really matter too much how much power your home used. With modern house designs this focus has shifted and designers are now constantly looking for ways to reduce household energy consumption.
There are a number of household appliances and necessities which are fundamentally different in a house which has been designed with energy efficiency in mind and this extends far beyond changing all of your incandescent globes to LEDs. Water heaters, ovens, stoves, fridges, air conditioners etc, all of these energy hungry appliances have more efficient versions or alternatives which lend themselves towards an off grid household. This brings us to the smart way to take your home off grid.
The Smart Way To Go Off Grid
The smart way involves a lot more work and planning but will save you a lot more money in the long run as you are changing your home to be more energy efficient rather than just powering your current home’s needs using more equipment.
Firstly you need to look at your big energy users and how you can change or remove them in order to reduce your energy demands, we’ll go into these in a bit more detail below.
The Water Heater / Geyser
Water heaters are an essential part of any household so you need to look at ways to make them more efficient rather than removing them altogether. Most older houses will have a water heater in a column outside, in the roof, basement or garage. It is essentially an insulated tank with a large element in it which keeps a large amount of water permanently hot.
We know that in order to keep something hot, we have to keep replacing the energy that is being lost into the environment. We also have to keep on heating the cold water that is added to replace any of the hot water we have used. In order to make this process as efficient as possible, there are three possible solutions.
The first is to make the current setup more efficient, add a blanket around your heater/geyser which insulates it further and prevents heat from escaping which means less energy is used to keep the water hot. You can also reduce the thermostat temperature as the higher the temperature difference between the water in the heater and the ambient air, the higher the losses. Reduce the temperature to the point where you do not need to mix cold water with it in order to have a hot shower, this is usually the hottest you require water to be in your home. Lastly, you can add a timer. Timers are quite largely debated as you have to follow a strict routine in order to see any savings and to avoid having the occasional cold shower. Basically, you want the timer to only switch the heater on once a day, an hour later the heater should be turned off and everyone should shower. The water should then remain cold until the next day when the timer turns on again. If you can’t follow this type of routine then a timer is probably not going to have much effect on your electrical bill.
The second option is to change your water heater or geyser to a solar one. This type of heater sits in a sunny spot on the roof and uses black vacuum tubes to harness the heat from the sun and use it to heat up your water and to keep it warm. These heaters often come with an element as well to boost the water temperature when there has not been enough sun throughout the day. These heaters however can only be used in warmer, sunny climates and are not suitable for snow or icy regions.
The last option is to replace the water heater with an inline gas or electric model. Why should we store large amounts of hot water and pay to keep the water hot when we can just heat water up as we need it? These devices are fitted near the tap or shower and switch on automatically when water starts flowing to instantly heat up the water. If you are considering going off grid then an inline gas heater is probably your best solution.
Air Conditioning and Heating
The next big user of electricity in your home is the air conditioner and the central heating.
Consider replacing your air conditioner with an evaporative cooler. These box like systems look similar to an AC and can be mounted on a wall or on the roof. They rely on the evaporation of water in order to cool the air which is blown through them. In hot climates with a low humidity they are just as effective as air conditioning and use up to 80% less electricity. If an evaporative cooler won’t work in your environment due to a high humidity, then switch to ordinary household fans, a fan also uses up to 95% less electricity than the air conditioner.
For heating, you should again consider switching to gas or to a solid fuel based central heater. Gas heating systems are the most efficient, often the cheapest to buy and gas is one of the cheaper fuels you can buy. In some regions gas is piped directly to your home so you don’t need to worry about having cylinders stored around your property.
Stove & Oven
The stove and the oven are not going to make a huge difference to your energy savings in the long run, unless you cook a lot. Making changes to them will however significantly reduce your peak demand in the evening and this helps to reduce the inverter size and to some extent the battery bank capacity.
Gas stoves and gas ovens are the best solution to an off grid home and if you are changing your heating and water heating to gas solutions then it will be easy for you to install a single cylinder or pipe your gas line to multiple appliances and reap the rewards of reduced energy consumption.
Refrigerator
This one only really applies if you have a fridge which is older than about 10 years. Modern fridges offer significantly improved insulation and new digital inverter based refrigeration systems which together result in the fridge running for less time and with less power. These savings add up in the long term and will reduce the size of your solar installation.
Lighting
This is probably the best marketed energy saving tip for your home, changing your incandescent bulbs to LED bulbs can save you up to 90%. Now this is true as a 60 watt incandescent bulb is usually replaced by a 7 or 9 watt LED bulb however if you look at the contribution lighting makes to your monthly electricity bill, the savings are actually quite low in comparison to making changes to your water heating, stove or air conditioning.
That said, changing your household lighting to LEDs is a must if you are going off grid. The number of lights in your home quickly add up and if you do the maths on additional inverter size and additional batteries you require to run more power hungry CFL, fluorescent or incandescent lights, you will see that is is much cheaper to change all of your lights to LEDs before changing to a solar installation.
If you are going to be changing all of your lighting in order to go off grid then it is worth considering replacing your 110VAC or 220VAC lights with a 12V lighting circuit. You will need to get an electrician to give you advice and make a few changes to your distribution board but it is usually quite a cheap conversion as the wiring can be preserved and you get 12V bulbs which fit into the existing AC sockets. The benefit of changing to 12V lies with the non need for an inverter. Your lighting can now be powered directly from your 12V batteries. This saves you money by reducing the size of the inverter you need for the rest of your house, 12V LED lights are more efficient than AC lights as LEDs are inherently DC and 12V LED globes are cheaper than AC globes.
Now Change To Solar Panels
Once you have worked through these big energy users, you home will already be using significantly less electricity. I made these changes to my home and have seen savings of around 75% on the original electrical bill meaning my energy usage is currently a quarter of what it was originally. I only have to supply a quarter of what I originally had to supply with solar power which means my conversion will be almost a quarter of the price and I will only need to replace a quarter of the original number of batteries every two years.
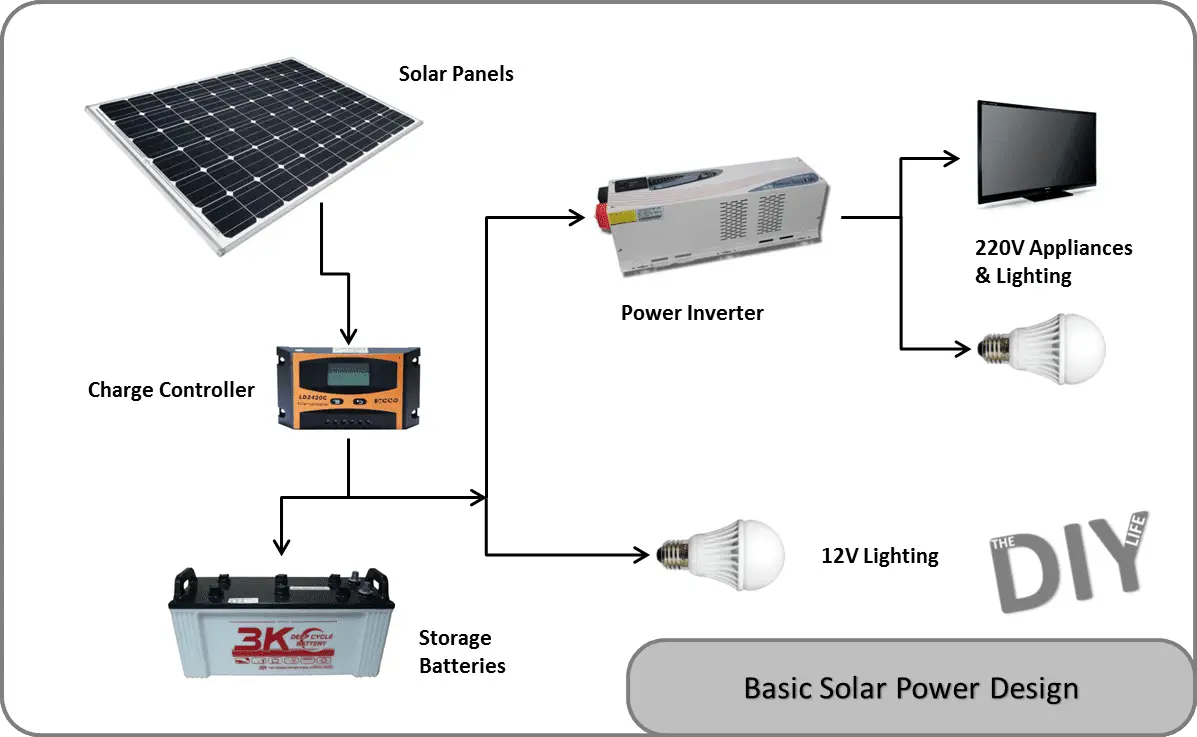
Now you can work on switching your electrical supply to solar. This article on switching to solar details all of the components required and how to select them. There is nothing complicated with a solar installation and it is an easy project to do yourself over a few weekends. You will need to get an electrician in to do the final connections to your distribution board, to check your installation and make sure that everything conforms to your local regulations. He may also have to provide you with a compliance certificate so be sure to check your local regulations before you complete the installation or make any changes to your existing electrical supply.
If you would like to save further when switching to solar power, you could also try making your own solar panels. It is actually quite easy although it is time consuming and you should be fairly competent with a soldering iron before taking on this project. Solar panels are essentially just a string of solar cells which are mounted onto a piece or glass and a frame and by making one yourself you can eliminate around half of the cost of a commercial panel.
Once you have selected the main components for your solar power system, use this guide and spreadsheet to check that the components are compatible and adequately sized: Solar Power Design Check. Remember that if you are changing your lighting circuit to 12V then you can remove their power demand from the inverter calculation but you still need to take them into account for the battery calculation.
Do you have any more tips or tricks for saving power, going off grid or switching to a solar installation? Let us know in the comments sections below, we would love to hear your ideas and feedback.
Cover Image: SolarPanels by Chris Kantos used under CC BY 2.0