I recently looked at how much power some common Arduino boards consume and how long we’d be able to power them using one or two 18650 batteries. I found that I could power a 3.3V Arduino Pro Mini using a single 3.7V lithium-ion 18650 battery for 117 days in lower power mode. This got me thinking. What else could be done to make the Arduino Pro Mini even more power-efficient? How long could I get it to last? So I did some research and testing to find out.
For each test, I’ve included two battery capacities in my calculations, one for the 4200mAh claimed on the test batteries and one for the more commonly available 3500mAh batteries. I’ve then calculated the number of hours, days and years of run time for each modification and each battery. I’ve put these results into a table at the end.
Here’s the video of the modifications and the results, otherwise read on for the full write-up.
Testing The Standard Board With A Single 18650 Battery
Let’s start with the standard board with no power-saving or sleep mode active and no hardware modifications to use as a baseline.
I loaded a basic sketch onto the Arduino which simply waits 8 seconds, then flashes the onboard LED for 100 milliseconds.
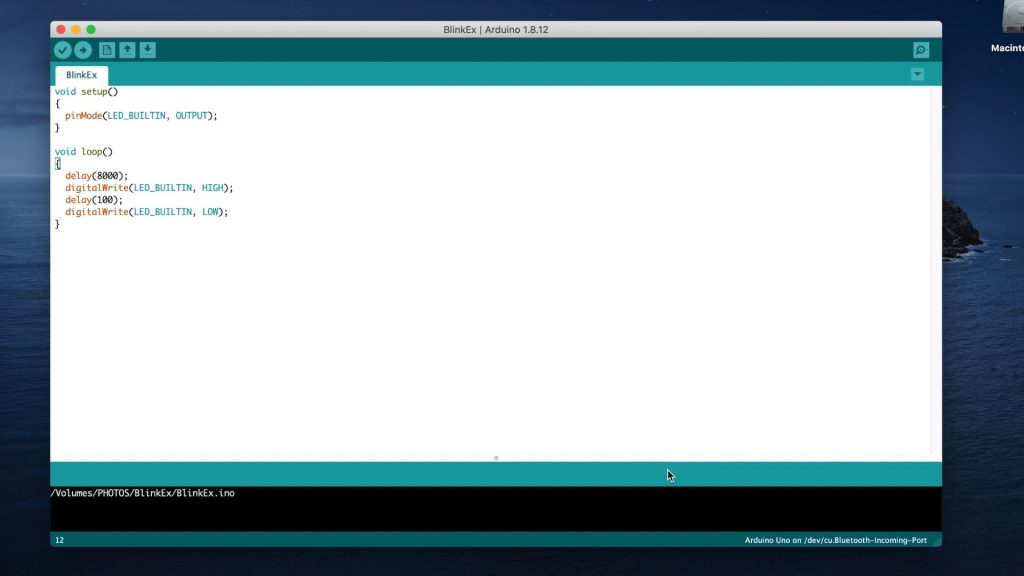
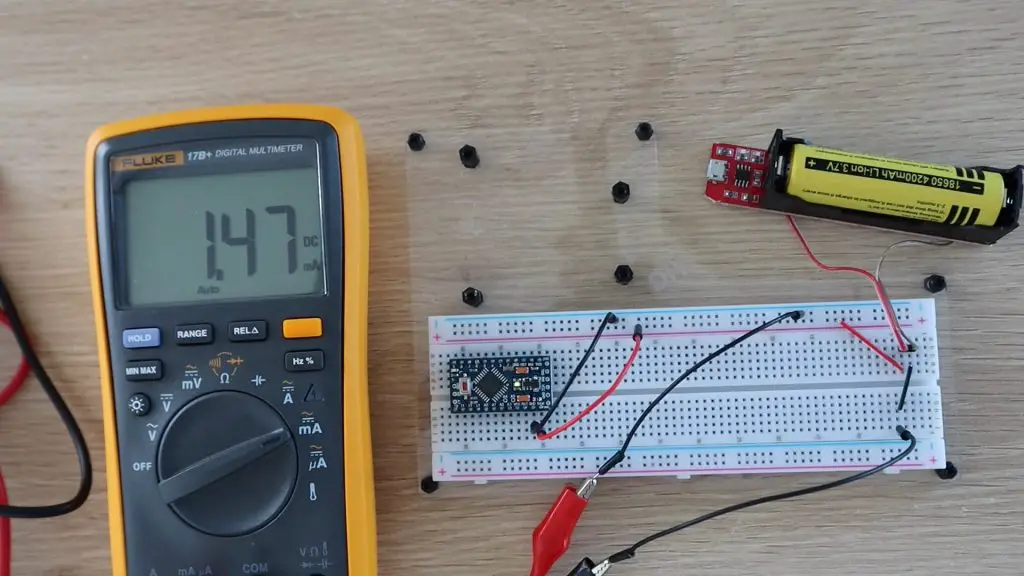
I then connected the single lithium-ion 18650 battery to the GND and RAW pins with the multimeter hooked up on the GND lead to measure the current being supplied to the Arduino.

So with no modifications, a 3.3V Arduino Pro Mini uses around 5.4 milliamps. Meaning that it could run for around a month on either the 4200mAh or the 3500mAh battery, the difference is only a couple of days.
Testing Low-Power Sleep Mode
The Atmega chips on the Arduino Pro Mini supports a number of different sleep modes that turn off any unused peripherals in order to conserve power when the Arduino is running on batteries. So let’s try putting the Arduino into a low power sleep mode between flashing the LED, using the following sketch and the LowPower library.
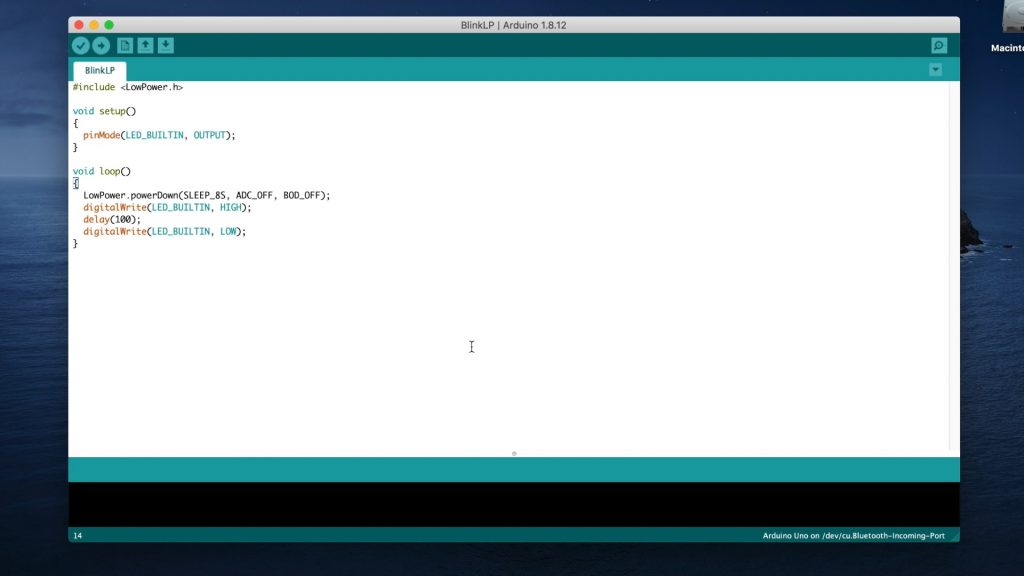
We’ll keep all of the connections and hardware the same the same for this test.
So this mode has decreased the current draw to around 1.5 milliamps, which means that the Arduino will last almost 4 months on the 4200mAh battery and a little over 3 months on the 3500mAh battery.
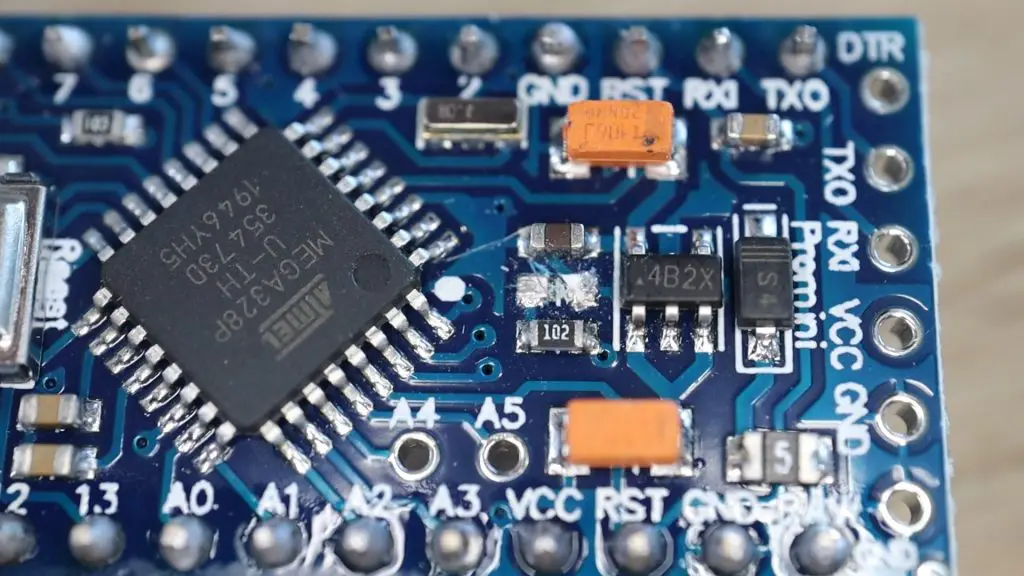
Remove The Built-In Power LED
Now let’s try making some physical modifications to the board in order to conserve more power.
The first and probably most obvious thing to do is to get rid of the on-board power LED. These small LEDs don’t draw much power, but when we’re trying to power the board for over a month using a single battery then even small consumption items like these can become significant. It’s also not particularly useful to have an onboard power LED if the board is going to be in a housing or box.
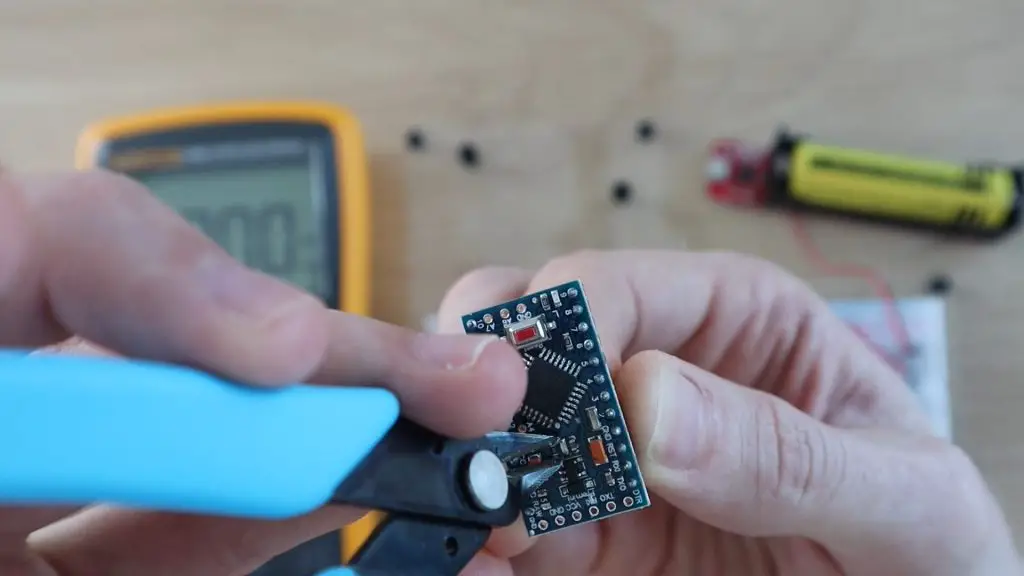
Because its a surface-mounted component and there are components alongside it, the easiest way to disable it is to break it off of the board with pliers or some wire cutters. You could also cut through one of the supply traces on the PCB.
Now let’s see what improvement we’ve made.
Here’s the current draw shown in milliamps.

Let’s try switching the multimeter to microamps to get better resolution.
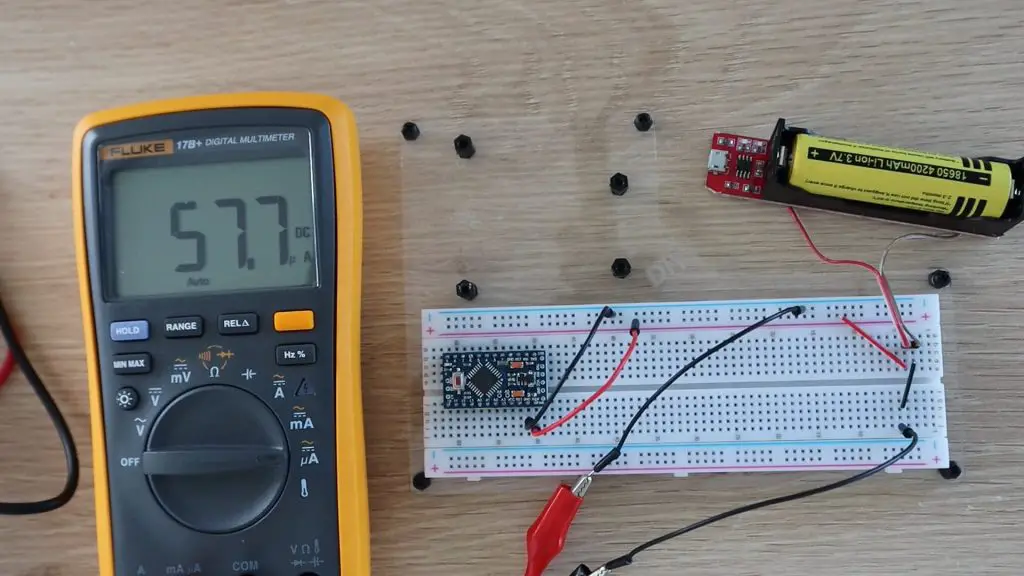
So the supply current has reduced from 1.5 milliamps to 0.058 milliamps or 58 microamps, which is a substantial saving. We’re now using 25 times less power than with just the power-saving mode activated, and all we’ve done is remove an LED which we probably wouldn’t have seen anyway.
So we’ve got an extra 2900 days of run-time by removing the LED. Your Arduino should now last for 8 years on a single charge on the 4200mAh battery and 7 years on the 3500mAh battery.
In practice, this will obviously be less, because your Arduino will also be doing some more complicated processing between sleep cycles, not just flashing an LED, but depending on how often and for how long it wakes up, this is what is possible.
You’ll also need to consider that an 18650 battery has a charge life of around 1 year, meaning that it slowly loses its charge over about a year to a year and a half. So your battery is actually losing its charge faster than the Arduino is using the power. If you’re going to be building really long term projects then you’ll probably want to use non-rechargeable batteries as these typically have a longer shelf life. Non-rechargeable lithium batteries generally have a shelf life of around 10-12 years.
For most projects, 8 years is more than enough and your components will likely pack up before the battery is empty. But why stop there? Let’s see if there is any other way we can further improve battery life.
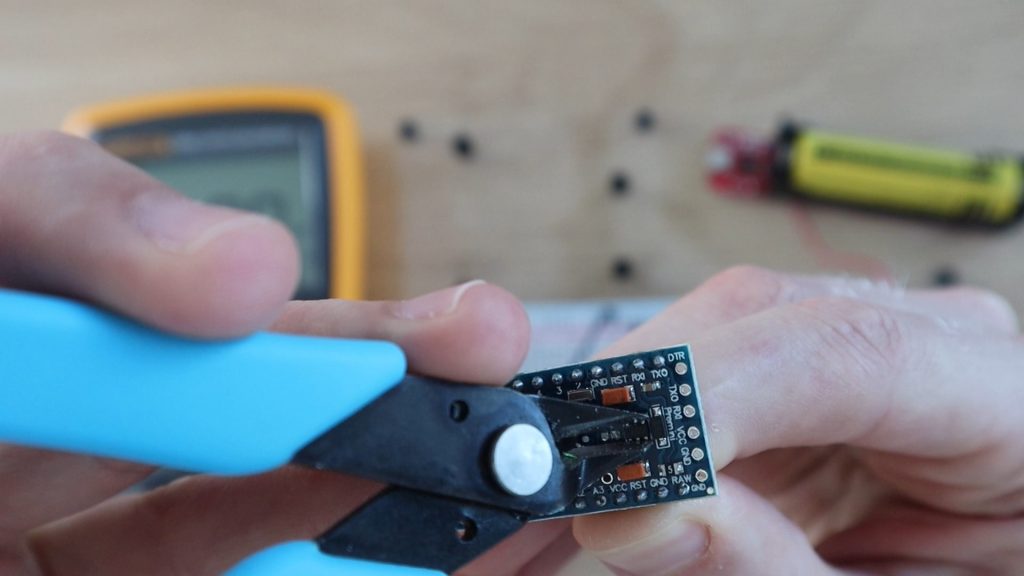
Remove The Onboard Voltage Regulator
The next thing I’m going to try is to remove the voltage regulator. The 3.3V regulators which are typically used on these boards are not very efficient at very low currents, you usually only get around 10-20% efficiency on the low end of thecurve. Replacing the regulator with a linear regulator, such as an MCP1700 will dramatically improve the battery life of your Arduino as well. This is a bit more complicated to do, you’ll need a steady hand and some patience to remove the surface mount voltage regulator from the board and replace it with a new one.
The other option is to remove the voltage regulator altogether. The ATmega328P chip can actually support input voltage levels between 2.7V and 5.5V, however the voltage on the IO pins will vary with the input voltage as well. This may not be a problem if your IO devices can handle the fluctuating voltages, as is often the case with LEDs, pushbuttons and relatively simple OLED displays. We’re going to try this method and see if the Arduino will still run and flash the onboard LED while using less power during sleep.
In order to remove the voltage regulator, I also just used some wire cutters and pulled the regulator off of the PCB.

You’ll also need to make a slight modification on your breadboard. With the voltage regulator removed, you’ll now need to power your board by connecting the 18650 battery to the GND and VCC pins. Connecting the battery to the GND and RAW pins will do nothing.
With the multimeter in milliamps, it doesn’t even register the current draw, but the LED is flashing, so the Arduino is still working.
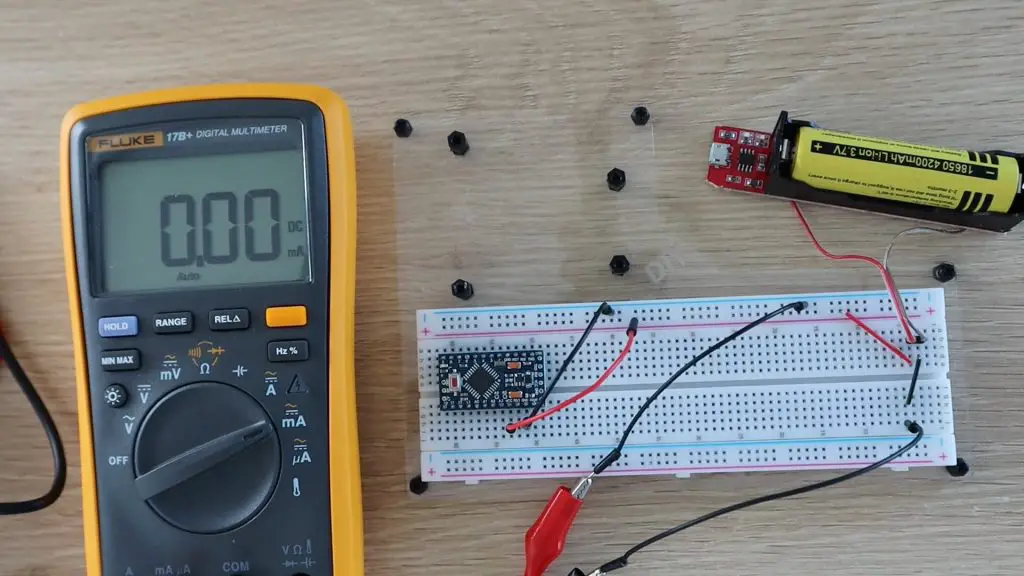
Let’s try switch it to microamps.

With the voltage regulator removed, our board is now drawing 5 microamps in sleep mode.
At 5 microamps we’re now up to 35,000 days on a single 4200mAh 18650 battery. This is also now pretty close to what the ATmega datasheet claims for power down sleep mode, so it’s unlikely that we’ll be able to reduce this much further.
You’ll notice a brief spike in the current reading when the LED flashes as the Arduino wakes up and supplies power to the LED.

So we now have an Arduino which will theoretically run for 96 years on a single 18650 battery. That’s way better than I thought we’d be able to do!
Let me know in the comments section what low power projects you’ve built using an Arduino and how long your batteries typically last.
Great addition.
It’s amazing what you can do with this type of card.
I enjoyed your presentation thank you, very much aligned with my current research on low power management.
What is your 328 clocked at?
The 3.3V Arduino Pro Mini’s have a clock frequency of 8 MHz.
Have you considered a circuit like this to shutdown the arduino for a period of time. Maybe wake once an hour or once a day.https://youtu.be/oh-q_IA0xFI