When installing new fittings, mirrors, lights or pipes in the kitchen or bathroom, there often is a need to drill holes through tiles. Special care and the correct equipment needs to be used to drill through tiles so that you do not crack them.
What you will need:
- Electric Drill or Combination Driver (Hammer Action Turned Off)
- Glass Drill Bit or Diamond Tip Hole Saw
- Masking Tape (For Glass Drill Bit)
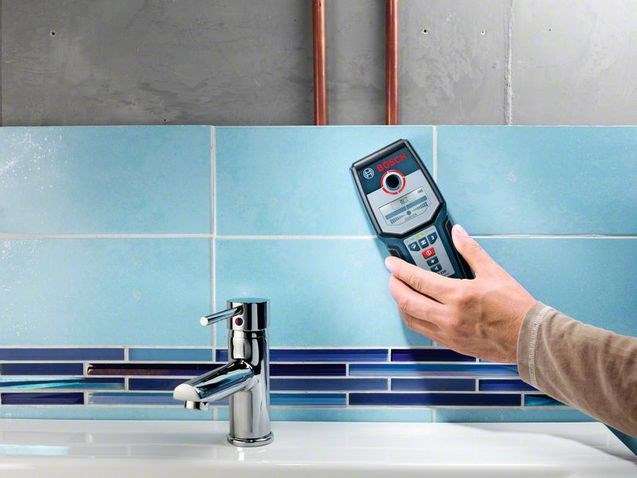
When drilling into the walls in bathrooms and kitchens, it is always a good idea to know what you may be drilling into. There is a multitude of electrical lines, water supply pipes and water drain pipes running vertically and horizontally in the walls. It is best to use an electronic detector to look for electrical conduit and metal pipework running in the walls to avoid an expensive repair.
Secondly you need to check whether the tile has been laid correctly. Often wall tiles are laid incorrectly on an inadequate bed of adhesive or they are only laid with dollops of adhesive in the corners. Tap around on the tile you are going to be drilling into. If there is a hollow sound anywhere, this indicates that there is no adhesive behind the tile in this area and it is not advisable to drill through the tile as it will most likely crack. If you have no option but to drill through the tile then do so with very little pressure on the drill bit, any excessive stress on a badly laid tile will cause it to crack.


Lastly you need to choose the correct type and size drill bit. Glass and tile drill bits usually come in sizes from 2mm up to 10mm (1/8″ to 1/2″) but rarely larger than this. For larger holes such as a hole for a copper pipe, you will need to use a diamond tip hole saw which usually come in sizes from 4mm to 50mm (1/4″ to 2 1/2″). For additional drill bit types, see this guide.
Drilling Using Tile Drill Bits
When using a tile drill bit, place a piece of masking tape in the area you are going to be drilling and then mark the point on the masking tape. The marking tape helps to keep the drill bit from wandering when you start drilling. Begin drilling on a low speed until the bit has broken through the glaze. Once the drill bit is through the glaze you can drill through the ceramic base at a higher speed. Once through the ceramic base, you may need to switch drill bits to a masonry bit of a size smaller than the hole through the tile to drill through brick and cement walls for a masonry wall plug installation. Here is a guide to installing screws in a masonry wall to complete your installation of a bathroom fitting, mirror or shelf.
Drilling Using A Hole Saw
When using a diamond tipped hole saw, mark the tile where you are going to be drilling. With the drill on a high speed, angle the diamond tip bit so that the bottom section of the drill bit surface touches the tile first. Hold the drill firmly and apply pressure until the hole saw begins to cut away the glazing. Now straighten the drill and continue drilling into the tile at a high speed. If you have thick ceramic tiles, it may be necessary to lubricate the drill bit in contact with the tile with water as you drill. This is easiest to do with water in a spray bottle. Spray directly into the contact area while you drill to keep the bit cool and from binding. Once you have drilled through the ceramic of the tile, pull the hole saw out of the hole and the cut out tile disk should come free. You may now need to switch to a masonry drill bit of a slightly smaller size than the hole through the tile to drill through the remainder of the brick or cement in the wall for the pipe.
Use a homemade dust collection bag under your drill bit, as shown here in order to limit the amount of cleaning up you have to do afterwards. Clean up the ceramic dust with a damp cloth, be careful as there may be sharp broken shards of tile glaze in the dust. It is advisable to wear suitable eye protection when drilling into any glass or glazed surface.