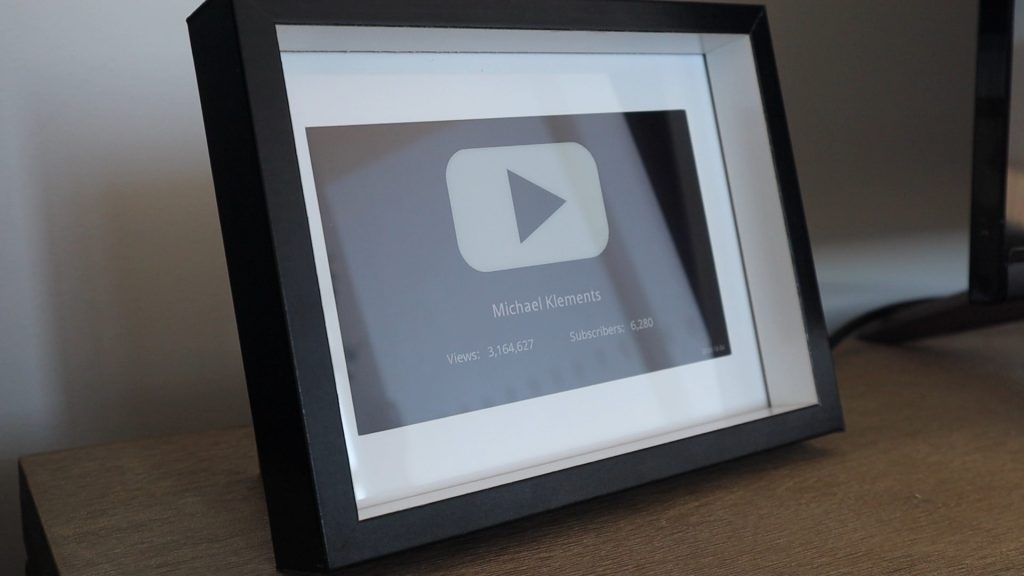
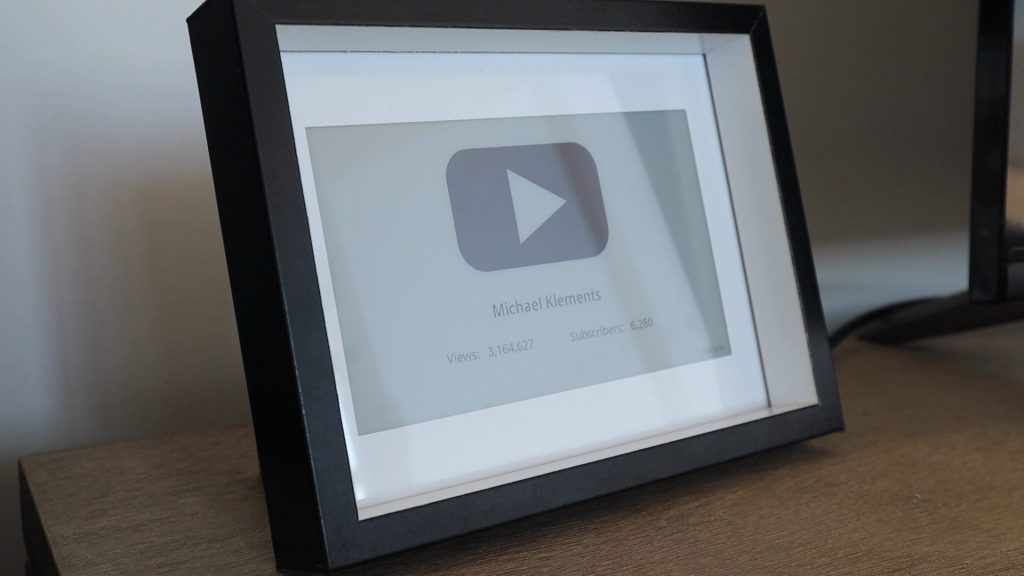
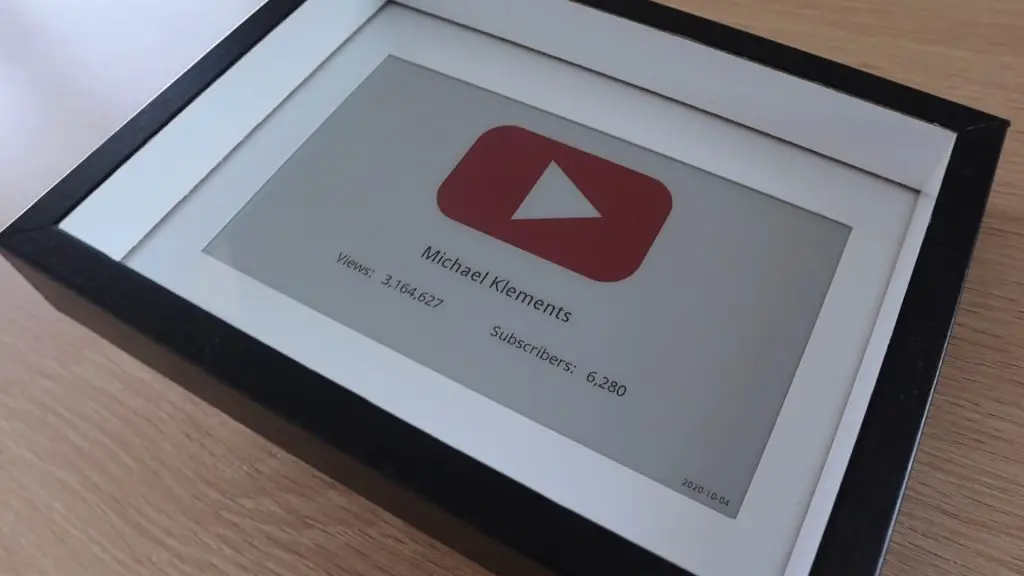
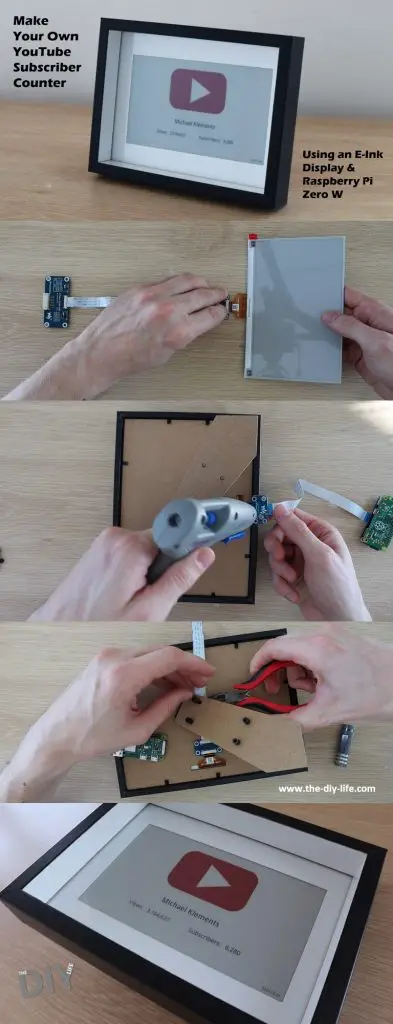
I’ve seen a couple of different designs for YouTube subscriber counters and social media follower counters and I had a Raspberry Pi Zero W lying around which I wanted to put to use. I didn’t want the distraction of a bright LCD display at night, so an e-ink or e-paper display seemed like the best option. So, in this project, I’ll show you how to make your own Youtube Subscriber Counter using a 7.5” Waveshare E-Ink display and a Raspberry Pi Zero W to update it.
The Raspberry Pi uses a Python script to query the YouTube API a couple of times a day and then refreshes the e-ink display to update the counter. It’s really simple to make as it just uses the Waveshare Hat for Raspberry Pis, so there is no soldering required and you don’t have to worry about tinkering with any other electronics to get it working.
The e-ink display provides great visibility during the day, even in bright light, and only uses power when it’s being refreshed, so the counter uses very little power to run. The updates take about 40 seconds to complete and between updates the Pi uses around 0.5W while at idle.
Here’s a video of the build and the display updating, read on for the step by step instructions to build your own.
What You Need To Make Your Own Youtube Subscriber Counter
- Raspberry Pi Zero W – Buy Here
- Micro SD Card – Buy Here
- Waveshare 7.5” HD E-Ink Display (B) With Controller – Buy Here
- 6×8” Shadow Box Frame – Buy Here (The one linked to is not exactly the same as used in the project, but the most similar I could find on Amazon)
- Keyboard, Mouse & Monitor For Setup (Or Connect Through SSH)
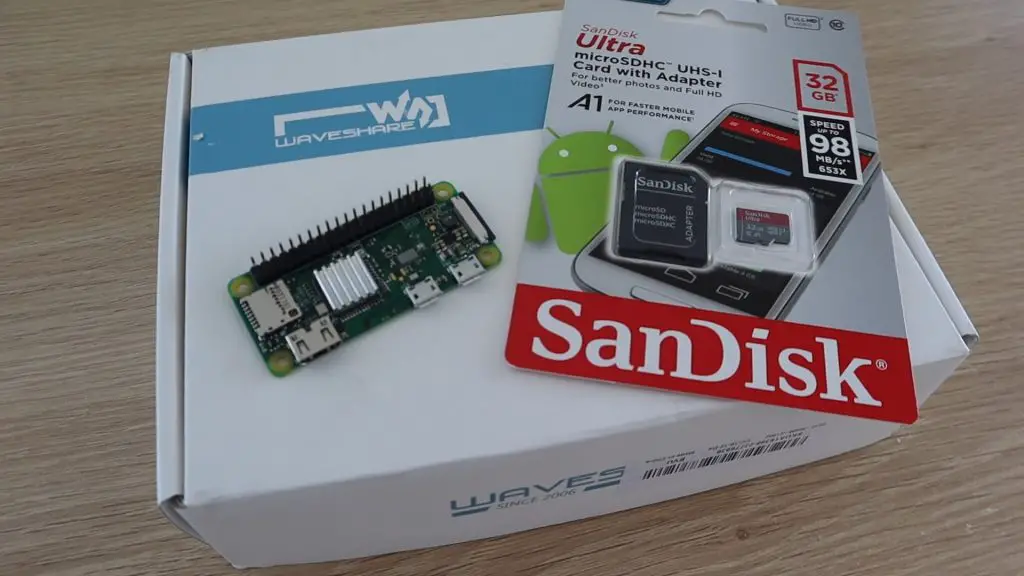
All you need for this project is a Raspberry Pi Zero W, an SD card, and a Waveshare E-Ink Display, make sure that you order the display which includes the hat display controller for the Raspberry Pi. You’ll also need a suitable frame to put it in, you may even have one lying around your home.
Connect & Prepare The Electronics For Your YouTube Subscriber Counter
Let’s start by preparing the Raspberry Pi Zero W. You’ll need the header pins to be soldered to your Pi Zero, so if yours didn’t come with them already installed, then you’ll need to install them before starting. Also, attach the heat sink to the CPU, this project isn’t particularly strenuous on the CPU, but it’s a good idea to install it anyway.
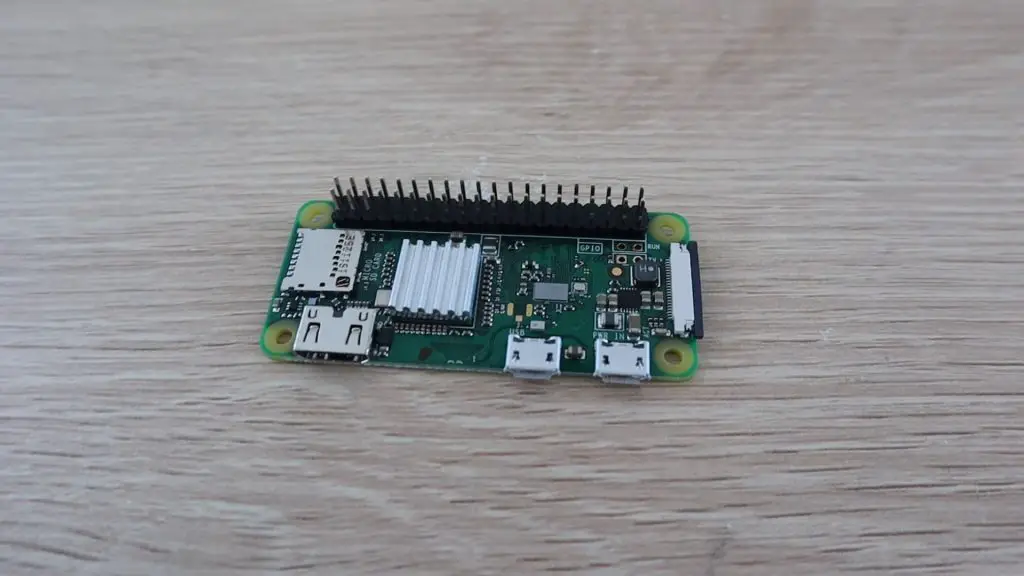
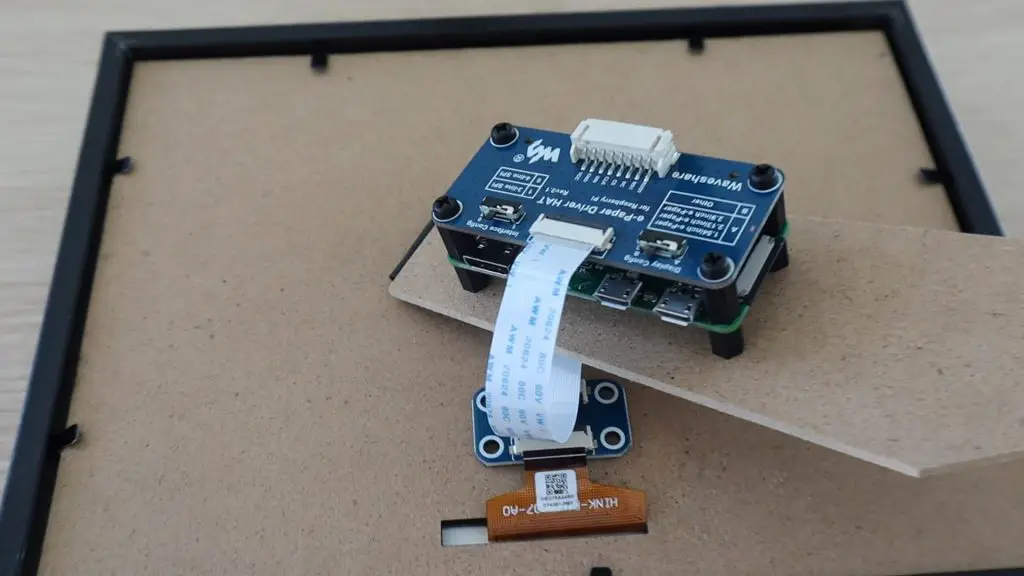
Once your Pi is prepared, you can connect the display. I’ve used the 7.5” HD 3 colour version, the three colours being white, black and red. You also get a two colour version which is just black and white and another 3 colour version which had yellow instead of red. The red just works better for the YouTube play button.
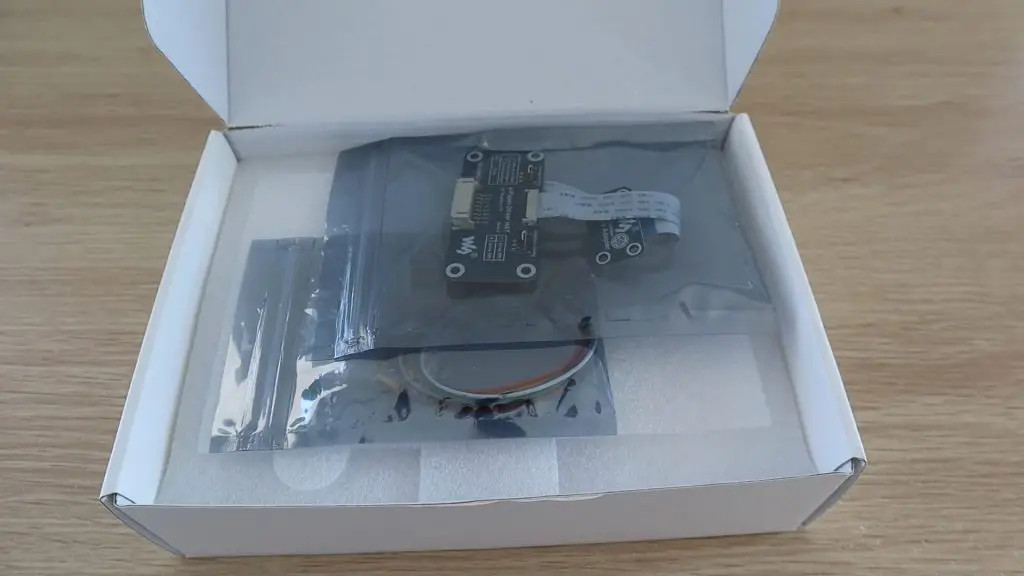
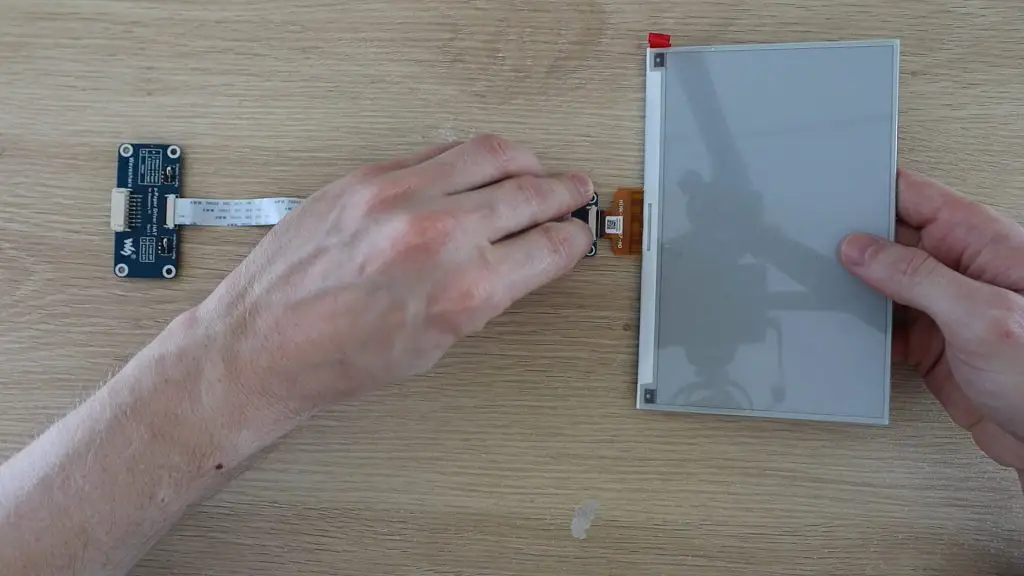
In the box, you get the SPI e-paper display controller, which is designed as a Raspberry Pi hat, to plug directly onto the GPIO pins. It also includes a plug and a set of leads to connect the controller to another SPI capable device, such as an Arduino or ESP32.

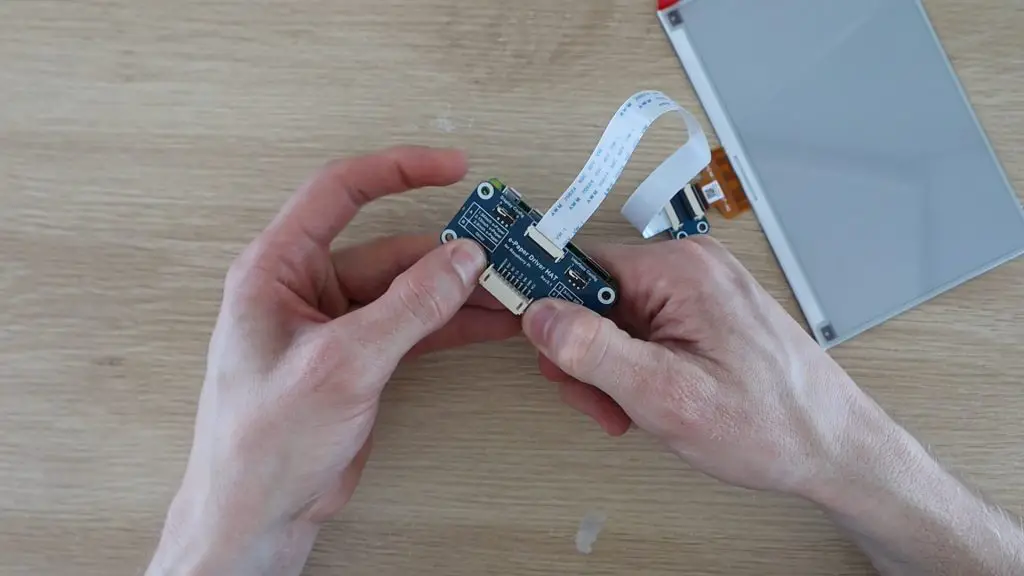
The actual display is really thin and has a thin ribbon cable at the bottom which plugs into the controller.
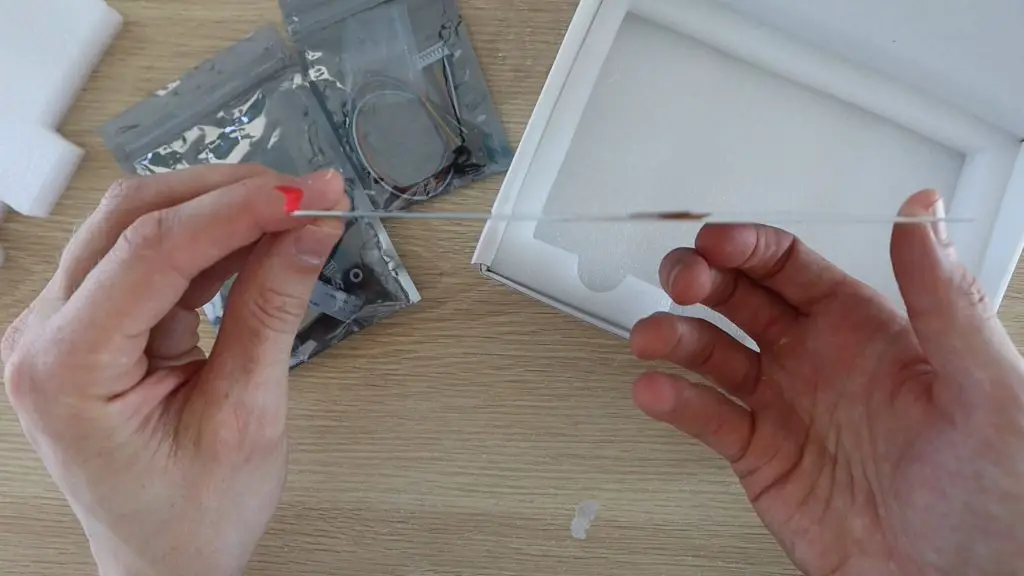
To connect the electronics together, you simply lift the black tab on the back of the connector, plug the display’s ribbon cable into the connector and then push the black tab down to lock it into place. Make sure that you get the orientation of the plug correct, the components are all face-up when laid on a flat surface.
You’ll need to prepare your SD card with an installation of Raspberry Pi OS, which can now be easily done using the Raspberry Pi utility for Windows and Mac computers. You just choose the operating system you’d like, then the target SD card, and the utility does the rest for you.
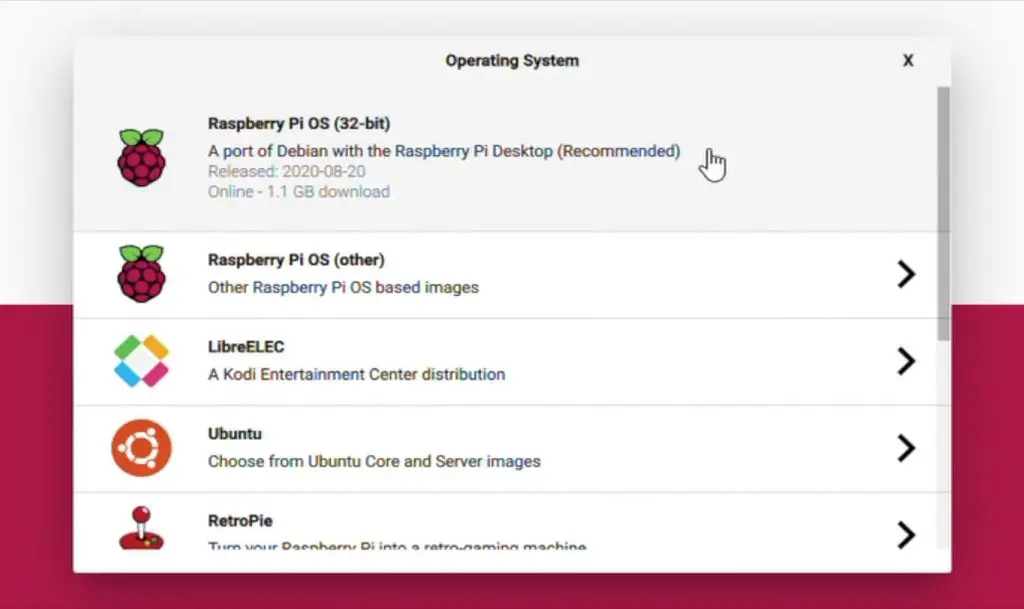
For this project, you can use the full version of Raspberry Pi OS or the Lite version which doesn’t have the GUI (graphical user interface) if you’re comfortable using the terminal (command line prompts) to set it up. If you’re planning on setting it up using SSH then you’re better off just using the Lite version.
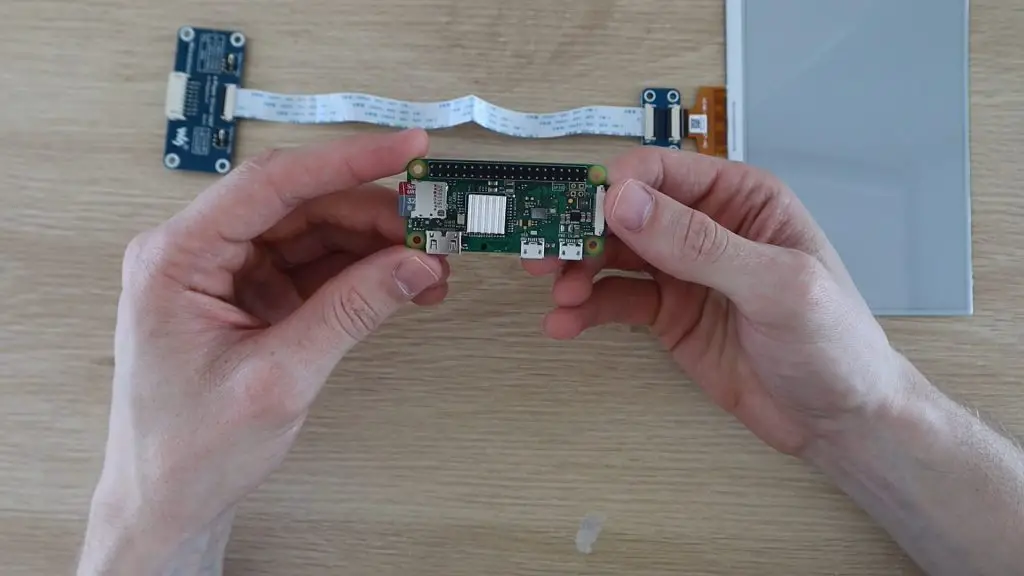
Plug your formatted SD card into your Pi and then plug the hat onto the GPIO pins.
You can now get started testing the display. I’d suggest that you get it working like this before building it into the frame if this is your first project using one of these e-ink displays.
The Waveshare Wiki for the 7.5″HD e-Paper Hat (B) is a great place to start. It walks you through the exact steps required to get the example code working and the display running through some example images and text. The Python script used for this project is based on this Waveshare example script.
If you’re not comfortable tinkering with the display and working through this Wiki then just follow the steps I’ve outlined in the subsequent sections to get it working for this specific project.
Build The Electronics Into The Frame Or Display Box
Now let’s build the display into the frame or display box. I found this cheap 6×8 inch box frame which will work quite well. You should be able to pick up a shadow box or deep photo frame around this size from a local discount store for a few dollars.
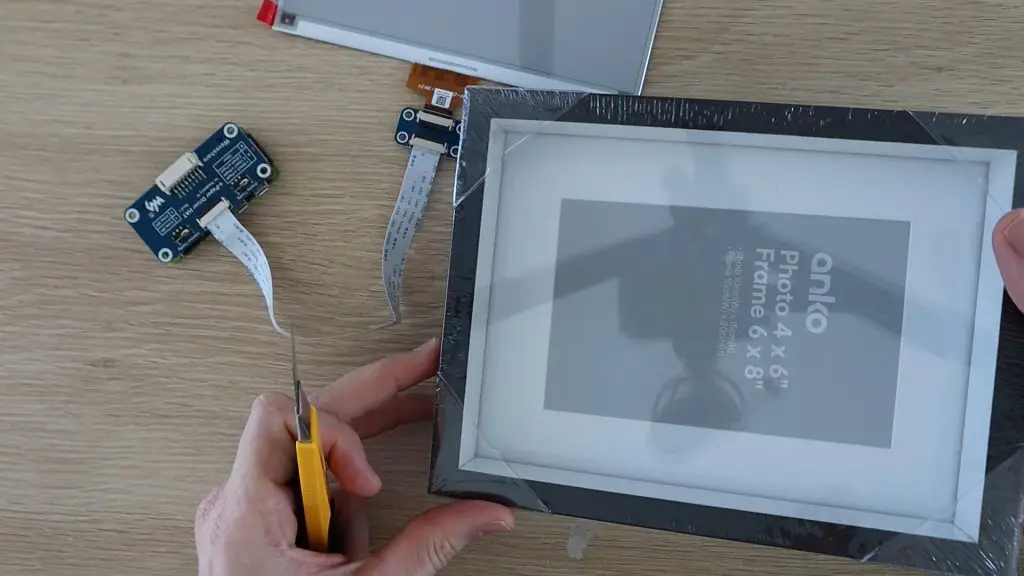
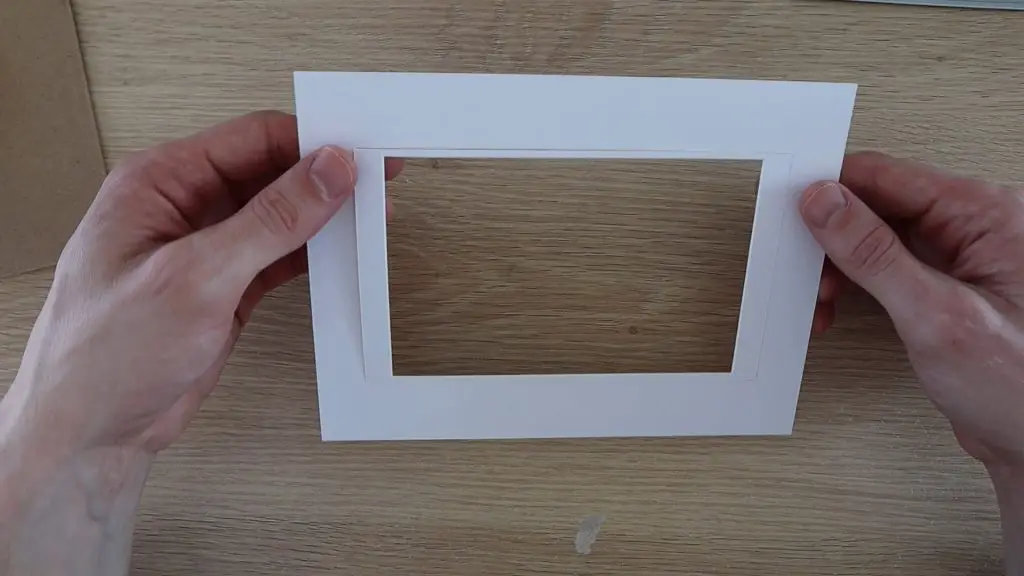
I started by removing the back layer to get to the white frame panel.
This is likely sized for a 4×6 inch photo like mine, so you’ll need to open it up a bit using a craft knife and a ruler so that it fits your display.
Measure the size of the display area and then mark it out on your frame insert.
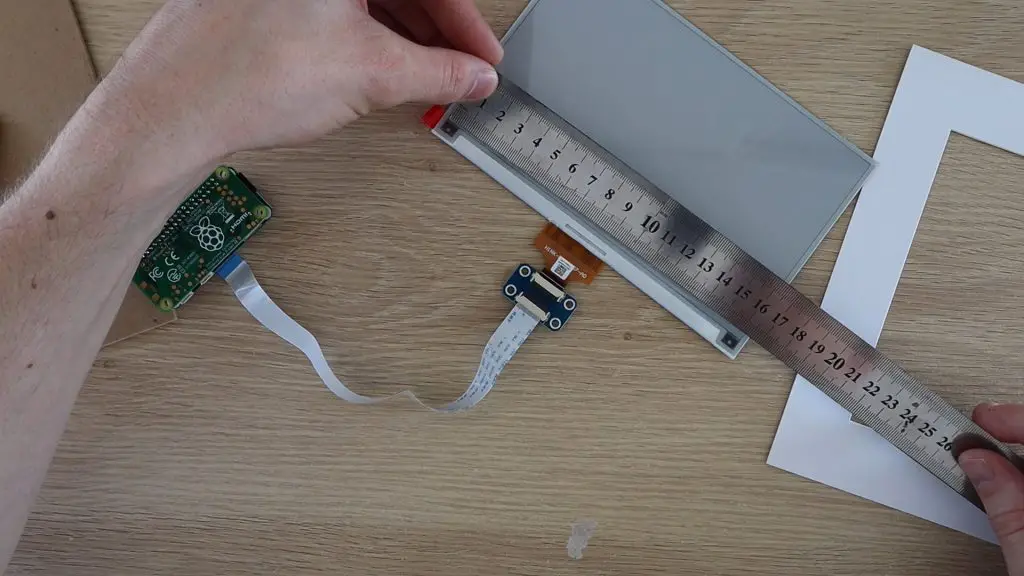
Use a sharp craft knife and a ruler to cut along the new lines to open the frame up to fit the display.
You could also just adjust the display content size to fit within the frame area if you don’t want to modify yours.
Peel off the protective film from the display.
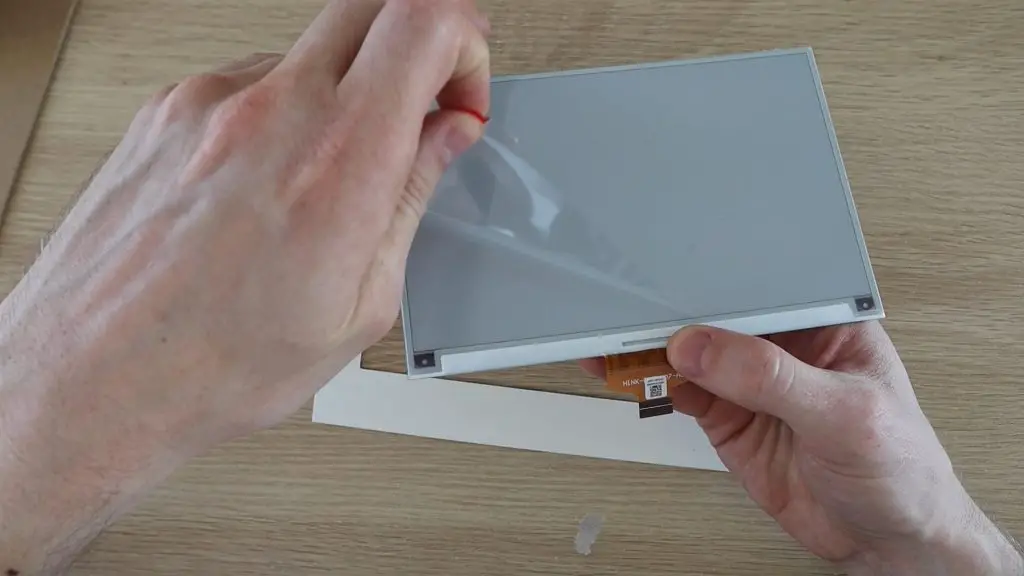
Then carefully glue the back of the display to the frame, making sure that it’s centred and straight. I used a drop of hot glue on the corners to hold it in place.
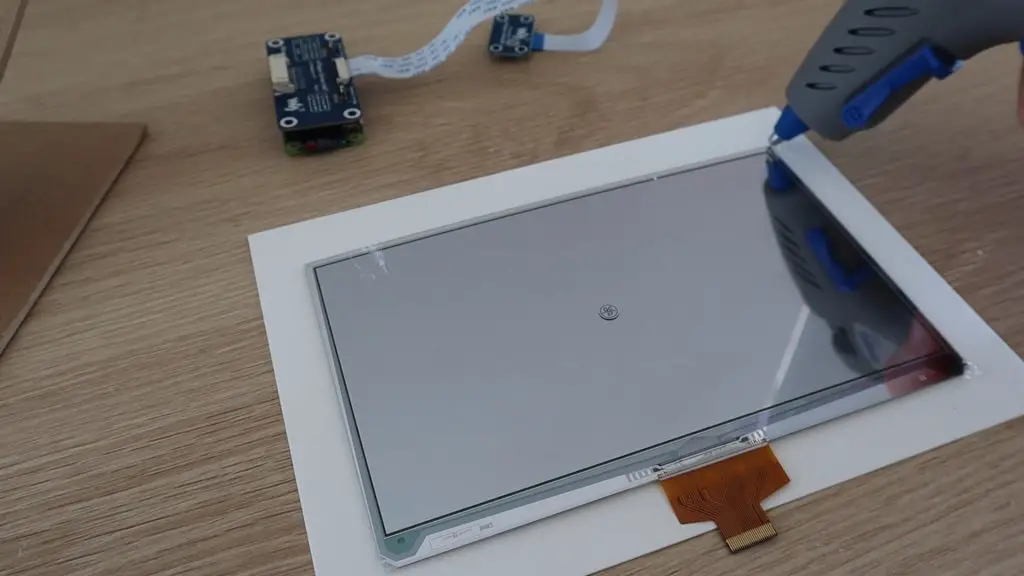
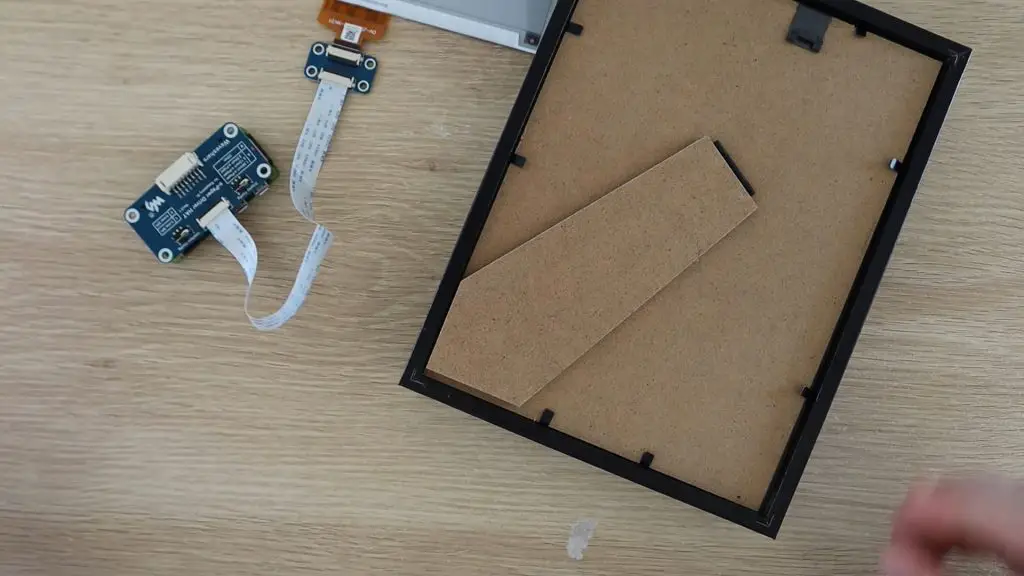
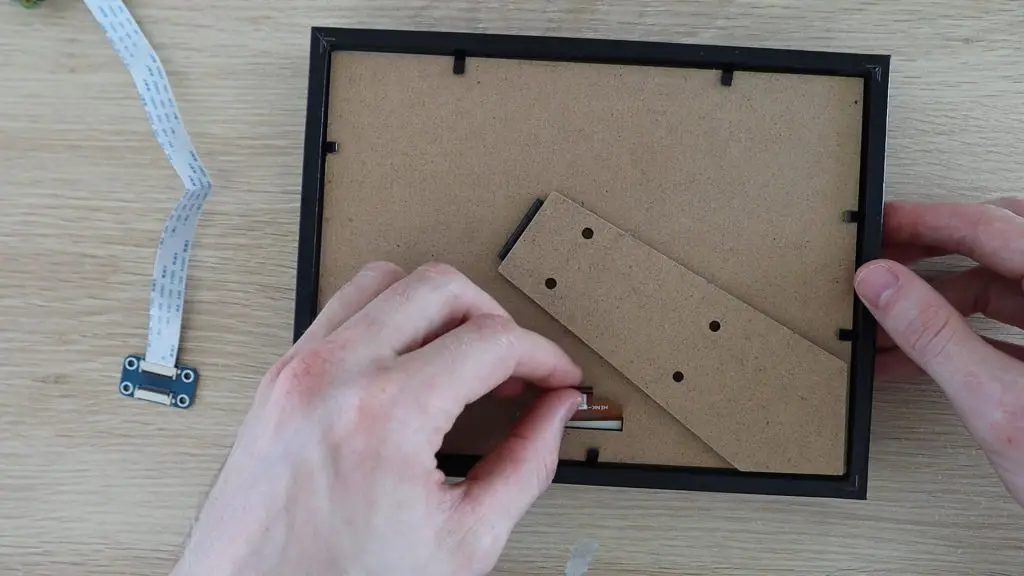
Next, mark out and cut a slot in the back layer to pull the display’s ribbon cable through.
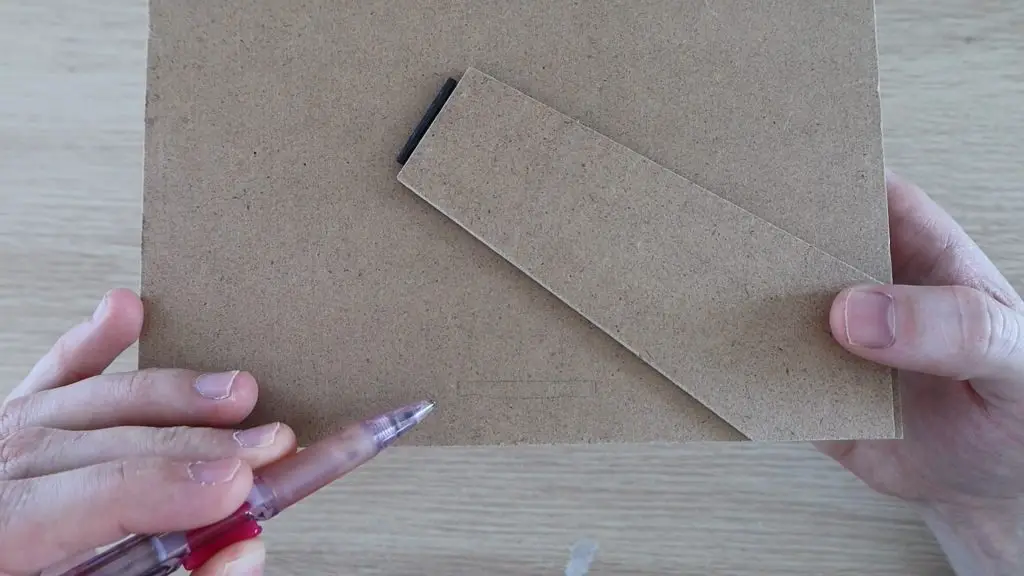
I also made the holes to mount the Raspberry Pi onto the stand.

Now re-assemble the frame and clamp the back layer back into place. If you don’t want a glossy finish to your frame, you could remove the glass panel from the front or use a matt finish panel instead.
Plug the display back into the controller and glue the connector in place so that it doesn’t put any stress onto the display’s ribbon cable.
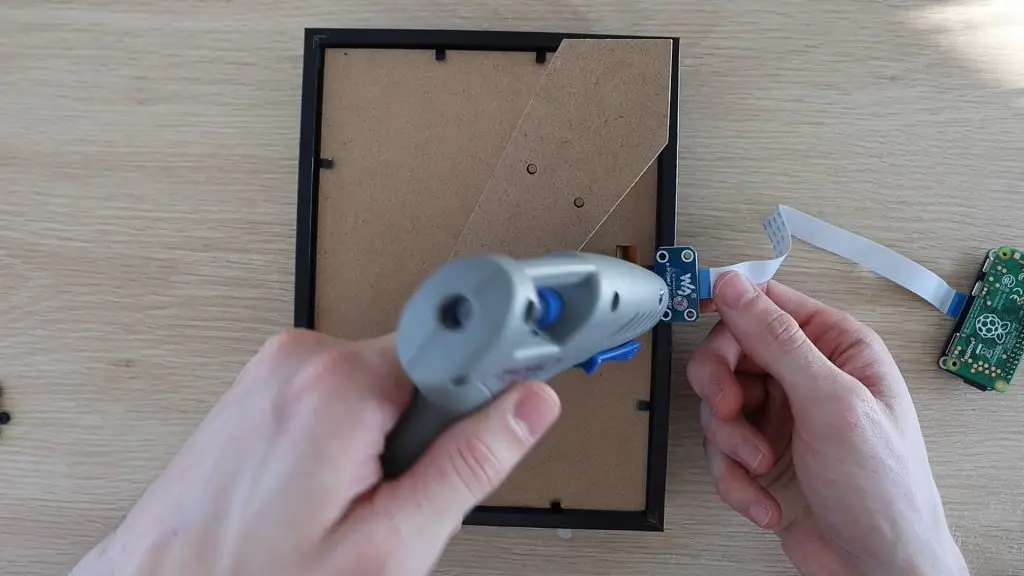
Now lets add some plastic standoff mounts to mount the Raspberry Pi and the Hat.
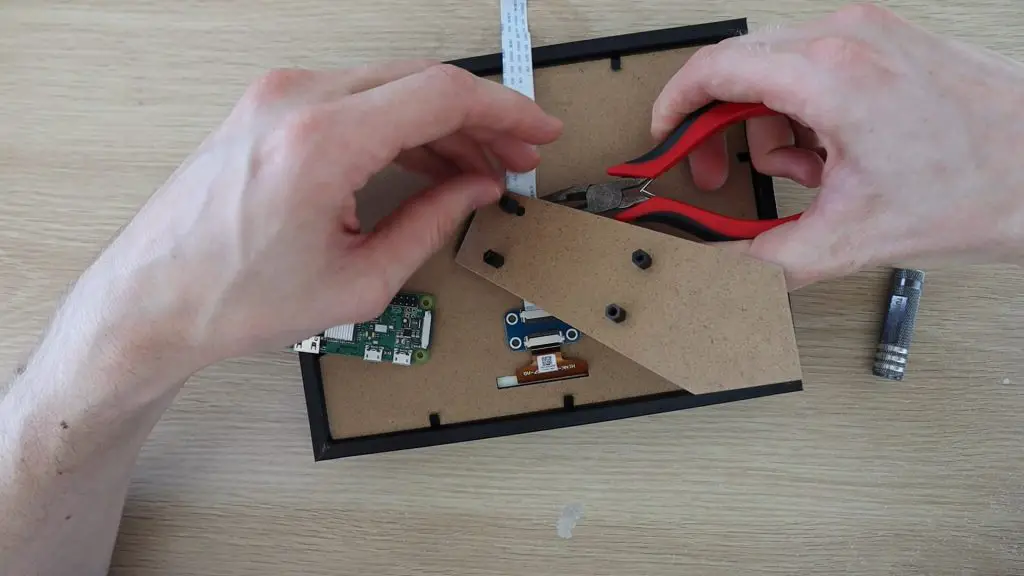
Your frame is now complete and ready for programming.

Setting Up & Programming Your Raspberry Pi Zero W
The first time you boot up the pi, it will take a while to set up the Operating System, get connected to your WiFi network, and do any updates. Most of this is done automatically and you should be guided through prompts until you get to your Desktop view and your Pi is ready for programming.
Before you start with the Python script, there are a couple of libraries to install and setup steps to work through.
Please also remember that software changes quite often with these devices, these steps work as of 6 October 2020, but you may encounter errors in the future as packages are updated and pieces of software become obsolete.
Setup & Library Installation
These initial setup steps are as per the display’s wiki from the Waveshare Wiki for the 7.5″HD e-Paper Hat (B)
Enable The SPI Interface
The Raspberry Pi communicates to the display controller using the SPI interface, so you’ll need to enable it on your Pi.
Open the terminal window and enter the following command:
sudo raspi-configChoose Interfacing Options -> SPI -> Yes
You may need to reboot your Pi for the changes to take effect.
sudo rebootOnce you’ve restarted your Pi, open a new terminal window again and enter the following to install the libraries:
Install the BCM2835 libraries:
wget http://www.airspayce.com/mikem/bcm2835/bcm2835-1.60.tar.gz
tar zxvf bcm2835-1.60.tar.gz
cd bcm2835-1.60/
sudo ./configure
sudo make
sudo make check
sudo make install
Install the WiringPi libraries:
sudo apt-get install wiringpi
wget https://project-downloads.drogon.net/wiringpi-latest.deb
sudo dpkg -i wiringpi-latest.deb
gpio -v
Install the Python2 libraries:
sudo apt-get update
sudo apt-get install python-pip
sudo apt-get install python-pil
sudo apt-get install python-numpy
sudo pip install RPi.GPIO
sudo pip install spidev
Install the Python3 libraries:
sudo apt-get update
sudo apt-get install python3-pip
sudo apt-get install python3-pil
sudo apt-get install python3-numpy
sudo pip3 install RPi.GPIO
sudo pip3 install spidev
Get Your YouTube API Key
In order for the Python script to retrieve your current subscriber count and number of views, you’ll need to add your Channel ID and your YouTube API key.
Here’s how to generate your API key:
Go to the Google API web page while signed in to your google account associated with your YouTube channel – https://console.developers.google.com
Go to your Dashboard and the click on “Create Project”, choose a name for your project and click “Create”.
Next, click on “Enable APIs and Services” and type – Youtube Data API v3 – into the search box. Enable it and click “Create Credentials”.
On the next page, you should see a link to create an API key in small letters, click on this link.
Next click “API Restrictions” and select “YouTube Data API v3”.
Click “Create” and you should then be given your API key which you’ll need to copy into the main Python script below.
You’ll also need to get your Channel ID. You can find this under “Advanced Settings” for your channel account. Click on your profile picture in the top right, then go to “Settings”, wait for the page to load and then click on “Advanced Settings” from the menu on the left.
You can test your API Key and Channel ID by going to the following address in your broswer, replacing YourChannelID and YourAPIKey with the ones you’ve just got:
https://www.googleapis.com/youtube/v3/channels?part=statistics&id=YourChannelID&key=YourAPIKey
Load The Python Script
This script is largely based on the Waveshare example script, with a couple of additions and changes to get the information from Youtube:
#!/usr/bin/python
# -*- coding:utf-8 -*-
import sys
import os
import requests
picdir = os.path.join(os.path.dirname(os.path.dirname(os.path.realpath(__file__))), 'pic')
libdir = os.path.join(os.path.dirname(os.path.dirname(os.path.realpath(__file__))), 'lib')
if os.path.exists(libdir):
sys.path.append(libdir)
import logging
from waveshare_epd import epd7in5b_HD
import time
from PIL import Image,ImageDraw,ImageFont
import traceback
from datetime import date
today = str(date.today())
logging.basicConfig(level=logging.DEBUG)
# Set up the structure of the API request URL
URL = "https://www.googleapis.com/youtube/v3/channels"
type = "statistics"
channelid = "******"
apikey = "******"
PARAMS = {('part', type), ('id',channelid), ('key',apikey)}
#Get API results
r = requests.get(url = URL, params = PARAMS)
data = r.json()
subscribers = int(data['items'][0]['statistics']['subscriberCount'])
totalviews = int(data['items'][0]['statistics']['viewCount'])
#Convert results to a string and format numbers with commas
noViews = 'Views: ' + f"{totalviews:,d}"
noSubs = 'Subscribers: ' + f"{subscribers:,d}"
#Update the display
try:
logging.info("Updating display")
epd = epd7in5b_HD.EPD()
logging.info("initialising and clearing display")
epd.init()
epd.Clear()
font12 = ImageFont.truetype(os.path.join(picdir, 'Font.ttc'), 12)
font24 = ImageFont.truetype(os.path.join(picdir, 'Font.ttc'), 24)
font32 = ImageFont.truetype(os.path.join(picdir, 'Font.ttc'), 32)
logging.info("Drawing new image")
blackImage = Image.new('1', (epd.width, epd.height), 255)
redImage = Image.new('1', (epd.width, epd.height), 255)
draw_blackImage = ImageDraw.Draw(blackImage)
draw_redImage = ImageDraw.Draw(redImage)
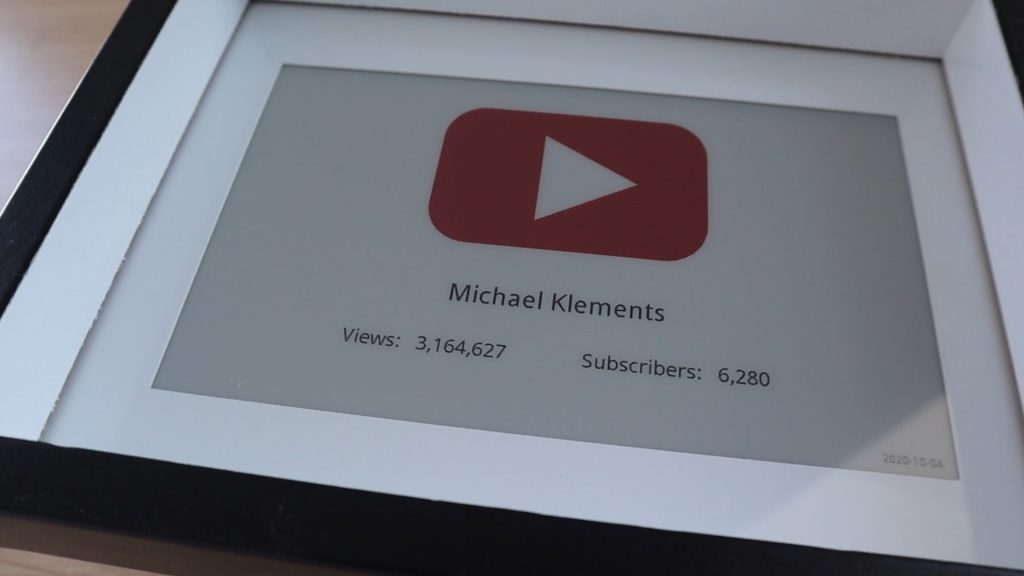
draw_blackImage.text((312, 360), 'Michael Klements', font = font32, fill = 0)
draw_blackImage.text((200, 435), noViews, font = font24, fill = 0)
draw_blackImage.text((475, 435), noSubs, font = font24, fill = 0)
draw_blackImage.text((800, 500), today, font = font12, fill = 0)
bmp = Image.open(os.path.join(picdir, 'youtubeIcon.bmp'))
redImage.paste(bmp, (265,80))
epd.display(epd.getbuffer(blackImage),epd.getbuffer(redImage))
#To delay before clearing, if used
#time.sleep(20)
#To clear the display afterwards
#logging.info("Clear...")
#epd.init()
#epd.Clear()
logging.info("Putting display to sleep")
epd.sleep()
epd.Dev_exit()
except IOError as e:
logging.info(e)
except KeyboardInterrupt:
logging.info("ctrl + c:")
epd7in5b_HD.epdconfig.module_exit()
exit()
Copy the root folder into your home/pi/ directory so that your script is in /home/pi/SubCount/SubCount/subCount.py
You may also need to include the Font used from the Waveshare example, paste this font into the pic folder along with youtubeIcon.bmp
We start by importing the libraries, functions and directories needed as well as getting the current date.
We then use the Youtube API to get the subscriber count and number of views. Remember to update these in your script before running it, just replace the ****** with your own ID and Key.
We then format the returned numbers with commas and finally connect to the display to update it. You’ll also need to update your channel name to your own channel name by replacing the “Michael Klements” with your own channel name in this portion of the code.
The script then puts the display into a low power sleep again until the next update.
If you’d like to play around with the layout of the display, try adjusting the numbers in the display portion.
draw_blackImage.text((200, 435), noViews, font = font24, fill = 0)
The first number is the X position and the second number is the Y position of each object to be displayed.
You’ll also need to run the setup.py script, included with the above code download, once before you run the actual script:
import sys
from setuptools import setup
setup(
    name='waveshare-epd',
    description='Waveshare e-Paper Display',
    author='Waveshare',
    package_dir={'': 'lib'},
    packages=['waveshare_epd'],
)
Try to run the script and after a few seconds, you should see your display start to refresh. The full refresh of the display does take quite a while, somewhere around 30 seconds on the Raspberry Pi Zero. It is a bit faster on a Raspberry Pi 4.
The flickering is normal for these controllers and is done to prevent burn-in on the display. It’ll first flicker black and white to clear the display, then load a black and white version of the image and finally replace some of the black with red as instructed.
Schedule The Python Script To Run Automatically
Once you’ve got the script working, you’ll just need to schedule the script to run automatically using crontab, mine updates the YouTube subscriber counter display every 8 hours, running three times a day. You could probably just refresh the display once a day, but Waveshare recommends updating the display at least once every 24 hours to prevent burn-in. So I just went with every 8 hours to be safe.
I followed this guide by scottkildall to get crontab to automatically run the script at 6AM, 2PM and 10PM.
You essentially need to create a launcher.sh script in the same folder as your Python script:
#!/bin/sh
# launcher.sh
# navigate to home, then script directory, then execute, then back home

cd /
cd home/pi/SubCount/SubCount/
sudo python3 subCount.py
cd /
This script tells the Raspberry Pi to change directory to the home directory, then navigate to your script, then run the script using python3 and then go back to the home directory.
Once you’ve got your launcher script created, open crontab by opening a terminal window and entering:
crontab -eYou’ll then edit crontab to run the launcher.sh script by adding lines:
0 22 * * * /home/pi/SubCount/SubCount/launcher.sh
0 6 * * * /home/pi/SubCount/SubCount/launcher.sh
0 14 * * * /home/pi/SubCount/SubCount/launcher.sh
Save the changes and your Raspberry Pi should now be all set to update automatically at 06:00, 14:00 and 22:00. You can edit the minutes and hours in the above lines to set the times you’d prefer. The first is the minutes and the second the hours, in 24 hour format.
Using Your YouTube Subscriber Counter
Once you’ve got the scripts set up and scheduled to run automatically, your Youtube Subscriber Counter is complete. Just plug it into a USB power supply and place it on your desk or shelf.
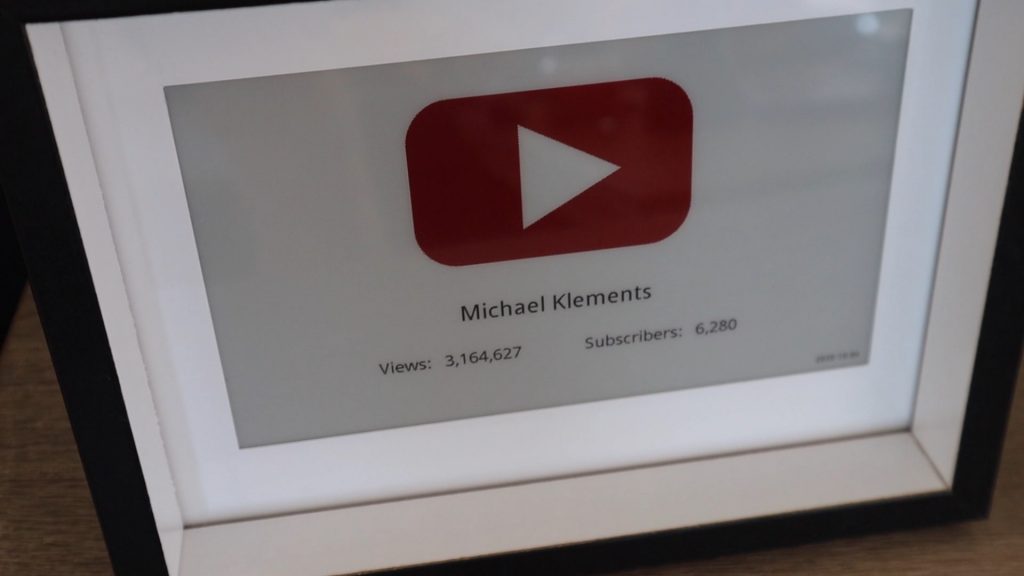
The date in the bottom right corner is updated to reflect the last time the stats were updated, so you’ll be able to see if anything goes wrong and the Pi stops updating the display regularly by checking this date as well.
I wanted to build this particular YouTube Subscriber Counter using a Raspberry Pi Zero W, but you could also use an ESP32 to use even less power by putting the controller to sleep between updates to the display, something that’s difficult to do on a Raspberry Pi.
Let me know what you think of it in the comments section and let me know if you try building your own!
Share This Guide
Great project! Thank you very much.
I have adapted the tutorial for instagram, have however not been able to generate a bmp file, that will properly render the instagram logo – I always end up with a fully filled red rectangle.
Any idea how what I am doing wrong?
Thanks Vince. Your bitmap file needs to be pure black and white (even if you’re displaying it in red) and needs to be the correct size (in pixels) to display on the screen. Make sure that it is, for example, 150 pixels by 150 pixels as a start. Hope this helps.
Great, that solved it. I caused myself some extra headache by using the alpha channel in the bitmap – not the best idea in hindsight.
Ended up using ImageMagick as follows for it:
$magick xc:red xc:white xc:black +append palette.bmp
$magick imageToRemap.bmp -remap palette.gif result_image.bmp
Good to hear you managed to get it working!
Great tutorial Michael!
I am trying to start with this project and reading/watching your guides and noticed that you didn’t show any power supply to be plugged in the Pi Zero W. Does the Pi Zero W doesn’t require any power supply?
Thanks for sharing your guides. Very concise and clear.
Hi Michael,
Such a great project, thank you for sharing! I’m having a little bit of an issue. I’m getting a syntax error when trying to execute the python subcount script for line 39,it says invalid syntax. Any ideas would be greatly appreciated!
noViews = ‘Views: ‘ + f”{totalviews:,d}”
Michael,
I ran into a similar issue. Code started to work once I chose the correct epd driver in subcount.py. your version of epd will vary depending on your version of screen, but be sure to match that in the code or you will run into that invalid syntax error. Also, i needed to copy a font to the pic lib and name it Font.ttc
epd = epd7in5bc_V2.EPD()
you will know you have the right driver when the screen starts to flicker and the clear command actually clears the screen.
Hi Michael,
Everything Ok from my side in terms of configuration and installation of the software. However the display unit came broken, with horizontal lines that rendered the picture really bad. I contacted the seller, no response. I was wondering how is your unit working after more than 10 months and have you used any other e-ink display in any other project?
Thanks!
Miguel
Hi Miguel,
That’s disappointing, did you buy it through a channel that allows returns or refunds? My display is still operating perfectly after 10 months and is being updated 3 times a day. I’ve used another e-ink display for a smaller project but also a Waveshare product, just a smaller display.
Thanks Michael. I bought it in Amazon, so all OK. I returned it today, waiting for refund now. Since you unit is working so far for more than 10 months, I will try again to get another unit and see what happens.
BTW, I did not get an e-mail with your response, even I clicked the boxes; something to be aware of.
Best,
Miguel
Hi Michael,
FYI, a display replacement just came and I managed to finished this project. Thanks a to for the guidance. Also, just in case, in the crontab, I had to add ‘sudo bash” to all my jobs, since they were giving “permission denied”; you may want to update that part.
Thanks again!
Miguel
That’s great Miguel, happy to hear you’ve managed to get it working. Thanks for the tip for crontab.
This is a great project and i was able to set up pretty quickly as my first project with a Rasberry Pi!!
One thing that i had to change for my set up was the waveshare driver reference on lines 13, 48 and 80 in the file “aubCount.py”. For me the reference epd7in5b_HD wouldn’t work and needed to be epd7in5b_V2. Not sure why this was but playing with the example codes, showed what worked.!!
Also changed the Crontab lines to be one single line for the same result.
0 */8 * * * /home/pi/SubCount/SubCount/launcher.sh
This runs at 0 minutes past the hour every 8 hours.
Thanks again for this project!!
I had the same issue initially, and it was I bought the wrong display (epd7in5b_V2), this one with smaller resolution. The one used in this sample and I finally got is full HD, so the sample works well with it.
Thanks for the feedback Ben.
Yeah, you’ll need to make sure that the display you’re using is the correct one as per the example code. This also took me a while to figure out as mine was actually mislabeled.
Thanks for the crontab tip, that’s also a useful way to do it. I specifically set the times as I wanted it to update before waking up in the morning as a routine. You could obviously achieve the same result with your timing as well, you’d just need to be aware of the time it first runs.
Small update on the CronTab tip. The code works but doesn’t work for this application!?
I think the code runs when the Pi starts up and so potentially runs before there is an internet connection estabilished. This causes the screen refresh to look like noise rather than the expect text and logo. Long story short, i’m going back to your code and having it refresh at set times…
Oh also, I returned low-def screen to get the same High-Def screen as it was only £3 more expensive!!
Thanks again…
Just got mine working. Thanks for taking the time to put all this together! Here are the updates I have since doing this.
1) I wasn’t able to saddle the pins into the hat – I had to use the included cables to manually connect everything from the hat to the Pi (I used a full sized Pi 3B+ that I had on hand)
2) My “pi” folder was actually set up as my first name, so it was home/nils/SubCount… etc., not home/pi/SubCount…
3) Make sure to update the permissions on the launcher.sh file so that they can be executed by everyone, otherwise you get a “permission denied” error when you try to run it.
4) The SubCount.py file errored out every time because of the missing / incorrect font file. I ended up using Font Forge to create my own font.ttl by combing two existing fonts I found online. I uploaded it to my Google Drive in case anyone else wants to use it and skip all the hassle. https://drive.google.com/file/d/16zUq-BCQWFXs-lGGjh83v3x_GzggQb2P/view?usp=sharing
5) I had to reposition a few things on the screen in order to get mine to work with the new font, which was just updating the X and Y coordinate numbers in the SubCount.py file.
6) I decided to add my channel logo where the channel name was. To do this, I downloaded the icon.bmp file (the YouTube logo included) and opened it in Photoshop then brought in my logo and made it the same size. I then duplicated the YouTube logo line and positioned it underneath the play button.
I think those were all the changes I made. Anyway, great job with this and it’s super cool to have this on my desk!
That’s great to hear. I like your idea to use a different font, I must definitely try that out! I’ve you’ve got any pictures of how yours turned out, it would be great to share them on the page.
I’ve tried without success. When running the script, the following message appears:
DEBUG:root:e-Paper busy
DEBUG:root:e-Paper busy
DEBUG:root:e-Paper busy
DEBUG:root:e-Paper busy
DEBUG:root:e-Paper busy
INFO:root:cannot open resource
is there a solution for this
Any chance you might update this DIY guide using the Pimoroni Inky Impression e-paper panel (5.7 or 7.3″)?
The assembly and foundational software installation is much simpler and more efficient opening the door to a wider audience of DIY users. The cost of the Inky Impression with a Pi Zero WH is also quite cost competitive with no fiddly ribbon cables to deal with.