Why would anybody want bats in their yard? Here are three great reasons! Bats are attracted to flower nectar just like bees and (like bees) pollinate as they visit from flower to flower. Since they “work the night shift,” bats pollinate all night like bees do all day. Secondly, bat poop is incredibly rich in nutrients, bat droppings have an ideal ratio of NPK (nitrogen, phosphorus, and potassium, the elements required for plant growth, ) and have a high percentage of living organisms, making it a natural fungicide which destroys nematode worms. Finally, but most importantly, is pest control – bats feast on as many as 1,200 insects each hour and mosquitoes are a major part of their diet. If you’ve ever grown your own garden, you know how difficult it can be to combat bugs, particularly if you are committed to avoiding harmful pesticides. Bats eat the bugs responsible for wreaking havoc on your garden.
Bat houses give females a safe, warm place to raise their young. Because bats typically only have one pup each year, populations are slow to grow. Plus, because of habitat loss, bats are finding it harder to find places to roost during the day and to raise their young. By installing a bat house, you give these pups a chance to survive and for populations to be healthy. And all those healthy bats mean we can use less pesticide on our plants—a win win for everyone.
Without bats, humans would be in trouble. Bats help control insect populations, reseed deforested land, and pollinate plants, including many that we eat. Researchers and scientists also learn from bats to improve medicine and technology. As population encroaches on forested areas, loss of habitat has endangered many species of bats. Building a bat house provides a safe place for bats to live and a nursery for their young.
So, let’s get started to make a proper, weather-tight bat house with good ventilation and proper dimensions.
What You’ll Need To Build A Bat House
You can use most any wood, but cedar is recommended for its weather resistance and insect repelling properties. I am typically against painting cedar, but a good skin of outdoor water-based latex paint will add years of life to your bat house. You will want to use liberal amounts of yellow carpenter’s glue or silicone caulk – or use both to provide as dry an interior as possible.
- 1 x 1m (3’) Long 25mm x 200mm (1″ x 8″) Cedar Plank
- 1 x 60cm x 60cm (2’ x 2’) Sheet of T-111 Exterior Plywood.
- 1 x 2.5m (8’) Long 25mm x 150mm (1″ x 6″) Cedar Plank
- 1 x 100mm x 100mm (4’ x 4’) Sheet 6mm (¼”) Plastic Mesh
- 1 x 180cm (6’) Long 25mm x 100mm (1″ X 4″) Cedar Plank
- 46 x 40mm (1 5/8″) #8 Galvanized Wood Screws.
- 2 x 90cm (3’) Long 25mm x 25mm (1″ x 1″) Cedar Plank
- Silicone Sealant
- Paint and Paint Brush
- Electric Drill, Saw, Measuring Tools, Heavy Duty Stapler
How To Make The Bat Box
Choosing & Cutting The Lumber
The plans for this bat house come from Florida Bat Conservancy (view site here) who do great things for the conservation of bat populations.
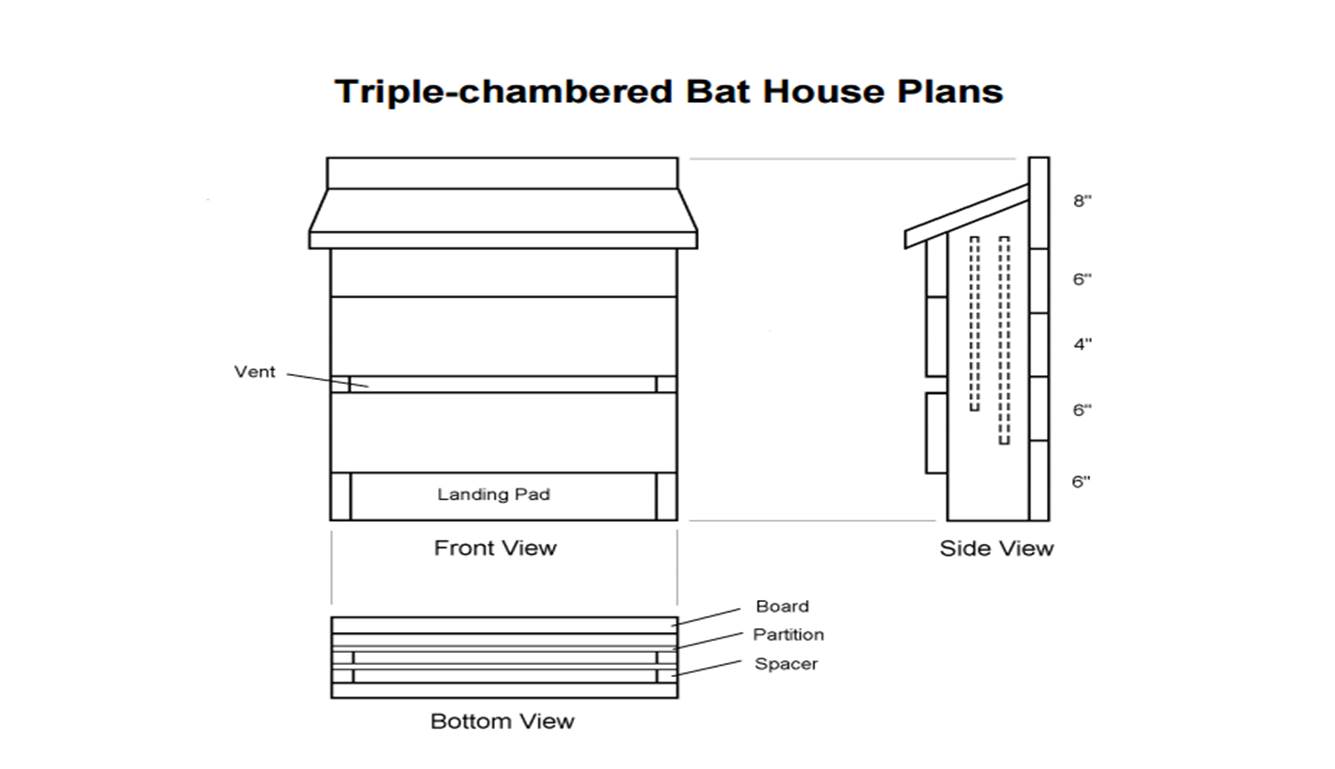
From the 25mm x 150mm (1×6), cut six 355mm (14″) sections for the front and back panels of the bat house.
From the 25mm x 200mm (1×8), cut one 405mm (16″) section for the roof and one 355mm (14″) section for the back.
From the 25mm x 25mm (1×1) cut four 430mm (17″) sections. These will be used as spacers to secure the partitions.
From the 25mm x 100mm (1×4), cut one additional 355mm (14″) section for the back.
From the remaining piece of the 25mm x 100mm (1×4) cut two sections for the sides. One end of each piece will be cut at a 30-degree angle for the roof. This can be done by cutting each piece with a front length of 545mm (21½”) and a back length of 600mm (23½”).
From the T-111 or plywood sheet, cut a 430mm x 305mm (17″x12″) section for the back partition, and a 405mm x 305mm (16″x12″) section for the front partition. If a larger piece of plywood is available, these two pieces can be cut 320mm (12½”) in width to provide a flush fit at either side.
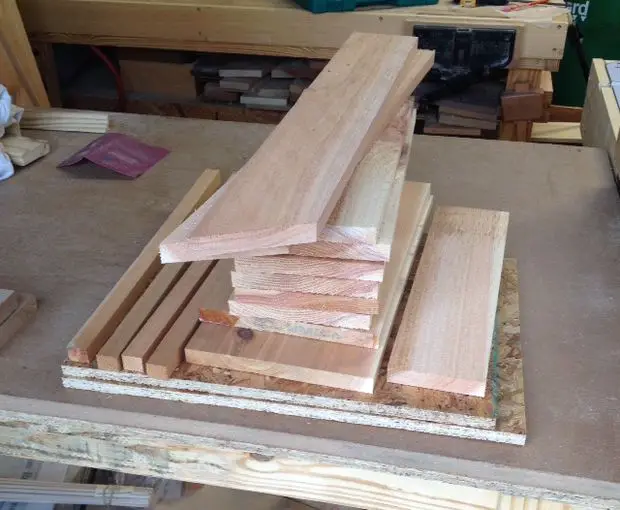
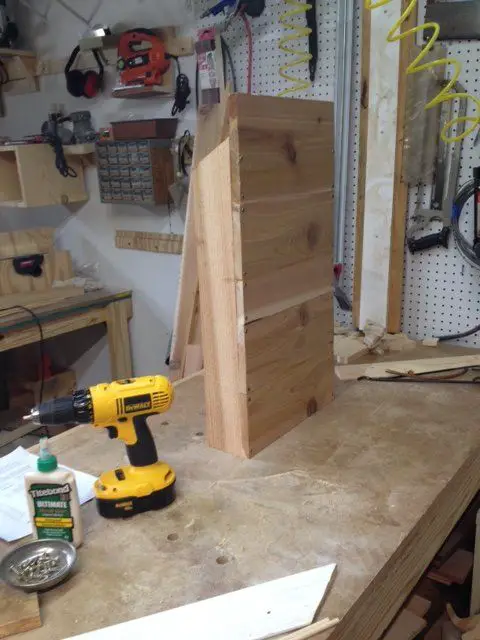
The plans were accurate, so cutting all of the pieces can be done without regrets. Having everything pre-cut helps dry fitting pieces; the dry-fitting process helps visualize how the project comes together.
Putting The Pieces Together
Before any assembly, plan your steps so you can anticipate when glue is needed or best time to apply caulk. As pieces come together, it can become difficult to spread glue or apply caulk into tight spaces.
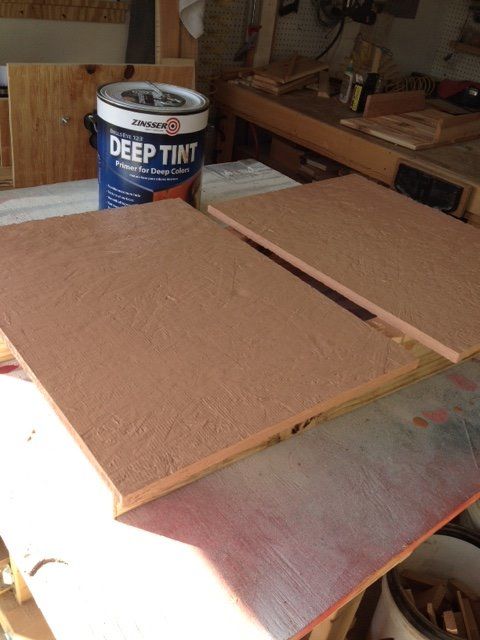
You can score the interior pieces (cut a very shallow groove every 15mm (1/2″) or so) to give the bats something to climb on/cling to – or you can staple a plastic mesh material to interior surfaces . . . most folks go with the mesh. Just make sure you don’t cover up your grooving or the mesh with paint – it renders it unusable by the bats.
After fastening mesh material, everything goes together using construction screws. You can use any type of screw, however, it should be a wood screw, it should be weather resistant, and it should be short enough to avoid poking through to leave exposed screw tips to harm the bats. A construction screw works well – it not only stands up to outdoor conditions, it has a six-pointed star drive which will not spin out during installation (important when using heavy lumber that this project calls for.) Don’t have a star drive bit for your drill? No problem – a bit is usually packed with a box of these screws.
Pre-drill all holes to prevent splitting wood. Use a drill bit slightly smaller in diameter than your screw. Seat each screw firmly making sure you don’t leave any exposed screw tips to harm bats. Spread glue just before screwing; clamping is not necessary if screwed properly, however using clamps sometimes helps hold pieces firmly while you pre-drill holes and install screws.
All joints receive a coating of waterproof carpentry glue. When the glue dries, all corners receive a generous bead of silicone caulk; you should plan to do one or the other, but I recommend doing both to ensure a dry interior and extended life.
Place the two side pieces on a table with the long sides up and 355mm (14″) apart (outside to outside). It is recommended that glue or caulking be used as the bat house is assembled to strengthen and weatherproof it.
Place one of the 355mm x 150mm (14″ X 6″) pieces on top and align it with the bottom of the two side pieces. Fasten it with two wood screws on each side. Repeat the process with a 150mm (6″), 100mm (4″), 150mm (6″) and 200mm (8″) piece, in that order. This will place the 200mm (8″) piece at the top of the bat house.
Now turn the bat house over so it is laying on its back. Drill one hole at the top, and one hole bottom. These will be used for mounting the bat house to a post or building – skip these holes if you plan to use a French cleat mounting system. If you do drill the holes, they should be located in the center and 50mm (2″) from the edge.
If plastic mesh is being used, cut two sections of plastic mesh the same dimensions as the plywood partitions. Staple the mesh to the plywood using vertical rows of staples. The side with the mesh will face the front of the bat house. Cut a section of plastic mesh and place it on the back wall of the bat house. Fasten the mesh with vertical rows of staples.
Position the 25mm x 25mms (1X1’s) in the left and right-hand corners with the bottom ends located 115mm (4½”) from the bottom of the bat house. This will create a landing pad. Place the 430mm (17″) partition with the rough or mesh covered side up on top of the two 25x25s (1X1’s) already in position. Use three wood screws in each; one in the center and the other two a little from each end. Make sure the top wood screw securely attaches the 25×25 (1X1) to the board on the back wall. This will add strength to the bat house
Position the remaining two 25x25s (1X1’s) on each side of the partition directly above the previous two. Place the 405mm (16″) partition on top (rough or mesh side up); allowing 25mm (1″) of the previous 25x25s (1X1’s) to show at the bottom. This open space makes it easier for bats to crawl into the forward crevices. Now fasten the plywood section and 25x25s (1X1’s) using two screws on each side. Locate them about 40mm (1½”) from the top and bottom of the plywood partition to avoid the screws underneath.
Place the beveled board at the top of the front, aligning the beveled edge with the 30 degree angle of the two side pieces. Fasten it using two screws on each side. Repeat using a second board. Locate the third and final board about 12mm (½”) down from the previous one to form a gap for the vent. This vent is important as it creates different temperature zones inside the bat house – bats will gravitate to different temperatures depending on maternal status, age, etc. and the vent gives them that choice.
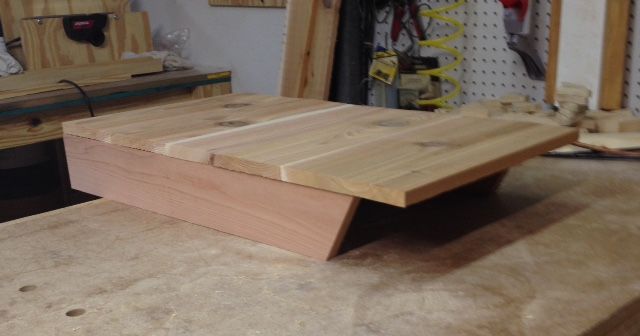
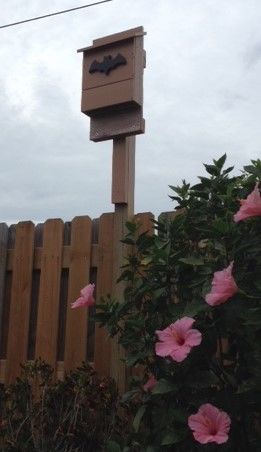
Center the roof section such that there is equal overhang on each side. Fasten it to the side pieces using two screws on each side. The roof should be caulked where it meets the back wall. Adding roofing material and painting the bat house will greatly extend its life.
Paint color and texture also regulates bat house temperature. Paint color should be black where average high temperatures in July are less than 30°C (85°F), dark colors (such as dark brown or dark gray) where they are 30°C (85°F) to 35°C (95° F), medium colors where they are 35°C (95°F) to 38°C (100°F) and white or light colors where they exceed 38°C (100°F). Much depends upon amount of sun exposure; adjust to darker colors for less sun. For the interior, use two coats dark, exterior grade, water-based stain. Apply stain after creating scratches or grooves or prior to stapling plastic mesh. Paint fills grooves, making them unusable. Use exterior-quality, water-based stain or latex paint, and choose flat paint rather than gloss or semi-gloss paint for best solar absorption.
Mounting The Bat House
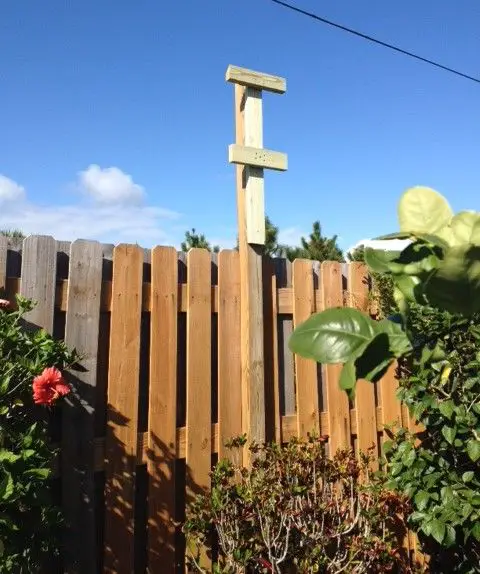
The bat house can be mounted on a post or the side of a building using the holes drilled above and three lag bolts. Alternately, a “T” brace using a cleat for the cross member can be used and anchored to a second cross member using screws in both lower corners. A large galvanized or stainless steel washer (fender washer) is recommended to protect the wood. Mounting on trees is not recommended because they have proven to be the least successful location for bat houses. Bat houses should be located at least three meters or ten feet above ground. Experience indicates the higher the bat house is mounted the more likely it will get bats; optimum elevation is between 3.5m and 6m (12 and 20 feet) above ground level.
You’re up and ready for bats. The research suggests it can take as long as a year for bats to adopt a new bat house. Bat houses can be installed at any time of the year, but they are more likely to be used during their first summer if installed before the bats return in spring. When using bat houses in conjunction with excluding bats from a building, install the bat houses at least two to six weeks before the actual eviction, if possible.
If you still have trouble with pugs and pests in your garden, have a look at our recipe for an all natural homemade pesticide.
This post is based on Bat House by JanM46 and is used under the Creative Commons Public Domain license.