In this guide, we will be looking at how to run an artificial neural network on an Arduino. This is the perfect project to learn about machine learning and the basics of artificial intelligence. The neural network in this example is a feed-forward backpropagation network as this is one of the most commonly used, the network concept will be described briefly in the background section.
Although we’ve used an Uno in this example, the network can be run on a Nano, Mega or Leonardo as well.
This project assumes you know the basics of Arduino programming, otherwise read our article on getting started with Arduino.
Background on Artificial Neural Networks
An artificial neural network is a mathematical computing model which is designed to mimic the way in which the brain reacts to sensory inputs. The brain is made up of millions of neurons which are connected to each other in huge networks. Each neuron is capable of being stimulated, much like a switch being turned on or off, and the state of the neuron turns surrounding neurons on or off as well depending on the level of activation of the neuron and the strength of the connection between the neurons. A neuron with a strong connection will have a greater level of stimulation than one with a weaker connection. Very simplistically, the neurons own level of stimulation is related to the sum of the stimulation it is receiving from all of the other neurons connected to it, and this is precisely how the artificial neural network works.
Let’s start off by understanding what exactly a backpropagation network is. The network itself is not a new concept, in fact they have been around since the 80’s and while they are based on some fairly complicated mathematics, you do not need to understand the mathematics in order to understand how the network functions.
So what is an artificial neural network? In short, an artificial neural network is a segment of code which learns how to respond to inputs based on example sets of inputs and outputs. They are very powerful tools and are rapidly finding their place in facial recognition, autonomous vehicles, stock market and sports predictions and even as far as websites suggesting products which you may be interested in. Their most powerful application lies in pattern recognition, where the exact input into the network is not known. There may be too little or too much information and it is up to the network to decide how it is processed. A good example of the application of an artificial neural network is in handwriting recognition. We are able to recognise letters and numbers but the exact shape of the characters varies from person to person, therefore the input into the neural network is never precisely known. It is up to the neural network to identify the input and relate it to the relevant output.
In an artificial or software based neural network, a mathematical model of all of the neurons and their connections is created. An input is then fed into the network and the neurons systematically add up their inputs and produce an output into the next level of neurons until an output is reached.
One of the key principles in an artificial neural network is that the network needs to be trained. When the network is set up, random weights are applied to each of the connections. These weights provide a starting point for the network but will almost invariably provide “rubbish” outputs. A set of sample data is input into the network and the results are compared to the expected results. The weights are then adjusted and the input/output cycle repeated. This training cycle is repeated until the output data from the network matches the expected output data within a certain level of accuracy. This typically takes a few tens of thousands of training cycles depending on the complexity of the data and network.
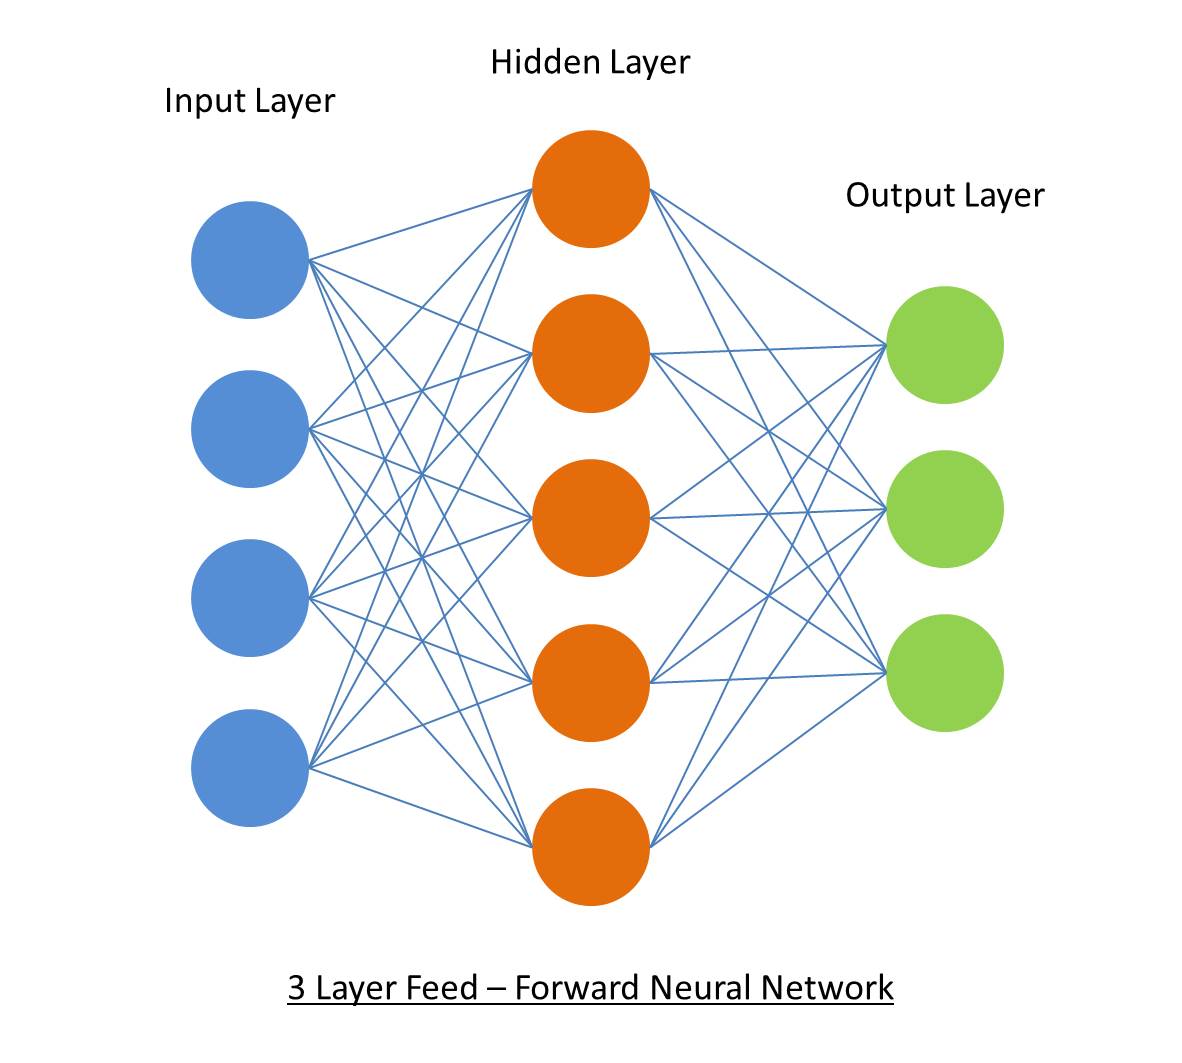
In this example, we’re going to be building a three layer feed forward network, the three being the input layer, hidden layer and output layer as shown below.
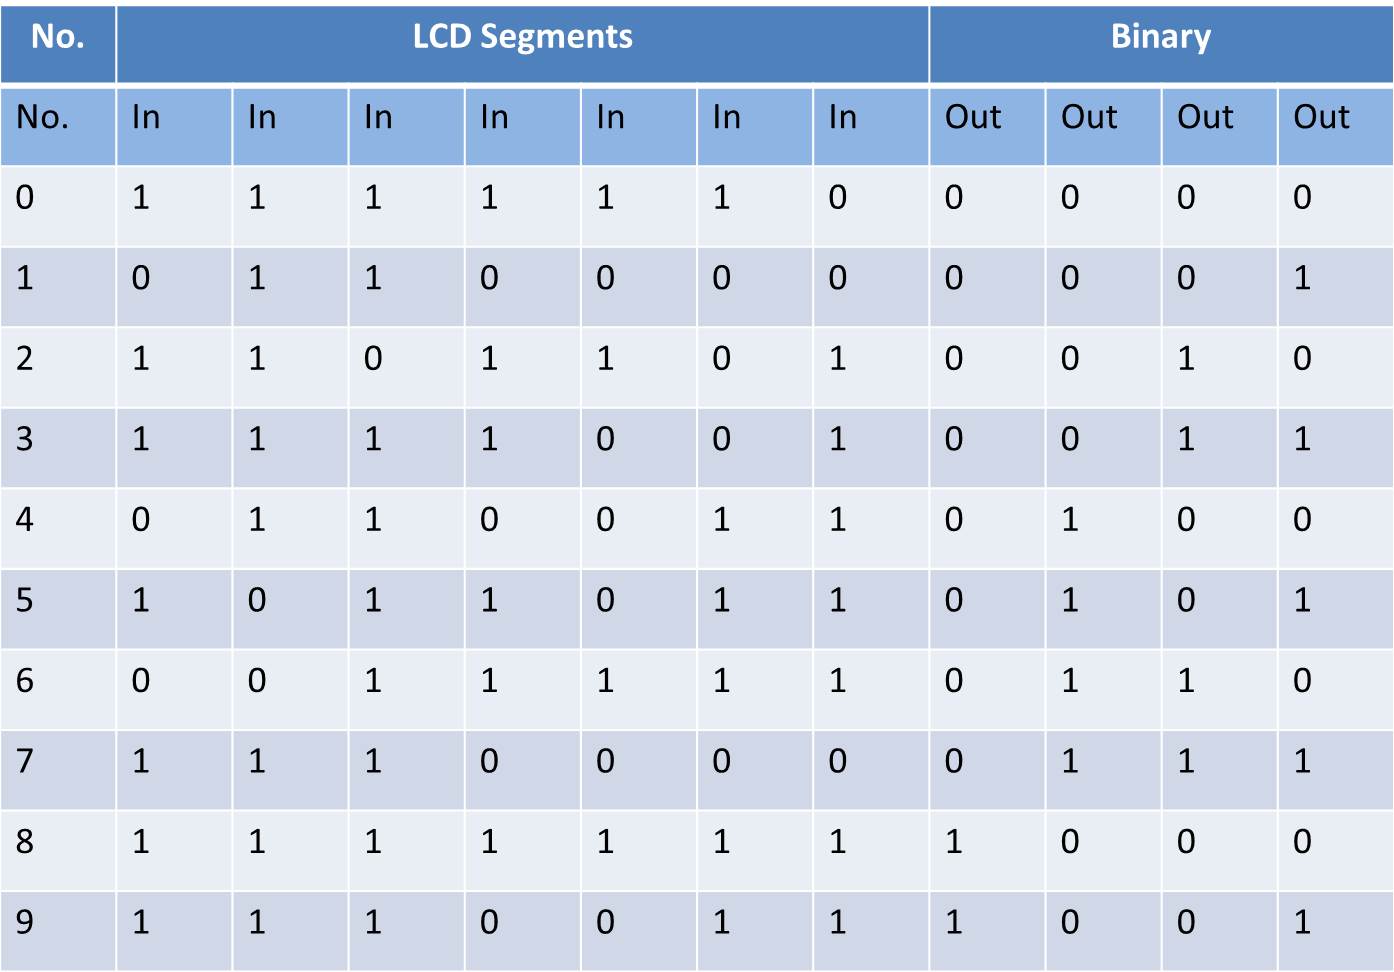
 In the sketch in this article features a set of training inputs and outputs which map the seven segments of an LED numerical display to the corresponding binary number. The network runs through the training data repetitively and makes adjustments to the weightings until a specified level of accuracy is achieved, at this stage the network is said to have been trained.
The input and output training data:
You’ll need to run the Serial monitor on your Arduino IDE in order to see the progressive training and the final results. The program will send through a set of training data every one thousand cycles so that you can see how the network is “learning” and getting closer to the correct answers.
You can create your own training data to train your network on, have a look at the last sections in this guide for instructions on creating your own training data.
What You Need For Your Arduino Based Artificial Neural Network
- An Arduino (Uno Used In This Guide) – Buy Here
How To Build Your Arduino Based Artificial Neural Network
In this example, we are simply training a network with a predefined set of training data until a solution is achieved. This is the easiest and most basic way to get an artificial neural network running on your Arduino and it requires no connections to the input or output pins. You’ll simply need to plug your Arduino into your computer using the USB cable and you’re ready to upload the neural network code.
Understanding The Code
As stated before, the mathematics behind a neural network can be quite complex if you don’t have a strong mathematical background but fortunately you don’t need to understand the code to be able to use it and modify it to use your own training data. You should be able to follow the majority of the code through a simple understanding of arrays and loops.
Simplistically, the program establishes a system of arrays which store the network weights and the data being fed through the network. The data is then sequentially fed forward through the network and then the errors are back propagated through the network and the weightings adjusted.
Here’s a summary of the code operation:
- Set up the arrays and assign random weights.
- Start a loop which runs through each item of training data.
- Randomise the order in which the training data is run through each iteration to ensure that convergence on local minimums does not occur.
- Feed the data through the network calculating the activation of the hidden layer’s nodes, output layer’s nodes and the errors.
- Back propagate the errors to the hidden layer.
- Update the associated weights.
- Compare the error to the threshold and decide whether to run another cycle or if the training is complete.
- Send a sample of the training data to the Serial monitor every thousand cycles.
Uploading The Code
The best way to learn and understand how the code works is to run it and see on the Serial monitor how the solution to the training data is developed.
Here is the code:
//Author: Ralph Heymsfeld
//28/06/2018

#include <math.h>

/******************************************************************
 * Network Configuration - customized per network
 ******************************************************************/

const int PatternCount = 10;
const int InputNodes = 7;
const int HiddenNodes = 8;
const int OutputNodes = 4;
const float LearningRate = 0.3;
const float Momentum = 0.9;
const float InitialWeightMax = 0.5;
const float Success = 0.0004;

const byte Input[PatternCount][InputNodes] = {
  { 1, 1, 1, 1, 1, 1, 0 },  // 0
  { 0, 1, 1, 0, 0, 0, 0 },  // 1
  { 1, 1, 0, 1, 1, 0, 1 },  // 2
  { 1, 1, 1, 1, 0, 0, 1 },  // 3
  { 0, 1, 1, 0, 0, 1, 1 },  // 4
  { 1, 0, 1, 1, 0, 1, 1 },  // 5
  { 0, 0, 1, 1, 1, 1, 1 },  // 6
  { 1, 1, 1, 0, 0, 0, 0 },  // 7
  { 1, 1, 1, 1, 1, 1, 1 },  // 8
  { 1, 1, 1, 0, 0, 1, 1 }   // 9
};

const byte Target[PatternCount][OutputNodes] = {
  { 0, 0, 0, 0 },
  { 0, 0, 0, 1 },
  { 0, 0, 1, 0 },
  { 0, 0, 1, 1 },
  { 0, 1, 0, 0 },
  { 0, 1, 0, 1 },
  { 0, 1, 1, 0 },
  { 0, 1, 1, 1 },
  { 1, 0, 0, 0 },
  { 1, 0, 0, 1 }
};

/******************************************************************
 * End Network Configuration
 ******************************************************************/


int i, j, p, q, r;
int ReportEvery1000;
int RandomizedIndex[PatternCount];
long  TrainingCycle;
float Rando;
float Error;
float Accum;


float Hidden[HiddenNodes];
float Output[OutputNodes];
float HiddenWeights[InputNodes+1][HiddenNodes];
float OutputWeights[HiddenNodes+1][OutputNodes];
float HiddenDelta[HiddenNodes];
float OutputDelta[OutputNodes];
float ChangeHiddenWeights[InputNodes+1][HiddenNodes];
float ChangeOutputWeights[HiddenNodes+1][OutputNodes];

void setup(){
  Serial.begin(9600);
  randomSeed(analogRead(3));
  ReportEvery1000 = 1;
  for( p = 0 ; p < PatternCount ; p++ ) {
    RandomizedIndex[p] = p ;
  }
}

void loop (){


/******************************************************************
* Initialize HiddenWeights and ChangeHiddenWeights
******************************************************************/

  for( i = 0 ; i < HiddenNodes ; i++ ) {
    for( j = 0 ; j <= InputNodes ; j++ ) {
      ChangeHiddenWeights[j][i] = 0.0 ;
      Rando = float(random(100))/100;
      HiddenWeights[j][i] = 2.0 * ( Rando - 0.5 ) * InitialWeightMax ;
    }
  }
/******************************************************************
* Initialize OutputWeights and ChangeOutputWeights
******************************************************************/

  for( i = 0 ; i < OutputNodes ; i ++ ) {
    for( j = 0 ; j <= HiddenNodes ; j++ ) {
      ChangeOutputWeights[j][i] = 0.0 ;
      Rando = float(random(100))/100;
      OutputWeights[j][i] = 2.0 * ( Rando - 0.5 ) * InitialWeightMax ;
    }
  }
  Serial.println("Initial/Untrained Outputs: ");
  toTerminal();
/******************************************************************
* Begin training
******************************************************************/

  for( TrainingCycle = 1 ; TrainingCycle < 2147483647 ; TrainingCycle++) {

/******************************************************************
* Randomize order of training patterns
******************************************************************/

    for( p = 0 ; p < PatternCount ; p++) {
      q = random(PatternCount);
      r = RandomizedIndex[p] ;
      RandomizedIndex[p] = RandomizedIndex[q] ;
      RandomizedIndex[q] = r ;
    }
    Error = 0.0 ;
/******************************************************************
* Cycle through each training pattern in the randomized order
******************************************************************/
    for( q = 0 ; q < PatternCount ; q++ ) {
      p = RandomizedIndex[q];

/******************************************************************
* Compute hidden layer activations
******************************************************************/

      for( i = 0 ; i < HiddenNodes ; i++ ) {
        Accum = HiddenWeights[InputNodes][i] ;
        for( j = 0 ; j < InputNodes ; j++ ) {
          Accum += Input[p][j] * HiddenWeights[j][i] ;
        }
        Hidden[i] = 1.0/(1.0 + exp(-Accum)) ;
      }

/******************************************************************
* Compute output layer activations and calculate errors
******************************************************************/

      for( i = 0 ; i < OutputNodes ; i++ ) {
        Accum = OutputWeights[HiddenNodes][i] ;
        for( j = 0 ; j < HiddenNodes ; j++ ) {
          Accum += Hidden[j] * OutputWeights[j][i] ;
        }
        Output[i] = 1.0/(1.0 + exp(-Accum)) ;
        OutputDelta[i] = (Target[p][i] - Output[i]) * Output[i] * (1.0 - Output[i]) ;
        Error += 0.5 * (Target[p][i] - Output[i]) * (Target[p][i] - Output[i]) ;
      }

/******************************************************************
* Backpropagate errors to hidden layer
******************************************************************/

      for( i = 0 ; i < HiddenNodes ; i++ ) {
        Accum = 0.0 ;
        for( j = 0 ; j < OutputNodes ; j++ ) {
          Accum += OutputWeights[i][j] * OutputDelta[j] ;
        }
        HiddenDelta[i] = Accum * Hidden[i] * (1.0 - Hidden[i]) ;
      }


/******************************************************************
* Update Inner-->Hidden Weights
******************************************************************/


      for( i = 0 ; i < HiddenNodes ; i++ ) {
        ChangeHiddenWeights[InputNodes][i] = LearningRate * HiddenDelta[i] + Momentum * ChangeHiddenWeights[InputNodes][i] ;
        HiddenWeights[InputNodes][i] += ChangeHiddenWeights[InputNodes][i] ;
        for( j = 0 ; j < InputNodes ; j++ ) {
          ChangeHiddenWeights[j][i] = LearningRate * Input[p][j] * HiddenDelta[i] + Momentum * ChangeHiddenWeights[j][i];
          HiddenWeights[j][i] += ChangeHiddenWeights[j][i] ;
        }
      }

/******************************************************************
* Update Hidden-->Output Weights
******************************************************************/

      for( i = 0 ; i < OutputNodes ; i ++ ) {
        ChangeOutputWeights[HiddenNodes][i] = LearningRate * OutputDelta[i] + Momentum * ChangeOutputWeights[HiddenNodes][i] ;
        OutputWeights[HiddenNodes][i] += ChangeOutputWeights[HiddenNodes][i] ;
        for( j = 0 ; j < HiddenNodes ; j++ ) {
          ChangeOutputWeights[j][i] = LearningRate * Hidden[j] * OutputDelta[i] + Momentum * ChangeOutputWeights[j][i] ;
          OutputWeights[j][i] += ChangeOutputWeights[j][i] ;
        }
      }
    }

/******************************************************************
* Every 1000 cycles send data to terminal for display
******************************************************************/
    ReportEvery1000 = ReportEvery1000 - 1;
    if (ReportEvery1000 == 0)
    {
      Serial.println();
      Serial.println();
      Serial.print ("TrainingCycle: ");
      Serial.print (TrainingCycle);
      Serial.print ("  Error = ");
      Serial.println (Error, 5);

      toTerminal();

      if (TrainingCycle==1)
      {
        ReportEvery1000 = 999;
      }
      else
      {
        ReportEvery1000 = 1000;
      }
    }


/******************************************************************
* If error rate is less than pre-determined threshold then end
******************************************************************/

    if( Error < Success ) break ;
  }
  Serial.println ();
  Serial.println();
  Serial.print ("TrainingCycle: ");
  Serial.print (TrainingCycle);
  Serial.print ("  Error = ");
  Serial.println (Error, 5);

  toTerminal();

  Serial.println ();
  Serial.println ();
  Serial.println ("Training Set Solved! ");
  Serial.println ("--------");
  Serial.println ();
  Serial.println ();
  ReportEvery1000 = 1;
}

void toTerminal()
{

  for( p = 0 ; p < PatternCount ; p++ ) {
    Serial.println();
    Serial.print ("  Training Pattern: ");
    Serial.println (p);
    Serial.print ("  Input ");
    for( i = 0 ; i < InputNodes ; i++ ) {
      Serial.print (Input[p][i], DEC);
      Serial.print (" ");
    }
    Serial.print ("  Target ");
    for( i = 0 ; i < OutputNodes ; i++ ) {
      Serial.print (Target[p][i], DEC);
      Serial.print (" ");
    }
/******************************************************************
* Compute hidden layer activations
******************************************************************/

    for( i = 0 ; i < HiddenNodes ; i++ ) {
      Accum = HiddenWeights[InputNodes][i] ;
      for( j = 0 ; j < InputNodes ; j++ ) {
        Accum += Input[p][j] * HiddenWeights[j][i] ;
      }
      Hidden[i] = 1.0/(1.0 + exp(-Accum)) ;
    }

/******************************************************************
* Compute output layer activations and calculate errors
******************************************************************/

    for( i = 0 ; i < OutputNodes ; i++ ) {
      Accum = OutputWeights[HiddenNodes][i] ;
      for( j = 0 ; j < HiddenNodes ; j++ ) {
        Accum += Hidden[j] * OutputWeights[j][i] ;
      }
      Output[i] = 1.0/(1.0 + exp(-Accum)) ;
    }
    Serial.print ("  Output ");
    for( i = 0 ; i < OutputNodes ; i++ ) {
      Serial.print (Output[i], 5);
      Serial.print (" ");
    }
  }


}
The code can also be downloaded through this link: ArtificialNeuralNetwork
Creating Your Own Training Data
Once you have the basic network running, you may want to try and input your own training data. To do this, you’ll need to modify the training data in the table as well as these items in the input parameters:
- PatternCount – The number of items/row of training data in your table.
- InputNodes – The number of neurons associated with the input data.
- Output Nodes – The number of neurons associated with the output data.
In addition to the above parameters which have to be changed for the new training data, the following items can also be changed and experimented with to get different training results:
- HiddenNodes – The number of neurons associated with the hidden layer.
- LearningRate – The proportion of the error which is back propagated.
- Momentum – The proportion of the previous iteration which affects the current iteration.
- InitialWeightMax – The maximum starting value for the randomly assigned weights.
- Success – The threshold at which the program recognises that it has been sufficiently trained.
You’ll may need to adjust some or all of these values in order to optimise the training process for your new training data. It is possible that a solution may never be reached and the training process gets stuck oscillating above and below the threshold infinitely, you’ll need to then adjust these values such that a solution is able to be reached. You can read up further on each of these parameters if you research and improve your understanding in how artificial neural networks work.
It is worth noting that the training data and network configuration provided in this example is about as large as you can run on an Arduino Uno without exceeding it’s 2K SRAM. If you’d like to experiement with a larger network, you’ll need to use an Arduino board with a larger SRAM allocation such as the Mega. Unfortunately, no warning is given by the IDE or the Arduino if the allocation is exceeded, you;ll just keep getting strange results and the network will be unable to be trained.
Obstacle Avoiding Robot Running A Neural Network
Tim Kälin has used this code as a basis for an obstacle avoiding robot which uses two ultrasonic modules connected to an ESP32 running the neural network to control it’s movements. The neural network has two inputs nodes from the ultrasonic modules and five output nodes, turn left, turn right, light left, light right and go straight
According to Tim it takes a minute or two to train the neural network on the data set when powered up. It also has some on-board LED strips which are used to display the inputs, hidden layer activation and selected outputs so that you get a visual representation of the neural network’s functioning.
It’s really impressive to watch.
The code is quite a bit more complicated than in this example due to the complexity of the project but it’s broken down quite well. You can download the code through this link – Neural Network Robot
What To Try Next
Once you’ve become familiar with artificial neural networks and you’ve tried experimenting with different training data, I’m sure you’d like to make use of the Arduino in a more practical way. Here are some ideas to take this project further:
- Add an LCD or TFT display to your Arduino and send the training or output data to the display instead of to your Serial monitor.
- Develop a network which responds to inputs to the Arduino. For example, you could use physical switches or photoresistors on the Arduino inputs to activate the input nodes and drive a “learnt” output.
- Use the network to drive outputs on your Arduino. Add a motor or servo onto your Arduino which uses the neural network to response to inputs. For example you could make a servo arm shade screen which covers the Arduino when light falls onto a photoresistor.
Have you built your own artificial neural network? Tell us how it went and what you’ve used it for in the comments section below.
Good effort!! i really liked it… keep it continue. Can you explain how can i use neural network in Image Processing.
Hi Sandeep,
Thanks for the great feedback. Unfortunately this neural network is already at the limit of an Arduino’s capability in terms of memory and processing power. I doubt that you’d be able to do anything useful in image processing with an Arduino.
Hi Michael it’s John Ellick from Maryland. I just wanted to say Kudos on providing that basic nueral network code. It worked perfectly on my Arduino Uno. Compiled on first try. It was a great introduction to creating a nueral network from scratch. Amazing stuff !
Great to hear John, thank you!
Hello! First of all I’d like to say many thanks to you for such nice example to get first practice with neural networks. I succeed to run it on UNO and NANO, also changing all the input and target data was interesting. The reason why I’m learning all the related knowledge is that I want to develop quite simple mobile robot based on tank platform with 2 motors driven by PWM and I just don’t want to drive it by simple automated algorithm like: if sensor read this, do this, else this.. I want to make it more complicated – to create real individual intelligence which will drive it 🙂 I also have several US and IR sensors to collect some environment data for input nodes and now I’m wondering how to run it, what should be the target for the whole system… Anyway once more thanks a lot for this very interesting starting info for me!
Hi Roman,
Thanks for the great feedback. I’ve seen a few examples online of small Arduino based robots which run neural networks for movement. I think a fairly simplistic starting project is a light seeking or light avoiding robot based on LDRs, the goal being to either maximise or minimise light reception on the LDRs. Good luck with your project!
Hi, It is possible to have soil moisture and temperature as an input on this neural net? Thank you.
Hi Ryan, yes it definitely it. You’ll just need to adjust the number of inputs accordingly. What would be your outputs?
Hi. Is it possible to use as an input picture from camera? How to teach this neural network with datasets (pictures)?
It is possible to do with a neural network but an Arduino is not going to be powerful enough to handle the large amount of data. You essentially break the image up into small blocks (pixels) and assign a numerical value to each pixel and input this into the neural network to interpret. The training process would be similar to this, you’d need to input a number of images with known outputs and “train” the network until the correct outputs are achieved.
Hi, your article is very good, I have some doubts about how to train it with several data for the same output, I have a esp32 and it has much more memory and I want to implement the recognition of voice commands but I don’t know how to train that data in This type of network. would you give me a hint of how to do it? thank you.
Hi Leonardo, there is a lot more to voice recognition than simply inputting the sound recording into a neural network. I doubt that you’d be able to do it on an esp32 but you can give it a try. This article will give you a pretty good idea of what you need to do to be able to do voice recognition with a neural network – http://bit.ly/2HsWB9r
hey I tried to input my own input nodes into the matrix and output nodes to just try to get my Arduino to do simple math to see how it would do but it keeps getting stuck no matter what values I change. What do I do to get a resulting solution without it getting stuck over 1 learning cycle?
This is not really a straight forward question, there are a number of different places which could cause problems in what you are trying to achieve. What are your inputs and when you say simple math, what are you talking about? Are you trying to train the network to add? What size numbers? How are you representing your inputs and outputs? How are you training the network? These all have an influence in what results you’d get and how to troubleshoot errors.
Hi Michael,
thanks for your precious contribution, I looked for a long time (with no success) for a clear example of neural network (or decision tree) to use with an irrigation management tool based on Arduino.
I developed a client that retrive weather predictions from OpenWeatherMap api every 24h for the next 24h time frame. I then collecting data in a SD card (e.g. 2019-11-5, 0 , 0, 1, 2, 2, 3, 1, 1 the number represent a sort of mix between probability and amount of rain every 3 hours) and finally, at the end of the day, I add the amount of rain (mm) actually fell in my garden.
What I want is: taking advantage of the knowledge base growing day by day, using my new forecast (e.g. 1, 1, 2, 1, 3, 3, 1, 0), take the decision to pause or not my irrigation. Your example works very well on my Arduino MKR1010, now I have to adapt the code for my case. How can I get the resulting algorithm trained by my data and then use it to predict a new entry?
Thanks again for you help,
Dan
Hi Dan,
That sounds like an interesting project. You will need to create a set of training data which you’ll put through the network to get it to start predicting correctly. It really depends on what information you have available to start with, you’d ideally need something like 200 days of data “inputs” and the corresponding correct “outputs” to compare it to. You’d then pass this data through your network and make corrections to the weightings after each until your network starts predicting correctly. To improve on this initial training set, you could have some form of confirmation input each day once it is running to tell it whether it has predicted correctly or not, this way it can use the days it has gotten correct to further strengthen its prediction capabilities and slowly adapts to changes in environment as well.
Hope this helps as a starting point and good luck with your project!
HI, i’m trying to understand you answer. Firt I take 200 samples of the forecast prediction api and what really happend in these 200 days to create a trained model. In the 201th day I get the forecast and try to predict the values. So, how to add this 201th sample and add in my training algorithm? Do I need to re-train sample 1 to 201, 2 to 202, 3 to 203 and so on every day to keeping updating continously?
Hi Anderson,
To start with you need to take a set of sample inputs and their corresponding correct outputs to create a trained model. Depending on the complexity of what you’re trying to predict and the correlation between your inputs and outputs, you might be able to use as little as 200 data sets and you might need closers to 10,000 to 100,000 data sets, it really depends on the network you’re setting up. As a crude example, having an 0 or 1 input as an indication of whether a light switch is on or off and then predicting whether the bulb has been lit up is very simple, the input is very reliable and the output is very predictable, so you wouldn’t need more than a couple of hundred training data sets to start getting reliable results. But something like predicting whether or not it’s going to rain based on temperature, humidity and air pressure is much more complex and much less reliable, so would take significantly longer.
On the 201st day, you would just run one cycle of the training algorithm to now include the data from the day. You would need some way of telling the system whether or not it had predicted correctly and you’d feed this back through the network to make minor adjustments to the weightings. So you’d be strengthening the network each day by adding an additional data set, it’s already got the previous 200 days built int. If you re-train the network the way you’ve suggested then you’re essentially starting the network from scratch each day, for only 200 data sets, just based on more recent data.
Does this make sense?
Thanks a lot. I think I got the idea.
Dont you forgot to compute the bias set on lines 61, 62, 65 and 66 with +1?
Hi Michael
Fantastic article. Well done!
How do you use the network once it is trained?
i.e. to get a live output from a live input?
Do you have a routine to do that?
Thanks!
I used your code as basic for a driving robot with two ultrasonic modules on a esp8266. It works really good and needs just some seconds to learn my data after startup. I’ve also added some leds to see input, hidden activation and selected output.
Thanks for giving us youre code
Hi Tim,
That sounds really cool! Let me know if you’d like to share some pictures of your build and code, I’m sure others would be interested in it too! Well done
I have to correct, I use a esp32. Because i use “ledc” to drive the motors it dont work on arduino. But thats no big problem to solve. About the learning time i was wrong. It tooks 1-2 minutes. I have two inputs from ultranonic and 5 outputs, turn left, light left, strait, light right and turn right. Important to have good training data to.
Yes i like to share, but the code is not totaly cleaned and commented yet.
where i can send it?
Yes I’m sure that other readers interested in your project could convert the code to work on an Arduino if they wanted to go that route. The ESP32 is also quite commonly used in the community, a great substitute.
The video looks awesome! Really cool project, well done!
You can send any info you have to admin(at)the-diy-life.com
https://youtu.be/SL0z8HkPOmg
😉
GREAT JOB!!! I hope finally to understand the entire code….math library its needed?? (i am not a programmer)
thanks
Its some time between but i think maths.lib is included in Arduino and the code that Michael shows has it included in the first row so you need to do nothing.
Hi Michael
Im proud to be part of your project and see that you realy mention me.
I have spend hours to understand just anougth to convert your code for my idea and also change some variable names for my brains logic. After that, the greate work was finding a usefull training data set, which in my case need to be differential but also overlaping. Also a bit tuning is needed for epsilon, mom and success (you dont can have 0 failure and with my code 0.4 works fine).
Im only using 25 training sets. Im just thinking about when the robot is at this position it have this distances and i like it to took output X (for direction). The training data is the key i think. If the values are to overlaping the network cant predict where it should change the output but if they are not overlaping anougth the network acts to sharp and in both scenarios the failure rate will have problems to go down.
Hi Michael, I have spent a few hours trying to convert the code to my idea too but I have a doubt in the part of the code you update the weights. I found this code in another website(http://robotics.hobbizine.com/arduinoann.html) that has an explanation about it. It tells me that the change rate in that respective weight is the = (learning_rate * PREVIOUS_WEIGHT*delta) +(momentum*previous_change), but in the code I found that is not the previous_weight that it uses, but the previous value of that neuron. Can you help me please? Thanks a lot.
Would you be able to indicate which line(s) of code you’re basing that on? I don’t see any difference in the explanation and what is implemented in the code?
Hi Micheal, You project is very helpful to understand what is neural networks far from complexity, I want to know how to use your example to read real analog inputs from two potentiometers connected to the Arduino, pot 1 represents current sensor and pot2 represent voltage sensor, I want to calibrate the two pots according to the target to have corrected and calibrated output very close to the target.
many thanks
Hi Michael,
I want to thank you for this project, it is really the best and simple example to understand the ANN.
I want to ask you how to change your project to accept two real analog inputs (two pots attached to A0 & A1), they represent for example voltage and current sensors , I want to calibrate the inputs ( set target to V=240 & I=5 A) to have calibrated output close to the target.
Many thanks…
Hi Michael
Thank you for the perfect project, actually your project is one of the best examples on the Internet to understand the ANN far from complexity.
I want to ask about how to do some changes on your project by adding two potentiometers representing AC voltage and current as analog inputs (real inputs) connected to Arduino (A1 and A2 ), the idea is to have calibrated output very close to the target value.
If I want to use arduino as calibrator by do some changes on your sketch, say the voltage input is 239.84 V, current 4.89 A, Targets of voltage and Current are 240V and 5A respectively, Output should be very close to the target say 239.99v& 4.96A,how I can apply this idea?.
Many thanks
Hi Michael.
Thank you for your simple and clear project, I want to change the code to accept two analoge inputs from potentiometers connected to the Arduino( A1& A2).
Many thanks.
Hi Wael, take a look at my code. https://www.the-diy-life.com/wp-content/uploads/2018/06/Neural-Network-Robot.zip
Its the one Micheal linked on this side. It is made for a robot with 2 distanze sensors as input and 2 motors as output. So maybe it work for you project. I tkink you need only one output for pwm something? So change the code to one output. You have to play with the input values, maybe divide or multiply it to give the network a good signal. Also change training data to input 2 and output 1 value.
Michael Klements AND Tim Kälin i already use your work to build both projects for a school project . Works great . I am a physics teacher and i am astonishing by the fact that neural network run to MCU like arduino or esp32. THANKS again , the students (16 years old) love it! I hope to have your permission to use your work ! (citing my source of course)
From my side, it is open and im happy to read that you are using it for teaching!
THANKS!!!
Im back in the game. Just started to split my code for a multi ESP32 use. One master, two for hidden layer calculations and one or two for output calculation. The master sends the trained values for the “neurons“ to the other ESP`s then provide them with usefull input data. I want to use the full power so i will try to use both of the cores. Another and cheaper idea is to use one ESP32 and both cores. One core works from input to hidden layer and the other from there to the output. So the first can start with work on the next task while the second calculate the output. Was my first idea.
I’m wondering why the code posted here is an exact copy of the code posted here by Ralph Heymsfeld: http://robotics.hobbizine.com/arduinoann.html
with code dated to 2012.
Perhaps I overlooked a reference or attribution, but that would be a good thing to add, don’t you think?
The first line of the code is a comment that says that the author of the code is Ralph Heymsfeld
How does training an artificial neural network by adjusting weights over many cycles help improve accuracy and turn initial random outputs into reliable results?