Mould developing on your bathroom or kitchen ceiling is generally as a result of poor ventilation. Steam and water vapour get trapped in the bathroom and eventually condense on the ceiling causing a damp spot which is perfect for the growth of mould and bacteria. You should try to treat patches as soon as they appear as the longer they have to grow, the larger the patch that needs to be cleaned and the more difficult it is to get rid of it. If you leave it too long, you may even have to replace a portion of your ceiling board.
A patch on your ceiling may also be as a result of a leak in the ceiling or walls above. It is worth checking the area in the ceiling above the mould spot for possible leaks.
What You Need To Get Rid Of Mould On Your Ceiling
- Paint Scraper
- Household Bleach or Hydrogen Peroxide
- Spray Bottle
- Scrubbing Brush
- Gloves & Safety Glasses
- A Ladder
How To Remove Mould From Your Ceiling
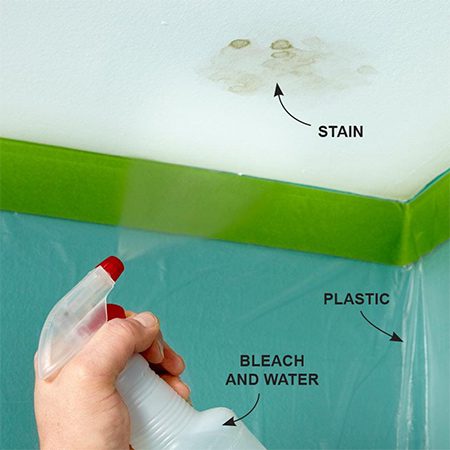
Before treating the mould, open all of the doors and windows to allow adequate ventilation. If you have wallpaper or polystyrene crown moulding near the area to be treated, cover this up with plastic sheeting before working near it so that you don’t damage it with the bleach or peroxide solution.
Scrape away any loose or flaking paint and mould.
If you are using bleach, dilute it with five parts water and put it into the spray bottle. Hydrogen peroxide can be used neat. Spray the solution directly onto the mould patch on the ceiling and allow it to work for 10 minutes.
Scrub the area lightly with your brush, rinsing the brush occasionally to prevent the mould from spreading and discolouring the surrounding area.
Once your have worked away all of the loose bits, repeat by spraying the area and allowing it to stand for 10 minutes again before re-scrubbing. These steps should be repeated until the mould has all been removed.
The ceiling may require a fresh coat of paint once you have finished cleaning the mould in order to cover up any discoloured areas. High cover primer is usually the best for covering up stains on white ceilings, apply one or two coats, allowing drying time between coats.
Preventing Mould In Future
Now that you have finished cleaning and restoring your ceiling, you need to look at preventing it from growing back again. The most likely cause is poor ventilation, keep the windows and doors open for a few minutes after using the bath or shower to allow the steam and moisture to escape. If you don’t have windows or they are too small to open, consider installing a small extractor fan to assist with removing the moisture.
Have you managed to restore a section of your ceiling? Let us know your tips and tricks in the comments section below.
Dust is another health hazard in your home, have a look at our 5 Cleaning Tips To Rid Your Home Of Dust.