The term “cylinder lock” could mean a large number of different locks, but in today’s guide, we will focus on one type of cylinder – the Euro cylinder. The Euro cylinder was first patented in 1805 and was an attempt by European locksmiths to standardise locks, which, in Europe and other parts of the world has been largely successful. Euro cylinders are now a common sight on the external doors of many homes. In the United States, Euro cylinders are used primarily on sliding glass doors and internal doors which divide two rooms.
Euro cylinders are easy to change or upgrade, and here at The DIY Life, we love to save you both time and money. There is no need to call a locksmith or handyman as these are one of the easiest locks to change, due to the cylinder being self-contained, their standardisation and wide availability. In fact, the most important part is the preparation.
To Change A Euro Cylinder You Will Need
- 1 Phillips Screwdriver OR 1 Torx Screwdriver (depending on the screw type)
- 1 Euro Cylinder Lock (Do NOT BUY before you have extracted the lock as you need the correct size)
- Your existing Euro cylinder key
How To Change The Lock
1. Firstly open the door so you can comfortably stand by the side of it.
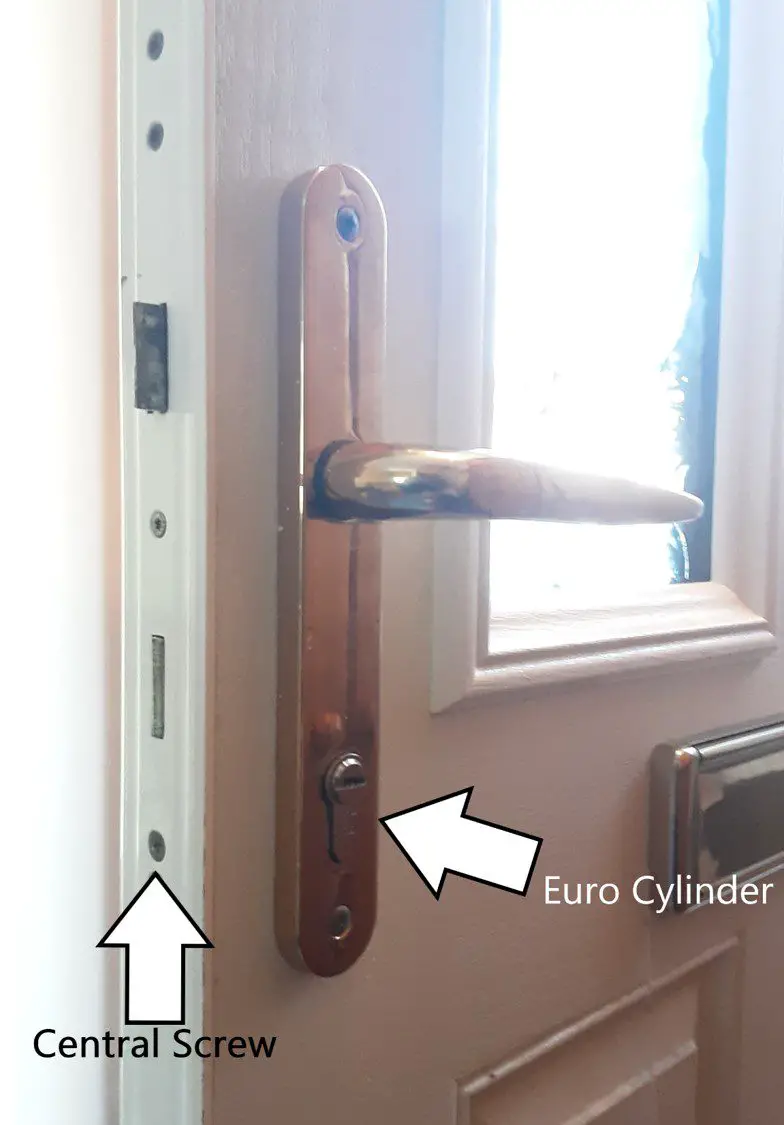
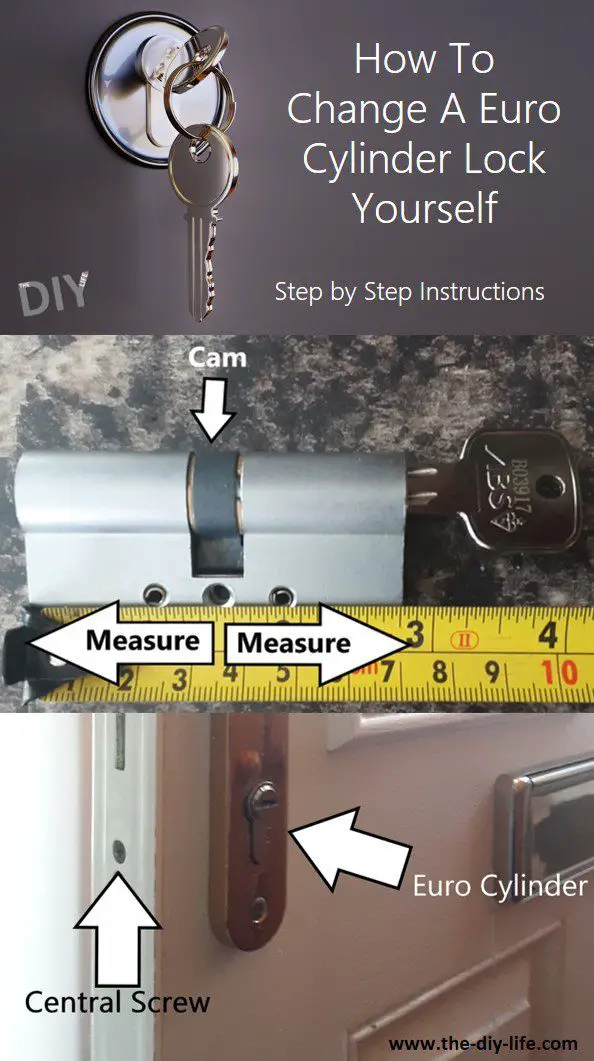
2. Next, locate the Euro cylinder on the door, then locate the central screw on the side of the door. This is the screw that keeps the Euro cylinder in place.
3. Identify which screwdriver is appropriate to use, then remove the screw. Normally this will be a Phillips, but may also be a Torx screw and very rarely may be a flat head.
4. Once the screw is removed, insert your key into the lock and turn it about an 8th of the way or to approximately to 2 O’clock, this is to align the cam (middle of the lock). Once aligned, pull the key and lock towards you until you feel a release. You sometimes need to loosen the screws to the door handle to make this easier, but will not usually be necessary. This can be a bit tricky, but just remember, all it is is an alignment issue. Loosen the door handle, turn the key to align the cam and wiggle the lock out.
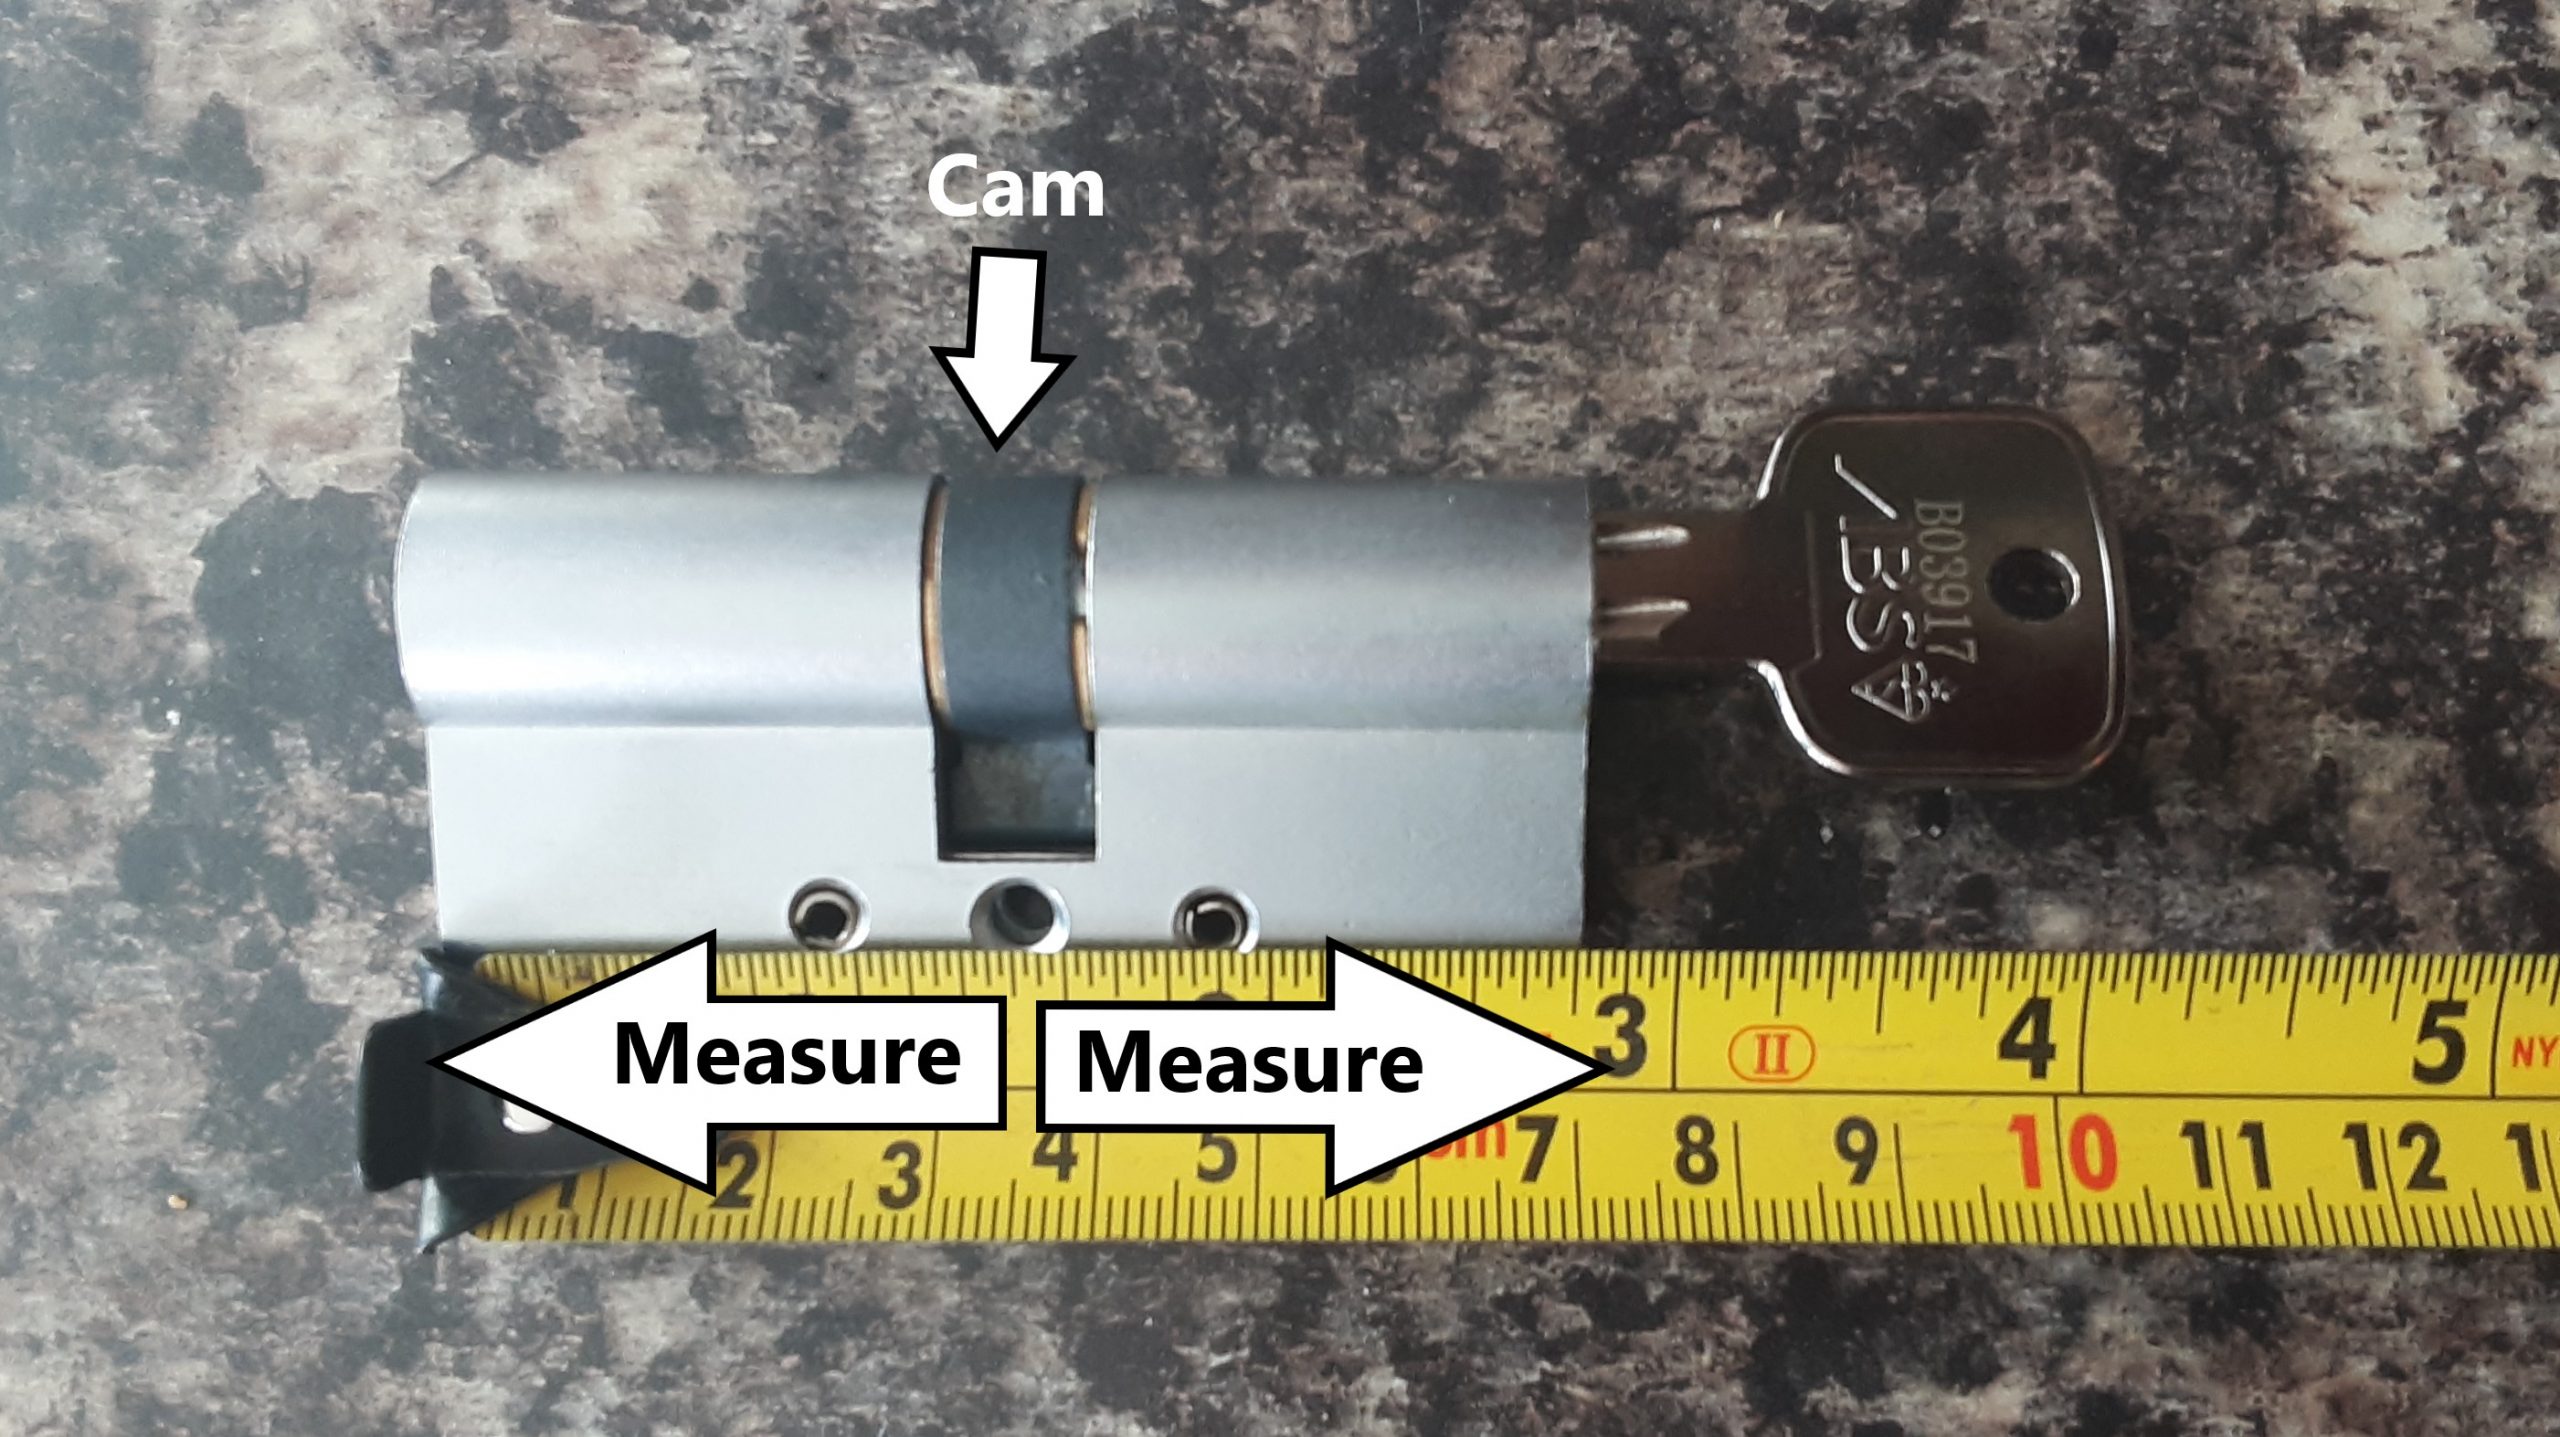
5. Now the Euro cylinder should be in your hand, giving you the opportunity to measure it. You can measure the size of a Euro cylinder by finding the central screw hole on the lock. Grab a tape measure and measure from the central screw hole to the end of the cylinder, measure both ways. Your measurement should be something like 35mm by 35 mm (As seen below) or 45mm by 50mm etc. However, this size is only correct if your lock is the correct size for the door in the first place. The cylinder should be flush to the door with none of the cylinder being exposed. If the cylinder is exposed then measure from the central screw hole to where the lock would fit flush to the door, this should be identifiable with a weathered line on the lock, where some of the lock has been exposed to the elements. This exposure of the lock is a serious security risk and makes bypassing the lock much easier with a technique called lock snapping (more on that later).
6. There are approximately 25 different sizes, so ensure you have measured the size correctly. Alternatively, if possible, you could take the lock with you to ensure you purchase the exact size needed.
7. Now travel to your local hardware store and purchase the correct size replacement cylinder.
8. Once you have the new cylinder, insert your new key into it and turn it an 8th of the way, so the cam (the middle) is aligned, allowing you to insert the lock into your door. The exact same way you took it out but in reverse. This bit can be as tricky as getting the lock out, remember it’s just an alignment issue so just fiddle around and it will eventually come right.
9. Once the lock is fitted nicely and is flush with the door, use the old screw you took out of your previous lock and insert it into the central screw hole and tighten it. We recommend using the old screw as it will be the correct length, sometimes a new screw will be too long and will have to be cut to size. Alternatively, if the new screw is the same size and doesn’t require cutting, then use the new screw. Don’t forget to keep your cylinder measurement for future maintenance.
10. To test that it has all been done correctly, lift the handle and turn the key to lock the lock with the door open. Lock the cylinder a few times to test it. Once you have seen this working it properly, it should be safe to shut the door and lock it.
Euro cylinders are great locks and are renowned for being difficult to pick, however, they do possess some natural weaknesses. one big vulnerability to the security of your door is called snapping. Lock snapping is exactly what the name suggests, it literally means snapping the lock in two. The scariest thing is that this technique can be successfully done in as little as 15 seconds, and the tools required to snap a lock can be found almost anywhere. This can be overcome by purchasing anti-snap locks with a sacrificial section. Instead of the lock snapping in half, the sacrificial section will break off leaving the rest of the lock within the door, safe from another snapping attempt.
Another vulnerability of the euro cylinder is drilling. Like most locks, the Euro cylinder can be drilled within minutes. While this cannot be overcome, you can purchase euro cylinders with anti-drill pins within them. This does not stop drilling, but it does make drilling a harder and longer process.
Generally higher quality Euro cylinders are made out of stronger and sturdier materials, they also contain more anti-drill pins, in addition to other security feature,s such as anti-bump pins, sacrificial sections and magnetic operating locks, making picking extremely difficult. If your Euro cylinder is for an external door you should consider purchasing a high-security lock, as this will be much more resistant to any bypassing techniques used by criminals, making it harder for them to enter your property. More on this and other helpful security tips and advice can be found on ITCC Locksmith’s blog section.
Have you tried changing your own Euro cylinder lock? Let us know in the comments section below.
Share This Guide
I purchased a cylinder lock recently for my UPVC front door, ( this was the 3rd lock that’s been replaced, due to burglary). Unfortunately my house is still been targeted by a burglar, who I believe uses a lockpick. What I need is a lock that is lockpick proof.
Hi Catherine,
Unfortunately, there isn’t really any lock that is lockpick proof. There are locks that are much more difficult to pick, and you could use multiple locks as well to increase the difficulty. But, given enough time and skill, almost any lock can be picked in some way.
It’s more likely that your burglar is bumping the lock. Practically indistinguishable from picking, but a darn sight easier. You could try a smart lock or a hidden camera to see what he’s up to.