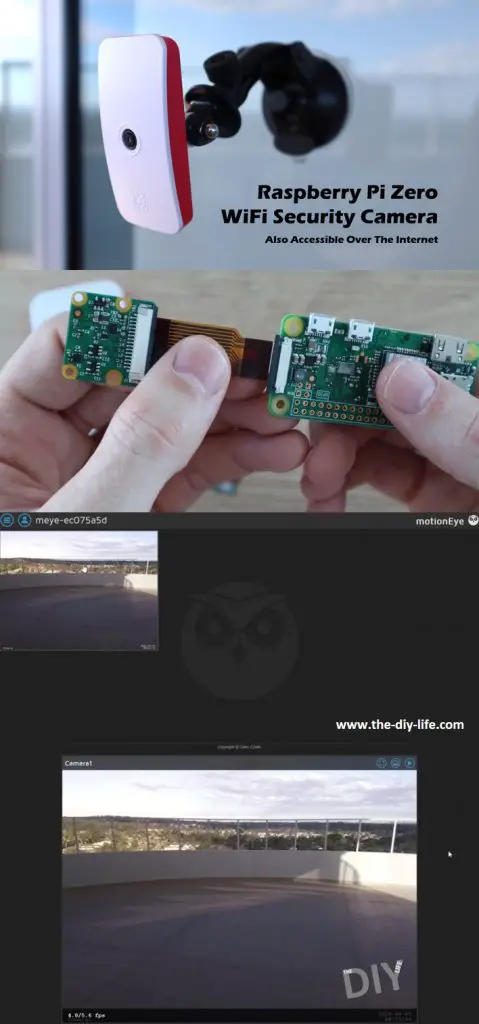
In this project, I’ll be showing you how to assemble and configure a Raspberry Pi Zero W to be used as a WiFi security camera, which is also accessible over the internet.
We’ll be using an operating system called MotionEyeOS on the Raspberry Pi, which is a web-based, mobile and tablet friendly surveillance system. It can be used with both the Raspberry Pi camera or any USB web camera plugged into the Raspberry Pi. You can also set up motion detection with email notifications, take still images and time-lapse movies, and even configure it to upload media files to network storage locations or to cloud storage services.
Here’s a video of the build and the camera in operation, read on for the full step by step instructions.
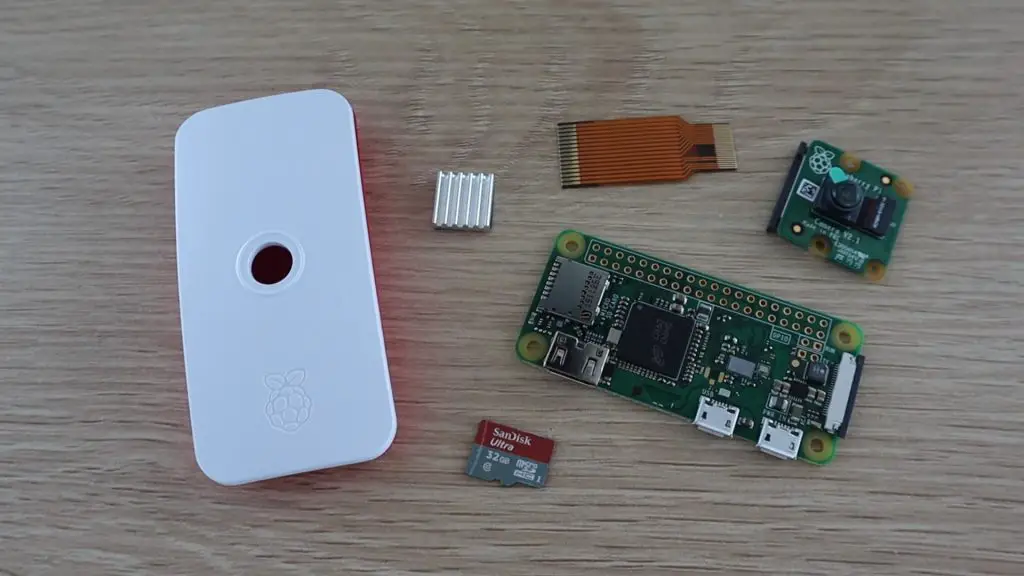
What You Need To Build Your Camera
- Raspberry Pi Zero W – Buy Here
- Raspberry Pi Zero Case & Ribbon Cable – Buy Here
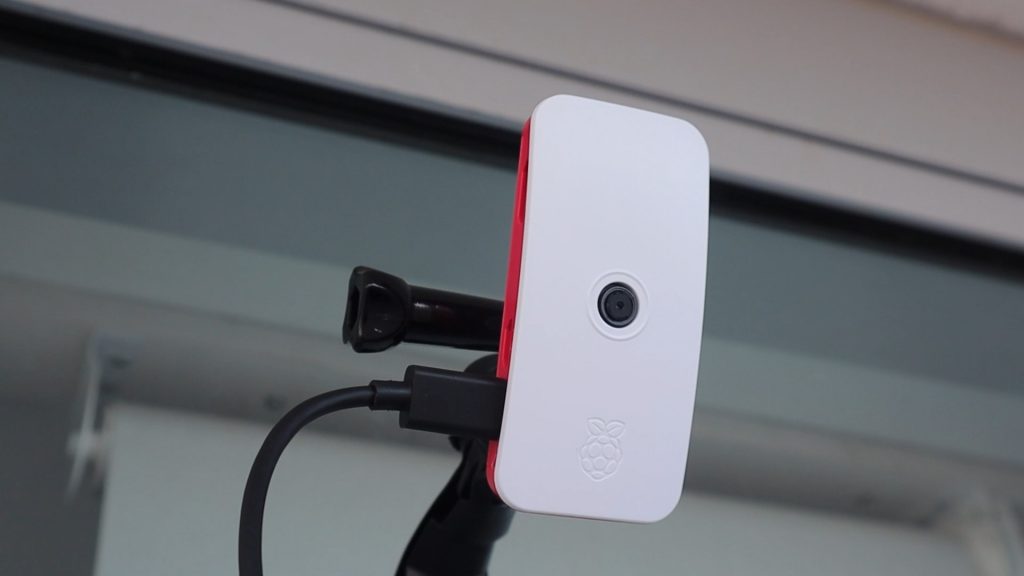
- Raspberry Pi Camera – Buy Here
- Micro SD Card (Min 8GB) – Buy Here
- Power Supply – Buy Here
Optional Alternative (You’ll still need to buy the camera):
- Pi Zero W Kit (Includes Pi Zero W, Case, SD Card, Power Supply & Camera Ribbon Cable) – Buy Here
Assembling The Raspberry Pi Zero WiFi Security Camera
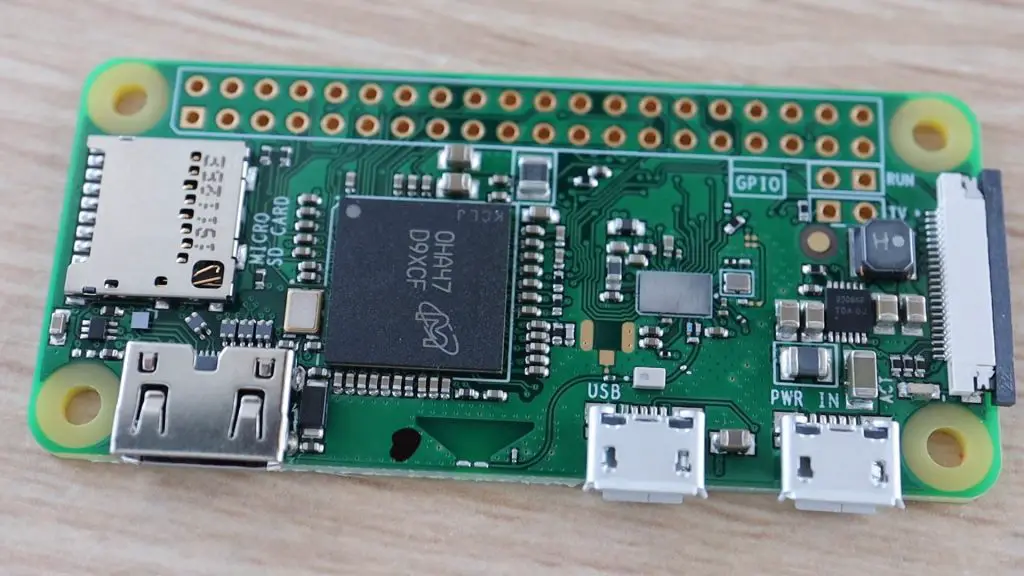
I’ve used a Raspberry Pi Zero W for this project because they’re relatively cheap and compact, making them perfect to mount discretely around your home. You can set up a couple of cameras around your home for less than $100. The W version has built-in WiFi, so there’s no need for an external WiFi or Ethernet adaptor to connect it to your home network.
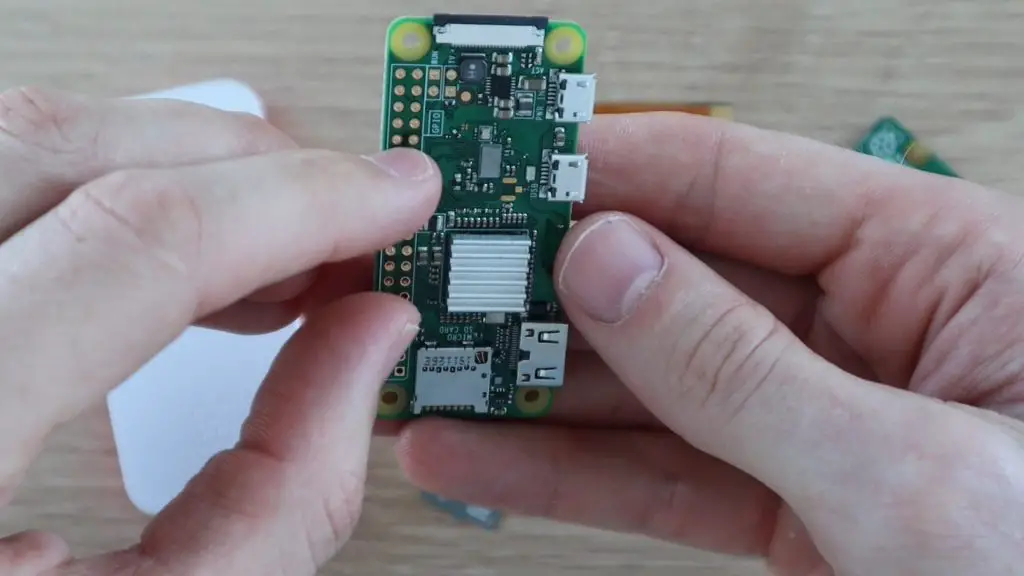
Let’s start by assembling the components into the Raspberry Pi Zero case.
If your Pi Zero came with a heat-sink, attach it to the board using the adhesive tape on the heat-sink.
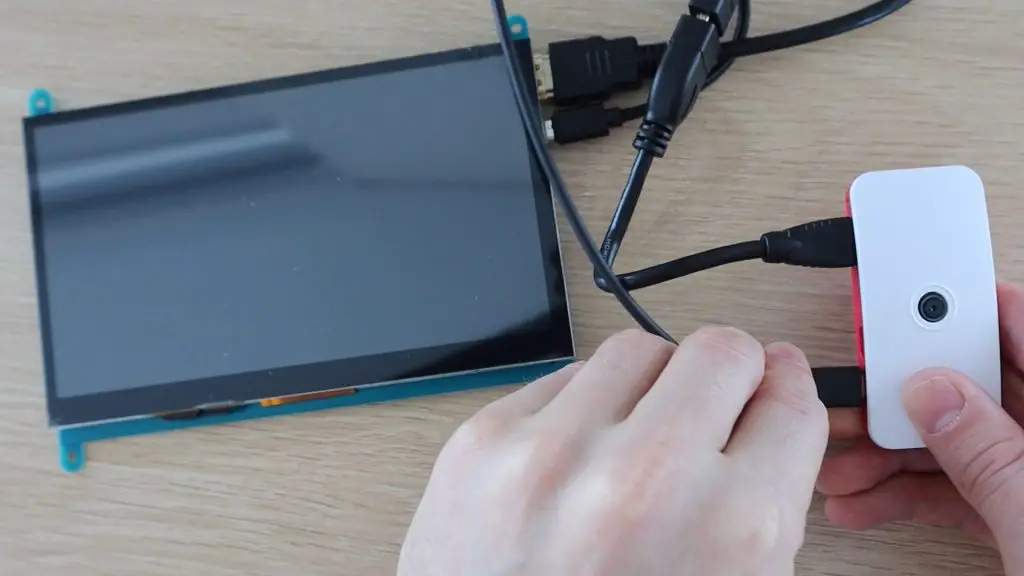
Once you’ve done that, you’ll need to connect the camera to the Pi.
The ribbon cable just slides into the connector with the contacts facing towards the board.
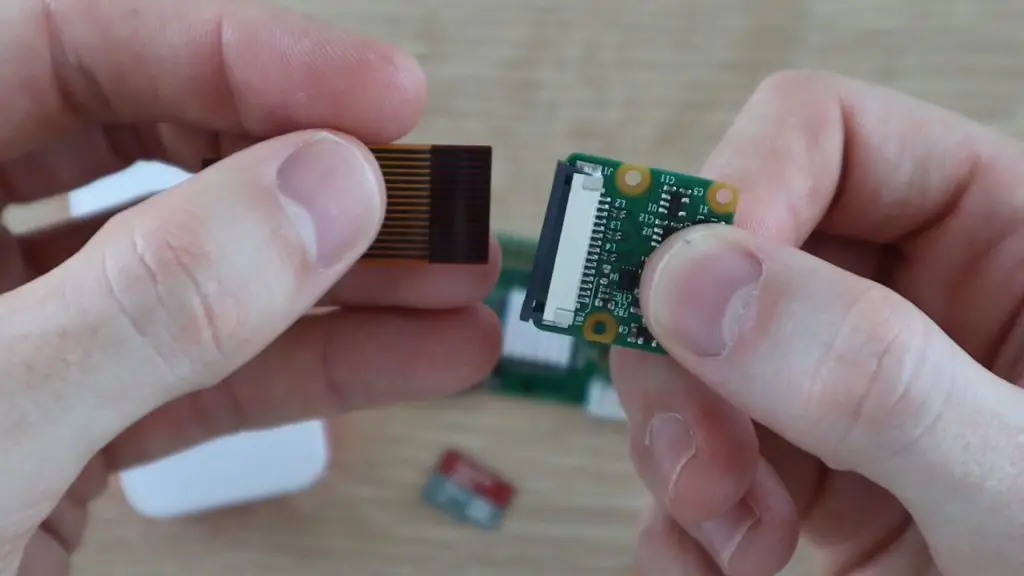
Make sure that the black clip is pulled away from the connector to open it. Then push the black clip back into place to grip the ribbon cable once it is seated correctly in the connector.
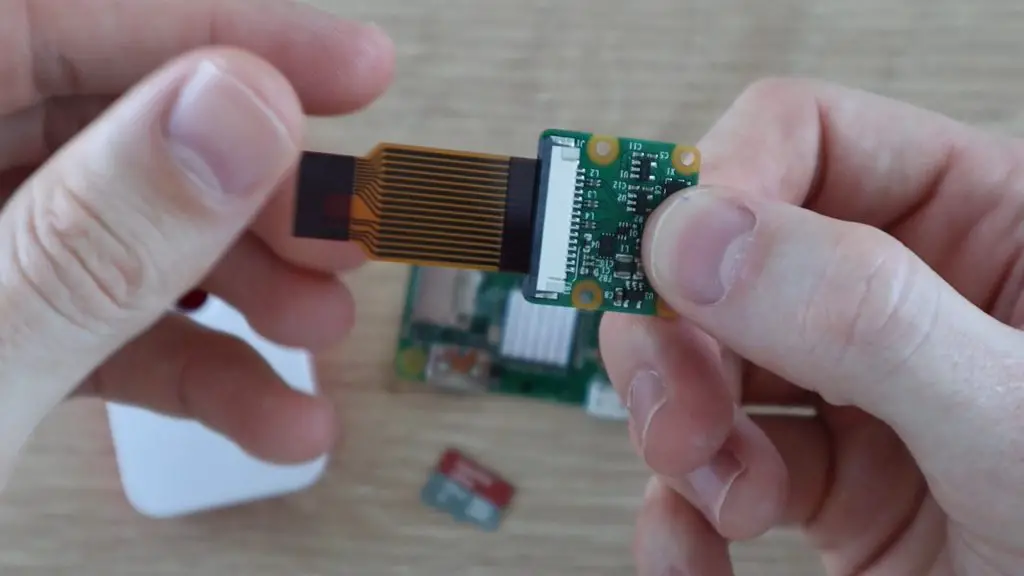
Now do the same on the connector on the Raspberry Pi to connect the camera module to the Pi.
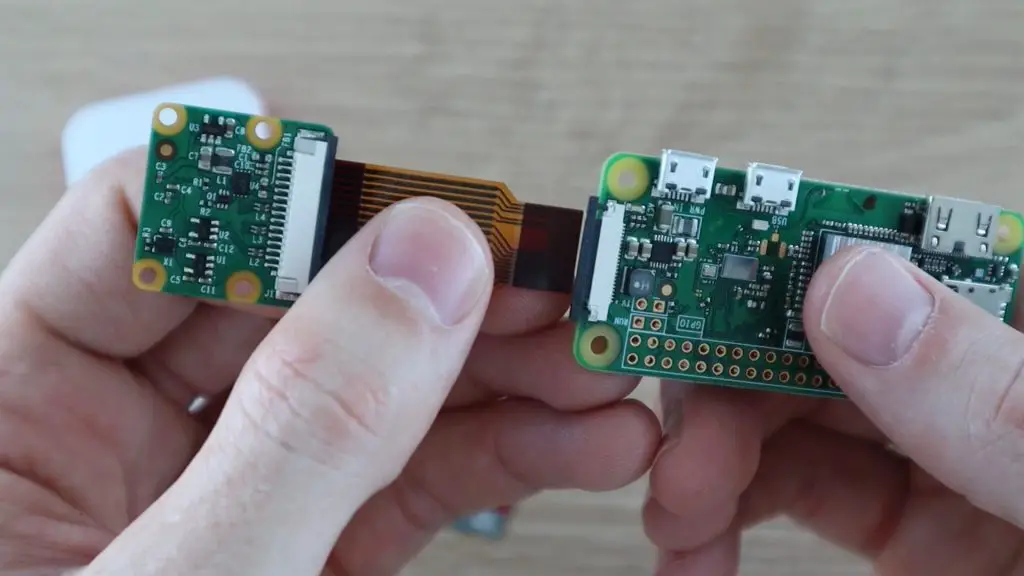
Next open up the case and push the Pi into the back of the case. There are small pegs on the case which align with the screw holes on the Pi and the ports should all be aligned with the cutouts on the side of the case.
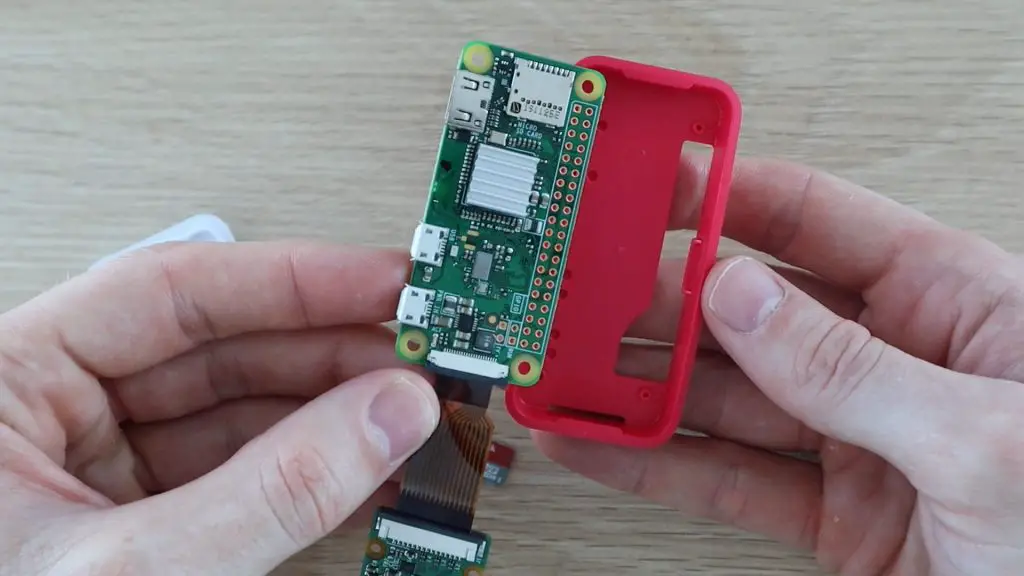
Next, clip the camera into place on the top cover and then close up the case to check that it all fits correctly.
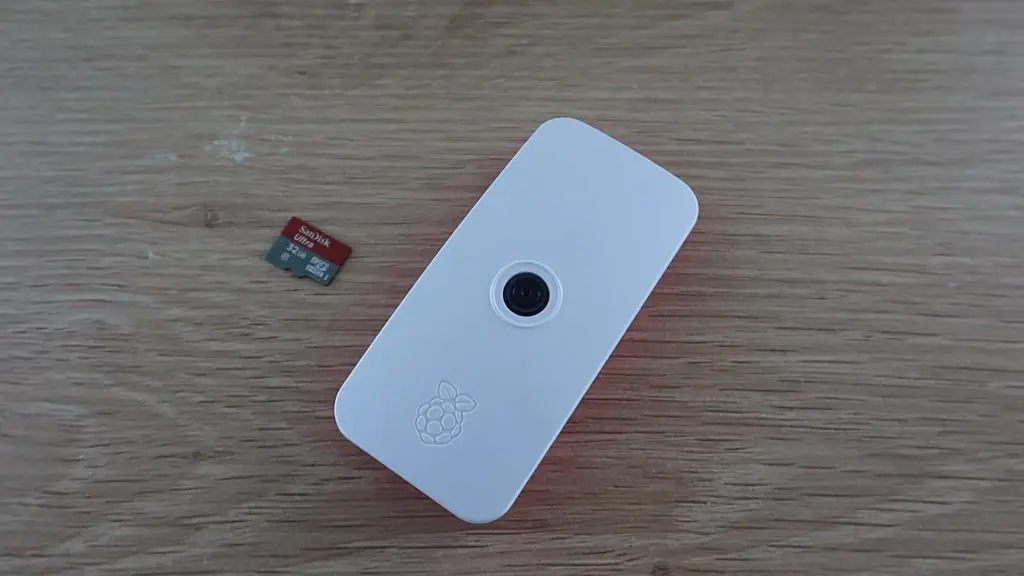
We can now move on to preparing the SD card with the MotionEyeOS operating system.
Loading The Operating System Onto The SD Card
Use a card reader to plug the card into your computer.
Now you’ll need to download the MotionEyeOS software.
If you’re not using a Raspberry Pi Zero, or you’d like to use a different board, have a look at the list of Supported Devices to see which version of the operating system you should download.
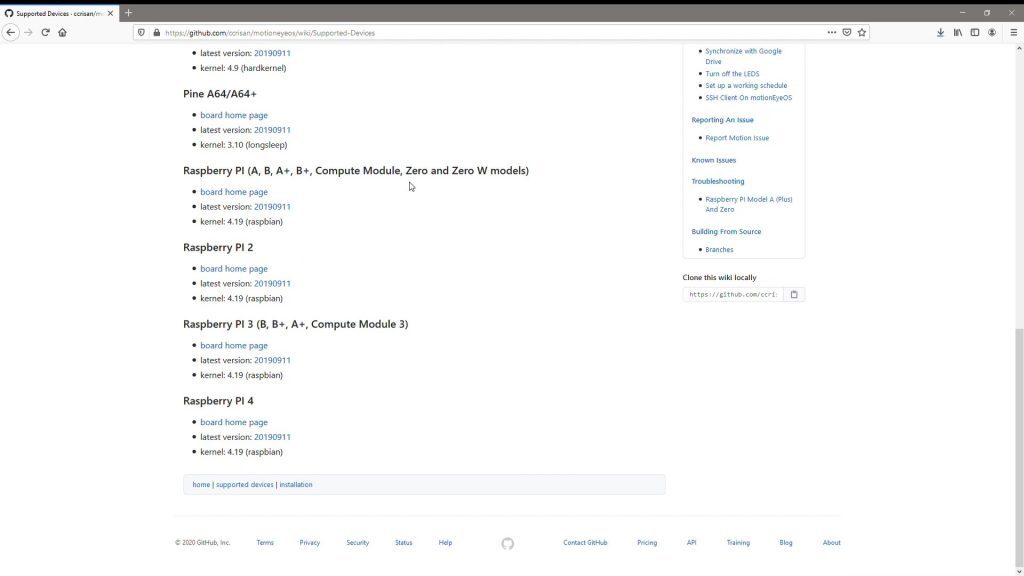
Go to the list of latest releases and make sure that you download the latest version of the software which is compatible with your board.
We’ll be using the Raspberry Pi version which was released on the 6th of June.
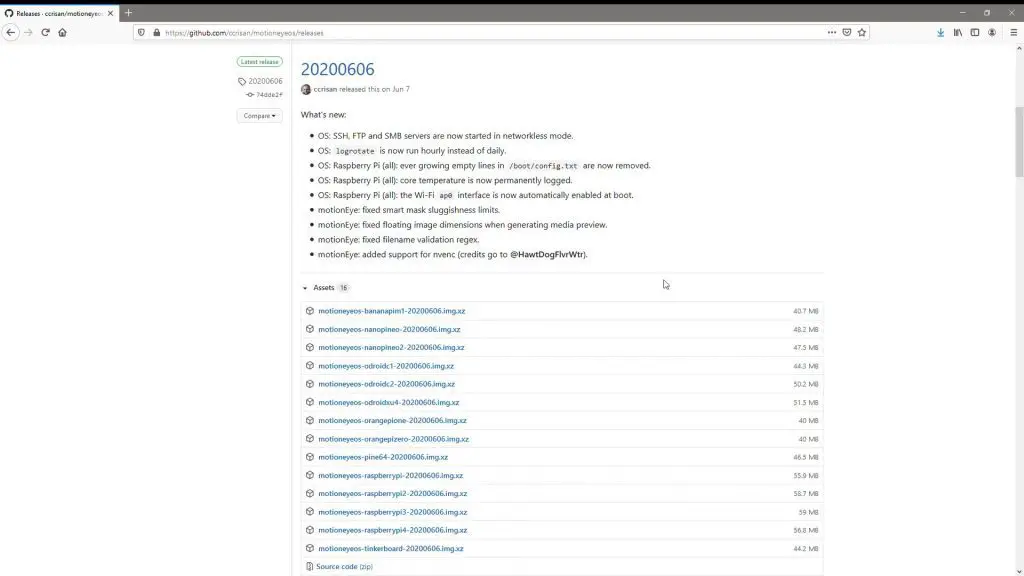
Once you’ve downloaded the software, you’ll need to unzip it to a folder on your computer. I used Easy 7-Zip for this. Don’t try to flash the zipped image to your SD card, it won’t work.
You’ll then need to use an image flasher to flash the disk image to your SD card. The one recommended in the installation instructions on GitHub is Balena Etcher. Once you’ve downloaded and installed the software, you can flash the disk image.
You’ll need to first select the source file, which is the disk image that you unzipped in the previous step.
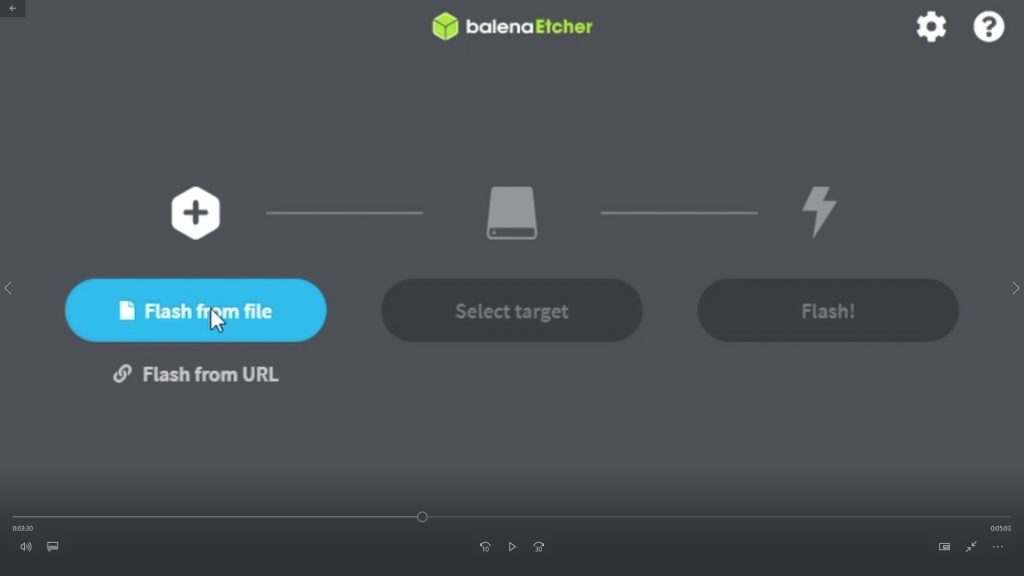
Then select your destination target, which is your SD card.
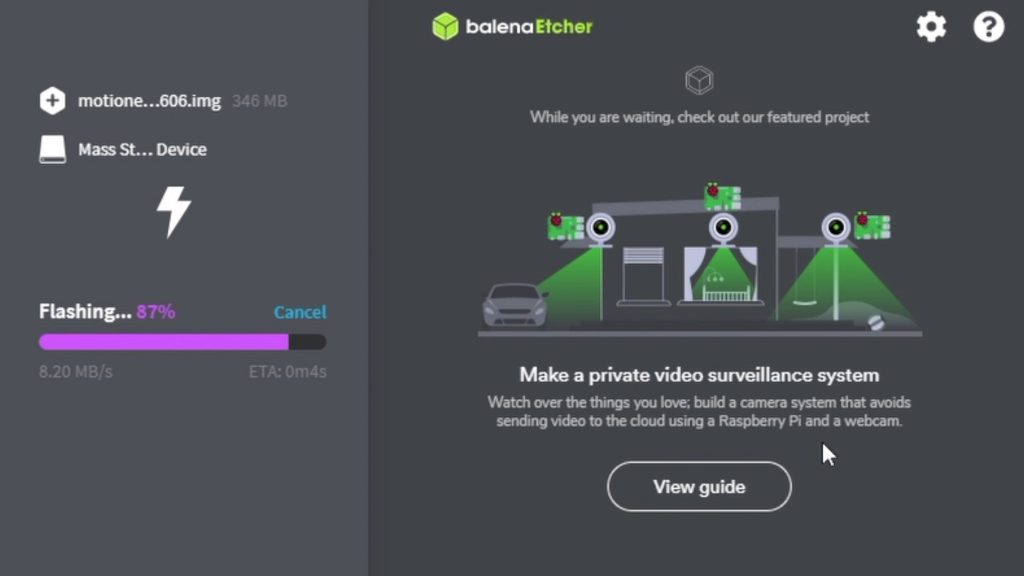
Then click on Flash and wait for the software to write the disk image to your SD card.
Finally, you’ll need to tell your Raspberry Pi how to connect to your WiFi network.
To do this, use the template below. It’s a basic text file in which you’ll need to add your country code and then your Network name or ID and the network password.
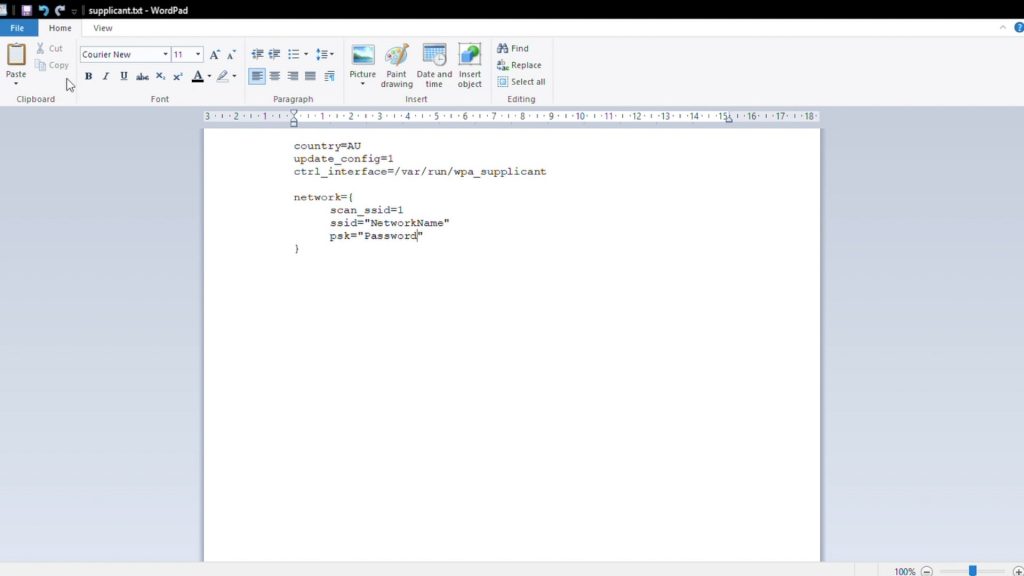
You can find a list of country codes on Wikipedia.
Rename the file to wpa_supplicant.conf, making sure to change the extension as well and then put it into the 30MB settings partition which you’re able to write to on your SD card.

Once you’ve done this, your SD card is ready to be installed into your Pi for the first boot up.
Booting & Configuring Your Pi Zero Security Camera
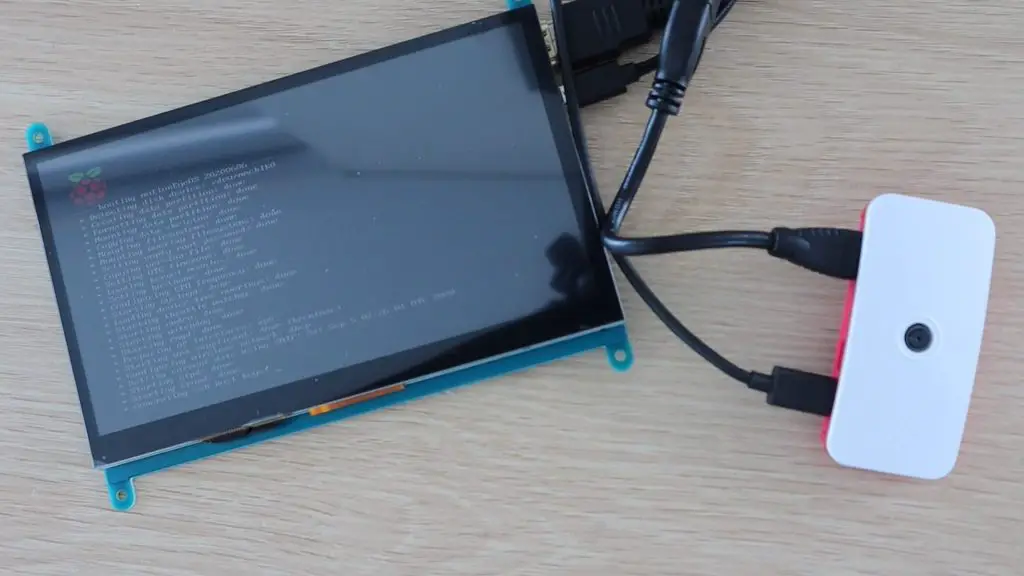
You don’t need to attach a monitor for this next step, but it is helpful to check that you don’t get any error messages and to make sure that the Pi has finished booting up.
The first boot up takes about a minute or two to complete, it’ll boot up much faster than this after the first boot.
If you haven’t used a monitor then you’ll need to find the IP address of the Pi using a network analysing tool on your computer.
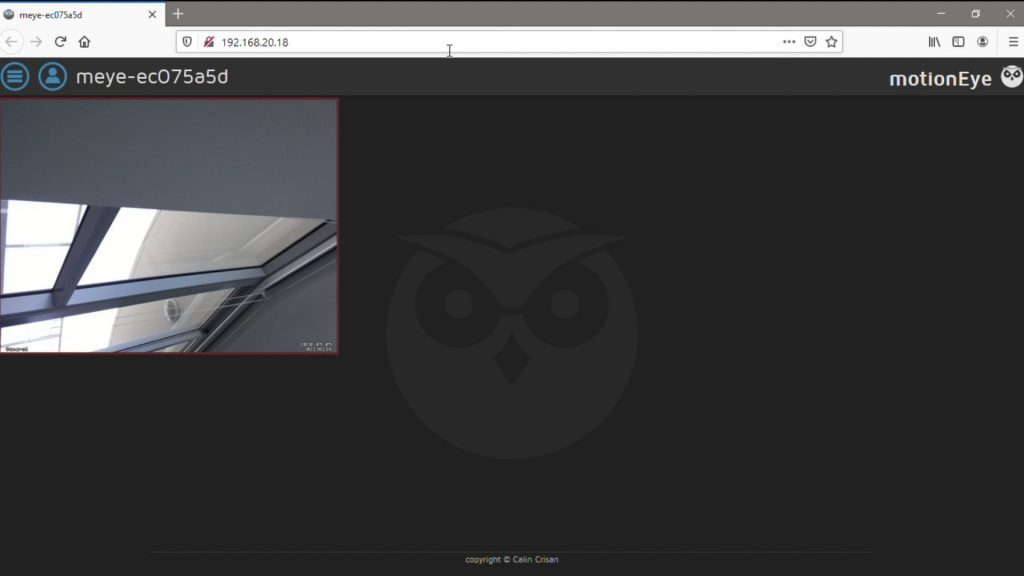
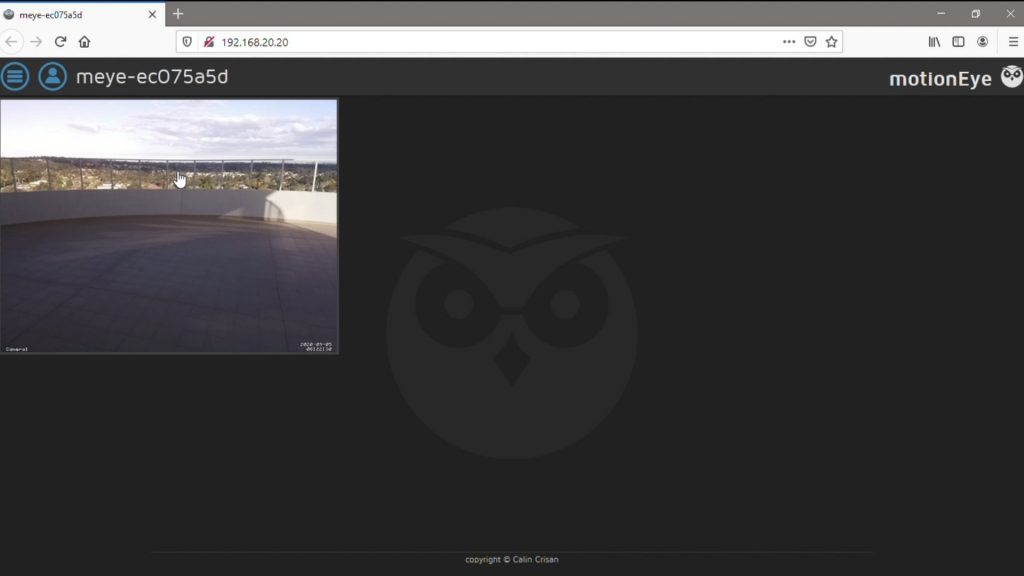
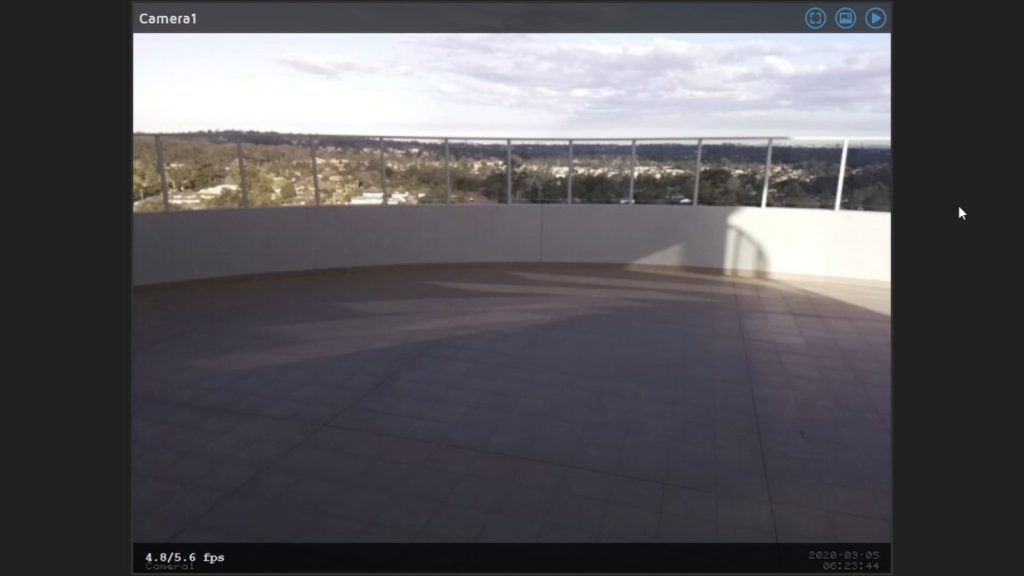
Once you’ve found the address, type it into your browser to access the Pi and it’s video feed.
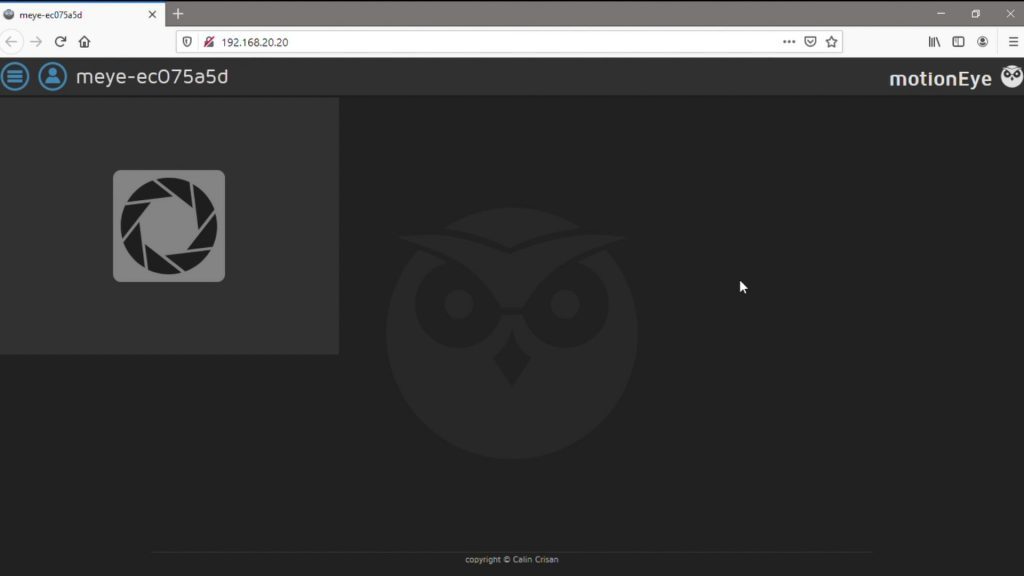
If everything is working correctly, the video feed from your camera should show up after a few seconds.
If you open up the settings menu, you can also shutdown or restart your Pi, which you’ll need to do if you’re going to be disconnecting it to install elsewhere. If you’re asked for login details, the default username is admin, with no password.
Mounting Your Camera
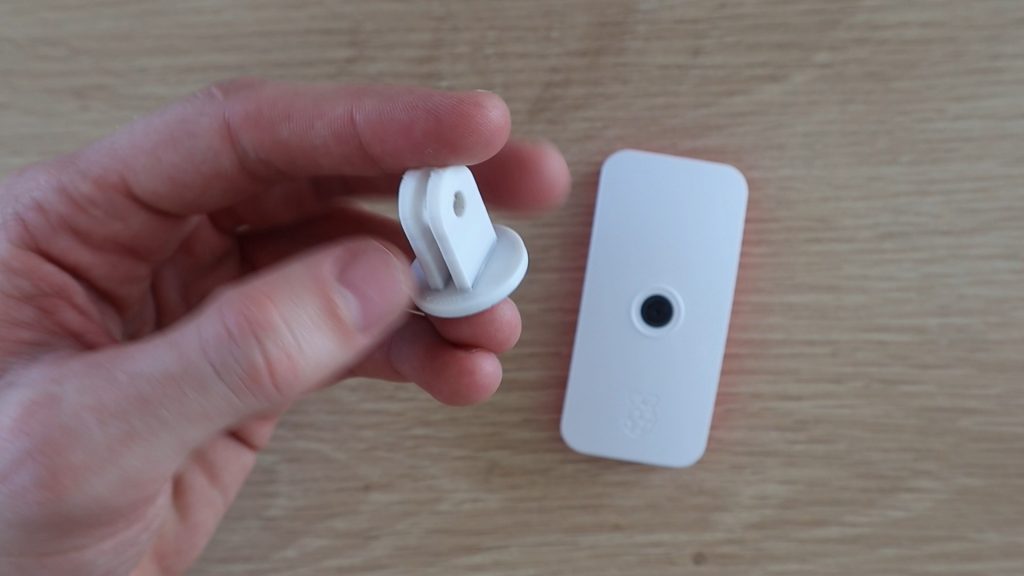
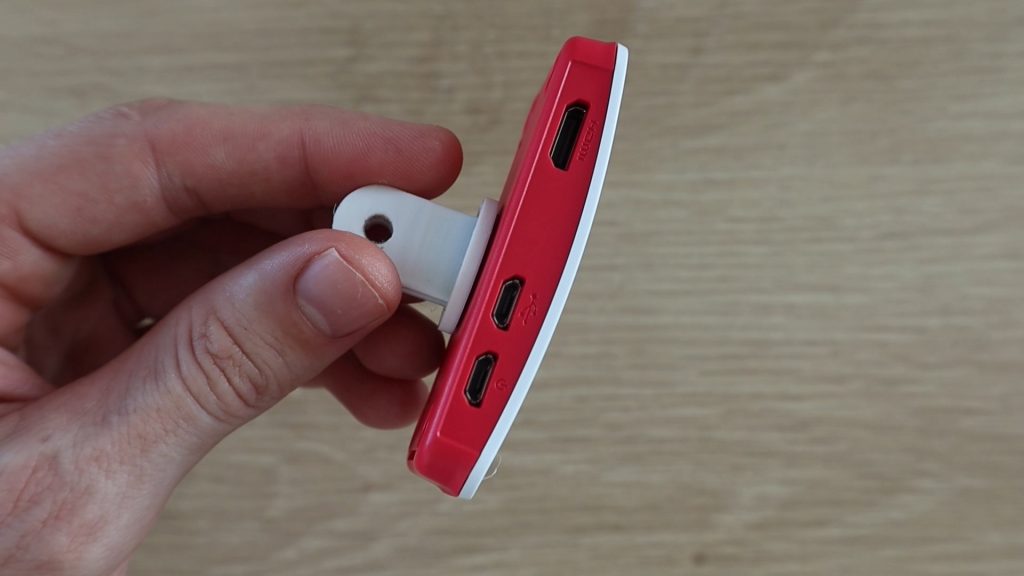
I 3D printed a small GoPro adaptor to stick onto the back of the Pi case so that it can be mounted onto any standard GoPro mounts.
I’m going to be using a suction cup mount to mount the Pi onto an outside window. It’s under cover, so it’s protected from direct sunlight and rain.
This mount also enables the camera to be positioned so that it’s pointing in the right direction.
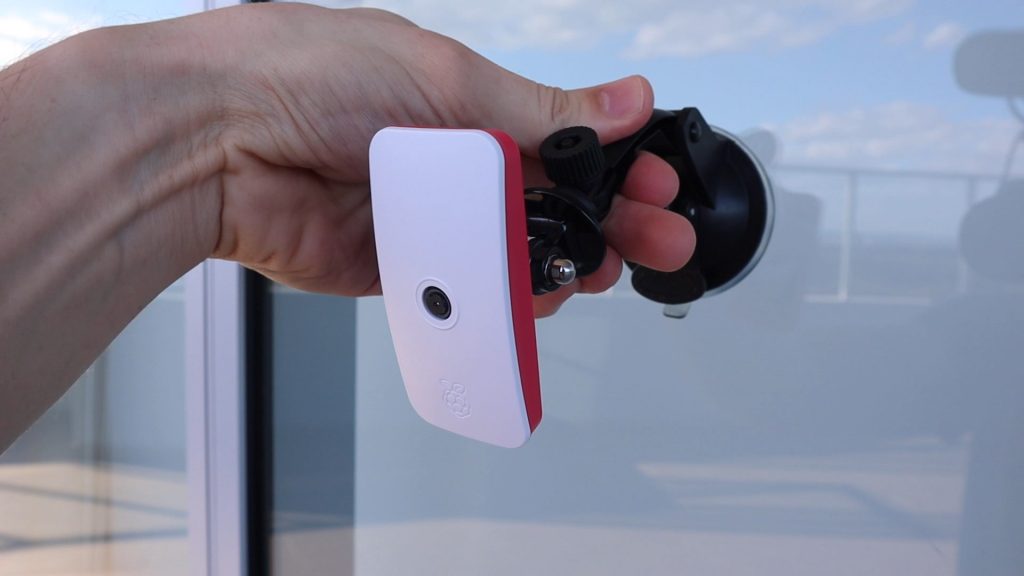
You’ll need to power it using a USB power supply. You can also use a power bank to temporarily power it for a mobile surveillance system.
Let’s have a look at the video feed outside.
You can also access the camera using your mobile phone or tablet by typing the same IP address into your device’s browser.
Configuring Port Forwarding To Access Your Camera Over The Internet
The last step is to configure port forwarding on your router, so that you can access the camera from the internet.
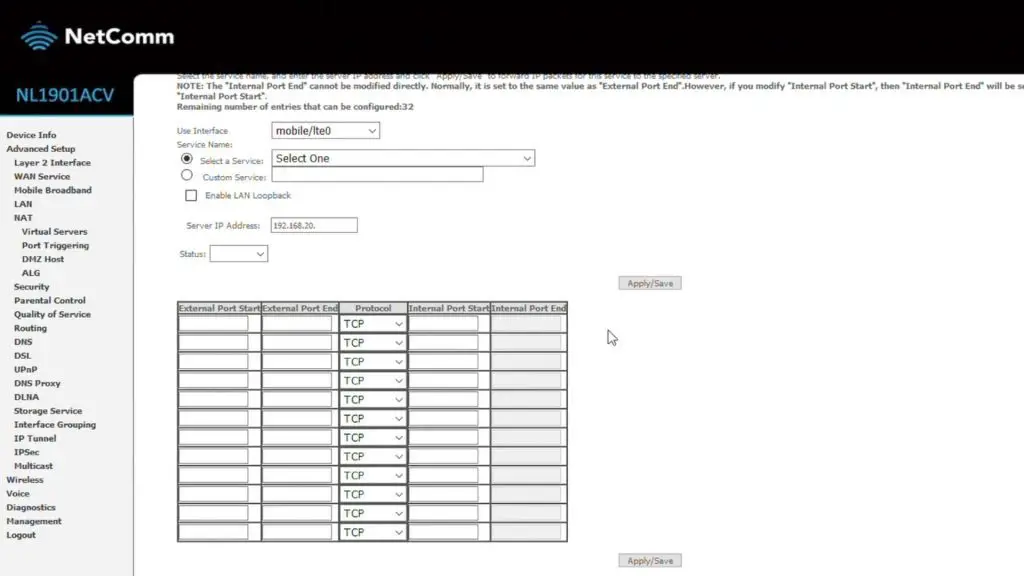
You’ll need to start by assigning a fixed IP address to your camera, so that it doesn’t change every time it re-connects to the network. This can be done in the MotionEyeOS settings menu. Set the IP configuration to manual and then change the IP address to the address you want to always assign to the camera. This should be out of the range that your router typically assigns addresses to otherwise you’ll land up with a conflict it that address has already been used.
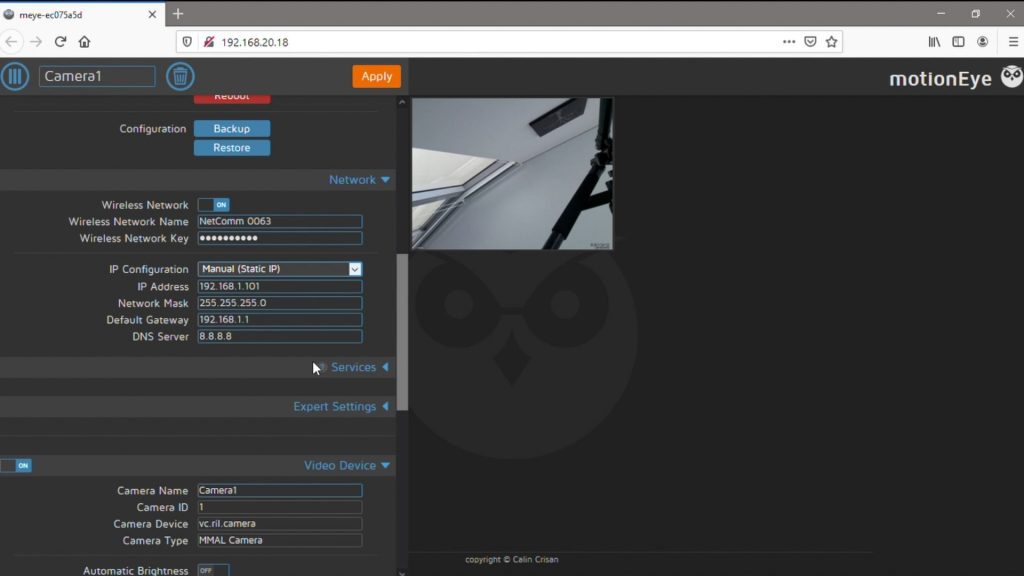
For example, if your router typically assigns IP addresses in the 192.168.10.1 to 192.168.10.20 range then you should pick an address higher than 20, so something like 192.168.10.21 and onward for your cameras.
You might also need to change your Default Gateway to your Router’s address.
Next, you’ll need to set up port forwarding on your router. This is something I can’t really show you how to do because it’s very different for each router make and model. But you essentially need to login to your routers configuration page and then add a port forwarding instruction so that requests from outside your local network on a specific port are forwarded to a particular device, in this case, your Raspberry Pi camera.
Here’s the general idea of what you need to do:
- You’ve got your Raspberry Pi’s local IP address (this is what you’ve been using to access the camera through your browser), you now need to know what port number it is communicating on. This is usually Port 80 by default. Since this is the default, it’s a good idea to change it to a port number that is unused by any other services as a security measure.
- Next, you’ll need to find your router’s external IP address. This can be done by googling – “What’s My IP” from any device connected to the same internet-connected network.
- This is the IP address you’ll need to type in over the internet in order to access your camera while you’re away from home. It is the IP address which your provider has assigned to your router. So this might change if you don’t have a fixed IP address arrangement with them.
- Lastly, you need to choose an external port to forward. Again, you can choose any unused port. You’ll use the combination of your router’s IP address and this port number in your mobile device’s browser in order to access the camera.
Now that you have an external IP address and port as well as your internal IP address and port, you should have all of the information that you need to configure the port forwarding instruction on your router. This is the part that is very different for each router manufacturer and model, so you’ll need to figure out how to do this on your own router.
Essentially what you’re doing is telling the router that when an external request is sent to it on the particular port you’ve chosen, the router should forward the “web page” which is served to it when it calls the local IP address and port number so that you’re able to see it from outside the network.
Once this is done, you should be able to access your camera over the internet in the same way you could do it locally. If you’re still unsure how to do this, try searching for setting up Port Forwarding on your specific router make and model.
Let me know if you’ve built your own Raspberry Pi Zero WiFi Security Camera in the comments section. What are you using it for?
Share This Guide
Good afternoon,
I love your guide. The one change I would do is in the section about port forwarding. While I agree with you that you can’t possibly show how to do this with every router out there, you could specify which port to forward to help people who are not totally familiar with the process of part forwarding.
Other than that, the guide is great.
Hi Pierre,
Thanks for the feedback and advice. I’ve added a bit more information and general instructions for port forwarding and which ports to use, hopefully this helps others out!
Hi Michael,
I hope you can help!
I had Motioneye working on a Raspberry Pi Zero for some time but it became very ‘flaky’ so I installed it again many times but it fails to load stopping just after * Configuring wired network: no device – Panic: rebooting in xx seconds (caused by network)
I purchased a new Pi Zero W and two 32Gb ScanDisk High Endurance Cards and guess what both fail to install.
I then installed the latest Raspian on both cards and both Pi zeros ran the OS and found my WIFI so there is nothing wrong with either Pi Zeros or the cards.
I have been using two Raspberry Pi Zero W and both setups fail the same.
1) Motioneyeos is the latest version 2020060
2) SD Card Formatter
3) BalenaEtcher
4) wpa_supplicant.conf (I live in the UK so GB is the code and is as below)
country=GB
update_config=1
ctrl_interface=/var/run/wpa_supplicant
network={
scan_ssid=1
ssid=”VMxxxxxxx”
psk=”xxxxxxxxxxx”
}
ssid is my network ssid and psk is my network password.
I used Notepad++to create the config file and I copied the file to the cards.
Can you tell me what I am doing wrong please????
Hi Dave,
Sorry you’re having trouble getting it to work.
It looks like you’re doing the right things to me, I can’t see any obvious issues with your process or the supplicant code. That error seems to suggest that the Pi isn’t able to connect to your network properly. When you connected them to the network using Raspian, did you use the GUI or through the terminal? Is your router picking up the Pi running MotionEye and assigning an IP address to it?
I just had a similar problem today. I was using a MAC for editing the wpa_supplicant file and thought I had changed the name from wpa_supplicant.txt to wpa_supplicant.conf it ended up being wpa_supplicant.conf.txt. It took awhile to figure this out and and to check it on another non-MAC computer where I discovered error. Once I got to .conf it booted and worked just fine.
Hello,
I had the same problem. But for me it was that my wi-fi was a 5GHz, and this is not supported on the RPI0. I didn’t know that.
Now with a 2,4GHz it works fine.
Thanks.
Hi, I have a similar problem. I am working with WIN10 and tried to flash version 20200606 on my raspi zero W 1.1. My WLAN-Network worsk with 2,4 AND 5 GHz under the same SSID. I’ve double checked the config of the wpa_supplicant.
Do I have to alter the ending to .conf like Ken wrote?
Ok, got it. Windows 10 hides per default the file-extension. In this case the .txt .
I had this problem as well, and I found that this build helped:
https://github.com/motioneye-project/motioneyeos/issues/2875
The reason is something to do with varied Pi Zero 2 chip versions in the market.
Thanks for taking the time to put this together. Curious if there would be an ability to add a motion sensor to this? Specifically I was thinking about making a bird feeder that takes pictures. Any thoughts?
Hi Brad,
The MotionEyeOs software has an option to trigger recording or photographs on motion detection, so you wouldn’t need to add an additional motion sensor. It should just be a case of setting it up and getting the sensitivity correct.
Michael:
Just put this together and having problems connecting to wifi. I tried another sd card I used for another project in this rpi 0w and it was able to connect so I think the Rpi is fine. I flashed the “motioneyeos-20200606” disk image to the card and added the wpa supplicant.conf file with country and network name and pw saved. I noticed there are some files on the card that appear different than the image provided above. The “fwupdater” and “initrd” files are shown as winzip files and do not have the .gz extention. The “cmdline” & “config” files do not have a .txt extention and the “kernal” file does not have a .img extention.
I am not familiar with programing so not sure if these differences could be causing the problem or not. Hope you can help, anxious to get camera up and running for monitoring 3d printer.
Thanks;
Jim
Hi Jim,
It sounds like your computer’s operating system isn’t showing the file extensions. So when you’re changing your wpa supplicant file you’re just changing it to wpa_supplicant.conf.txt, you’re not actually changing the file type. You need to enable file extension viewing and that will enable you to change the file type to .conf.
Hope this helps.
Michael:
Thank you, that did the trick!
Jim
Michael:
One more question. Is hdmi output enabled for this project. I connected the Pi Zero W to a monitor via hdmi but got no input. I checked cables on another device and they worked fine.
Thanks again for all your work on this project.
Jim
This depends on what you’re trying to achieve. In either case, you should at least be getting a text-based terminal output through HDMI. Make sure that you’re booting the Pi up with the HDMI cable already plugged in and the monitor powered on.
If you are wanting to display the video feed on your monitor then you’ll need to install MotionEye onto a full (not lite) copy of Raspberry Pi OS and then open a Chromium browser tab pointed to localhost to access the interface.
Hi – thanks for the detailed writeup and video.
How do you find running the Pi outside in the elements? I’m keen on doing this but not sure what precautions to take with extreme hot and cold weather.
If your camera is going to be exposed to wind/rain etc then I’d suggest putting it into a GoPro housing (the Pi Zero W just fits). Mine handles the heat and cold fine, they just don’t like dust and moisture.
Hello Michael. Thank you so much for this tutorial. I’ve done a few pi projects and am looking forward to using this one.
My PiZero won’t start MotionEye. I originally had the .txt file issue and it quick the boot, but now it runs through starting all of the processes, but fails at “starting motioneye:
It sits for a long time, but then fails on the boot screen. I can scan IPs but have tried all of the unidentified devices and none will load in my browser. I assume I should see some kind of normal pi desktop after it boots. Is that correct? Or is there no normal desktop with this configuration?
The system eventually just says that start failed and it reboots with the same results.
Did I miss something?
Thank you for the help.
Hi Tom,
It sounds like it is most likely a network connectivity issue. If it’s saying that starting has failed then I’d suggest checking your network settings. Remember that the network name and password are both case sensitive and should have all spaces etc..
There isn’t a desktop interface with this setup, the dashboard is only available through your web browser.
Thank you for the suggestion. I got it working by reformatting the SD card and installing the OS again. Seems to work fine. I appreciate the quick response.
Thanks for the quick reply, Michael. I got it working by reformatting the SD card and just reinstalling the OS. Works great!
Hi Michael, Tanks for a wonderful instructable. It almost worked first time (will wonders never cease) except it stops at:
welcome to meye-a127eeac!
If you want to see a friendly user interface, point your browser to the IP address of this board.
nmym-a something login:
( I purchased a beautiful little HDMI display from UCTRONICS that auto scales HDMI Inputs to 800 x 480, making the text nearly unreadable, though I can see it on my network)
When I attempt to bring up on my Windows 10/chrome browser, all I get is a blank screen…
Ideas?
Hi Again… all of a sudden I’m getting video on my PC… now onto the tricky part… thanks again
Very new to pi…… I believe that I am missing something as my camera is just grey. Any ideas I tested it a few days ago, and got a pic (not with motion eye) I have tried to reconnect the camera, ever looked thru the settings in case it was shut off. Any ideas would be great thank you
I followed your directions, flashed motion eye to a 32gb sd card, copied over the wpa_suplicant file with the .conf extention. place the pi zero into the same case, plugged it into a tv, and plugged it into a power source and nothing shows up on the screen and I checked to see if it connected to my router, and nothing.
what else did I do wrong?
I followed your directions, and when I plugged in the pi to my tv and power source, nothing appears on the screen. and I don’t see it connected to my router.
Hi Patrick,
You’ve probably got a problem with your wpa_supplicant file, if nothing is available over your network then your Pi probably hasn’t connected to your network properly. If you look at the files on your SD card, your Pi should have deleted the wpa_supplicant file if it was able to read it correctly.
I love this idea, but I have had a few problems.
Firstly, I couldn’t get motion eyeos (the latest version 20200606) to boot up (on a Raspberry pi 4 4gb), but I managed to solve it thanks to this (https://github.com/ccrisan/motioneyeos/issues/2760).
Unfortunately, when I add a camera to motion eyeos, it says unable to open video device (Raspberry pi V2-8). I have tested the camera in Raspberry Pi OS, and it works fine. The last comment in the above solution talks about problems with USB cameras, but I don’t really understand it. Any thoughts or advice? Thanks
It did not work. MotionEye cannot start my raspberry pi which is working with other os
Brak mi opisu jak ustawić MotionEye w tryb WIFI Access Point.
Ustawiłem tak oprogramowanie aby działało niezależnie, a dowolną komórkę lub tablet można użyć z aplikacją MotonEye lub dowolną przeglądarka pod adresem 192.168.100.1 lub dowolnym innym (do edycji). Działa niezależnie od internetu i routera.
It’s 2025 and the motioneyeOS project was updated Oct 2020 the last time. Now there is no tool which works to write the image to a memory card.
CRC error, or the latest BaleaEtcher eaven can not accept the IMG at all. I tried Win32DiskImager, BaleaEtcher or RaspberrryPi Imager. Eaven on LinuxM intDebianEdition it was not possible to write on a memory card. When writing at terminal it will work, but WPA_Supplicant.conf is obsolete. The RaspberryPi Zero2W does not adopt the wifi settings and cannot activate the wifiw0 device. For comparison: eaven RaspberriPi Imager with default Bookworm will ignore the wifi settings on Zero2W Raspi and the wifi adapter needs to be activated at the gui first and. (I tried this o 3 units of RaspberryPi Zero2W(Version 2024), so this does not happen on a single board.
I was able to run “motion” on the devices, but “motionEyeOS” is no longer a working project.
Hi
i have trend to connect a camera with usb. but there is nothing came up on the screen. can someone help