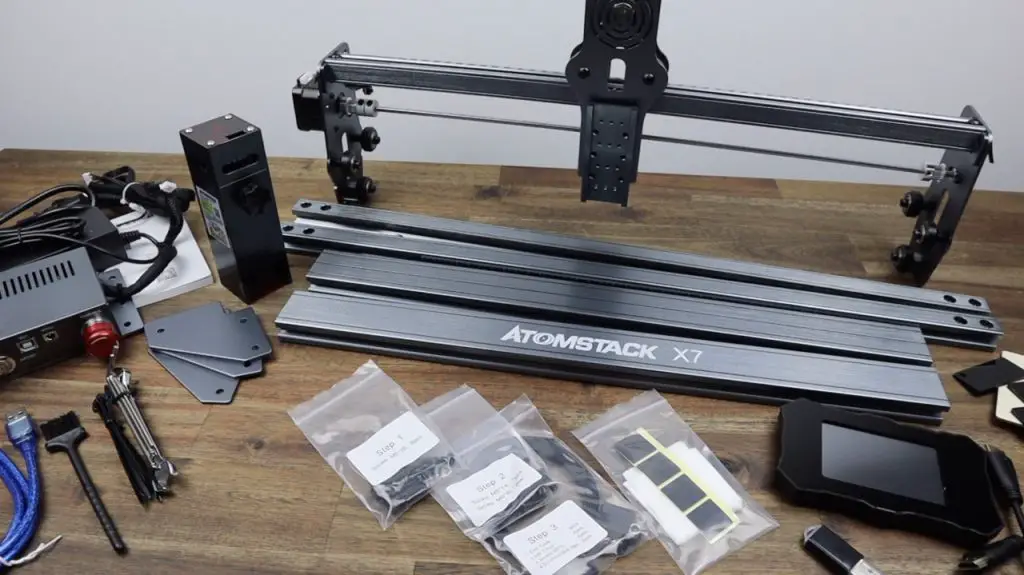
Today we’re going to design and laser cut some new Raspberry Pi cases from 3mm plywood using the Atomstack X7 40W. This is a new laser engraving and cutting machine from Atomstack which is largely the same as their flagship X7 Pro, but with a slightly lower power 40W laser module.
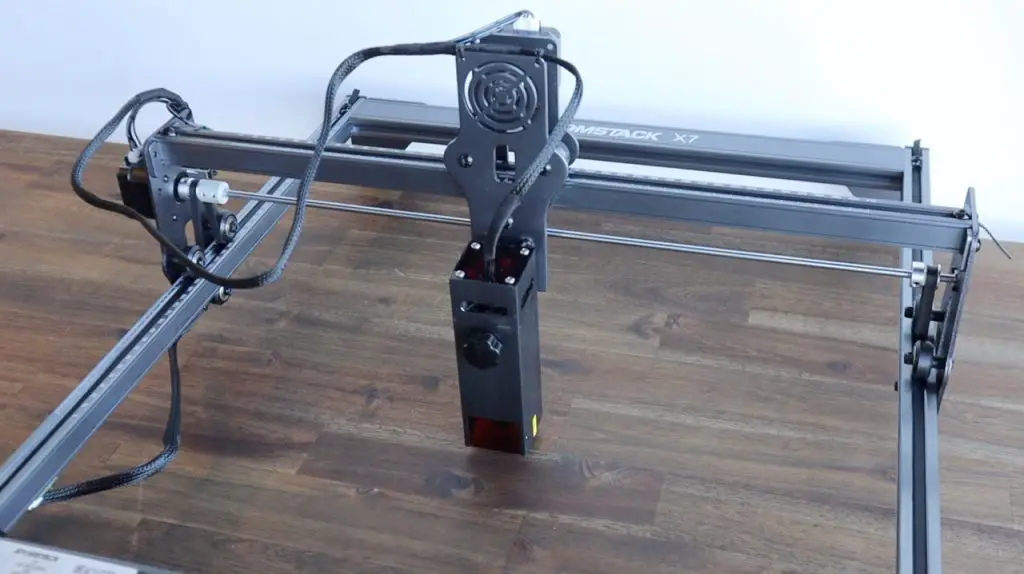
Being similar to their flagship model, it’s got a number of great features, including an offline independent control terminal, so you can operate the laser without it needing to be connected to a computer, a 32-bit ESP32 based mainboard, and a really high-quality all aluminium frame and electronics housing with a metal e-stop and buttons. Even the laser module is well packaged with an all-metal protective enclosure and a small acrylic window to see the laser.
They claim that the 40W laser module can cut through 15mm thick wood and acrylic, although the acrylic will need to be opaque black as a diode laser can’t cut through clear or translucent materials. I haven’t tested the machine up to 15mm, I’ve only used 3mm plywood, but it had no problems with it even though plywood can often be a challenge to cut.
Watch my full video below, or read on for the write-up:
What You Need For This Project
- Atomstack X7 40W – Buy Here
- 3mm Plywood – Buy Here
- Raspberry Pi 4B – Buy Here
- 40mm RGB 5V Fan – Buy Here
- 40mm Black 5V Fan – Buy Here
- M2.5 Brass Standoffs – Buy Here
- M2.5 Screws and Nuts – Buy Here
Some of the above parts are affiliate links. By purchasing products through the above links, you’ll be supporting this channel, with no additional cost to you.
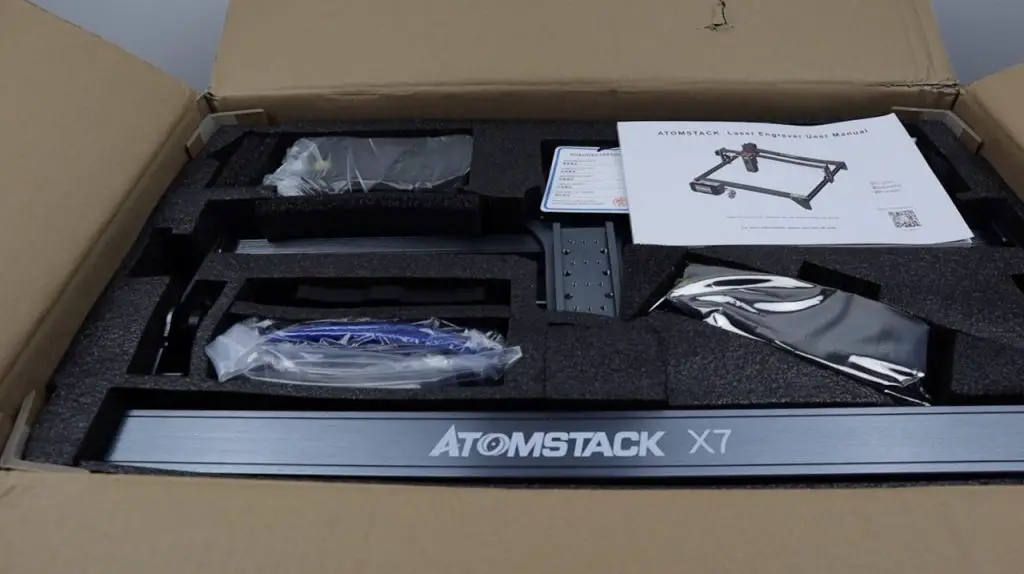
Unboxing & Testing The Atomstack X7 40W
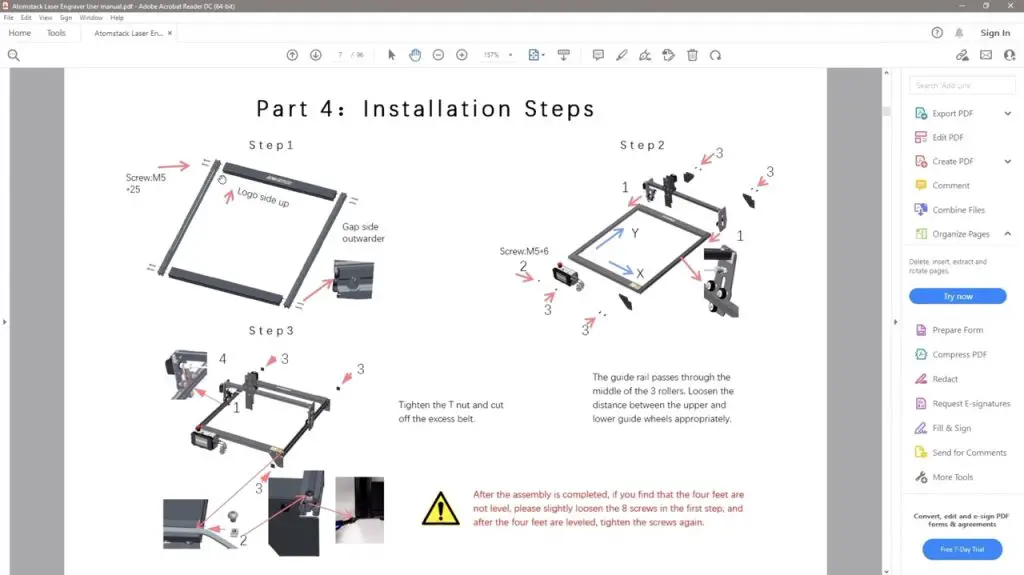
The assembly of the Atomstack X7 40W was pretty simple. The gantry is all preassembled with the motors, so you’re really just assembling the four sides frame and installing the gantry onto it.
That said, if you haven’t put one of these machines together or used one previously then you might need to look at some photos or videos online to help out as the manual is a bit too brief in my opinion. It’s basically just a single page for the actual three-step assembly of the machine, with the packets of screws marked for each of the steps.
To control the laser and/or generate the required gcode for your cutting and engraving, you have the option of using a free software package called LaserGRBL, which I’ve used previously on other lasers, or a paid-for software package called Lightburn. Lightburn does have a lot more functionality than LaserGRBL, so if you’re going to be using the laser for more complicated work or as a daily workshop tool then you’ll probably want to invest the $83 for a license key. LaserGRBL is only able to provide basic control of the laser, while Lightburn allows layout and editing features as well as more advanced control.
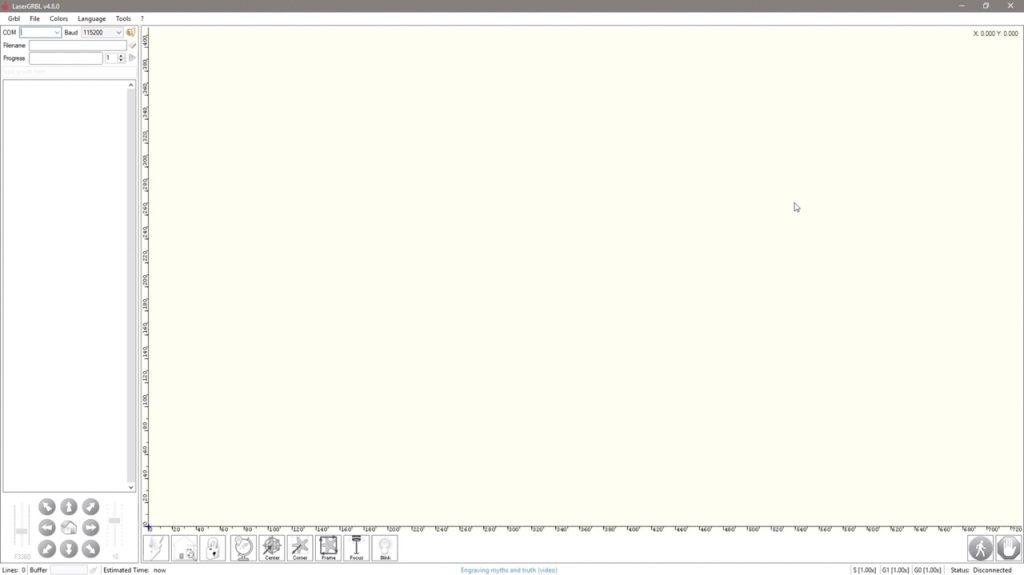
I used LaserGRBL for all of the work done in this project and it worked well for what I needed it for.
Once I had the Atomstack X7 40W set up, I tried a test engraving on one of the supplied sample pieces of plywood and I also did some test cuts on my own plywood.
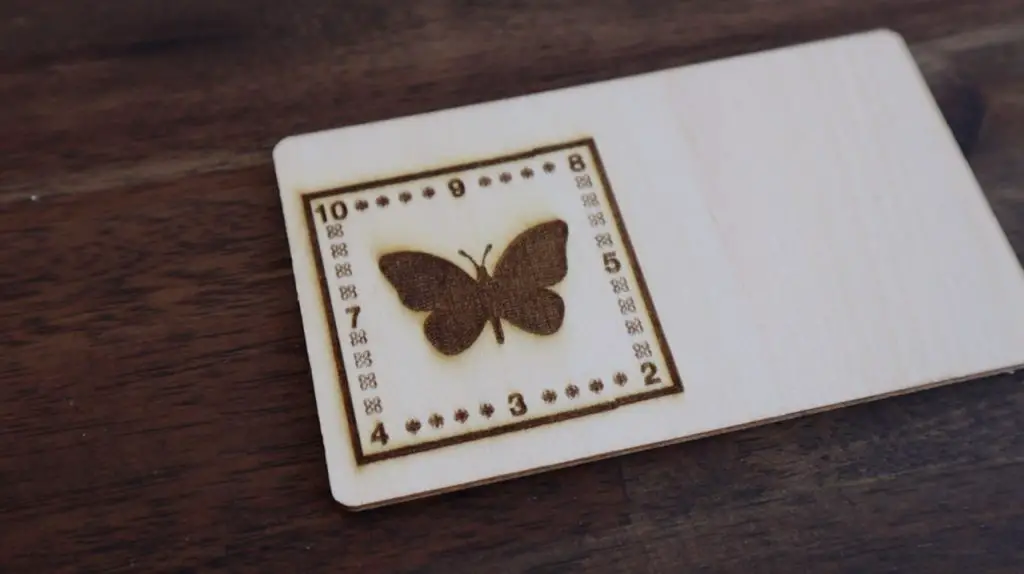
The sample engraving came out really well, the small laser dot size is able to produce high levels of detail, and it works fairly quickly too.
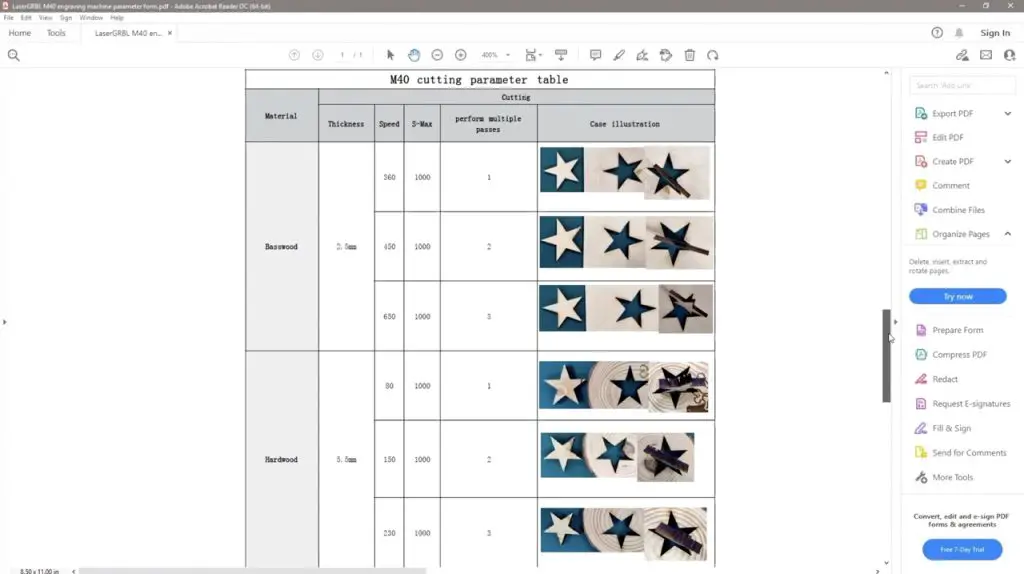
There is a lot of variation in the wood and adhesives used to make plywood, so you usually have to do a bit of experimenting to get clean cuts.
I used the example laser powers, speeds and passes provided by Atomstack as a rough guide and found that two passes at full power and 200mm/s seemed to work best for my plywood.
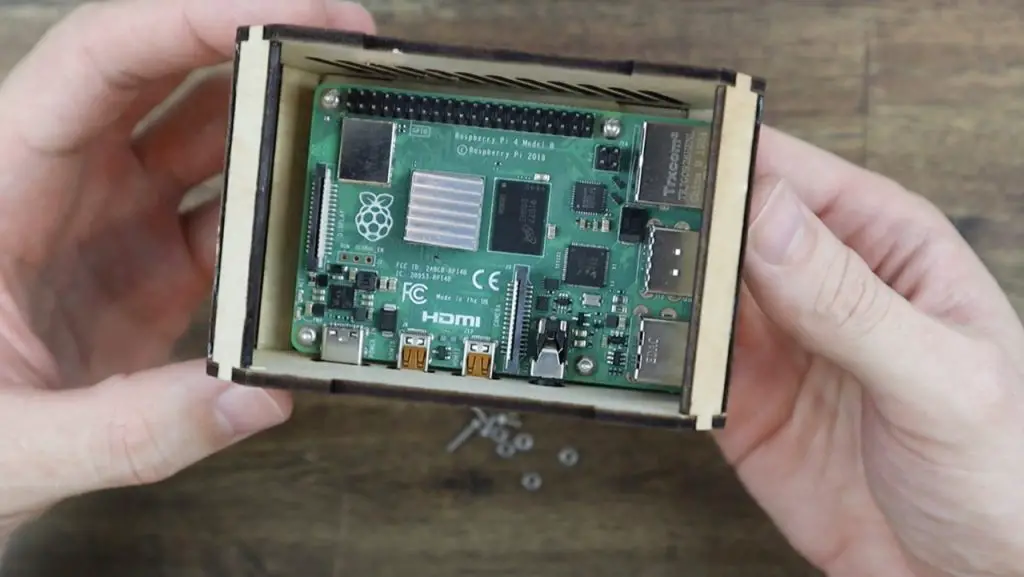
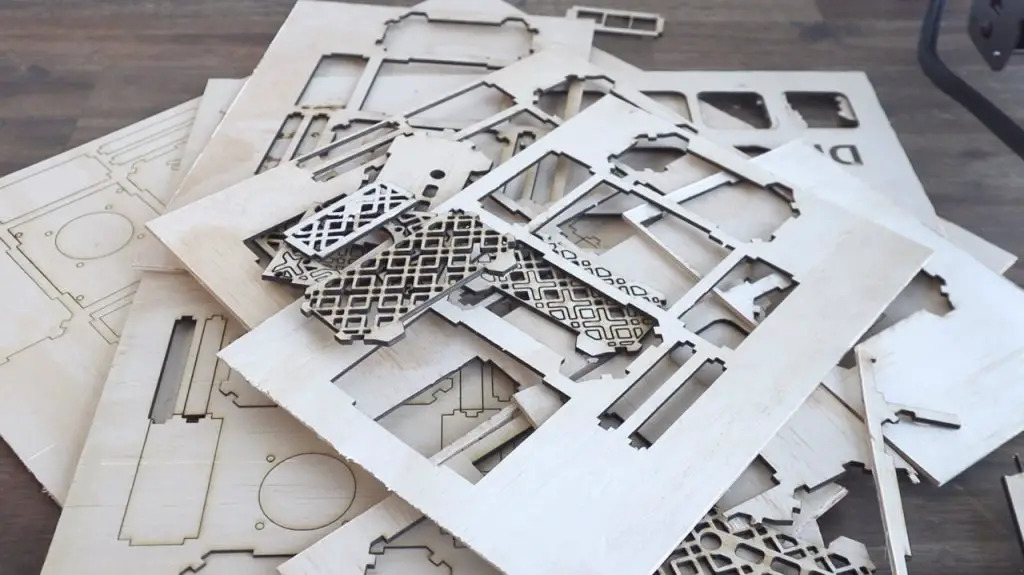
Designing & Cutting The Compact Raspberry Pi Case
Once I was happy with the quality of the cuts, I moved on to designing the case. I’ve been wanting to create a more compact or low profile version of the 3D printed case that I made previously. An added benefit is that if I made it from plywood, then it could be assembled and painted in any colour to suit the project that I’m working on.
I came up with this rectangular design, which I drew up in Inkscape.
Take a look at my video on how to design your own Pi cases in Inkscape.
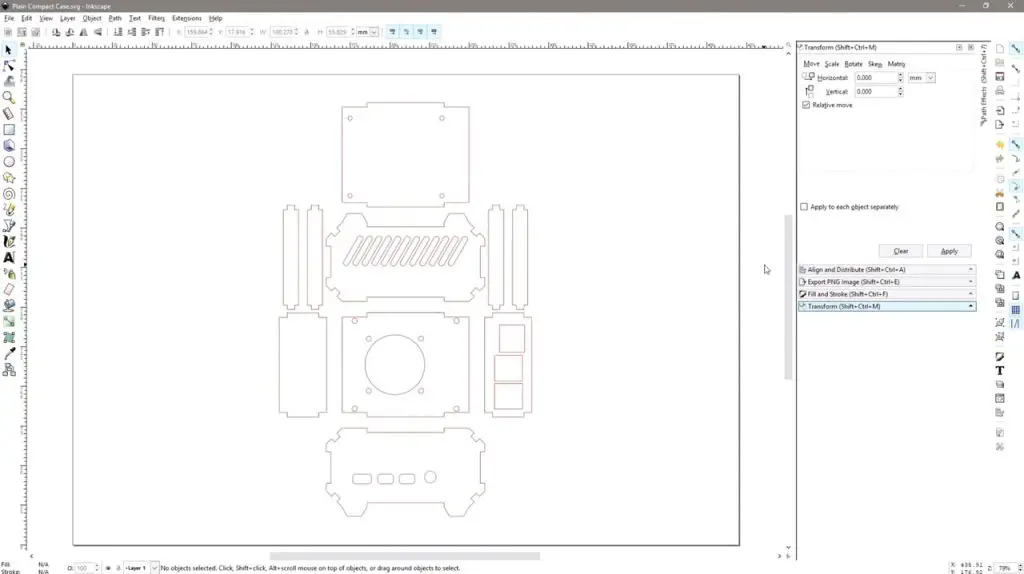
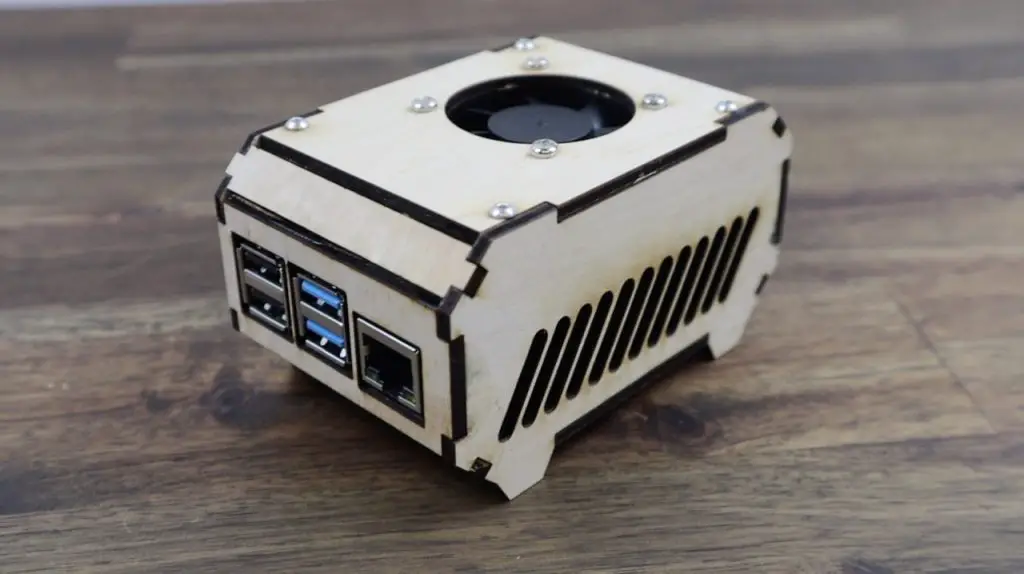
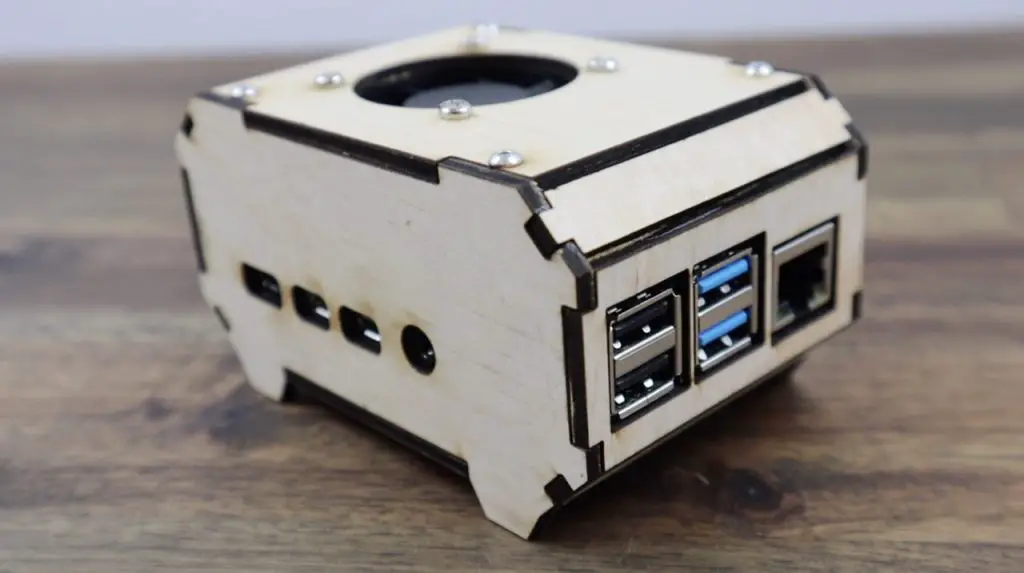
It has a similar form factor to my other cases but has a fan on top of the case rather than the side. The fan blows down onto the Pi’s CPU and exhausts air out of vents along the side.
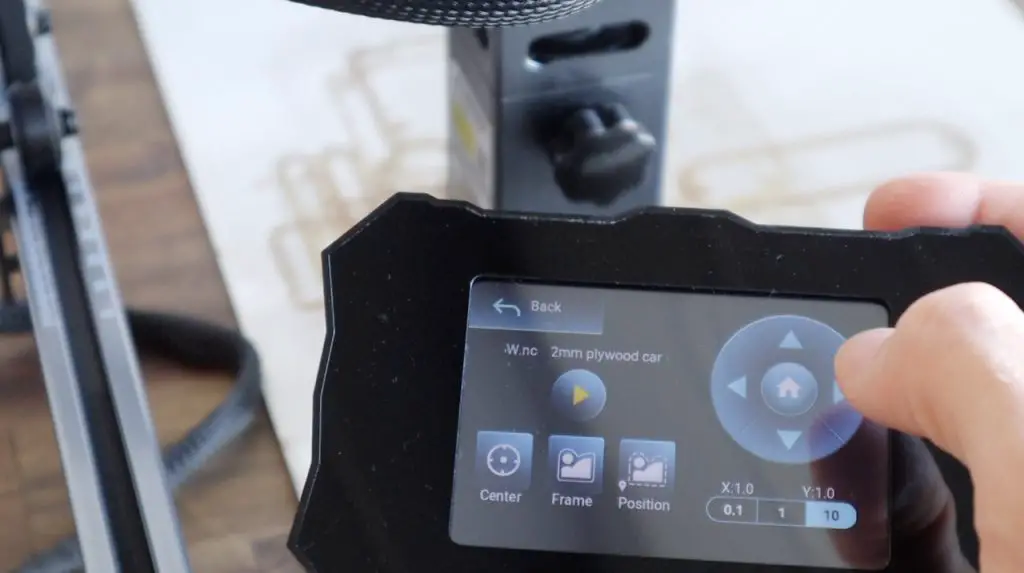
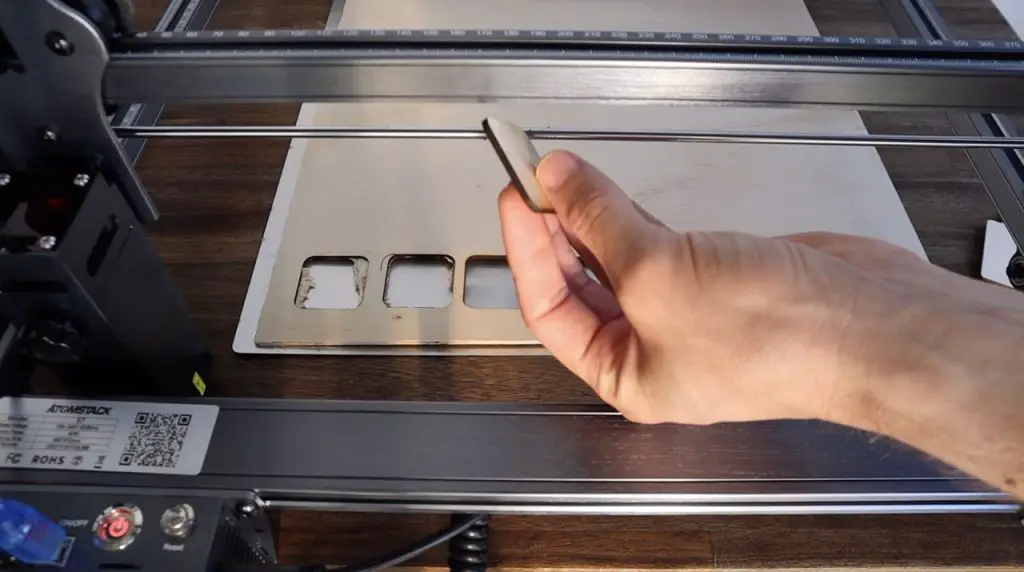
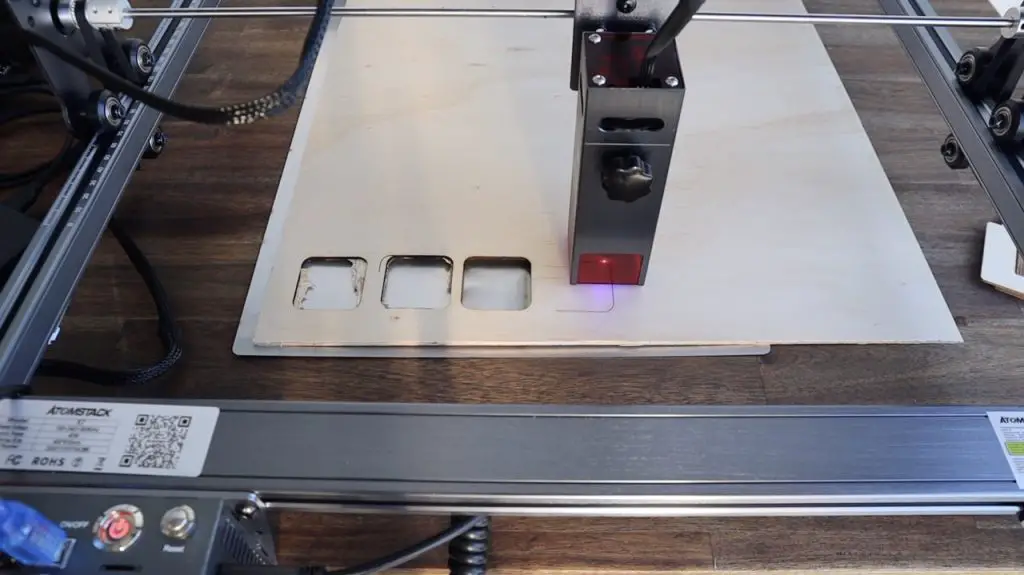
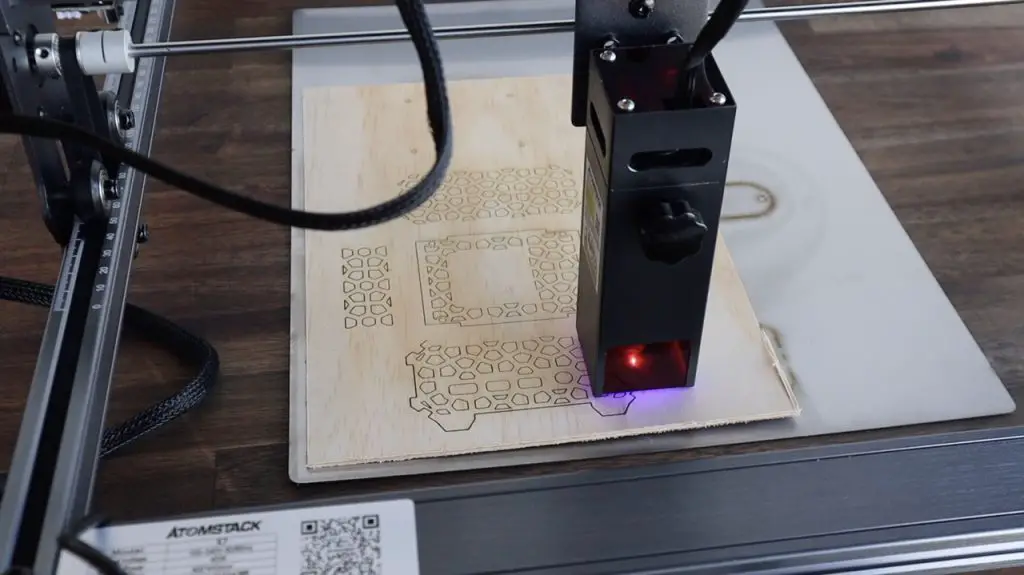
When I was happy with the design, I put a fresh sheet of plywood into the bed of the Atomstack X7 40W and got cutting.
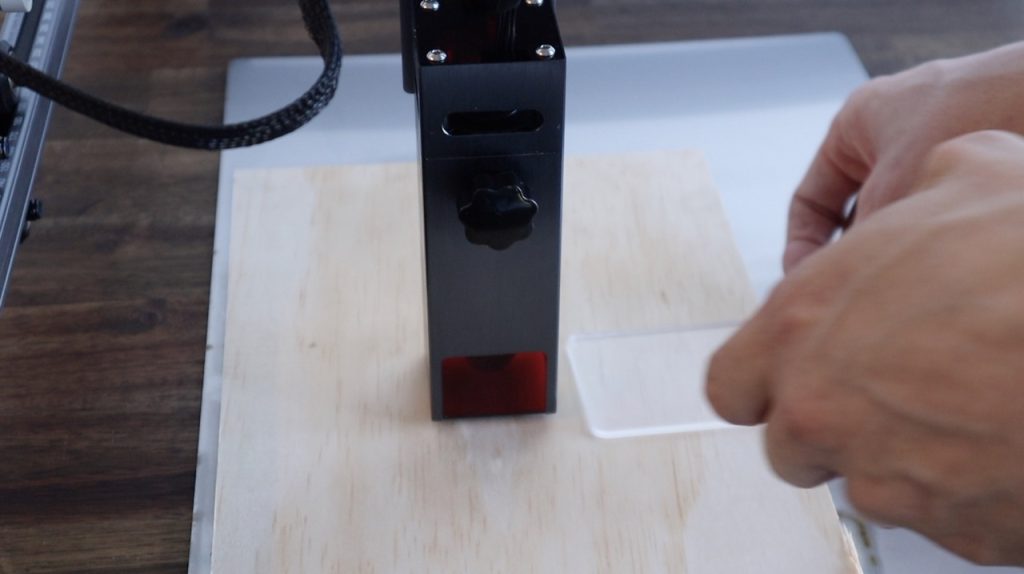
Cutting is pretty simple once you’ve got the hang of it. You’ll need to home the laser, then set the starting location for the cut. You also need to remember to adjust the focus of the laser to suit the material thickness that you’re cutting. This is easily done with the single thumbscrew on the front of the laser module, allowing the laser to be slid up or down on a track on the gantry. You’ll need to use a small piece of acrylic as a spacer between the bottom of the laser and the wood you’re going to be cutting.
You’ll also need to use an extractor fan or work in a very well ventilated room. One downfall of these open gantry designs is that the smoke made when cutting is not contained or filtered in any way. I worked near a large door and had a fan set up to blow the smoke out of the room.
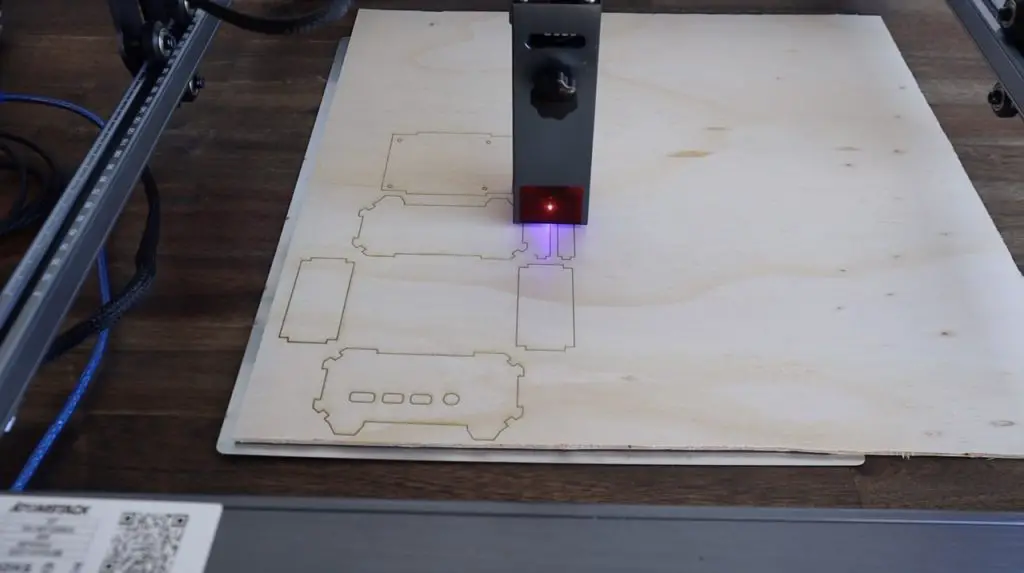
One thing that this laser module does quite well is to blow the air away from the immediate area being cut. The internal cooling fan exhausts air out of the laser end which helps keep the lens clean and the smoke away from the immediate cutting area.
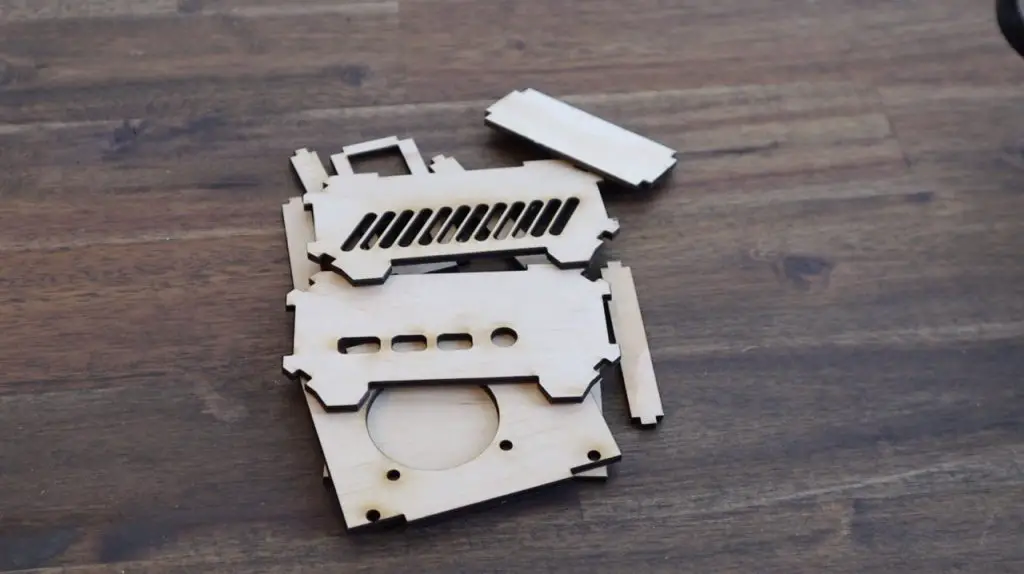
Cutting the plywood for this case in two passes took around 20 minutes to complete.
Assembling The Compact Raspberry Pi Case
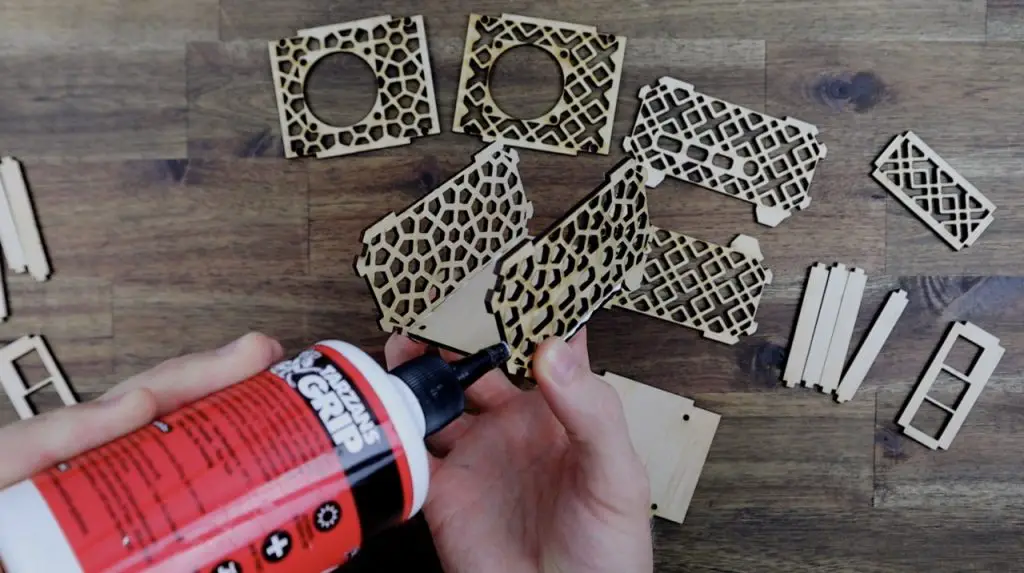
With our case components cut, we can now start assembling it.
I’m just going to be using PVA wood glue to glue the pieces together. The tabs on the sides of each piece interlock to hold them in position and keep the components square, so it’s quite easy to do.
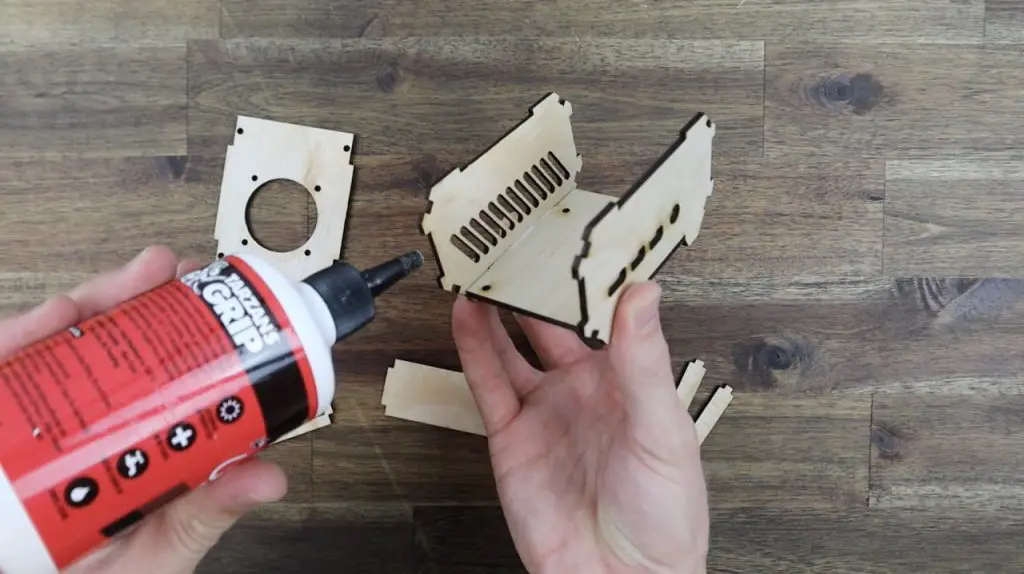
I’m going to first glue the four vertical sides together around the base. I’m also going to use the top cover to help hold them in place and hold them square, but I haven’t used any glue on it.
Once the sides are dry, we can add the 45-degree corner pieces to give it a bit more rigidity and close up the gaps along the edges.
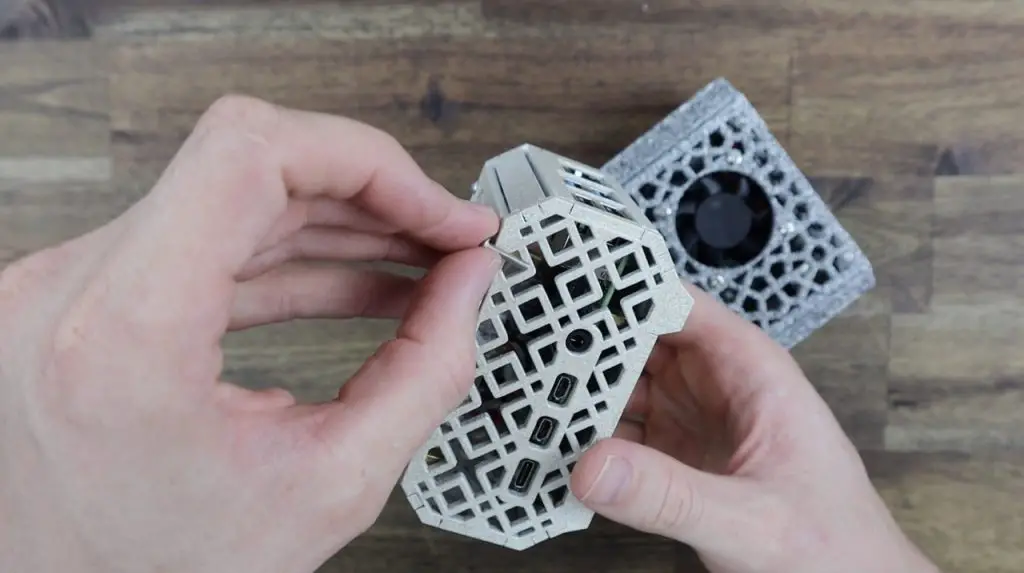
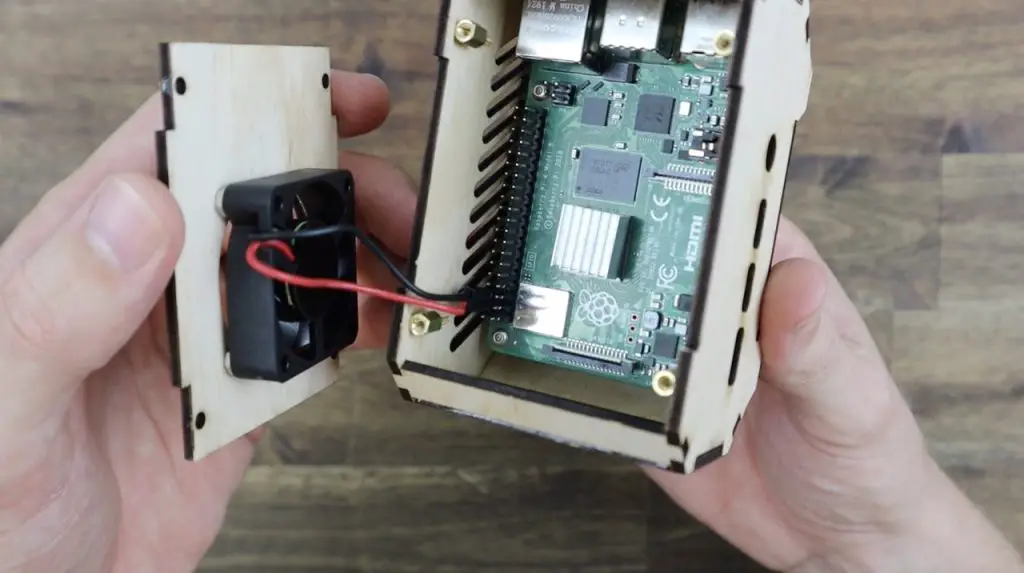
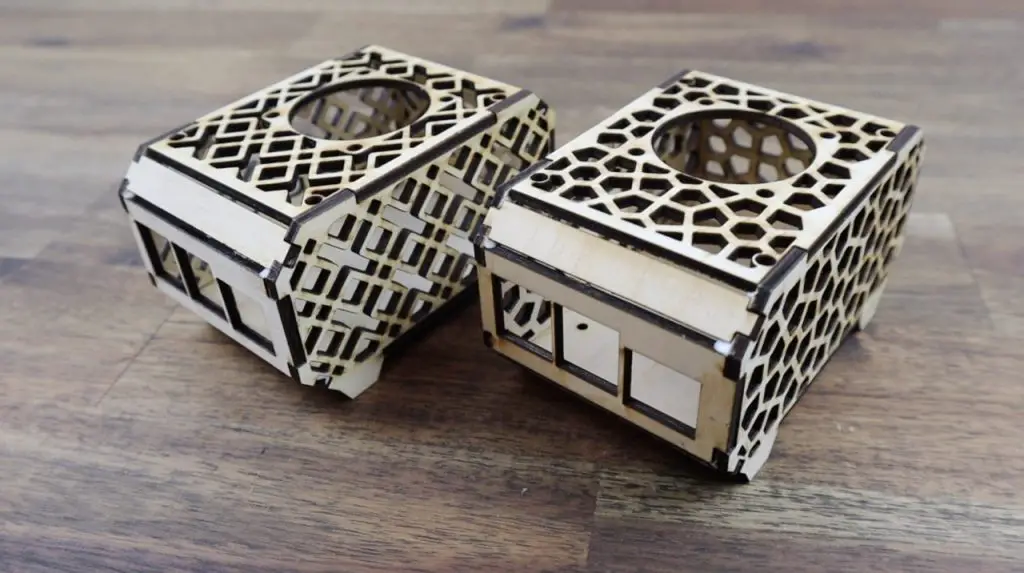
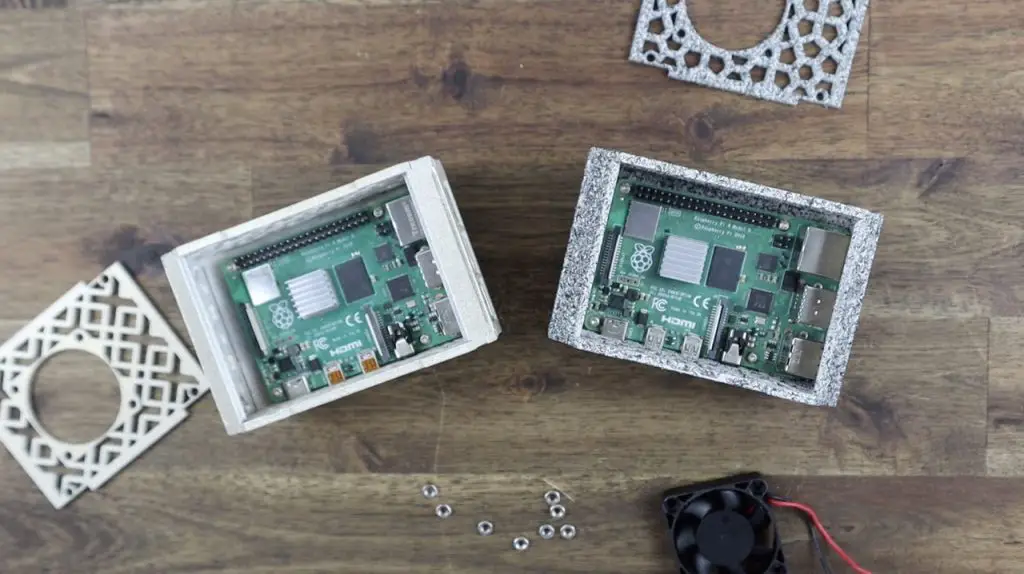
The case is now complete and we can install the Raspberry Pi and fan into it.
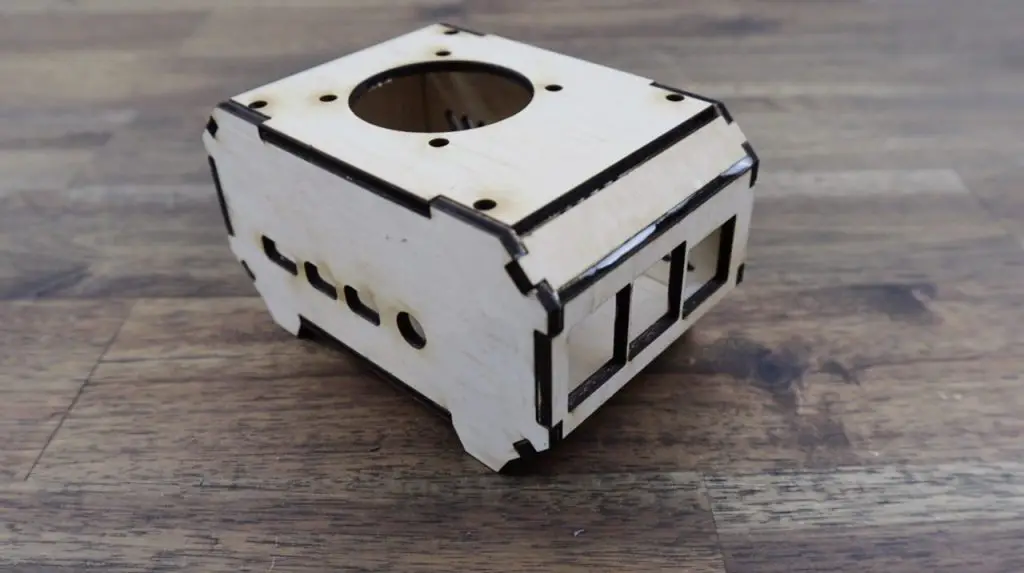
This is just done with four M2.5 x 12mm brass standoffs pushed through the holes in the base and secured with some M2.5 nuts.

The Pi is then held on the standoffs using either some M2.5 x 6mm screws or additional standoffs if you’re going to be using a hat with the Pi.
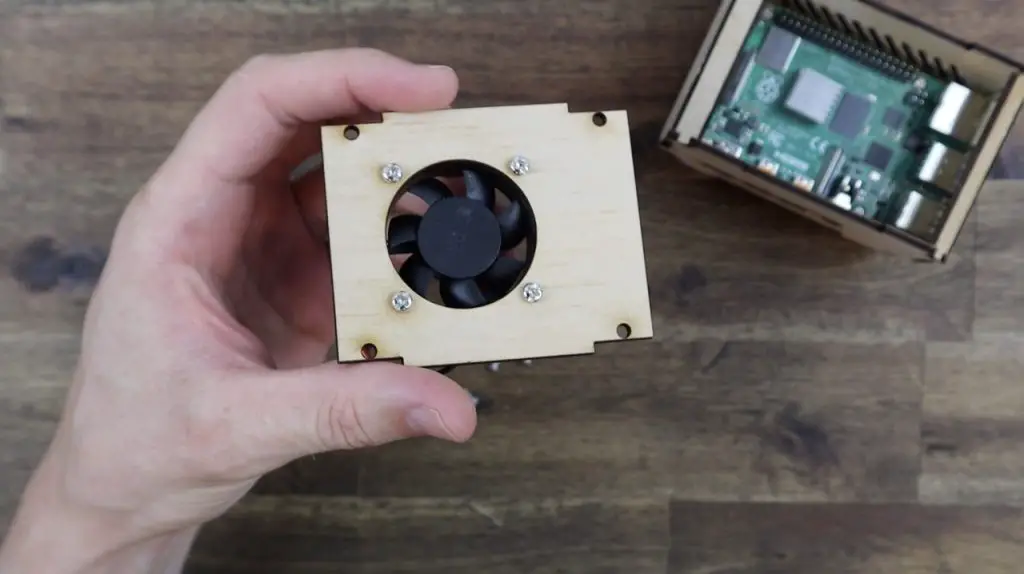
On the top cover, I initially planned on using some M2.5 x 12mm screws and nuts to hold the fan, but the pockets for the nuts are on the wrong side of the fan for the air to be pulled into the case and the screws are too short to go all the way through the fan. So I’m going to have to revert back to pressing some M3 nuts into the pockets and use the screws that came with the fan to secure it.
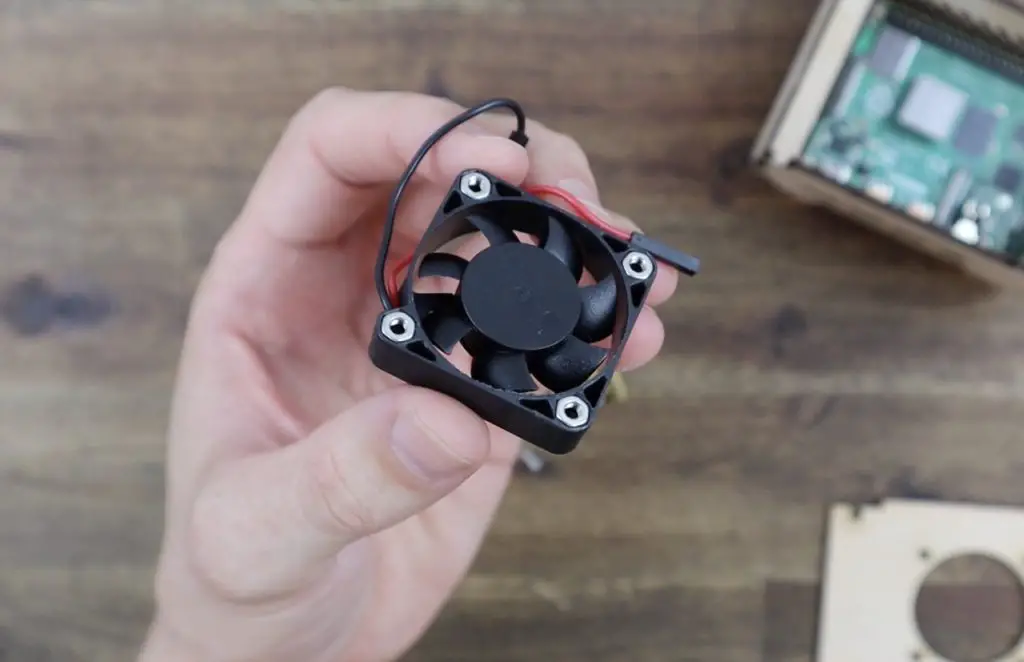
The fan is then held on the top cover using the M3 screws that came with it.
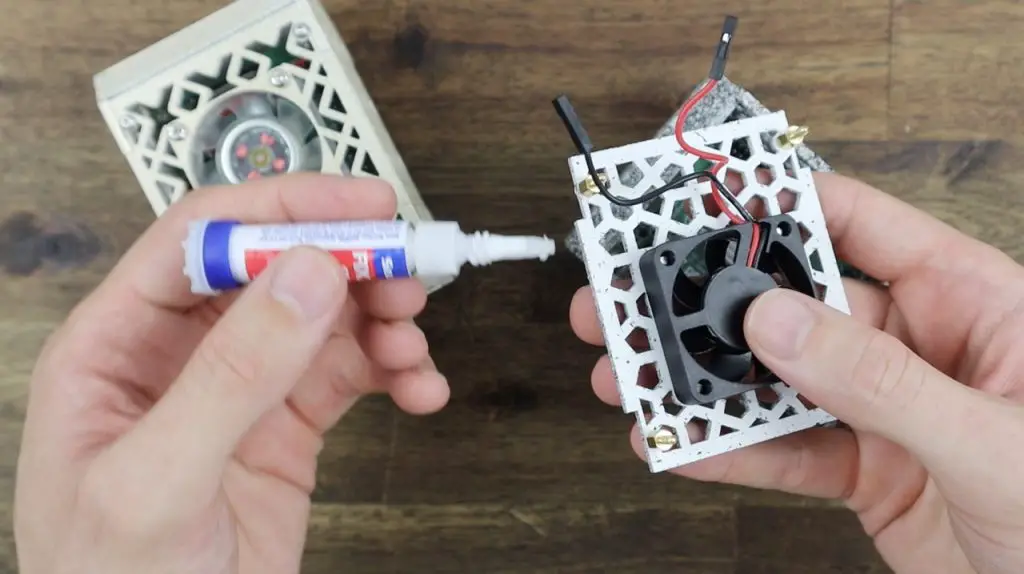
Lastly, I’m going to glue some 6mm brass standoffs to the inside of the side panels. These are needed to hold the top in place with four M2.5 screws. It’s easiest to screw these onto the top cover first, with the flat edge aligned with the edge of the cover. Then put a drop of glue onto each before pushing the cover down into place and allowing the glue to dry before removing the screws. Make sure that the glue doesn’t seep up the side of the standoffs and onto the cover or it might accidentally glue the cover to the case.
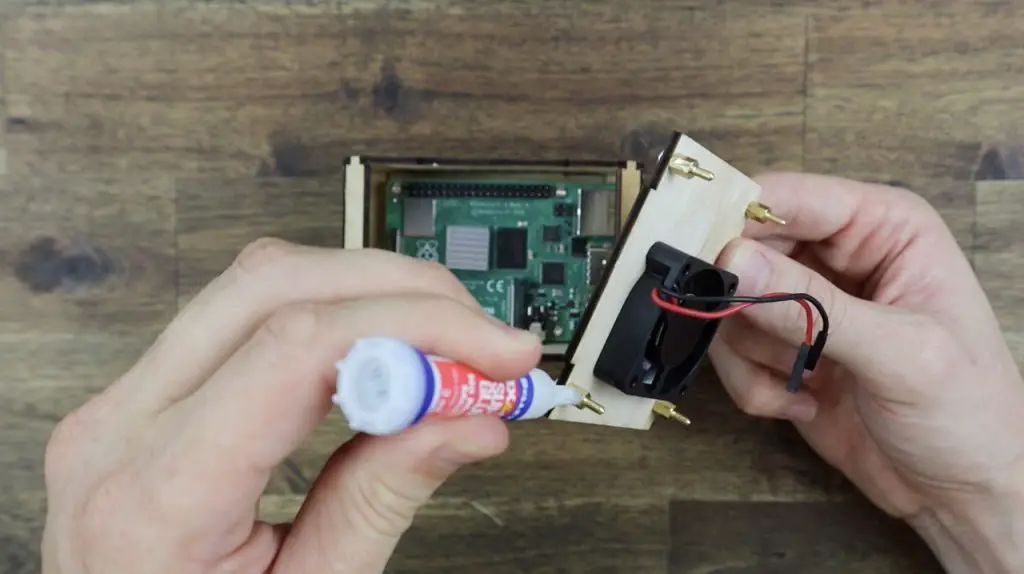
We can then open up the cover, plug the fan into the 5V and GND pins and then close up the case again.
Our basic, compact Raspberry Pi case is now complete. As mentioned earlier, the plywood finish can easily be painted or stained in a colour that suits your project.
Designing & Laser Cutting More Detailed Cases
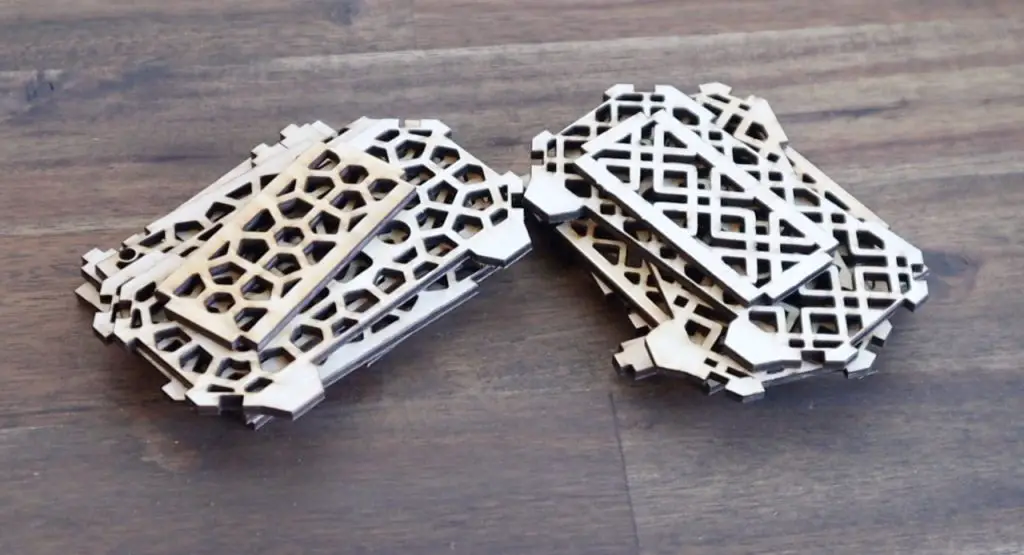
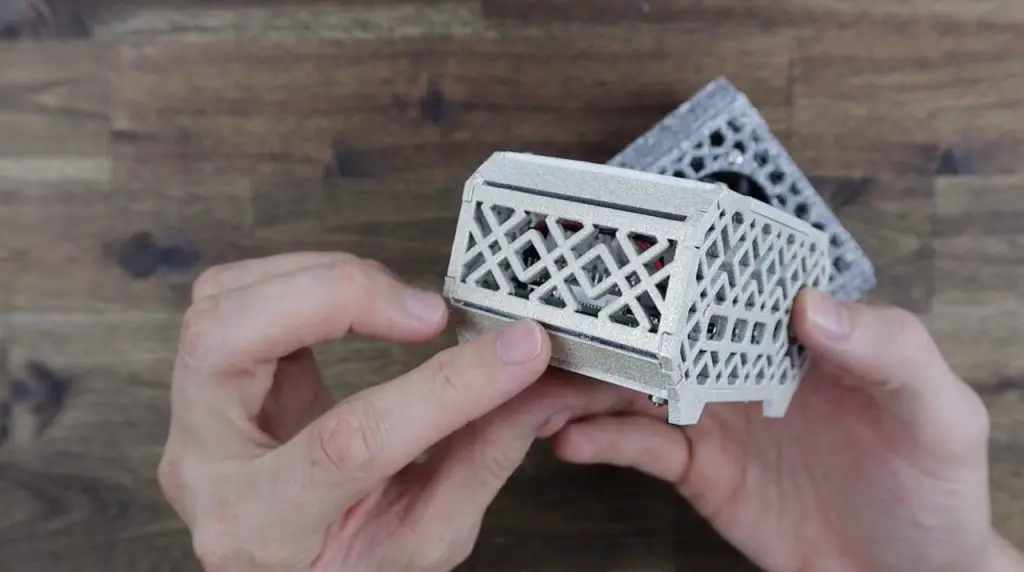
Now, this case looked a bit basic and didn’t really require much effort from the laser, so I decided to try and step the design up a bit and cut a pattern into the top and side panels as well.
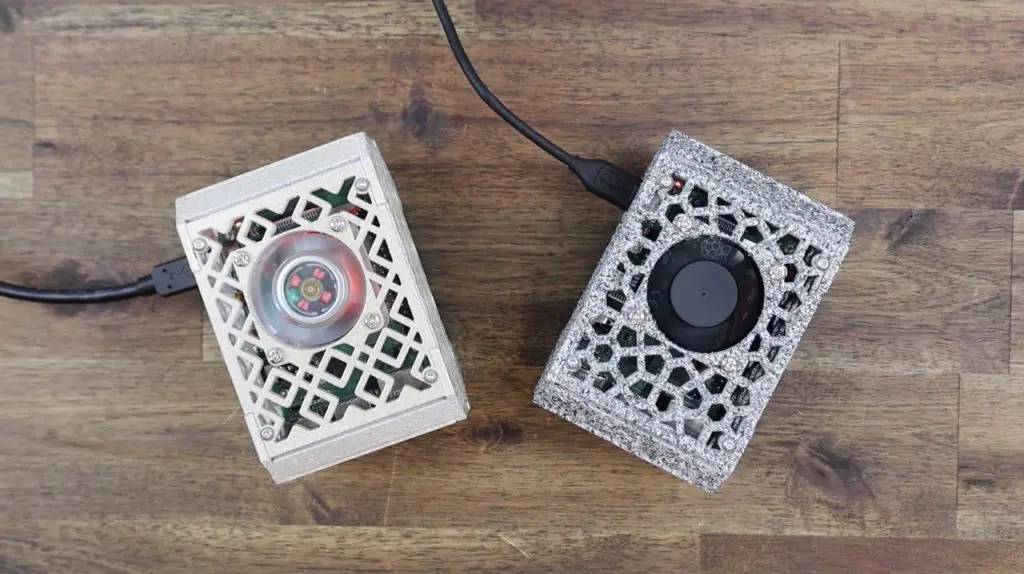
I integrated two patterns into the original design, one with a hexagonal geometric pattern and one with a diagonal line geometric pattern.

This was a lot more work than I thought it would be, and really challenged my Inkscape abilities, but it eventually started to look promising.
So let’s see what the laser can do with these patterned pieces.
And with that, we now have the parts to make two more cases.
Well if I’m honest, it took a few more attempts to get right. More cuts mean more time and more opportunities for things to go wrong, like the laser being bumped while cutting, pieces getting caught on the end of the laser and causing the wood to move and even a bit of variation in the plywood causing the laser not to cut through in the usual two passes.
So my one hour of planned laser cutting turned into 5 hours, but I eventually had all of the pieces I needed to make up the two extra cases.
Painting & Assembling The Detailed Cases
I’m going to glue these two together in the same way as the previous one and I’m then going to paint them.
I’m going to use two speciality spray paints that looked interesting at my local hardware store. I haven’t tried either of them before, but hopefully they come out looking good.
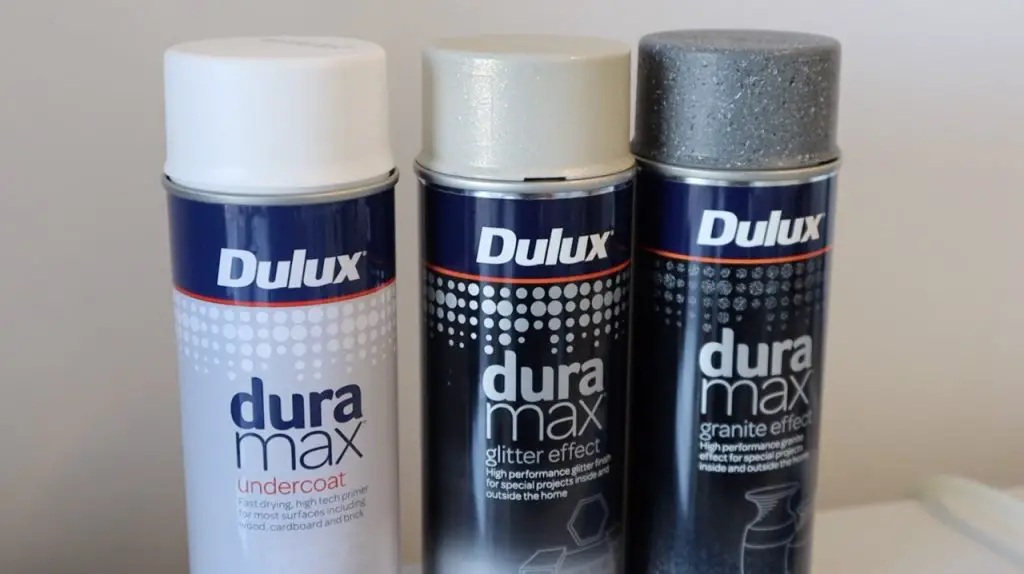
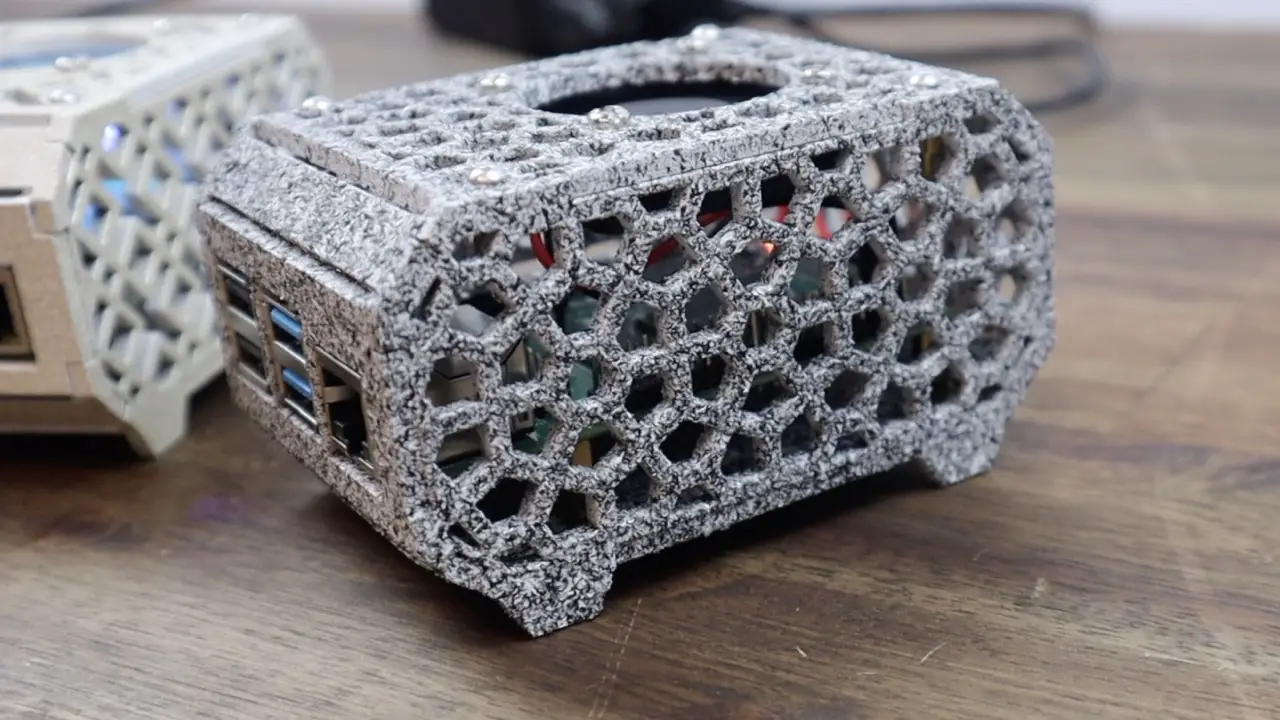
The first is a pearl white colour, which has a bit of a glittered finish to it. The second is a grey, stone finish, which has speckles of black and white in it to create a natural stone appearance.
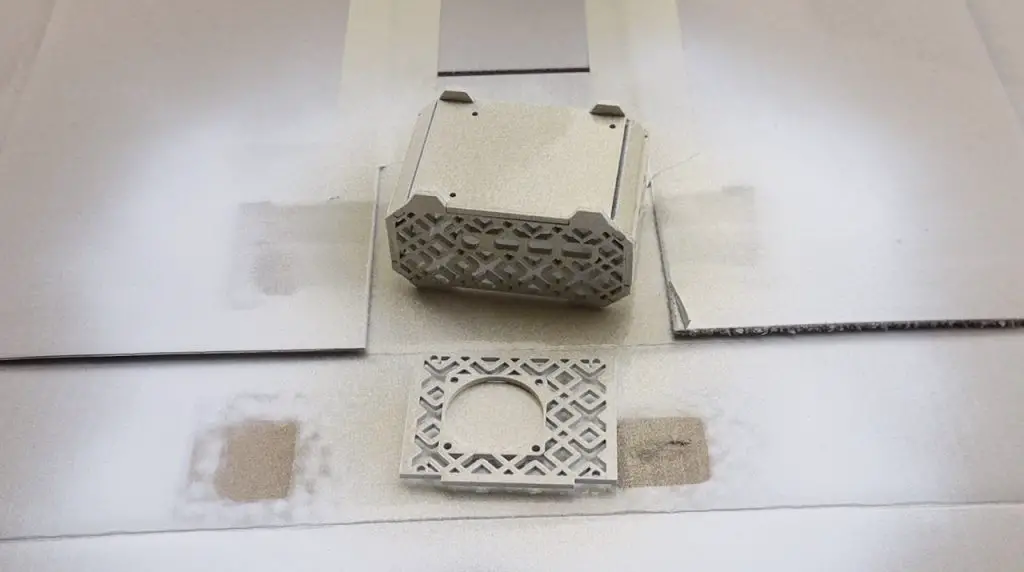
And, since I learned my lesson in the comments section of the last project that I didn’t use a primer or undercoat on, I’m going to be using a white undercoat on both cases before adding the colour.
So let’s give both cases a spray of the white undercoat to start.

After a few hours, the undercoat is dry and we can move on to spraying on the colour coats.
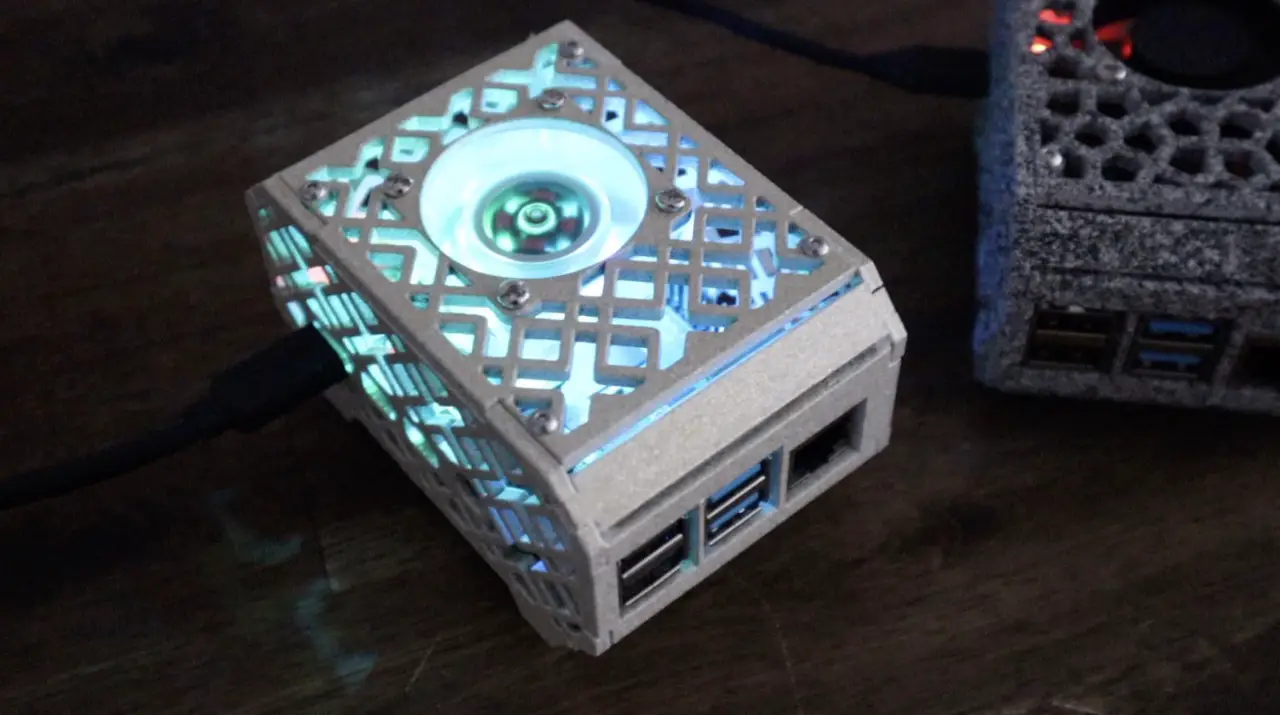
I’m going to start with the glittered pearl white and I’ll be painting the diagonal patterned case with this colour.
Next, I’m going to paint the hexagon patterned case with the grey stone finish. This paint needs 24 hours to dry and is applied quite thick, so I’m going to avoid doing too much around the edges where the top cover goes and I’m not going to do the underside of the top cover. If too much paint builds up in these areas then the lid isn’t going to fit properly anymore.
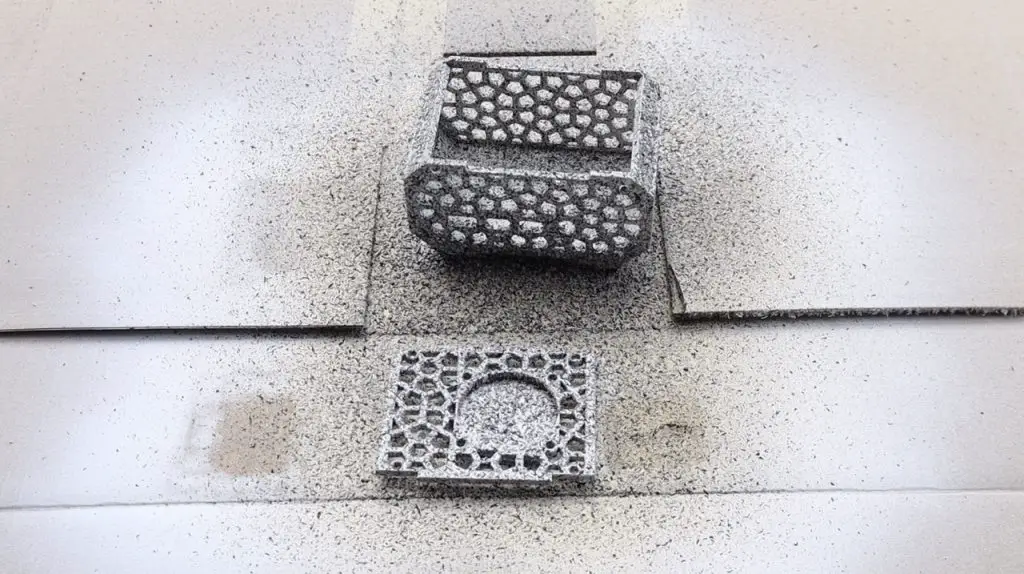
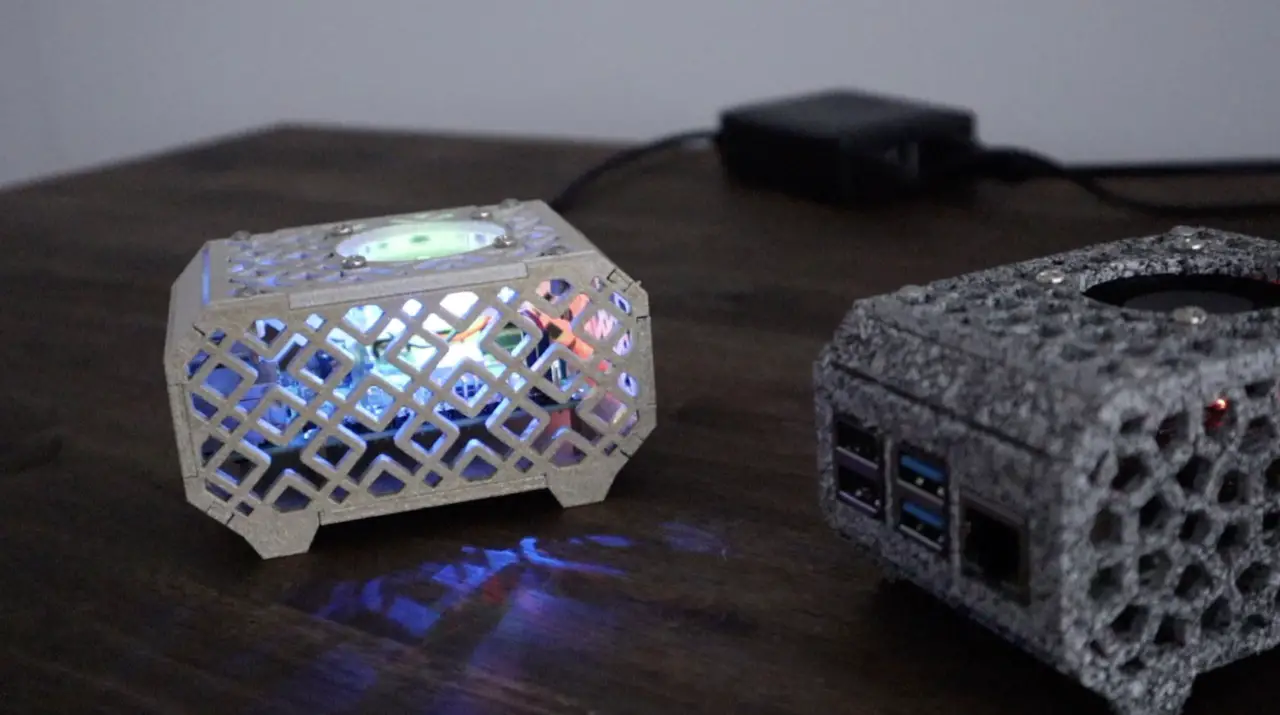
24 hours later, the two cases are ready to install the Raspberry Pis into. I really like the way the pearl white has come out, it looks great with the laser-cut pattern. The glitter effect is quite hard to capture on camera, but it looks really interesting when the light catches the edges.
The stone finish also looks great, it just took a really long time to dry. I’m glad I used the white undercoat with this paint as I think it would have come out too thick if I had tried to cover up the bare wood.
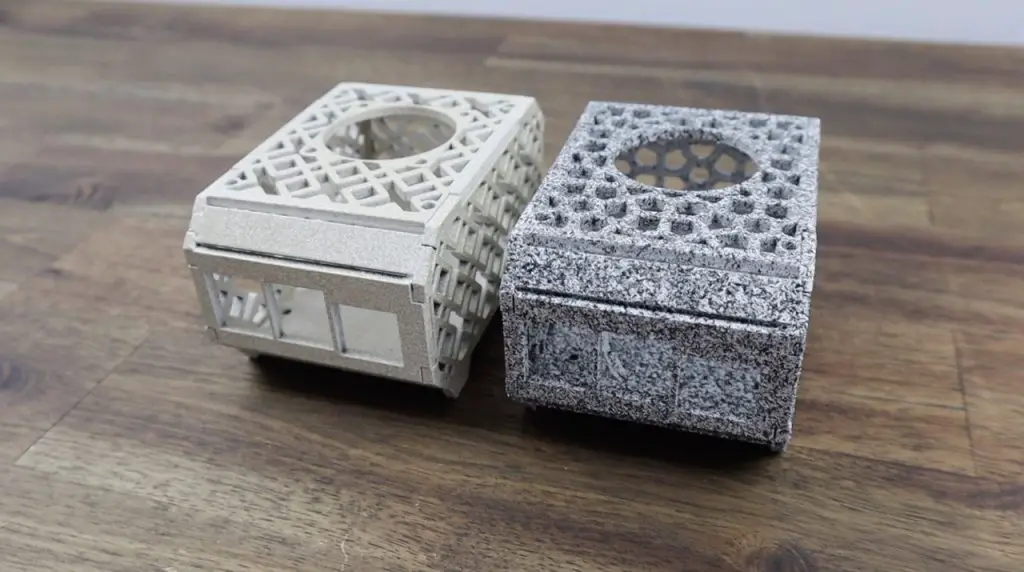
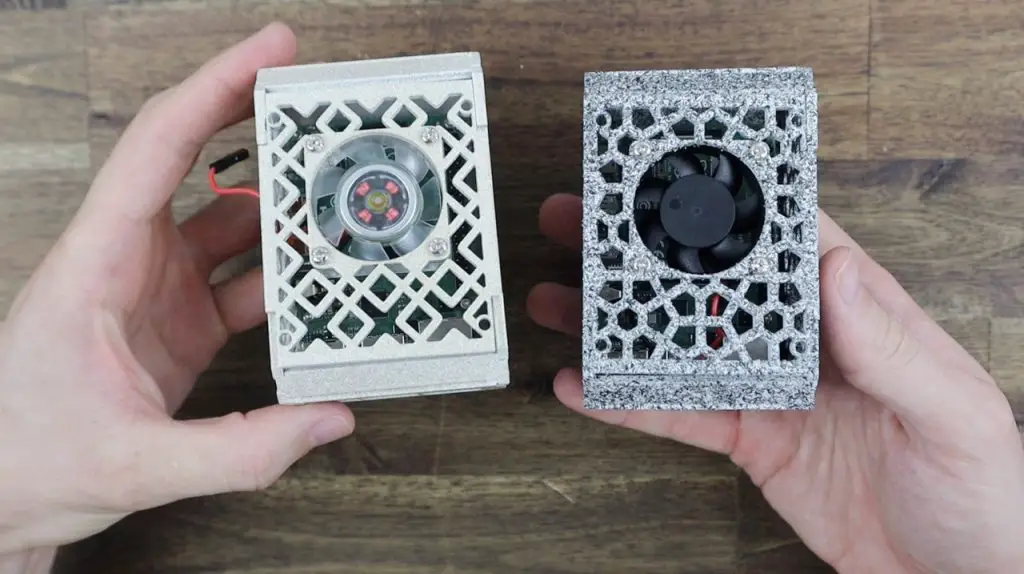
I’m going to install a plain black fan on the grey stone finish case and a clear RGB fan on the pearl white coloured case.
As with the previous plain case, the Pi’s are secured with some M2.5 x 12mm brass standoffs and some M2.5 x 6mm button head screws.
The fans are screwed onto the top cover with the included screws and some M3 nuts pressed into the pockets.
The top covers are secured with some M2.5 brass standoffs glued to the sides of each case and some M2.5 x 6mm screws to hold each in place.
That’s it, our two detailed cases are now completed. Although the general shape is the same, they look really different now that they’re finished off.
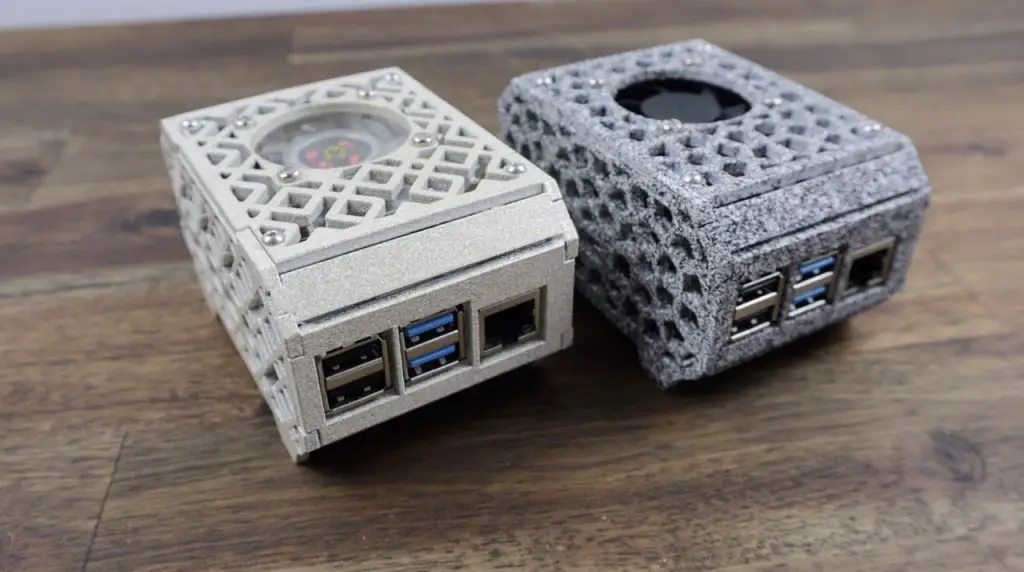
I also like how you can partially see into the cases and you can also see the Pi’s LEDs.
Final Thoughts On The Atomstack X7 40W And The Complete Cases
Overall I think that the Atomstack X7 40W is a good value for money, high-quality diode laser cutter and engraver. I really like the build quality and all-metal construction and the full-colour touch control panel makes it a breeze to use without a computer – something that most machines in this price range don’t have. The X7 40W is perfect for cutting and engraving woods and opaque plastics, but you’ll need to look at a CO2 laser if you’re wanting to cut clear materials. Be sure to have a look at the Atomstack website to get your own Atomstack X7 40W.
Let me know what you think of the two cases in the comments section below. Do you like the laser cut patterns on the sides? They obviously open the case up to a bit more dust, but they still provide a lot more protection to the Pi than just having the Pi exposed.
I think for future versions, I’d probably add an SD card slot into each of them to make it a bit easier to swap out the cards.
I’d also like to re-look at the screws that hold the lid in place. It would probably be better to design slots in the sides for the screws to screw into and do away with the brass standoffs entirely.