Home Blog Page 25

The Five Most Common iPhone Repairs You Can Do Yourself

With iPhone’s becoming so expensive, people are holding onto their older models a bit longer than they used to. It’s not uncommon for someone to keep an iPhone for 4 or 5 years before considering a replacement. Unfortunately, because we use our mobile phones on a daily basis, you’re probably going to land up breaking something on your iPhone, either through a drop or just general wear and tear. Instead of having to get a new phone, we’ve put together a list of the four most common iPhone repairs which you can do yourself without having to spend a fortune on parts or tools. You could even look for an old damaged iPhone online and repair it yourself to get yourself a good deal on a newer model phone or to make some extra money on the side.

While you need to be reasonably competent with a screwdriver and have some basic DIY knowledge, you don’t need to be an expert with mobile phones to be able to carry out these repairs.

So lets have a look at the five most common iPhone repairs which you can do yourself.

1) Replacing A Broken, Cracked or Shattered iPhone Screen

This is by far the most common repair which you may need to do to your iPhone, and also one of the most expensive to get done by a repair shop. It’s actually a relatively easy repair to do yourself and it has become even easier on the newer model iPhones, as there are fewer components mounted onto the screen since they’ve done away with the touch ID sensor.

All you need for this repair is a replacement screen kit, available online from sites like E-Bay and Amazon. These replacements are often sold with a small toolkit to help you out with the repair and while these are not the best quality tools, they’re usually good enough to do the repair once or twice.

Here are our guides to replacing the screens on some common iPhone models. Depending on your iPhone model, this repair should take you between 30 to 45 minutes to complete.

2) Replacing Your iPhone’s Battery

The second most common iPhone repair is a battery replacement. While this one is not usually due to a drop or misuse, your iPhone’s battery slowly degrades with time and charging to the point where it only lasts a few hours before needing to be recharged or dies completely. In iOS 11.3 or later, you can find information on your iPhone’s battery health under settings, we’ve put together a guide on understanding what your iPhone’s battery health means.

A replacement battery is relatively cheap to buy online and its one of the easiest components to replace. The battery in your phone is held in place by two thin adhesive strips between the battery and the back (body) of your phone and simply plugs into the logic board with a small ribbon cable connector which snaps into place.

Here’s a guide to replacing the battery in an iPhone 6. The procedure very similar for other iPhone models as well. This replacement should take you around 10 to 15 minutes depending on how difficult you find it to remove your old battery.

Once you’ve replaced your iPhone’s battery, make sure that you prolong your replacement battery’s life by charging your iPhone battery the right way.

3) Replacing Your Home Button (Touch ID Sensor)

On older iPhone models, especially the iPhone 5 and 6 models, it was fairly common for the home button to eventually fail. The touch ID sensor still worked but the button behind it, used to return to the home screen and close apps, stopped working. This can be really frustrating to work with and is quite a common reason for people getting rid of an old iPhone.

This repair unfortunately offers a choice between two options, keep your touch ID sensor or keep your home button. The touch ID sensor is paired to your iPhone’s logic board for security reasons and therefore can only be officially changed by Apple. This doesn’t stop you from replacing your home button though, so if you’d prefer to keep your home button functioning (at the expense of losing touch ID) then this is a worthwhile repair.

The replacement home button is really cheap, often a couple of dollars and it’s quite a simple replacement to do, taking around 15 minutes to complete.

4) Replacing Your Lightning Charger Port

The last two repairs are a little bit more complicated and you’ll need to be careful with surrounding components and patient in carrying out the repair. You’ll likely be charging your iPhone almost every day, and with music docks, Apple Carplay and wired headphones, your lightning port gets a fair amount of use and may eventually stop working, leaving you unable to charge your phone.

A replacement lightning charger port assembly is relatively cheap but it is quite a bit more complicated and takes a lot longer than some of these other repairs. That said, it can still be done at home and you may find it worth it to keep your old phone going a bit longer.

Here’s a guide to replacing the lightning charger port assembly on an iPhone 6.

5) Replacing Your Volume and Mute Button Assembly

The volume buttons on your iPhone usually last for the full life of the phone, but the mute button tends to eventually wear loose and doesn’t stay in the muted or normal position. A cheap volume and mute button replacement assembly can be bought online which replaces the three buttons behind the physical buttons you see on the outside of the phone. This is one of the cheaper repairs on the list but probably the most difficult and the one which takes the longest as you’ll need to remove the battery from your iPhone as well in order to get to the bracket which holds the buttons in place.

Here’s our guide to replacing the volume and mute button assembly on an iPhone 6.

There are a couple of other less popular repairs which you can do on your iPhone, have a look at our iPhone repairs section for a full list of repair guides we’ve done.

If you enjoyed reading about these repairs, you may be interested in these 5 Secret iPhone Codes You Didn’t Know About or find out how to Charge your iPhone Battery the Right Way.

Philips Hue Play Light Bars Unboxing and Review

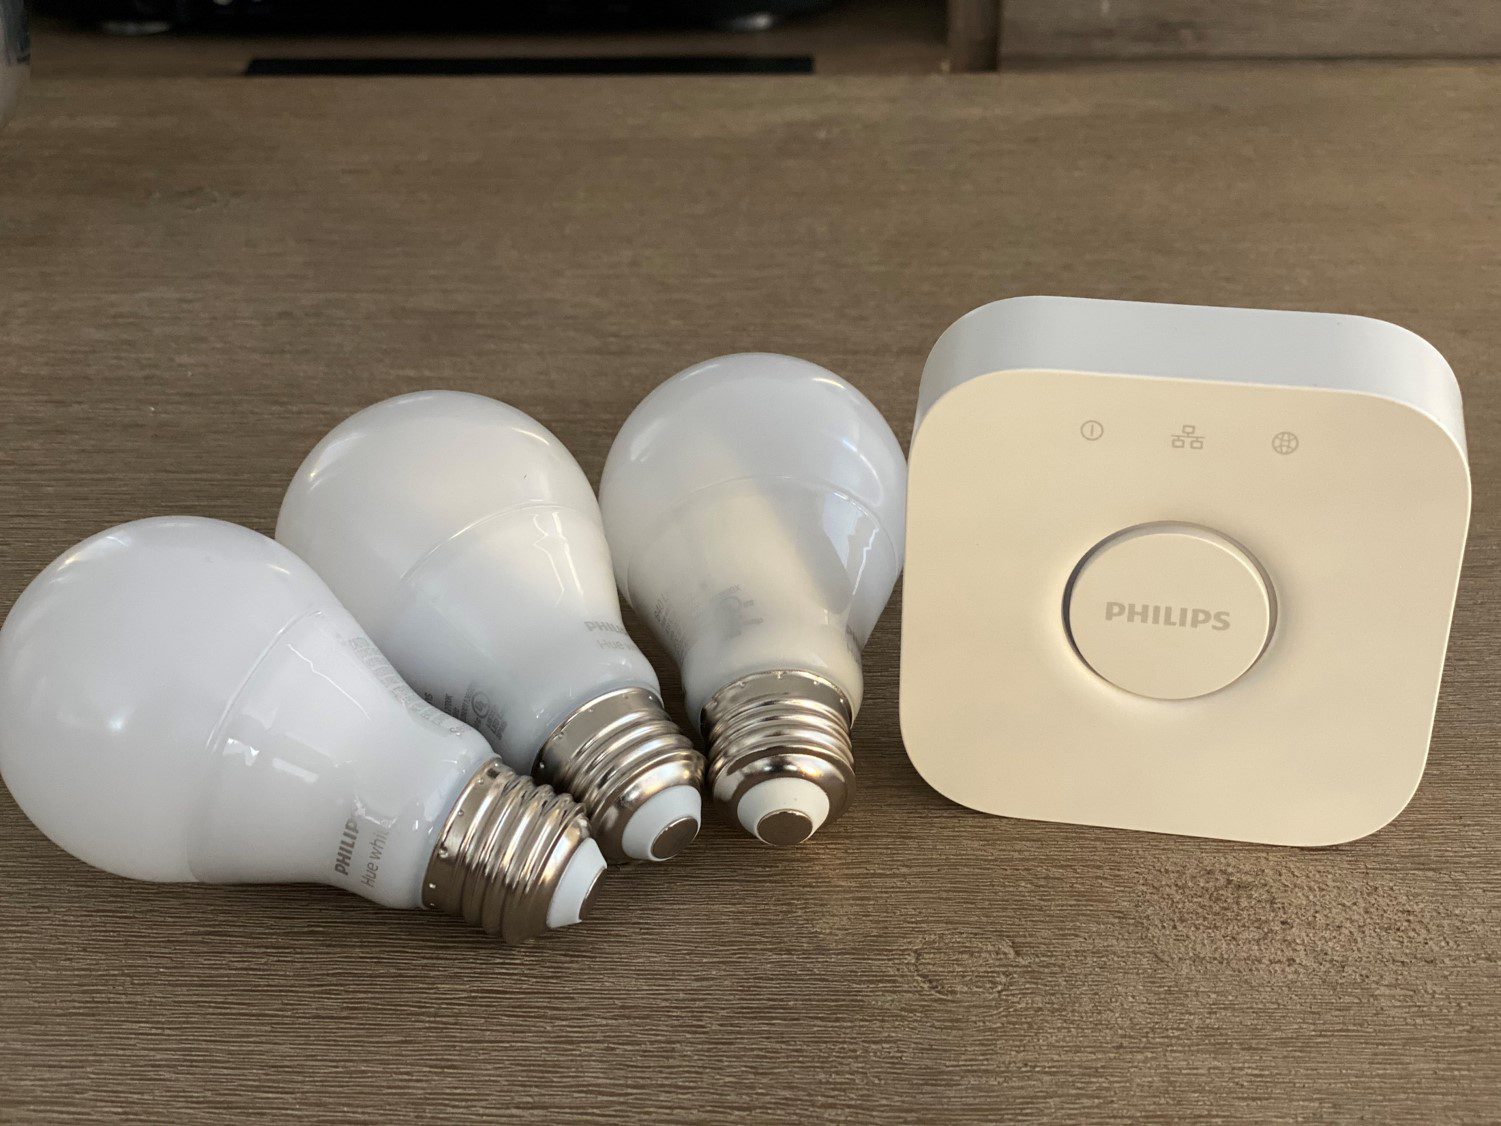
I got into the Philips Hue lighting system around two years ago, mainly because I was looking for a way to add a timer system to some lights around my home, which would also allow them to be controlled remotely. I’ve been pleasantly surprised by how well they’ve integrated into my home. I found myself buying a couple more bulbs shortly after getting the first ones, and my Philips Hue ecosystem has steadily been growing from there. Fast forward to a few weeks ago and I decided to try out the Philips Hue Play Light Bars to bring some colour to my living room, so here’s my experience unboxing and using them, including some great features and a couple of frustrations.

I picked up the Philips Hue Light Bars from Amazon for $85 on a sale, they typically retail for around $130. As with the other Philips Hue lighting equipment, they are quite expensive for what they are, and there certainly are cheaper options available, but I’ve found that the system works incredibly reliably, is really easy to setup and use and I’ve yet to have a bulb or switch fail.

Let have a look at the Philips Hue Play Light Bars…

Where To Buy Philips Hue Lighting

I’ve found that Amazon seems to stock the widest range and at pretty good pricing. They’re only usually beaten on their pricing if a store is running a good sale or special offer.

Here are some affiliate links to the products I’ve been using:

Unboxing the Light Bars

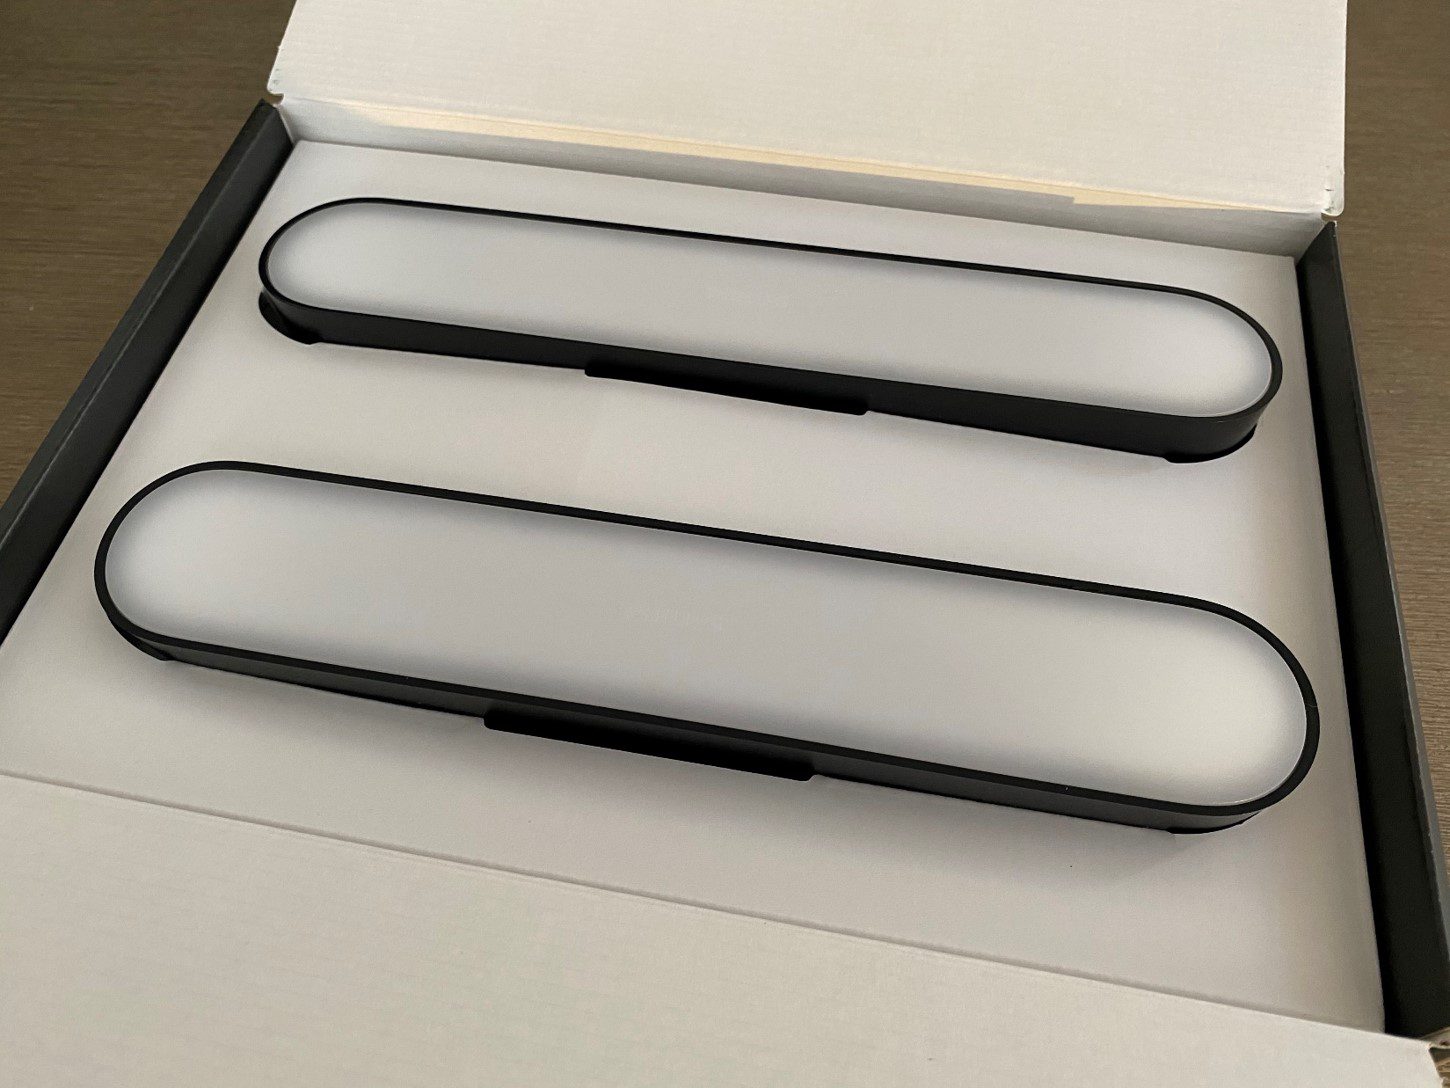
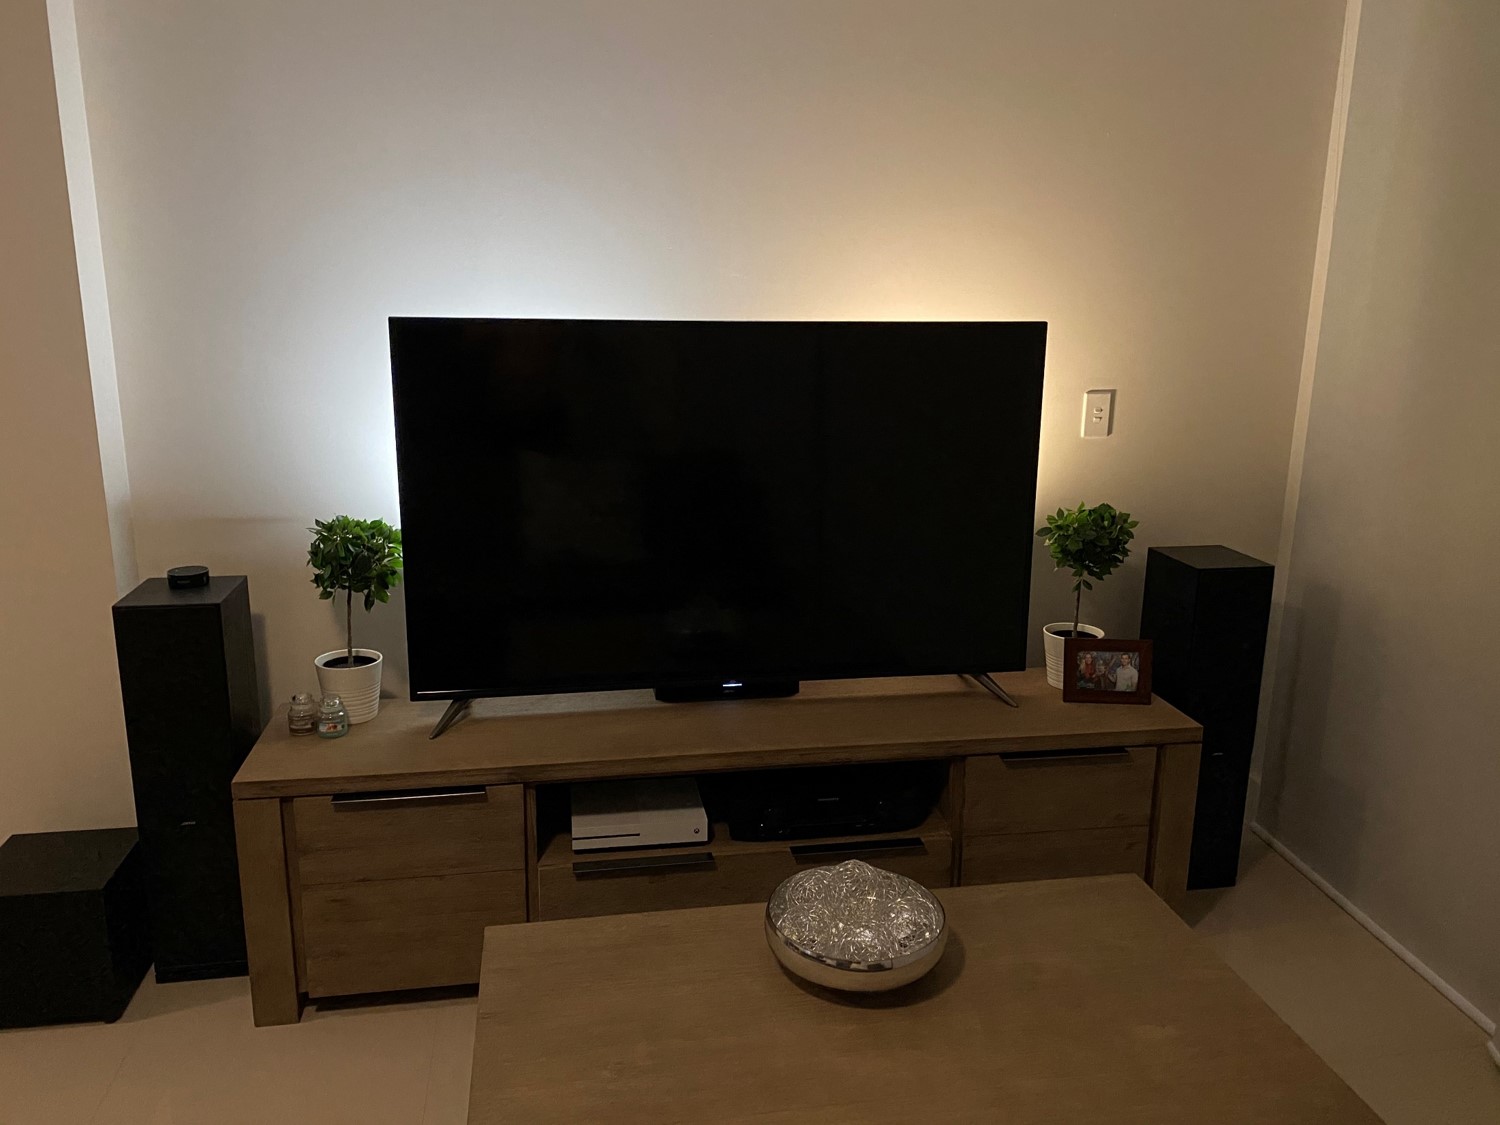
The Philips Hue Light Bars come in either an individual bar or as a bundled pack of two. I got the pack of two, which seemed like the best solution to be mounted behind my TV. I feel like it’s important to mention that while I bought them to mount onto my TV, they are primarily going to be used for ambient lighting and not for their TV sync capabilities. I’ve discussed this in more detail further on as it is one of the downfall of these light bars for the time being.

Philips Hue Play Light Bars Box

The box is a typically colourful Philips Hue box about the size of a shoe box with a couple of different lighting scenes on the back along with some technical information.

Philips Hue Play Light Bars Back Of Box

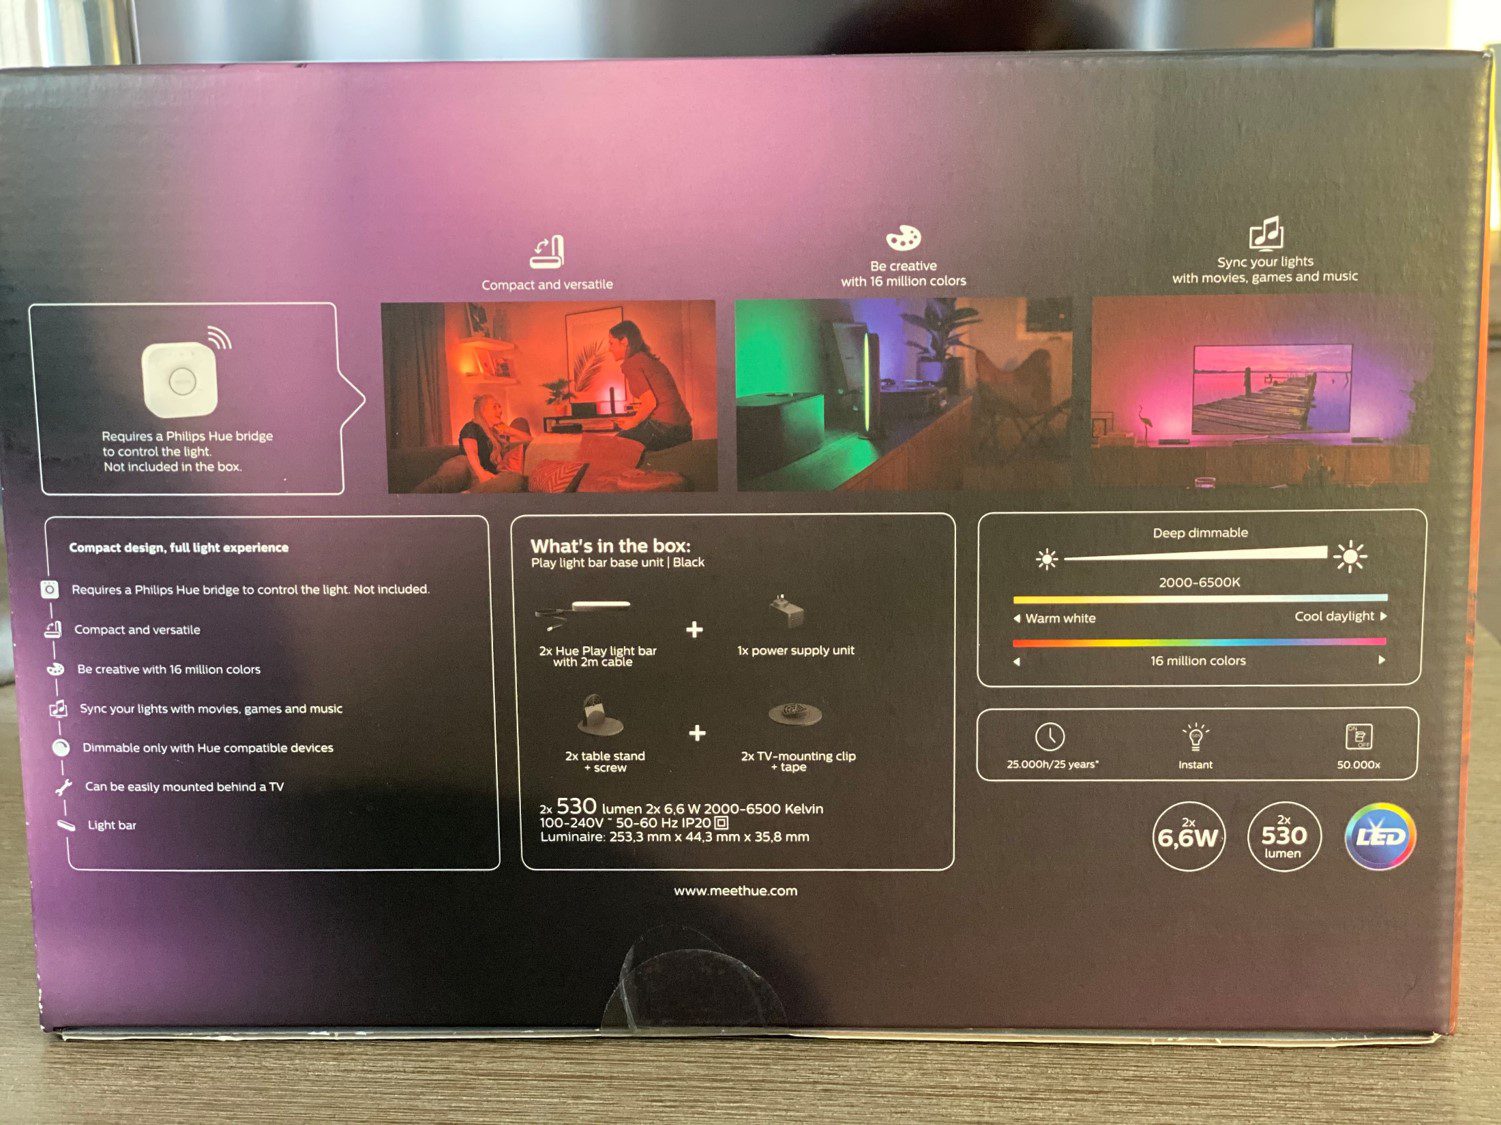
Technical Specifications

  • Power: 6,6W Each
  • Voltage: 100-240V, 50-60Hz
  • Illumination: 530 Lumens Each
  • Lifespan: 25,000 hours (Philips equates to 25 years of use)
  • Switching Cycles: 50,000
  • Colour Range: 16 Million Colours
  • White Temperature Range: 2000-6500K (Warm White to Cool Daylight)
  • Requires A Hue Bridge to control

What’s In The Box

Opening up the lid of the box reveals a basic set of instructions which should be sufficient to get a tech savvy individual up and running. They also provide links to more information, which help out if you run into trouble.

Philips Hue Play Light Bars Lid Open

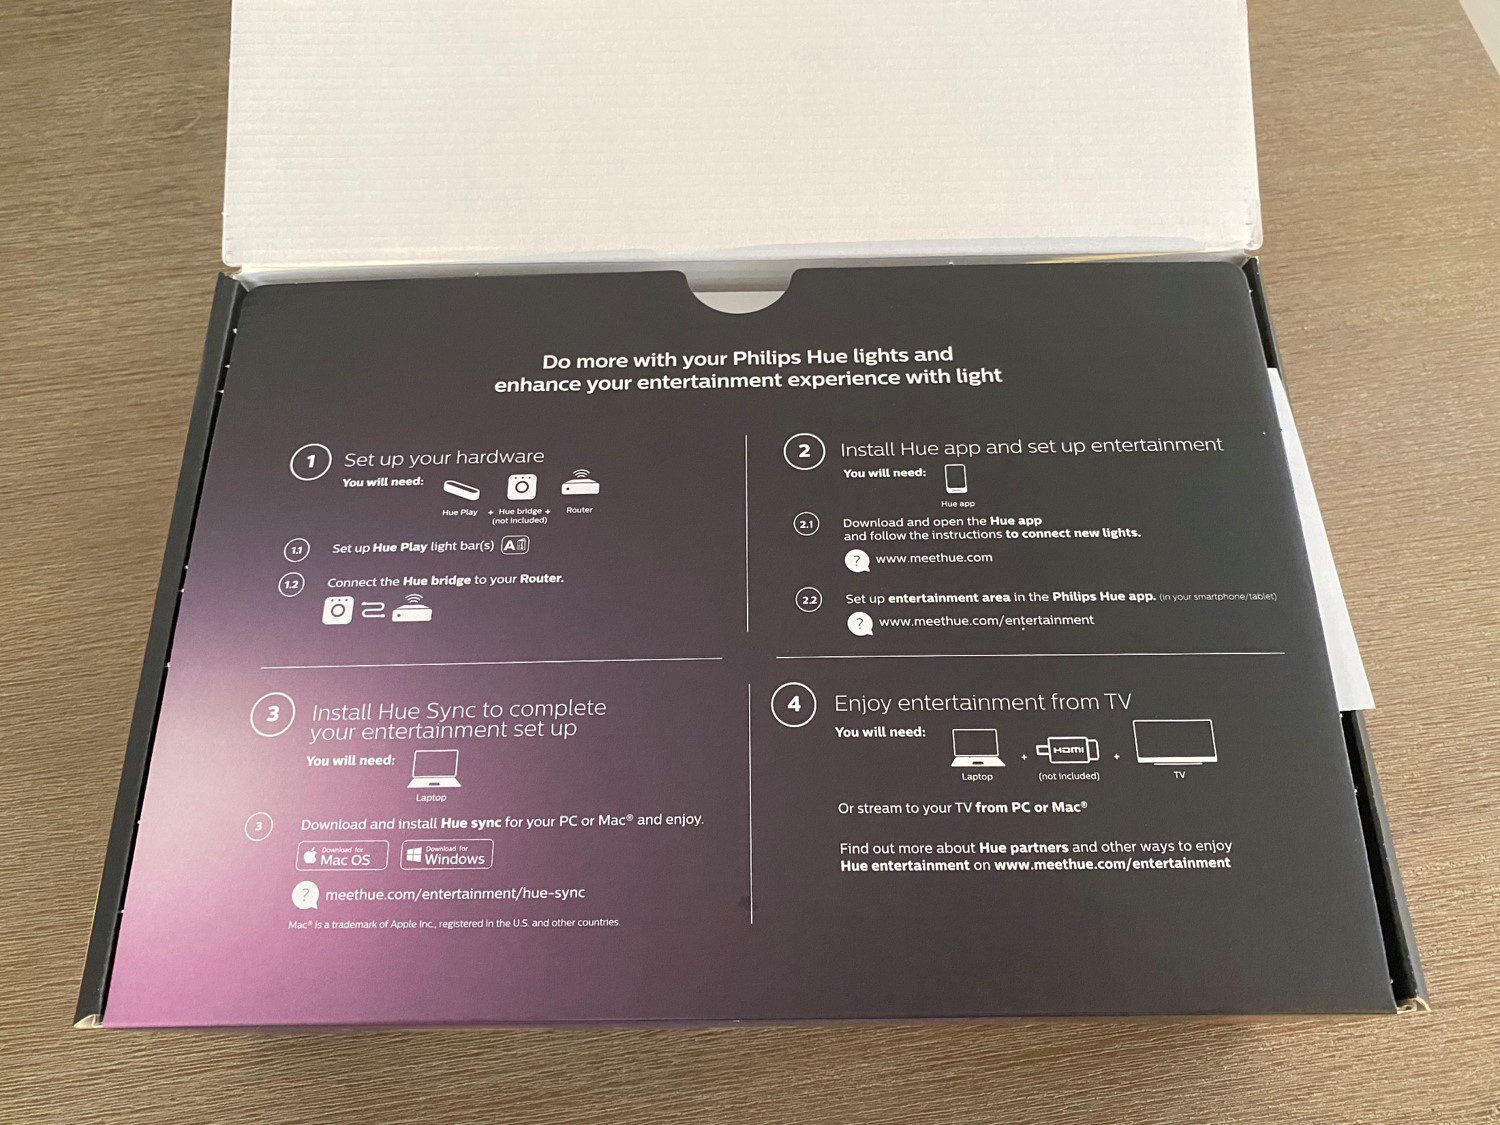
Folding this instruction panel away reveals the two light bars, which were a bit smaller than I was expecting. The packaging of the bars is neat and I understand what they were going for but it can be a bit frustrating to unpack. The bars are pretty well held in place, with the thin power cords wrapped into the backing sheet and no pull tab to lift them out or pull the cardboard insert out of the box. You kind of have to fiddle around a bit to pull them out enough to get the rest of the packaging out without pulling too much on the power cables. Maybe I’m just being overly critical, but a simple tab or lift here/pull here arrow or sticker would have made unboxing a bit easier.

Philips Hue Play Light Bars Open Box

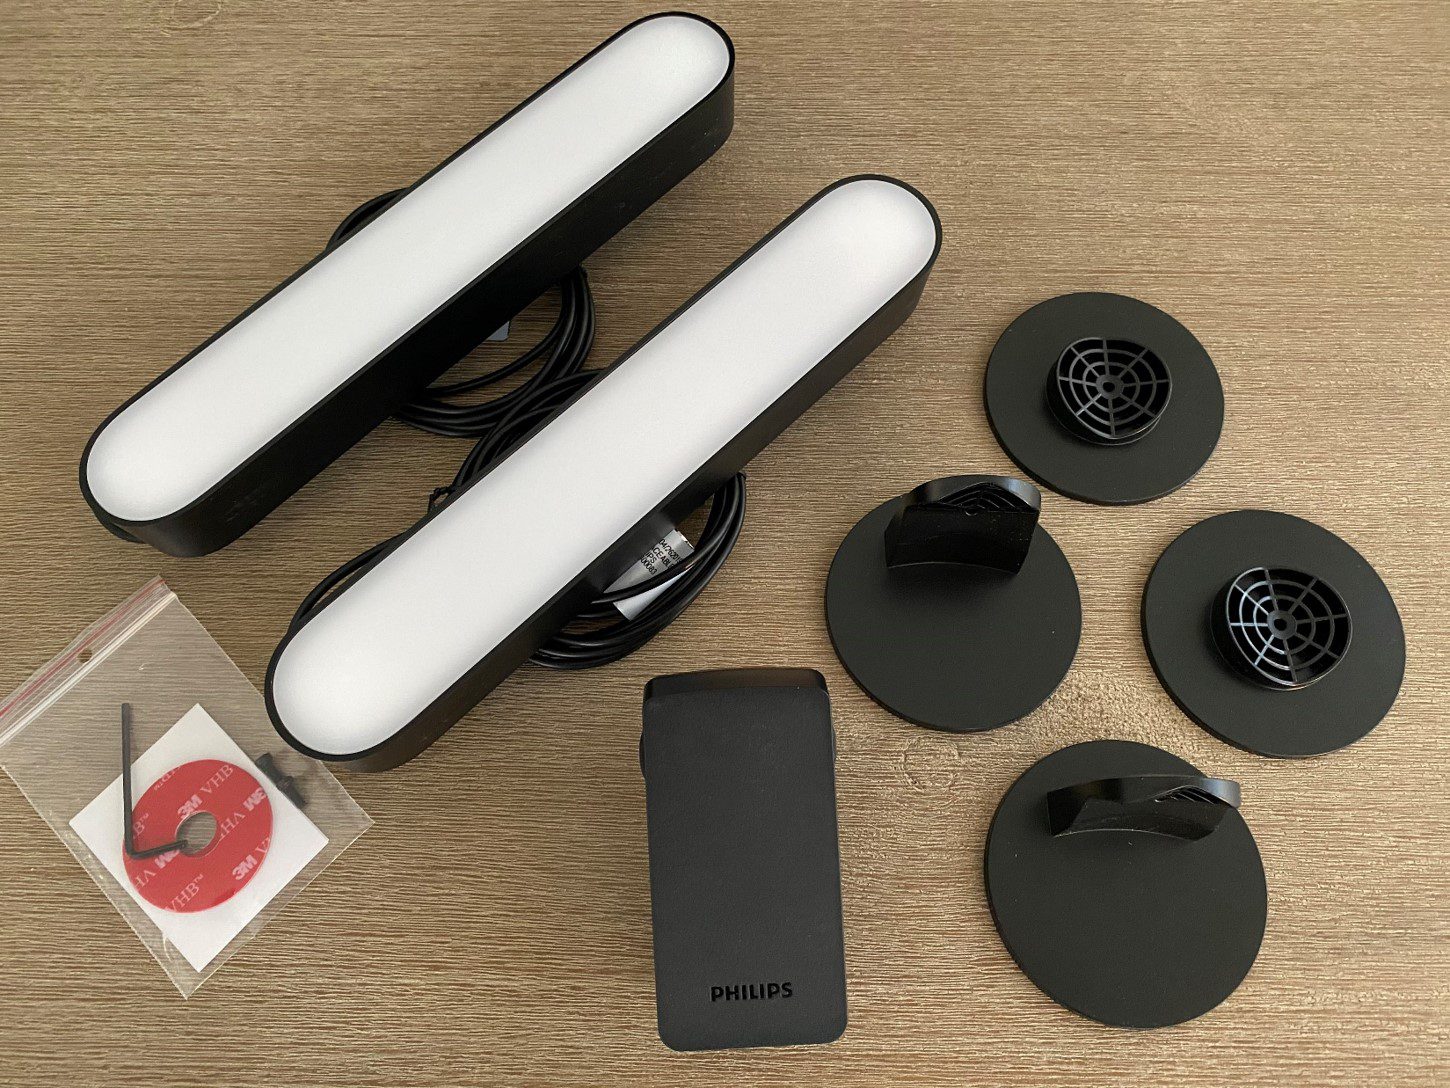
Inside the box are the two bars, the power adaptor (which can power up to three bars), two vertical stands, two horizontal stands, an allen/hex key and screws, two double sided stick on discs and two information guides.

Philips Hue Play Light Bars Contents

The information guides are typically brief with links to more detailed information. I had no problem setting up the bars and pairing them to my bridge, app and switches. The app and interface is really intuitive but I can see how someone who’s not too familiar with technology may struggle a bit.

I also think they could have included a second set of double sided adhesive discs. If you change your mind about the positioning, get a new TV or move home then you’ll need to buy another set of discs to stick the stands on with, and given that they claim that the lights will last around 25 years, this seems pretty likely.

Installation & Pairing To The Hue Bridge

The installation of the light bars is quite easy as well. You’re given two sets of mounting stands, one vertical and one horizontal.

Philips Hue Play Light Bars On Vertical Stands

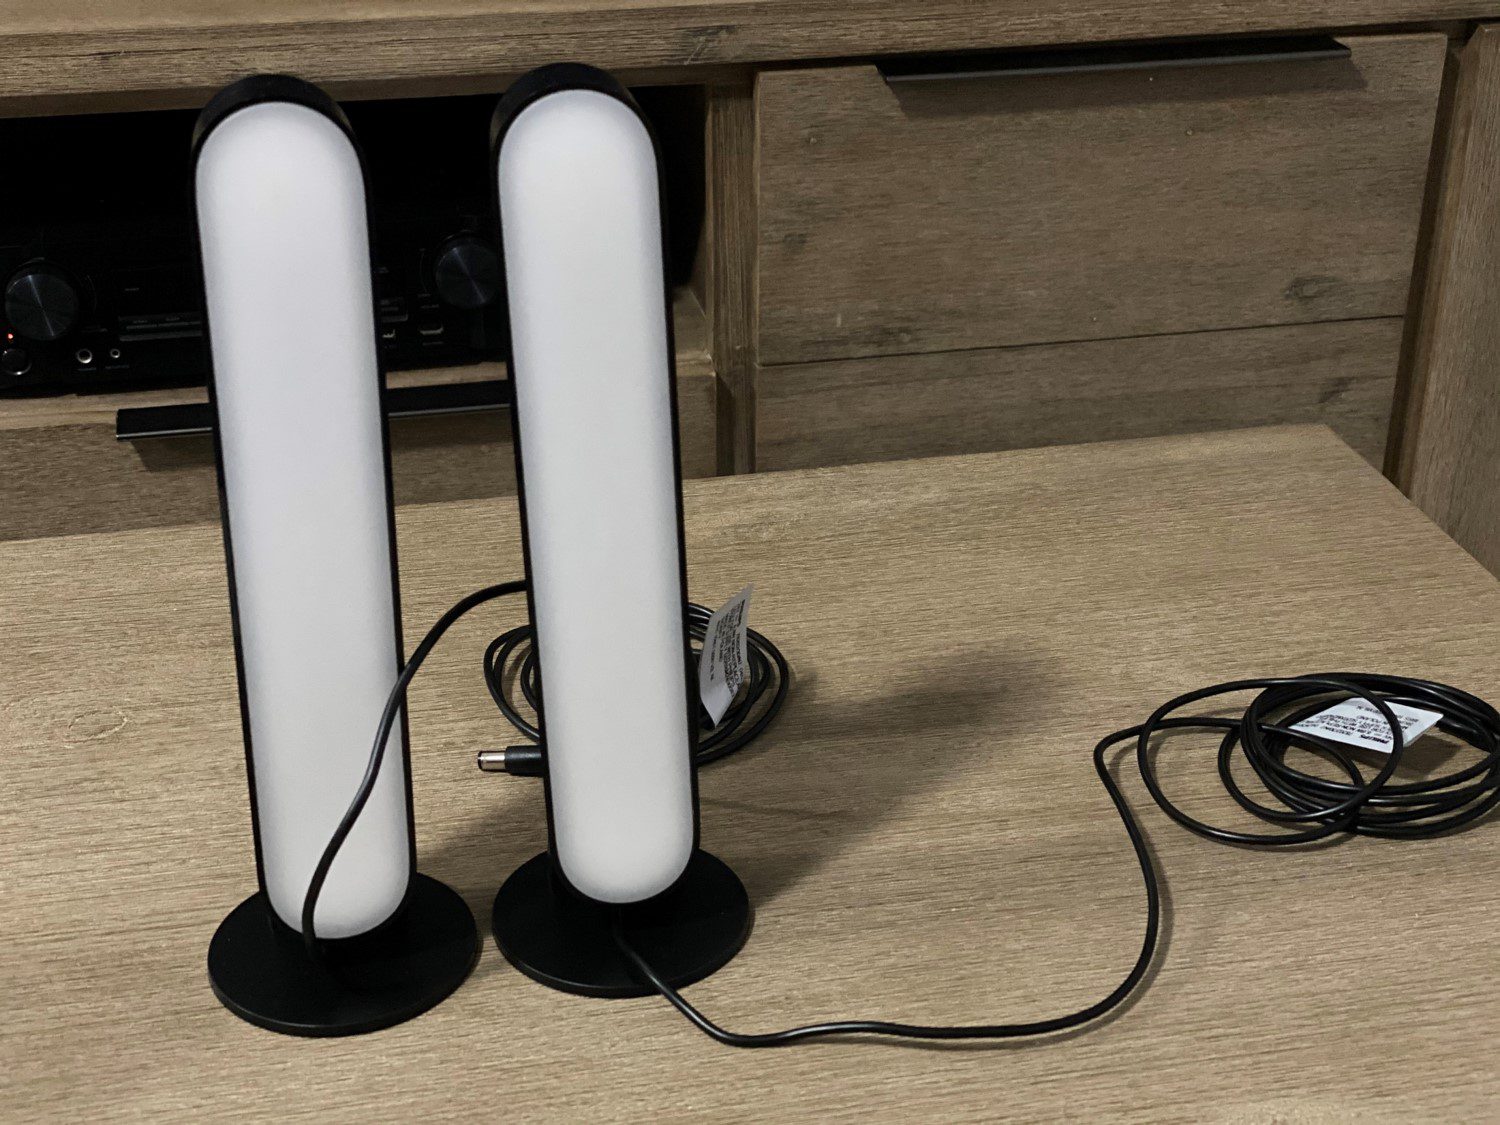
The vertical stands could be used to place the light bars upright on a shelf, behind a tv or in the corner of a room, facing a feature wall and are best suited for directing the light across the length of the wall.

The horizontal stands would be better suited to mounting on the back of the TV or lying them down on a TV stand, shelf or counter and directing the light up the wall and a little onto the ceiling.

Once your light bars are on their stands on a shelf or stuck to your TV, plug them into the adapter and power them on. Just like any of the other Hue products, they immediately turn on. They automatically switched on to a default warm white colour at around 70% brightness.

You then need to pair them to your Hue Bridge.

Philips Hue Hub and White Globes

If this is your first Hue Bridge then you’ll first need to set it up by plugging it in, connecting it to your router (via Ethernet cable) and then following the prompts on the Hue app on your mobile phone. This shouldn’t take more than a couple of minutes, although it often requires a firmware update as well.

Philips Hue App Light Setup

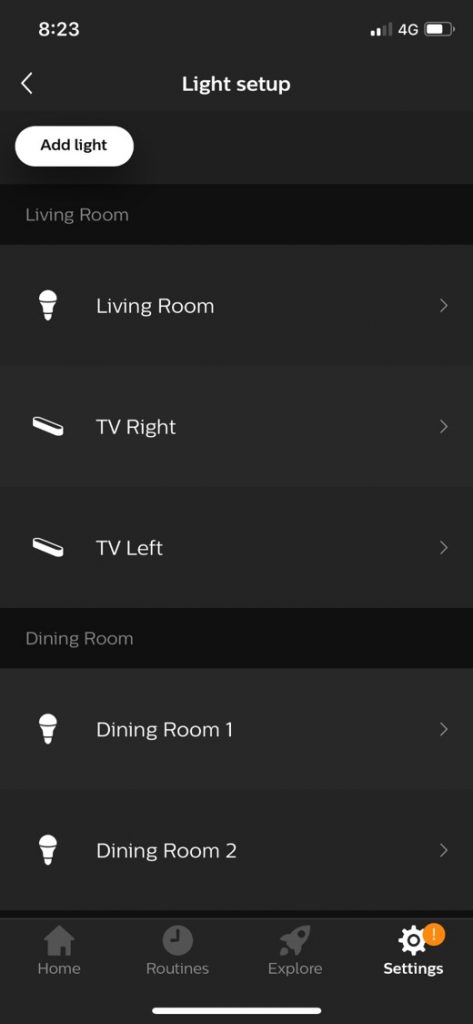
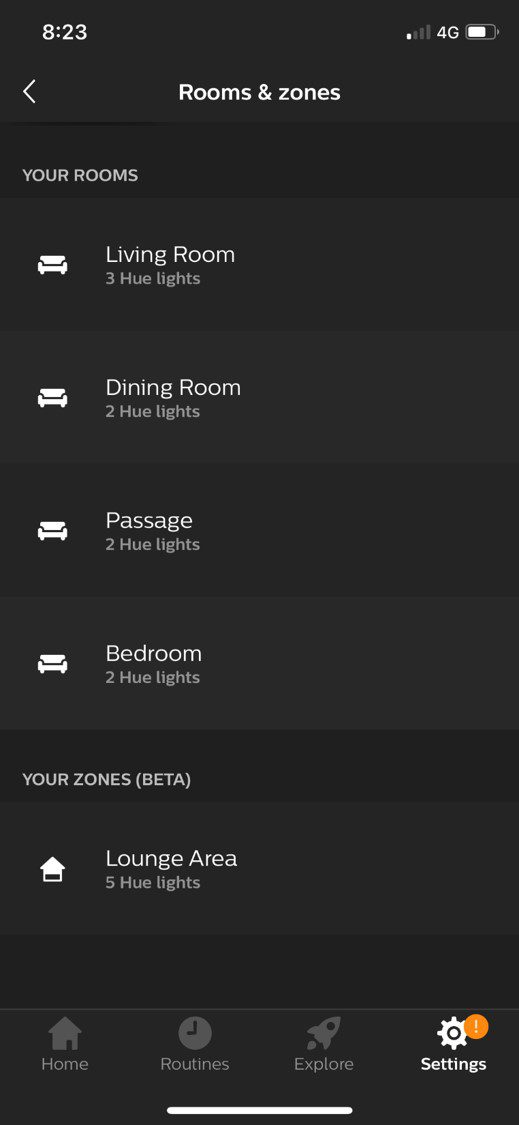
If you’ve already got a Hue Bridge or you’ve now got your new one up and running, you can open up the Hue app on your mobile phone and head over to the settings tab at the bottom and then click on light setup. This allows you to either enter the light’s serial number or wait for the app to automatically detect any unpaired lights. I usually just wait for it to automatically detect them and I’ve never had a problem with a light not being discovered, although I’ve never used the system in a really large house where I’d imagine you’d start running into signal strength issues. Your app should pick up the two light bars, after which you can name them and they’ll be ready to add to a room or zone.

Philips Hue App Rooms and Zones

Zones are a fairly new feature to the Hue app which allow you to merge multiple rooms or individual lights into a single zone. This is a useful addition to control larger areas of lighting, such as all of the lights downstairs or all lights upstairs or in an open plan living and dining room like mine.

Philips Hue Dimmer Switch

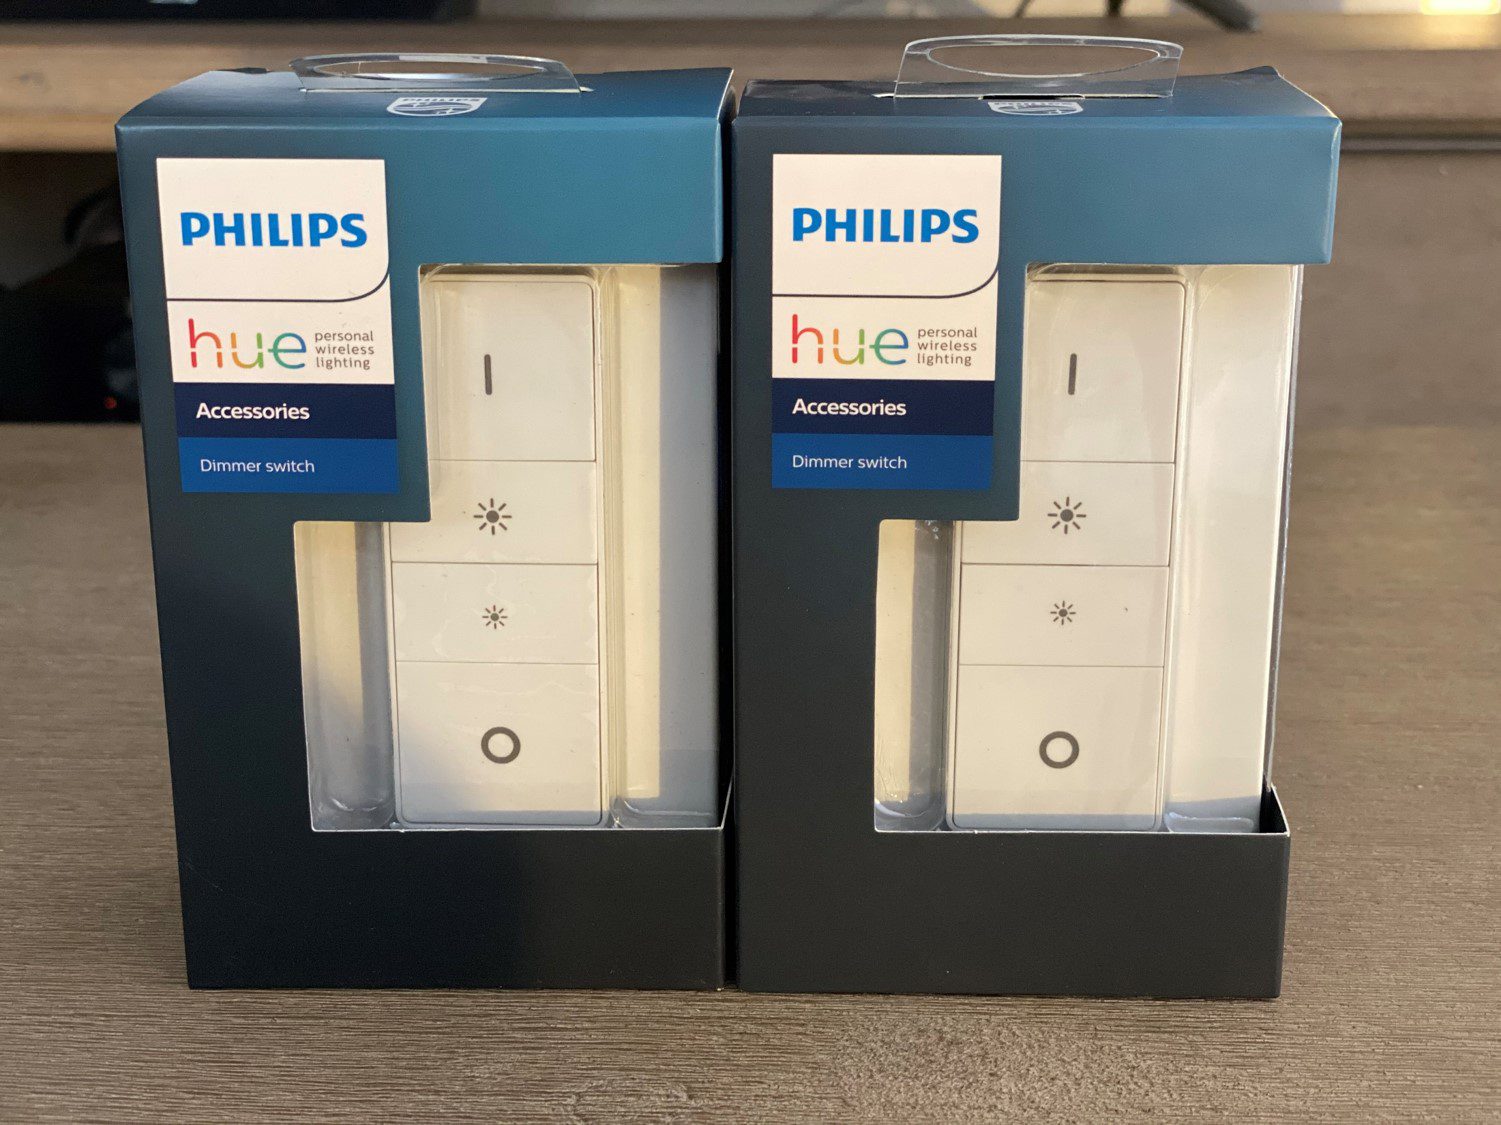
You can then also pair additional switches or dimmer switches to control the newly created room or zone. While you don’t really need to have these dimmer switches, as all of the functionality is available through your mobile phone’s app, they do play a big part in making the lighting system feel more integrated into your home. Having a physical switch or remote control on the wall or available in a room when you don’t have your mobile phone around makes it a lot easier to adapt to having a wirelessly controlled lighting system and not revert back to flicking the switches on the wall.

I’d like to see Philips come up with a solution to stick these switches over an existing light switch, as this would lessen the chance of someone turning the light off manually which would require a physical switch back on to get the connected lights running again. I have seen a couple of third party options available online though.

Using The Philips Hue Play Light Bars

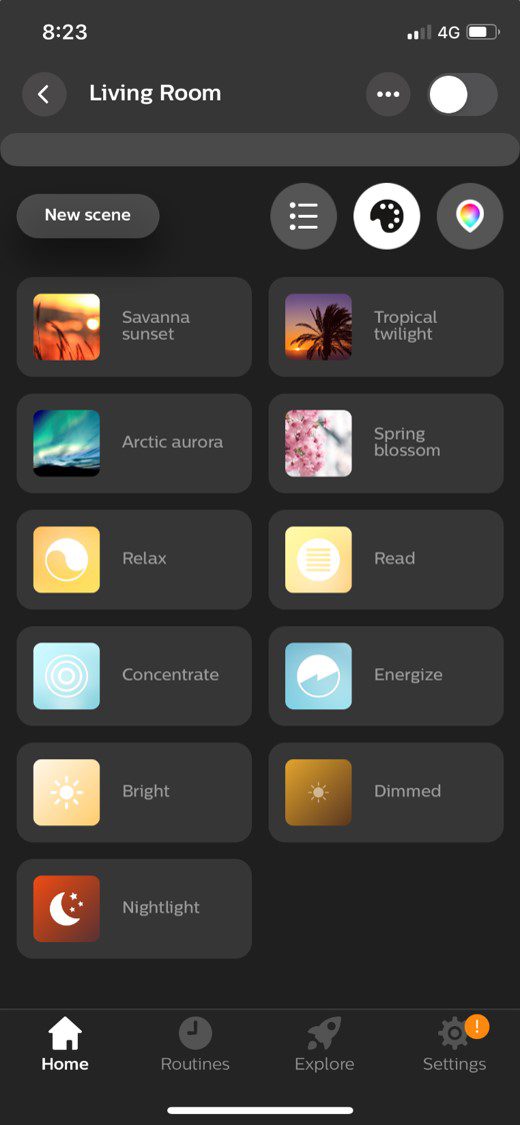
Now that your Play Light Bars are set up and paired to a room, you can start playing around with the colour options and creating scenes.

Philips Hue App Scenes

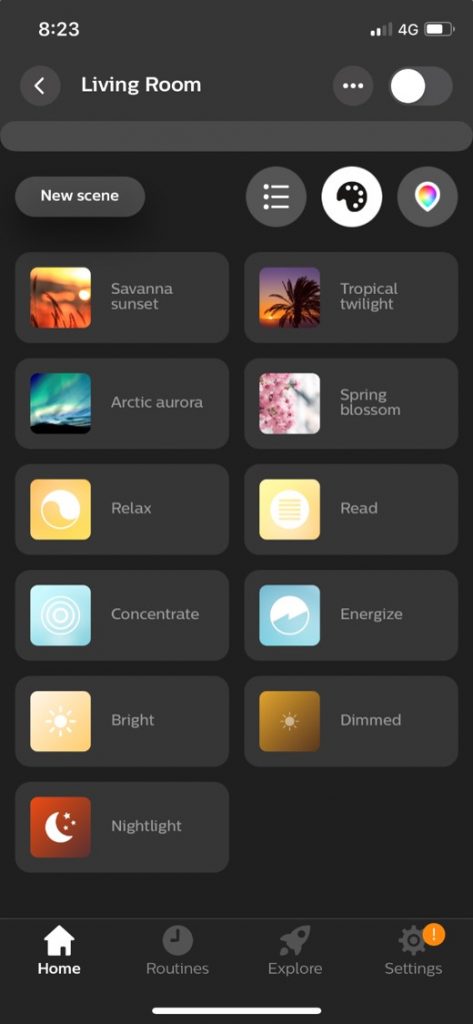
Scenes are effectively different colours and colour combinations displayed by the different lights in a room, saved under a pre-set with a title and image/icon. They make it easy to set your lighting up quickly for different moods or tasks.

Philips Hue Lights Energetic

You could set a scene up for watching TV which could involve turning off or dimming the main light and setting the play light bars to 60% brightness or create a scene for reading which turns all lights to a bright warm white. There are a number of built in scenes with pre-set lighting combinations which can be used by themselves or used as a base to create your own customized scene.

Philips Hue App Colour Pallet

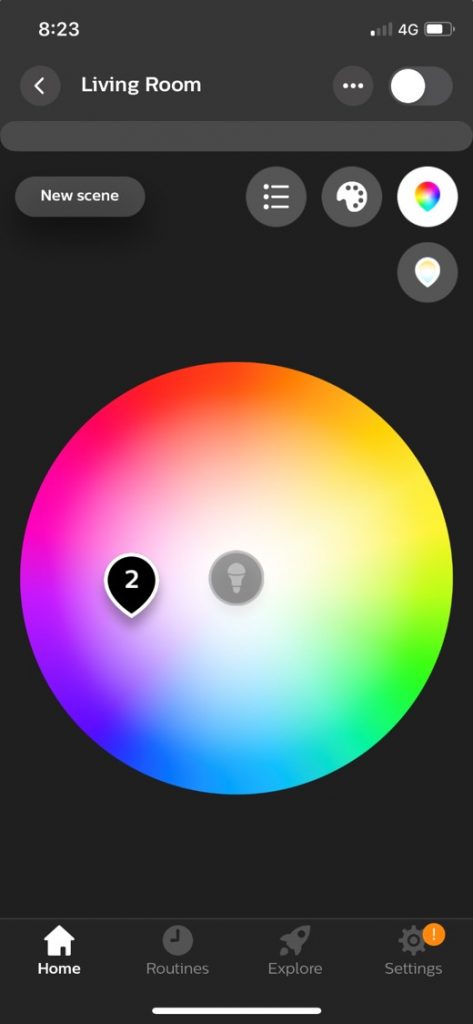
Scenes are set up by dragging the icon for each bulb around a colour pallet. You can also overlap bulbs to make them the same colour by dragging them onto each other, they’ll then show up as a number, representing the number of bulbs displaying this colour.

If you’ve got one or more of the dimmer switches, you can also use the “on” button to cycle through up to five different pre-set scenes and dimming options, a nice addition if you often do a few activities in the same room; like reading, watching tv or having drinks with friends all in the living room.

Philips Hue App Routines

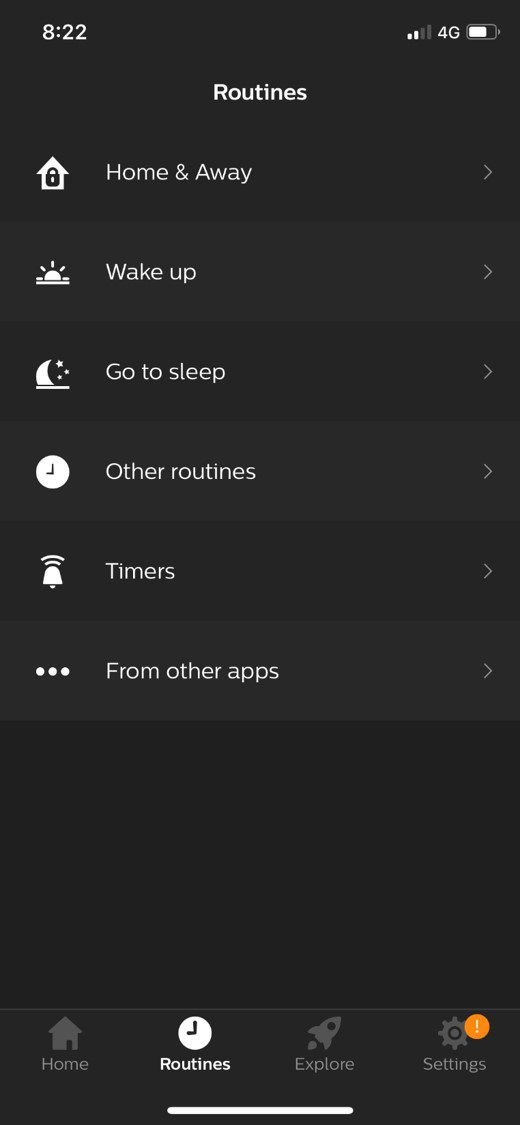
One of the feature’s which I use most often with the Philips Hue app are the routines. Routines enable you to create automated functions for your lighting based on timers or locations. This enables you to turn on certain rooms or zones at a particular time of day, simulate a sunrise or sunset or use location based services to turn off lights when you leave home and turn them back on when you get nearby your home again.

There are two particularly useful features to the routine timers which I think are useful addition. The first is the ability to turn lights on or off based on sunrise or sunset times. This prevents the usual problem with fixed timers turning your lights on well after dark or before sunset when used without adjustment over a longer period of time. The second is the random timer option, which is more of a security feature, allowing you to create a time window in which to turn the lights on or off and the Hue Bridge will then randomly switch the lights during this time frame. This create the impression that a person is home and the lights are not just on fixed timers.

Lastly, the Philips Hue lighting system pairs pretty well with Amazon’s Echo devices to allow voice controlled lighting around your home. You can ask Alexa to turn certain lights, rooms or scene on and integrate Hue lighting options into your Alexa apps routines as well.

Using Hue Sync For Immersive TV Back Lighting

One feature which is sort of fundamental to a lighting system which is designed to be mounted onto the back of a TV is the ability to synchronise the lighting with your movies, games or music. This feature, which is probably the Hue Play Bar’s greatest potential, is also the primary reason why I wouldn’t recommend getting them just yet.

There is some functionality provided out of the box, but it’s really not that practical and the best option for synchronisation is really expensive. You’re given the ability to install the Hue Sync app onto a PC or Mac, which allows the lighting system to sync up with the colours being displayed on your monitor and this seems to work pretty well. This is fine if you’re using your computer to watch TV or play games, but in the era of smart TV’s, having to pair your TV to your computer or cast content to your TV is a little cumbersome. Philip’s answer to this is an HDMI Sync Box, which essentially passes the HDMI signal through and uses the signal to sync the lighting, it looks like a great product online but it retails for $230! From what I’ve found, it’s their most expensive product. For a simply HDMI box. Just to get your lighting to sync with your TV, it seems like a heavy price tag for this functionality. And there isn’t any way to sync lighting if you’re using one of the apps on your smart TV and not an external box or consol.

If you’ve got an app for PC or Mac, why not expand this app to work directly on Android based TVs and gaming consoles? A simple free to download Xbox app would be able to drive the lighting and save me $230, it seems like a no brainer. From Philip’s Q&A platforms, it seems like this development is in the pipeline, so it may become available in the future. Until then, I wouldn’t recommend getting these lights for their syncing ability, unless you’re happy to fork out the extra $230.

You can learn a bit more about how the Hue entertainment syncing works on their website.

Should You Get The Play Light Bars

I think the decision shouldn’t be whether or not to get the Hue Play Bars, but rather the Hue Lighting System. If you’ve already got a Hue Bridge and a couple of lights then the Play Bars are a great way to add some colour to the room and create more dynamic scenes.

The TV back lighting synchronisation needs a bit more work to be really useful. If you’re just looking at getting the Play Light Bars and you’re not planning on expanding your lighting system then I think there are cheaper options available which have more functionality solely for TV back lighting and offer better value for money.

Philips have really gone a long way in making a broad range of good quality, easy to use, smart lighting products which work together really well together but they really need to be used together in order to really make use of the features and see the benefit in having a smart lighting system. It’s one of these systems where the more you buy into it, the better and more usable it gets.

Connect A 4×4 Keypad To One Arduino Input

A 4×4 keypad is a really useful Arduino project component, particularly for security access projects or projects requiring code inputs. One of the problems with using the keypad however, is that you’re going to be using up 8 of your Arduino inputs just to read all of the buttons. This is obviously more efficient than connecting the 16 buttons individually but it’s still using up the majority of your Arduino’s IO. If you’re using one of the smaller Arduino boards such as the Uno or Nano, you’re not going to be able to connect something like an LCD display, TFT display or Ethernet shield to it as well, making it difficult to display the code which has been input and really limiting the functionality you could bring to your project. So, in this guide we’rd going to be looking at a way in which you can connect your entire 4×4 keypad to a single Arduino input and still read each button individually.

This project assumes that you know the basics of Arduino programming, otherwise follow our guide on getting started with Arduino.

Here’s a video guide, otherwise read on for the step by step instructions:

What You’ll Need For This Project

How To Connect Your 4×4 Keypad To A Single Arduino Input

When working on Arduino projects, people often overlook the 6 analogue inputs and start working with the digital IO, especially if they’re not using “measurement” sensors in their project.  The analogue inputs can actually be quite powerful and versatile and although they require a bit more code, they can be effectively used to free up some of your digital IO.

This project draws upon a concept used in a previous project, connecting multiple push buttons to a single Arduino input, it is however a little more complex due to the way the keypad is internally wired. There isn’t a common ground and 16 outputs, one connected to each button. Instead, the buttons are wired into a grid matrix in rows and columns and you’re given a connection to each row and each column in order to identify which button is being pressed.

The overall concept is to connect a different set of resistors to each button so that you generate a different voltage on the analogue input for each button, thereby enabling your Arduino to identify which button is being pressed without actually having to connect each button individually to your Arduino and clog up your IO.

Connecting Your 4×4 Keypad

We’re going to ignore the LCD connections in this project and assume that you know how to connect an LCD display to your Arduino, if you don’t, follow the link and we’ll show you how. The LCD display in this project is just used to display which button is pressed and demonstrate than it is possible to connect a keypad and LCD display to your Arduino and still have 8 free digital IO pins! As I’ve done in the video, you can also make your project a bit easier by using an LCD Shield, which has the potentiometer, resistor and LCD connections all done for you already.

What we are going to be doing is turning the keypad into a selectable voltage divider circuit, with each button selecting a different divider configuration, resulting in a different voltage being measured by your Arduino, enabling it to identify which button is being pushed.

The voltage divider circuit consists of two resistors in series, with the Arduino’s analogue input measuring the voltage at the mid-point. We have a fixed resistor in the top half of the divider, which is the 5.1K resistor shown by itself on the top right in this example, and then a selectable group of resistors which are activated in different combinations by the keypad in the bottom half of the divider.

You can use any combination of resistors you’d like to, the actual resistance isn’t that important. What is important is that each resistor is a different resistance so that the ratios between the resistors create enough of a difference in voltage for your Arduino to detect each button combination.

Lets look at the circuit:

Circuit - 4x4 Keypad To One Arduino Input

We can see that each row and each column of the keypad has a resistor connected to it, and the whole keypad and resistor circuit is connected as the “bottom” or second resistor in our voltage divider circuit. When we push a button, a connection is made between one of the resistors in the left group of four and one of the resistors in the right group of four (one row and one column) to create an overall resistance, which is unique to each button.

You’ll notice that all 8 of these resistors are different and it’s important that no combinations can produce the same resultant resistance. For example, an 8K and 4K resistor together in series would have the same resultant resistance as a 7K and a 5K resistor in series.

The easiest way to do this is to create a quick spreadsheet with your resistor values along the top row (4, one for each row) and the first column (4 , one for each column). Then sum up the resistance of each row and column in the cells and make sure that none of them are the same or similar (one above or below is usually too similar).

Resistor Check

We then have a single resistor on the top right which forms the “top”or second resistor in our voltage divider circuit.

Lastly, the centre point of our voltage divider circuit is connected to one of our Arduino’s analogue inputs.

I used an LCD shield for my test setup so I don’t require the additional connections to the LCD display.

Keypad Breadboard Connections For One Arduino Input

That’s the circuit complete, we can now have a look at how to code your Arduino to identify each button from the single Arduino analogue input.

The Code

Let’s now have a look at how to get your Arduino to recognise which button is being pressed in the code.

Note – In the above example breadboard layout with a wired LCD, I have used A0 as the keypad input. In the photos, video example and code below, I have used an LCD shield and have therefore used A1 as A0 is used by the shield.

Here is the code:

//Michael Klements
//The DIY Life
//5 April 2020

#include <LiquidCrystal.h>

int keyIn = 0;                        //Variable for keypad input
int keyVals [16] = {423, 454, 503, 562, 429, 459, 507, 565, 451, 480, 525, 579, 462, 487, 531, 585};    //Array to store keypad numerical values
char keys [16] = {'1','2','3','A','4','5','6','B','7','8','9','C','*','0','#','D'};   //Key characters corressponding to each numerical value
int range = 1;                        //Tolerance above or below the numerical value

int buzzerPin = 2;                    //Buzzer used in video for key sound
LiquidCrystal lcd(8, 9, 4, 5, 6, 7);  //Assign LCD screen pins, as per LCD shield requirements

void setup() 
{ 
  pinMode(buzzerPin, OUTPUT);
  lcd.begin(16,2);              // columns, rows.  use 16,2 for a 16x2 LCD, etc.
  lcd.clear();
  lcd.setCursor(0,0);           //Display some text on LCD then clear it
  lcd.print("Keypad");          
  lcd.setCursor(0,1);
  lcd.print("One Input");
  delay(2000);
  lcd.clear();
}

void loop() 
{
  keyIn =  analogRead(A1);      //Read in keypad input
  String temp = "";             //Create a variable to store the key character
  for (int i=0; i<=15; i++)     //Run through the array of button values
  {
    if (keyIn >= keyVals[i]-range && keyIn <= keyVals[i]+range)   //If the measured value is in the range of one key
    {
      temp = keys[i];     //Set temp equal to the character for that key
      digitalWrite(buzzerPin, HIGH);  //Sound buzzer
      delay(100);
      digitalWrite(buzzerPin, LOW);
    }
  }
  lcd.print("Button: ");
  lcd.print(temp);             //Display button character on the LCD
  delay(1000);                  //Wait one second
  lcd.clear();                  //Clear the display
}

There are four variables used for the keypad input, the first is keyIn which is used to stored the value read on the analogue input. The second is an array of 16 values used to store the raw button input values which you’ll need to update once in the beginning for each button using your Serial Monitor or LCD. The third is a character array which stores the key symbol related to each button. The fourth is an allowable range, you may see that when you push a key it displays 512 and the next time 511. If your inputs vary slightly then this range allows you to accept values slightly higher or lower, this usually only needs to be 1 or 2 and can cause problems with overlap if higher.

The initial functions in the setup loop are all related to the LCD display, you can read up on these in our guide to connecting an LCD display to an Arduino.

In the loop function we read in a value from the analogue input, then cycle through the button keyValue array looking for a value which corresponds to the measured value within the range allowance and if one is found then the corresponding key character is saved to the variable temp which is then displayed on the LCD for 1 second before being cleared.

I’ve also added a small buzzer in the video and code to provide audible feedback when a button is pressed, similar to a security keypad.

The only challenging part of this code is determining what value is measured for each button pressed on your keypad. In order to do this you can either use the Arduino IDE serial monitor or you can simply display the measured value directly onto your LCD (Use the line lcd.print(keyIn) right after you read your analogue input)  and make a note of each value displayed for each button pressed. You’ll then need to update the input array keyVals with these numbers corresponding to each character in the array keys.

Once you’ve found and set your button values, upload the final code to your Arduino and try it out, your LCD should display the character corresponding to each button you press.

Operation - 4x4 Keypad To One Arduino Input

Keypad On One Arduino Input Running

Connect A 4x4 Keypad To One Arduino Input

Now you’ll be able to create better keypad based Arduino projects with more available IO!

Have you used this method or a similar method to connect your 4×4 keypad to your Arduino more efficiently? Let us know in the comments section below.

Share This Guide:

If you found this tutorial useful, please share it to help others out as well.

Connect A 4x4 Keypad To A Single Arduino Input

What Your iPhone’s Battery Health Means

If you’ve got a newish iPhone which is running iOS 11.3 or later then you may have seen the Battery Health Tool. This was an update which Apple made after people expressed their frustration with Apple throttling people’s iPhone performance, to prevent accidental shutdowns and battery problems without telling them. They also launched a battery replacement scheme which allowed you to replace your iPhone’s battery with them at a reduced cost, this was however discontinued in December of 2018.

So lets have a look at what this tool can do and what some of the information which it provides actually means.

What Is The Battery Health Feature?

If you’ve got iOS 11.3 or later then you can access the Battery Health feature by going to Settings > Battery > Battery Health.

On this screen, you’ll see information about your battery’s Maximum Capacity and Peak Performance Capability as well as an option for Optimised Battery Charging on newer models.

iPhone 6 Battery Health Screen

On my old iPhone 6, it says that the battery has a Maximum Capacity of 86% and under Peak Performance Capability that the battery is currently supporting normal peak performance, meaning that the phone is not throttling performance in order to prevent damage to the battery or unexpected shutdowns.

iPhone 11 Pro Battery Health

On my iPhone 11, it is still showing a Maximum Capacity of 100% and it says under Peak Performance Capability that built in dynamic software and hardware systems will help counter performance impacts that may be noticed as your iPhone battery chemically ages. This doesn’t really give you any information on whether the performance is being throttled or not, it just says that it may be – not particularly useful information.

The newer iPhone models do however give you an option for Optimised Battery Charging which essentially learns from your average daily usage and charging behaviour to prevent the phone from charging over 80%, which places stress on the battery and reduces battery life, during normal daily us in order to prolong the battery life. There are also a number of things you can do when charging your iPhone to protect the battery and ensure that you get longer battery life out of it.

Your iPhone battery should start at 100% capacity when it’s new and will slowly degrade, depending on how you use it, over the next few years. According to Apple, a normal battery is designed to retain around 80% of its capacity for 500 completed charge cycles when operating under normal conditions. If you’re running your iPhone through a near full cycle every day then you’re likely to get just short of two years’ worth of battery life out of it.

What If My iPhone Is Performance Throttled?

If your iPhone’s battery health has fallen below 80% then you’ll get a warning at the bottom of the screen saying that your iPhone’s battery has significantly degraded and it will provide you with a link to a page which tells you about how to get your phone serviced. It essentially means that you should consider replacing your iPhone’s battery if you intend to continue using your iPhone for the next few months/years in order to keep it performing optimally.

There will also be an option to disable the throttling although this has been put into place for a reason and is probably not a good idea to disable it. If you iPhone experiences a power related shutdown again, it will automatically enable the throttling again and you’ll have to go back into this settings page in order to disable it again.

If your iPhone is out of warranty and you’re interested in replacing you own iPhone battery for a fraction of the cost, have a look at this useful guide:

How to Replace The Battery On An iPhone 6 or 6s

Replacing The Battery In An iPhone 6

While this guide is for an iPhone 6, it is a similar process for other iPhone models as well.

Have you tried replacing you own iPhone battery? Do you have any tips for charging your iPhone in order to extend it’s battery life? Let us know in the comments section below. We’d love to hear from you.

Office Tech Trends That Are Shaping the Way We Work

A typical office used to be an entirely different place: strictly-dressed people would work under desk lamps in rows of desks with the sound of typing machines in the air. Nowadays the dress code at most offices is much leaner, meeting rooms are filled with bean bags and stress balls, while some employees work from home. Things have changed a lot indeed, and most of these changes are due to office tech advancements which allowed for more freedom in certain areas and have resulted in increased productivity in others and pushed businesses to develop in directions they haven’t perhaps even imagined.

With that in mind, here are a few ways that technology has shaped the modern office.

Moving to the cloud

Moving to the cloud

There are several reasons why you should move to the cloud if you haven’t already. For starters, you won’t need expensive hardware and additional employees to maintain your servers for the purpose of backing up data and daily business functions. This way you will save up a lot of money and make sure that your data are tended to by experienced professionals.

Also, companies that offer cloud storage services have taken the question of safety to the highest levels so your business and private customer data will be much more protected from human error and cyber-attacks. As for your employees, this change has helped them be more productive since the data can be accessed anytime and from anywhere, which means that they can prepare for business trips while travelling to the location and check a document in the middle of the night if they remember something important.

Putting employee comfort first

Putting employee comfort first

Employers have long ago realised that employee productivity greatly depends on them being well-rested and having optimal working conditions. If they don’t get enough light and if they sit in uncomfortable chairs, they will only experience back issues and headaches which will eventually cause them to take time off so it will affect their health, productivity, and perhaps even your budget if the projects aren’t finished on time.

Besides ergonomic chairs, keyboards, and wrist support additions which have been a must for some time now, human-centric industrial solutions for lighting have become one of the primary investments on the part of employers. With light being arranged properly around the floor, each employee gets enough light so their eyes don’t get tired as much, which affects their performance, and not only eye comfort and visibility. It is important to note that seating arrangements, office tech and office design are closely knitted with efficiency, so an open-floor office layout often demands noise-cancellation headsets and employees who are collaborating together to sit close, as well as to have a separate room for brainstorming sessions.

Embracing office tech, allowing for remote work

Embracing office tech, allowing for remote work

Technology has given entrepreneurs a chance to connect on many levels and to search for partners, suppliers, and employees all around the world. In fact, limiting yourself to the local talent pool can be detrimental to a business because you are depriving your business of people who can bring knowledge, experience, enthusiasm and many other vital elements to your team and in that way help your business grow and expand its customer base.

A quality internet connection and a laptop or a computer are all your remote employee needs to begin working with you, while all apps and software tools can be easily installed. Cloud storage and modern communication channels allow for real-time collaboration between team members and they also provide the employer with real-time monitoring options to make sure everything is going smooth. Even different time zones don’t have to be problematic if the workload is allocated with prior preparation.

Automating processes

Automating processes

Manual data entry, and especially management can lead to human error, which is most often the reason for data-breach problems. Mistakes don’t only revolve around data since employees are usually concentrating hard on a particular task so they omit to update a password or to double-check the source of the link they got in the email instead of clicking it right away. Different software solutions can prevent many of these mistakes by way of monitoring and sending different warnings and notifications so that the employees can focus on their work and leave the technical stuff to technology to take care of them.

Modern tools not only help employees focus but speed up many processes because the search for any necessary data is quicker, making the average employee more efficient. Needless to say, preventing errors and data leakage can save you a lot, so automating certain processes has influenced many areas of business.

Offices have changed a lot and even displaced themselves at homes and outdoors. Technology placed emphasis on efficiency and showed that strict office design is not a prerequisite for achieving business success. Creativity and productivity can originate from many places and by providing satisfactory work conditions to your employees, you are, in fact, giving them the tools to do better.

Taking care of your employees’ health with appropriate furniture, lighting, and seating arrangements can be an incredible motivator for them to achieve things even ahead of schedule and if you facilitate their work with proper software tools, your business will soon be on its way to growth. The sooner you start embracing technological solutions in the workplace, the quicker the positive results will come.

Do you manage your own workplace, team or office? What are some of the office tech advancements which you’ve made in your business? Let us know in the comments section below.

11 Baking Soda Hacks You Need To Try

Baking soda, or bicarbonate of soda is a wonderfully versatile household ingredient. Just a quick look on Pinterest will reveal hundreds, if not thousands, of uses for it, from baking to cleaning to some unlikely and surprising health benefits.

So here are a couple of the lesser known hacks which we’ve found to be particularly useful and different.

Clean your Fresh Produce

Clean your Produce With Baking Soda

Get rid of any dirt and pesticides on your fruit and vegetables by giving them a quick clean with this solution. Fill a bowl with two cups of water and a teaspoon of baking soda and give your produce a wipe with a small sponge and you’re ready to go.

Treat Bug Bites and Stings

You’ve got an itchy or red insect bite which won’t go away and you don’t have any cream around. Make a paste from baking soda a cold water and apply it to the bite or sting for a few minutes, it’ll instantly relieve the itch as well as reduce the swelling and redness.

Make Your Own Mouthwash

If you suffer from bad breath, this mouthwash receipt might be just what you need to get your mouth freshened up. Mouth wash reaches all of the places which a toothbrush just can’t get to and baking soda has a range of antibacterial and antimicrobial benefits. Simply rinse your mouth out with a half teaspoon of baking soda and a little warm water. You can also add a drop of peppermint essential oil to it for a fresh and minty aftertaste. It also helps to whiten your teeth!

White Clothing and Sheets

Use Baking Soda For White Clothing and Sheets

We’ve mentioned this one before, but baking soda is really good at whitening your underarm stains on your shirts and whitening your old linen or bed sheets. Have a look at these two guides to learn how to use it for best results.

Baking Soda Deodoriser

Baking soda is great for getting rid of unwanted smells, it works amazingly well to deodorise smelly shoes or trainers. Simply sprinkle a generous amount into your shoes and leave them until you’re ready to wear them again. Then either dust or vacuum it out and your shoes will be great and fresh again.

Clean your Bathroom

Baking soda is a very cost effective cleaning product, with both whitening and disinfecting abilities. Create a mixture of baking soda a warm water and use it to scrub away any grease and grime built up in your tile grout lines or around the edges of your bathtub, basin or toilet.

Disinfect your Toothbrush

Disinfect your Toothbrush

Cleaning your toothbrush is probably not very high up on your priority list but it is something which you should be periodically doing. Soak your toothbrush in a cup of hot water mixed with a tablespoon of baking soda for 30 minutes and it will be clean and disinfected.

Give Yourself a Spa Treatment

If you’re feeling stressed or overwhelmed, it may be the perfect time to give yourself a relaxing spa treatment at home. Sprinkle a quarter cup of baking soda into a hot bath and you’re ready to have a relaxing and nourishing spa soak.

Polish Your Silverware

Did you know that you can remove the tarnish from your silverware or jewellery without actually having to polish it? Here is a guide to cleaning your silverware with baking soda and another for cleaning your jewellery with baking soda. These tricks are so easy you’ll be wondering why you ever bought silver polish.

Clean Your Carpets and Rugs

Clean Your Carpets and Rugs

Freshen up your carpets or an old rug by sprinkling baking soda over it, allowing it to stand for a couple of hours to absorb the odours and any moisture and then vacuuming it up. If it’s a loose piece of carpet or rug, you can move it to a sunny spot on a hard surface and add a spray of hot water over it as well to further add to its stain and odour removing abilities.

Clean a Burnt Pot

You’ve scorched the bottom of your favourite pot or pan and now you’re faced with having to clean it. Sprinkle a generous amount of baking soda into the pot or pan and add a little hot water, now use a sponge to gently scour and lift the burn marks away.

Have you tried any of these hacks? Let us know your tips, tricks and hacks in the comments section below. We would love to hear from you.

Share These Hacks:

11 Unique Baking Soda Hacks You Need To Try

Use Baking Soda To Clean Pesticides From Your Fresh Produce

Use Baking Soda To Freshen And Deodorise Your Carpet

Baking Soda Can Be Used To Disinfect Your Toothbrushes


How To Replace A Shattered or Damaged iPhone X Screen, Step By Step

Almost everyone who owns a mobile phone has dropped it at some stage and no matter how well the cover protects it, occasionally the drop results in a cracked or shattered screen. Getting the screen replaced by the manufacturer is usually really expensive and in reality it is actually quite a simple fix, its even easier on the iPhone X than on previous iPhone models. You can buy an affordable replacement from Amazon or eBay for around $60 – $100 dollars (depending on the quality) and it takes around a half hour to an hour to do if it is your first time.

In this guide, we’ll show you step by step how to replace your screen on your iPhone X. Although this guide is done specifically on an iPhone X, the iPhone XR and iPhone XS as well as plus models are very similar inside as well.

Most of the replacement screens you’ll find on Amazon or eBay come with the tools required to do the replacement bundled together. These tools are not the best quality but they do get the job done, you’ll just need to be careful not to strip the heads of the screw drivers as they are made from low quality materials and this is really easy to do.

Have a look at these other guides if you have a different model iPhone:

What You Will Need To Replace Your iPhone X Screen

  • iPhone X Screen, Toolkit and Gasket Set – Buy Here
  • iPhone X Screen and Toolkit – Buy Here
  • iPhone X Replacement Gasket – Buy Here
  • iPhone Repair Tool Kit – Buy Here
    • Note – your replacement kit may come with a basic tool kit. This is usually good enough to get the job done but the screw driver heads often strip after a few screws.

How to Replace your Screen

The replacement of your iPhone X screen is done in three stages, you’ll first need to remove the old screen, then transfer the earpiece and sensor ribbon cable assembly over to your new screen and finally install the new screen onto your phone.

The most important thing to keep in mind when doing this replacement is to keep your screws well organised. The screws inside your iPhone are different types, sizes and lengths and it is very important that you put the correct screws in the correct place. It is easy to get confused and lose track of your screws. I like to draw a quick sketch of each bracket or component and lay the screws onto the sketch over the hole they came out of.

The next thing you may not be familiar with is the ribbon cable connectors. These are very fine connectors which simply “snap” into place, similar to Lego. To separate them, you can slide your pry tool underneath the connector and pop it off. To connect them again, make sure that they two are correctly lined up and simply pressed down on top of the connector and you’ll feel it snap into place.

Here is the complete video guide to replacing the screen, with steps outlined below:

Here is a summary of the steps involved in replacing your iPhone screen:

  1. Start by switching off your iPhone. On the iPhone X this is done by pressing volume up, volume down and then holding the lock screen button until the shutdown slider comes up
  2. Use your pentalobe driver to remove the two screens at the bottom of your iPhone around the charging port
  3. Next place your suction cup onto the bottom of the screen, you’re going to use it to pull the screen away from the body in order for you to fit your pry tool between them
    1. It helps if your phone is warm as this softens the tacky gasket between the two which is used to waterproof your iPhone. You can warm it up by placing it in front or on top of a heater, on your vehicles hot dashboard or heating it up with a hair dryer. Do not overheat it as this may damage the phone, you should still be able to comfortably handle it
    2. If your screen is shattered or cracked near the bottom area, put a few pieces of clear packaging tape over the damaged area to keep the glass in place and allow the suction cup to stick to the display
  4. Pull up on the suction cup to lift the screen and then insert your pry tool into the gap between the two
  5. First pry the bottom side up and then slide your pry tool up each side to unclip it and break the adhesive
    1. Do not push the pry tool in too deep or separate the screen too far from the body as there are delicate ribbon cables between them which you may damage
  6. The top side slides in underneath the edge of the body, gently pry it downwards and it should then come free. Again, don’t pull it down too far or you may damage the Face ID ribbon cable
  7. Once your display is free, open it up from the left side, the opposite way to a book. There are three ribbon cables along the right side which need to be disconnected
  8. Now use your tripoint screwdriver to remove the five screws securing the connector cover plate. Keep track of which screw goes into which hole as they are different lengths
    1. I usually draw a quick sketch of the bracket and place the screws onto the sketch in their positions
  9. Remove the cover plate
  10. Now use your spudger to gently pry up on the underside of the ribbon cable connectors to disconnect them. They simply snap into place and so are easy to connect and disconnect
    1. Try not to touch any of the surrounding components or damage the black spongy strips around the connectors
  11. Start with the battery connector to ensure that power is disconnected from the phone
  12. Next, disconnect the two display ribbon cable connectors
  13. Lastly, disconnect the FaceID and forward facing camera connector
  14. There is a small adhesive strip near the top keeping it in place, gently pry this away from the below ribbon cable, being gentle and careful not to tear it
  15. The display is now free from the body of your iPhone
  16. You now need to move the FaceID, earpiece and camera assembly over to your new display so that you keep your FaceID functionality
  17. There are three screws holding it in place
  18. Start with the centre screw which also has a small bracket attached to it
  19. Use your tripoint screwdriver to remove the screw and put it aside with its bracket. Remember to make a note of which screw goes where on this assembly as well
  20. Now remove the two remaining tripoint screws
  21. Use your spudger to pry the earpiece assembly down and away from the speaker and sensors
  22. You’ll now need to pry the remaining components away from the screen.
  23. The earpiece should come away quite easily
  24. The remaining sensor ribbon cable assembly is quite firmly glued into place buy works free with a spudger. Be careful not to damage the ribbon cable
  25. You can now install the assembly onto your new display
  26. Peel off any protective stickers on the back side of the screen before assembly, these are usually blue or pink if installed
  27. Install the components in reverse, starting with the earpiece speaker and then proximity sensor
  28. Make sure each component is properly seated before moving onto the next
  29. Finally, fold the remainder of the ribbon cable assembly up over the secured components
  30. Do a final check to see that all of the components are correctly located and are not being crushed or bent
  31. You can now use your tripoint screwdriver to replace the outer two screws
  32. Then replace the middle screw and bracket. It helps to orient the bracket and screw onto your screwdriver beforehand to make sure that it is the correct way around
  33. Once secure, make sure that the flat edge is parallel to the top of the display
  34. You can now reconnect your display
  35. If you are going to replace your iPhone’s waterproof gasket, do it now. Remove any pieces of the old gasket from the edges of the iPhone body. Then stick the new gasket down along these edges, be careful not to touch the gasket until you’re ready to install the new display
  36. Start by pressing the top FaceID ribbon cable connector into place
  37. Make sure that the connector halves a properly aligned before pressing them into place to avoid damaging the terminals. They should easily snap into place and don’t require much force if correctly aligned
  38. Now connect the two display ribbon cable connectors
  39. Finally, replace the battery ribbon cable connector
  40. Once this is done, it’s a good time to check that your new display is correctly connected and functions.
  41. Try powering your phone back on and checking the functionality of the screen, touch and front facing camera
    1. If this all works then you can proceed with replacing the cover plate. If something does not work, try disconnecting the ribbon cable connectors and re-connecting them. Also check all ribbon cables for any tears or bends
    2. If the display or touch functionality still doesn’t work, you may have received a faulty display. Try contact the supplier for assistance
  42. Replace the cover plate
  43. Replace the five tripoint screws
  44. Fold the display down and slide the top into place. If you have a new gasket which you’re installing, make sure the edges are aligned before touching the display to the gasket as it is difficult to re-position or move
  45. Press the top edge into place
  46. Now press down along the edges to snap them into place
  47. Press the bottom edge down and into place
  48. Replace the two bottom pentalobe screws

Your iPhone X’s screen has now been replaced. Remove the protective film and install a tempered glass screen protector to protect it from future drops or scratches. Good luck with the repair and let us know how it goes for you in the comments section below.

If you enjoyed this guide, you may be interested in these 5 Secret iPhone Codes You Didn’t Know About or find out how to Charge your iPhone Battery the Right Way. Also be sure to have a look at our other iPhone repair guides on replacing your iPhones charging port, home button, volume button assembly and camera assembly, or simply type your iPhone model into the search box on the top right of the page.

Should You Consider Wooden Window And Door Frames?

There are a number of different opinions on which material is best suited for window frames and people are often quick to discard wooden frames as an option due to their perceived high price and high maintenance. We’ve done some investigating, and it turns out that wooden window and door frames are actually a great choice, often marred by myths and misconceptions.

Here are some of the things we’ve found…

Wooden Window and Door Frames Are Not High Maintenance

This is perhaps the biggest misconception when it comes to wood / timber window frames and it seems to be a problem of the past. In the past, there were a limited number of wood treatment options available and they were not the greatest quality products. As a result, people were left having to sand down their window and door frames annually in order to re-apply varnish or other wood treatments, which can be costly, time consuming and messy.

Fortunately, we’ve come a long way since then. Modern wood treatments are often water based and are a lot easier to re-apply and dry quickly. An annual wash down with soapy water and re-application of sealant, simply by wiping it on with a cloth or sponge, is all that is needed.

Although we prefer the natural wood textures and finishes, you can also easily paint wooden window and door frames to suite your home’s decor theme.

Whats even better is that modern water based sealants often pack a number of other useful benefits as well, such as improved UV resistance, fungus resistance and durability as well as being non-flammable, water resistant and environmentally friendly.

wooden door frames

They Are Very Energy Efficient

Wooden window frames are available in both single and double glazing, ensuring that you can still have beautiful natural wooden frames and still keep your home warm in winter and cool in summer.

More than just with the glass, wood is an excellent insulator and the actual frames are far better at insulating your home around the edges than traditional steel or aluminium frames.

Lastly, wood has the lowest environmental impact as it is carbon neutral, completely recyclable and fully sustainable if sourced from sustainable forests or plantations.

Wooden Window And Door Frames Are Not Overpriced

If you’re buying good quality timber window and door frames, they may seem expensive upfront. But since they can last well over 50 years if properly treated and regularly maintained, they can actually turn out to be a cheaper alternative in the long run. Wooden frames also don’t typically have the complex rubber sealing components which come with aluminium or steel frames and need periodic replacement, which can be an expensive exercise.

If you also consider than wood is an excellent insulator, helping you save money on electricity, and has great aesthetic appeal, which means you’ll be adding substantially to your property value, offering you great return on your investment.

wooden window or door frames

Have you got wooden window or door frames installed on your home? What has your experience been and do you have any tips or tricks you’d like to share? Let us know in the comments section below, we’d love to hear from you.

Share These Tips

Are Wooden Window Frames Still A Good Choice

Renew Your Old Patio Furniture Set And Cushions – Make Them Look Brand New Again

Your patio furniture set has to stand up to the worst of the weather conditions your home sees, often in sunny and rain exposed areas of your home. This can quickly lead to the colours being dulled and your furniture looking old and dirty. In this guide, we’re going to be looking at how you can update your old faded furniture and make it look almost new again without spending a fortune, all with the correct paint or varnish.

When it comes to outdoor furniture, prevention is always better than cure and usually a lot easier to keep your furniture protected from the environment to ensure that it’s kept looking new, rather than trying to fix up your old patio furniture at a later stage. This is easily done with some inexpensive furniture covers or by packing your furniture away into a storage room or locker.

In renewing your patio furniture set, paint is your most powerful tool. Buying and applying the correct type of paint to your furniture and cushions, yes your cushions as well, can instantly make your set look brand new again.

Once you’re done with renewing your furniture, have a look at these 5 Decorating Ideas for your Patio.

What You Need To Renew Your Furniture Set And Cushions

  • Varnish or Paint To Match The Furniture Type and Colour
  • Sandpaper – Buy Here
  • Paint To Match The Cushion Colour(s)
  • Paint Brush Set – Buy Here
  • Or Foam Rollers – Buy Here
  • Water

How To Renew Your Old Patio Furniture

We’re going to start with the actual furniture, which may be wood, metal or plastic. Depending on how old and how much sun damage your furniture has experienced, this step may be as simple as just washing it down and re-applying a coat of paint or varnish or it may involve a bit more work and require sanding any flaking or rusty areas. Whichever yours is, make sure that you start out by giving your old patio furniture set a good wash, you don’t wanting to be painting over dirt or dust. A home high pressure washer system works well for deep cleaning and removing layers of built up dirt in the corners.

Once you’ve given it a good wash and allowed it to dry completely, you need to asses the damage. If your set is plastic, a good quality metal or hasn’t experienced too much rain damage, it may be good to be painted right away. If there are any signs of rust, flaking paint or bubbling varnish then you’ll need to give those areas a good sand to remove the damage before you start painting. This may sound like a lot of work now, but it will be well worth it to see the final product. A simple handheld electric sander can also make this job a lot easier and quicker to manage.

You’ll need to select the correct type of paint or varnish for your furniture’s material type, be it wood, metal or plastic. Go down to your local paint store and ask them what they’d recommend for outdoor use on your furniture set, they’ll likely be able to get you the best suited paint for your job.

For some tips in selecting a paint type:

  • More expensive is not always automatically better, there are loads of more affordable paints which are just as good as the premium products.
  • If your base coat is still good, primer is not necessary. Also look out for self priming plastic paints, these actually work quite well for DIY jobs.
  • Water based is much easier to work with, you don’t have to worry about solvents for cleaning and you’ll save yourself a lot of brushes and rollers, and its better for the environment.
  • Get a little bit extra, you may need more than you think and you can use the extra paint to touch up your furniture in a year or two’s time.

Paint Your Old Patio Furniture

Once you’re done with the furniture, it’s time to move onto the cushions, which usually fade the quickest. Some people have tried dying them, with mixed results. We have a better recommendation, give them a coat of paint as well! Now, there are obviously some limitations in what you can do with paint. You won’t be able to repaint intricate patterns or pictures, but it does work well for plain colours or simple two-tones or stripes.

Which paint works? We’ve tried out a few different techniques and have found that most water based acrylic paints work well, you just need to get the consistency right. When painting cushions, you don’t want to apply a thick layer of paint. You want the paint to be as thin as possible while still achieving the colour you’re looking for. We found that with most paints, its best to water it down in a ratio of 1 cup of water to 2 cups of paint, so however much paint you use, add half as much water to it before you start. You’ll obviously need to re-mix the paint in a larger container in order to water it down. You want the paint to be thin enough to not leave brush streaks and you should still be able to clearly see the weave pattern of the fabric. If the paint is too thick then you’re going to land up with firm and rigid cushions which make crack when you sit on them.

Use a brush for very soft cushions or a foam roller for larger and firmer square and rectangular cushions. Apply a thin coat of paint and allow it to dry before deciding on whether to paint a second coat. Remember that with painting your cushions, less is always better!

To waterproof and seal your cushions after your paint job, you can apply a coat of clear wax, the types sold for use over chalk paints. This will bring out the colour and make them a bit more water resistant. Just make sure that the paint is properly dry before applying the wax, perhaps leave them to dry overnight. Waxing your cushions afterwards is completely optional, it is perfectly fine to leave your cushions just as they’ve been painted.

Have you tried repainting your old patio furniture set and cushions? Let us know how it went for your in the comments section below, we would love to hear your tips, tricks and advice.

Share This Guide

Renew Your Old Patio Furniture Set And Cushions, Make Them Look New Again

5 Ways to Turn Your Home Into a Cozy Oasis

When you’re huddled up in blankets during wintertime, you need all the comfort you can get. Cold weather necessitates an extra level of coziness for your day-to-day living. Achieving this isn’t all that difficult, all you need is a bit of cozy décor to add to the comfy atmosphere of your home. If you’re strapped for ideas, here are some of the best ways to make your home look and feel a lot cozier.

1. Add a couple of pillows to the mix

Add a couple of pillows to the mix

As we all know, pillows are the epitome of comfort. They’re nice to look at and you get to use them to stay comfortable while you sleep. Decorative pillows are great for lounging around the couch, but you can use them for so much more.

With a couple of well-placed pillows, you can make your entire living room into a comfortable oasis. Throw them on the floor and call it extra seating. Even if you have a carpet, adding a couple more pillows on the ground will make your room feel a lot cozier. Guests can have a seat wherever they please and enjoy the atmosphere of your room. Moroccan poufs make for affordable and gorgeous pillow seats for any kind of floor.

2. Throw on some faux fur

If there’s anything that can give your home a luxurious feel, it’s fur. It’s a material that gives you equal parts luxury and comfort. There’s nothing quite like the feeling of fur on your skin. Drape it over the arm of a sofa and you’ll never want to leave your cozy spot ever again. The plush texture of fur makes it great for covering furniture, as it adds a pillow-like texture over the whole piece.

There isn’t much reason to get real fur, though. Faux fur gets the job done just fine. You can get a lot more bang for your buck with a good faux fur purchase. With more material at your disposal, you can get even more creative with your comfortable décor. Provide some physical and aesthetic warmth with your fur choices and you’ll enjoy comfort like never before.

3. Let some natural light in

Let some natural light in

When it comes to lighting options, natural light should always be a priority. During the day, it’s best to take advantage of the light that mother nature gives us to illuminate our homes. Natural light provides you with the warmth and comfort that you need throughout the day. Now, night time is a different story.

You’re probably going to have to turn on the lights come the night, but they’re not your only option for increasing visibility. For that extra bit of comfort, you can always turn to candles. They’re a wonderful source of natural light that also brings a bit of coziness into your space. There’s a reason why all the coziest home designs feature candles. They look nice, they smell nice, and they’re as cozy as can be.

4. Keep it warm and cozy

The best way to add some more comfort to your home would be to better regulate the temperature. Even when your home is kept at an even temperature at the mid-twenties, you can still have some issues with the insulation. Parts of your home might be colder than others. You can’t have a drink and read a good book by the window if it’s always several degrees colder when you get near it.

This is why it’s so important to keep your home’s weak points well-insulated. Start with the doors and windows. If you own an older home, you should consider installing triple glazed windows in place of regular ones. The air between the layers of glass helps keep temperature changes to a minimum. Doors should be reinforced with additional insulation to help prevent leaks at the edges. This way, your whole home will be equally cozy.

5. Use books to add flavour

Use books to add flavour

Books are a wonderful portal into the world of art and imagination. Getting cozy and reading a good book will always put you in a good mood. When it’s raining outside and there’s not much else to do, you can always get lost in your thoughts with some literature. However, books are also an aesthetic element that can add some flair to your home.

Books are a great décor addition for several reasons. For one, they’re pretty cheap for their aesthetic value. Plus, you probably already have a bunch of books that you enjoy, all you need is to place them in the right spots. Adding a wooden shelf to your room and filling it with books would give your home the collected feel of a library. If that weren’t charming enough, the storage option will let you move your books and declutter parts of your home.

Conclusion

Everyone wants to live in a cozy and comfortable home. Counteract the cold outside temperatures by adding some warm aesthetics to the inside of your home. A big part of your home’s comfort factor is the décor. If it looks warm and comfy, you can be sure that it will feel that way as well. Throw in some practical solutions and you’ll be well-prepared for the colder seasons.