Today I’ve got an exciting package to share with you, it’s the new Turing Pi 2 which the guys at Turing Machines have sent me to try out and share with you. So a big thanks to them for making this project possible.
This is the successor to the original Turing Pi, and if you’re wondering what a Turing Pi is, it’s essentially an all-in-one solution for creating a compact Raspberry Pi cluster, without the hassle of sourcing power supplies, cables and network adaptors, and then finding a way to connect them together. Something that I know all too well from my last cluster build.
All of the components required to build your ARM cluster are built into a single board. The original allowed 7 Pi Compute Module 3’s to be clustered together. While this new board has a number of improvements and upgrades over the original, the most significant being that it’s designed to use the newer Compute Module 4’s, so it’s a lot more powerful.
Here’s a video of my unboxing and assembly of my Turing Pi 2 cluster, read on for the write-up:
What You Need For This Project
- Turing Pi 2 – Buy Here
- 4 x Raspberry Pi CM4 Modules – Buy Here
- 4 x Waveshare CM4 Heatsinks – Buy Here
- or 4 x NVIDIA Jetson Nano Modules – Buy Here
- Sandisk MicroSD Cards (For Nodes without eMMC Storage) – Buy Here
- PicoPSU ATX Power Supply – Buy Here
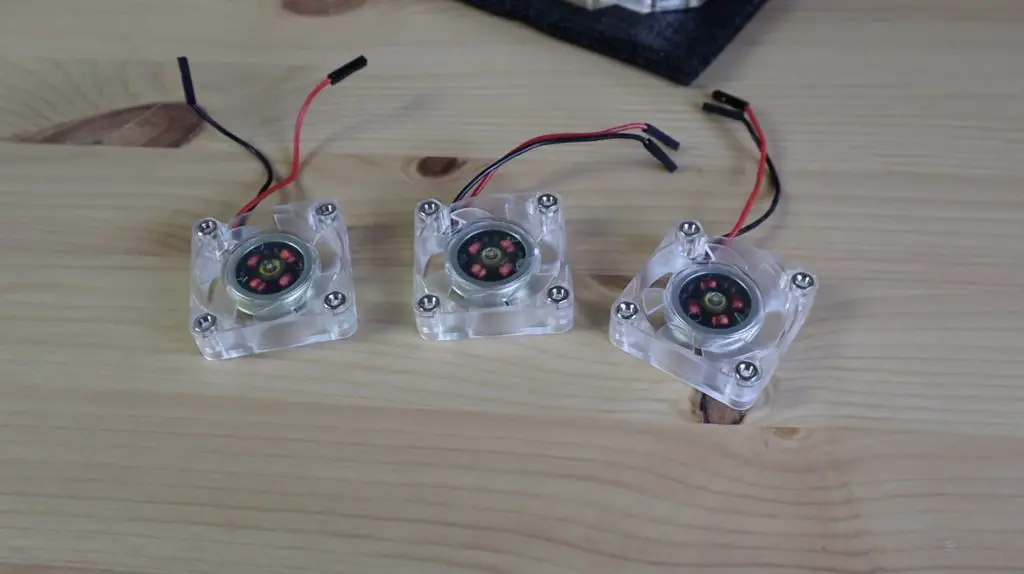
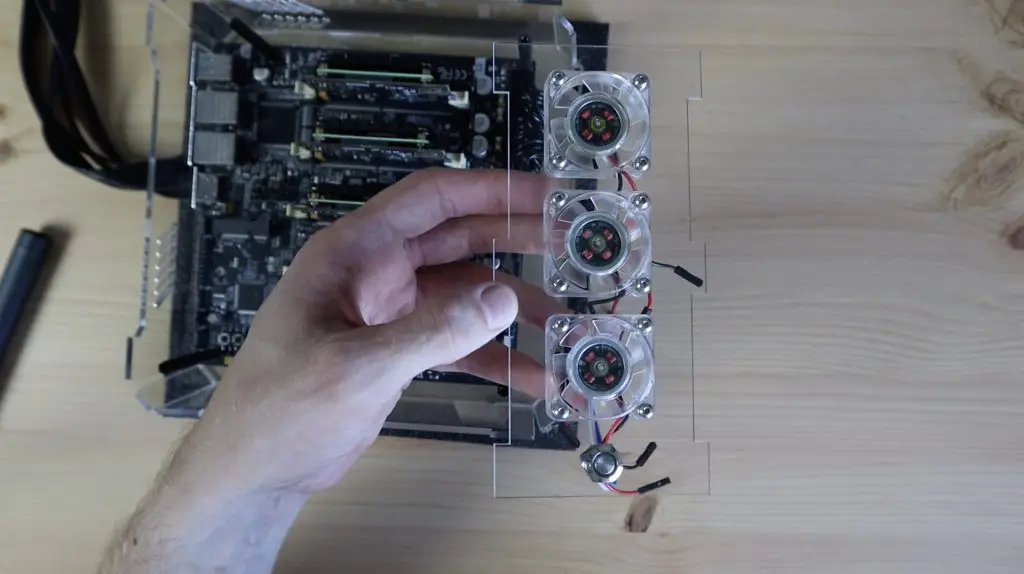
- 3 x 40mm 5V RGB Fans – Buy Here
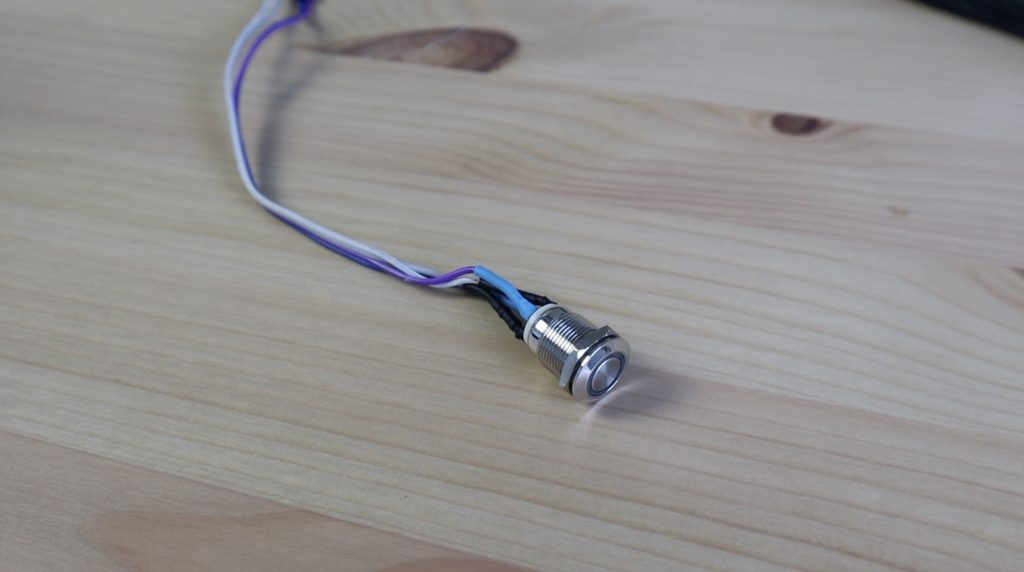
- Power Button – Buy Here
- M3 Brass Insert Set – Buy Here
- M3 Nylon Standoff Set – Buy Here
- M3 Button Head Screw Set – Buy Here
- 6mm Clear Acrylic – Buy Here
- 3mm Clear Acrylic – Buy Here
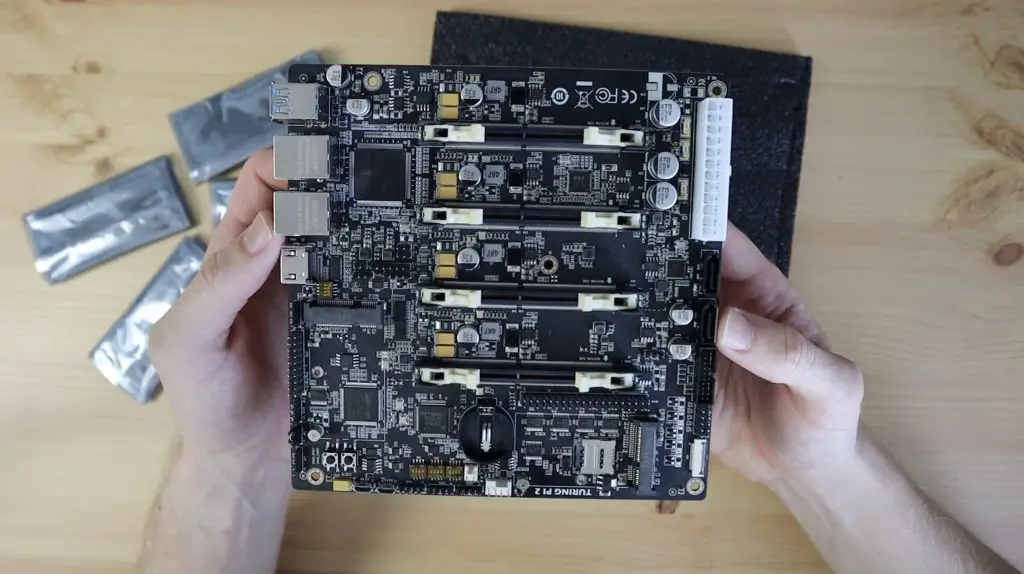
First Look At The Turing Pi 2
Now that you have a rough idea of what the Turing Pi 2 is, let’s take a closer look at the board.
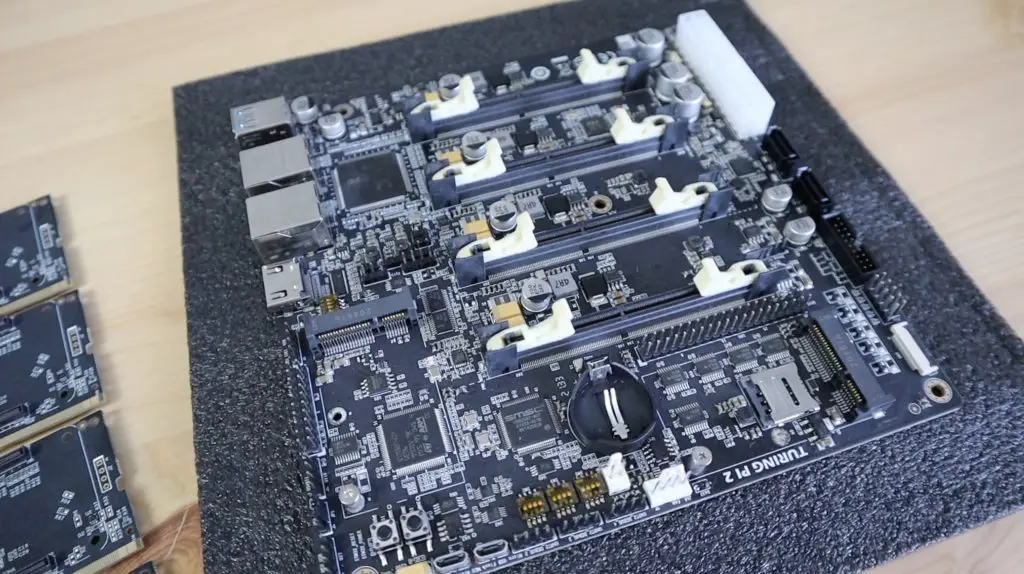
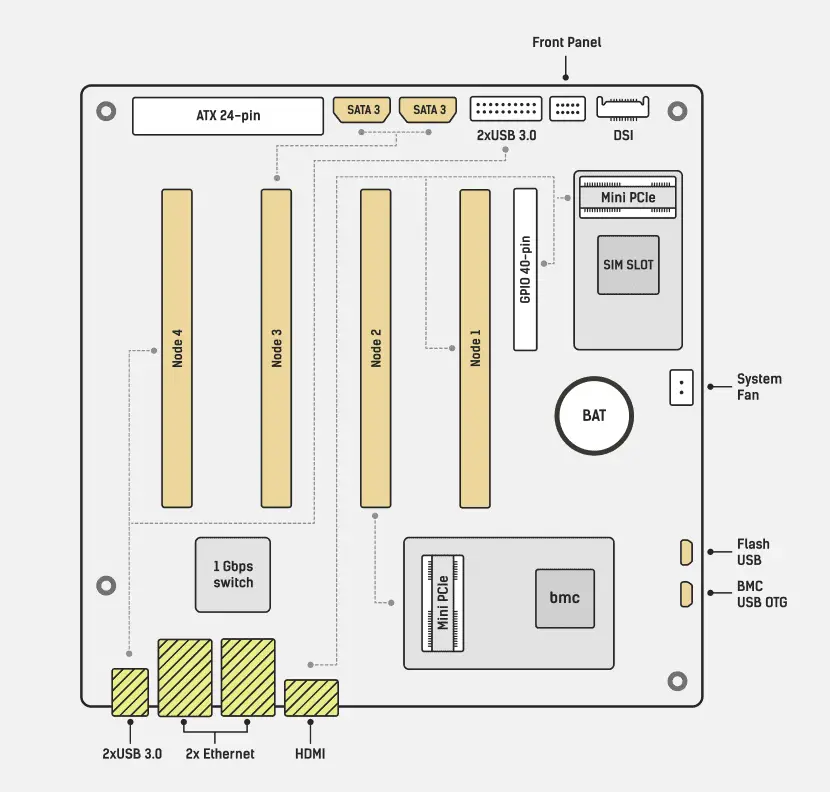
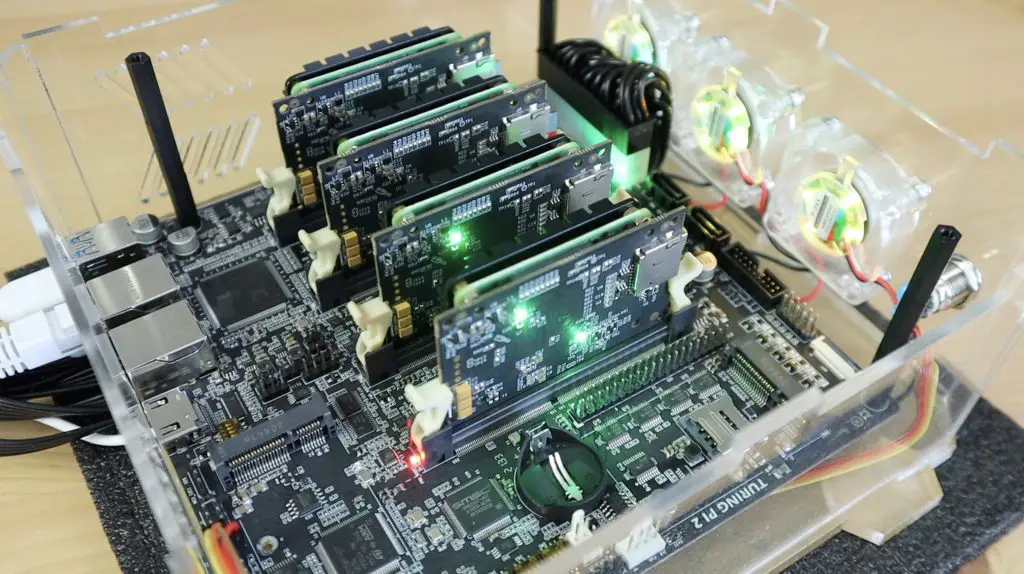
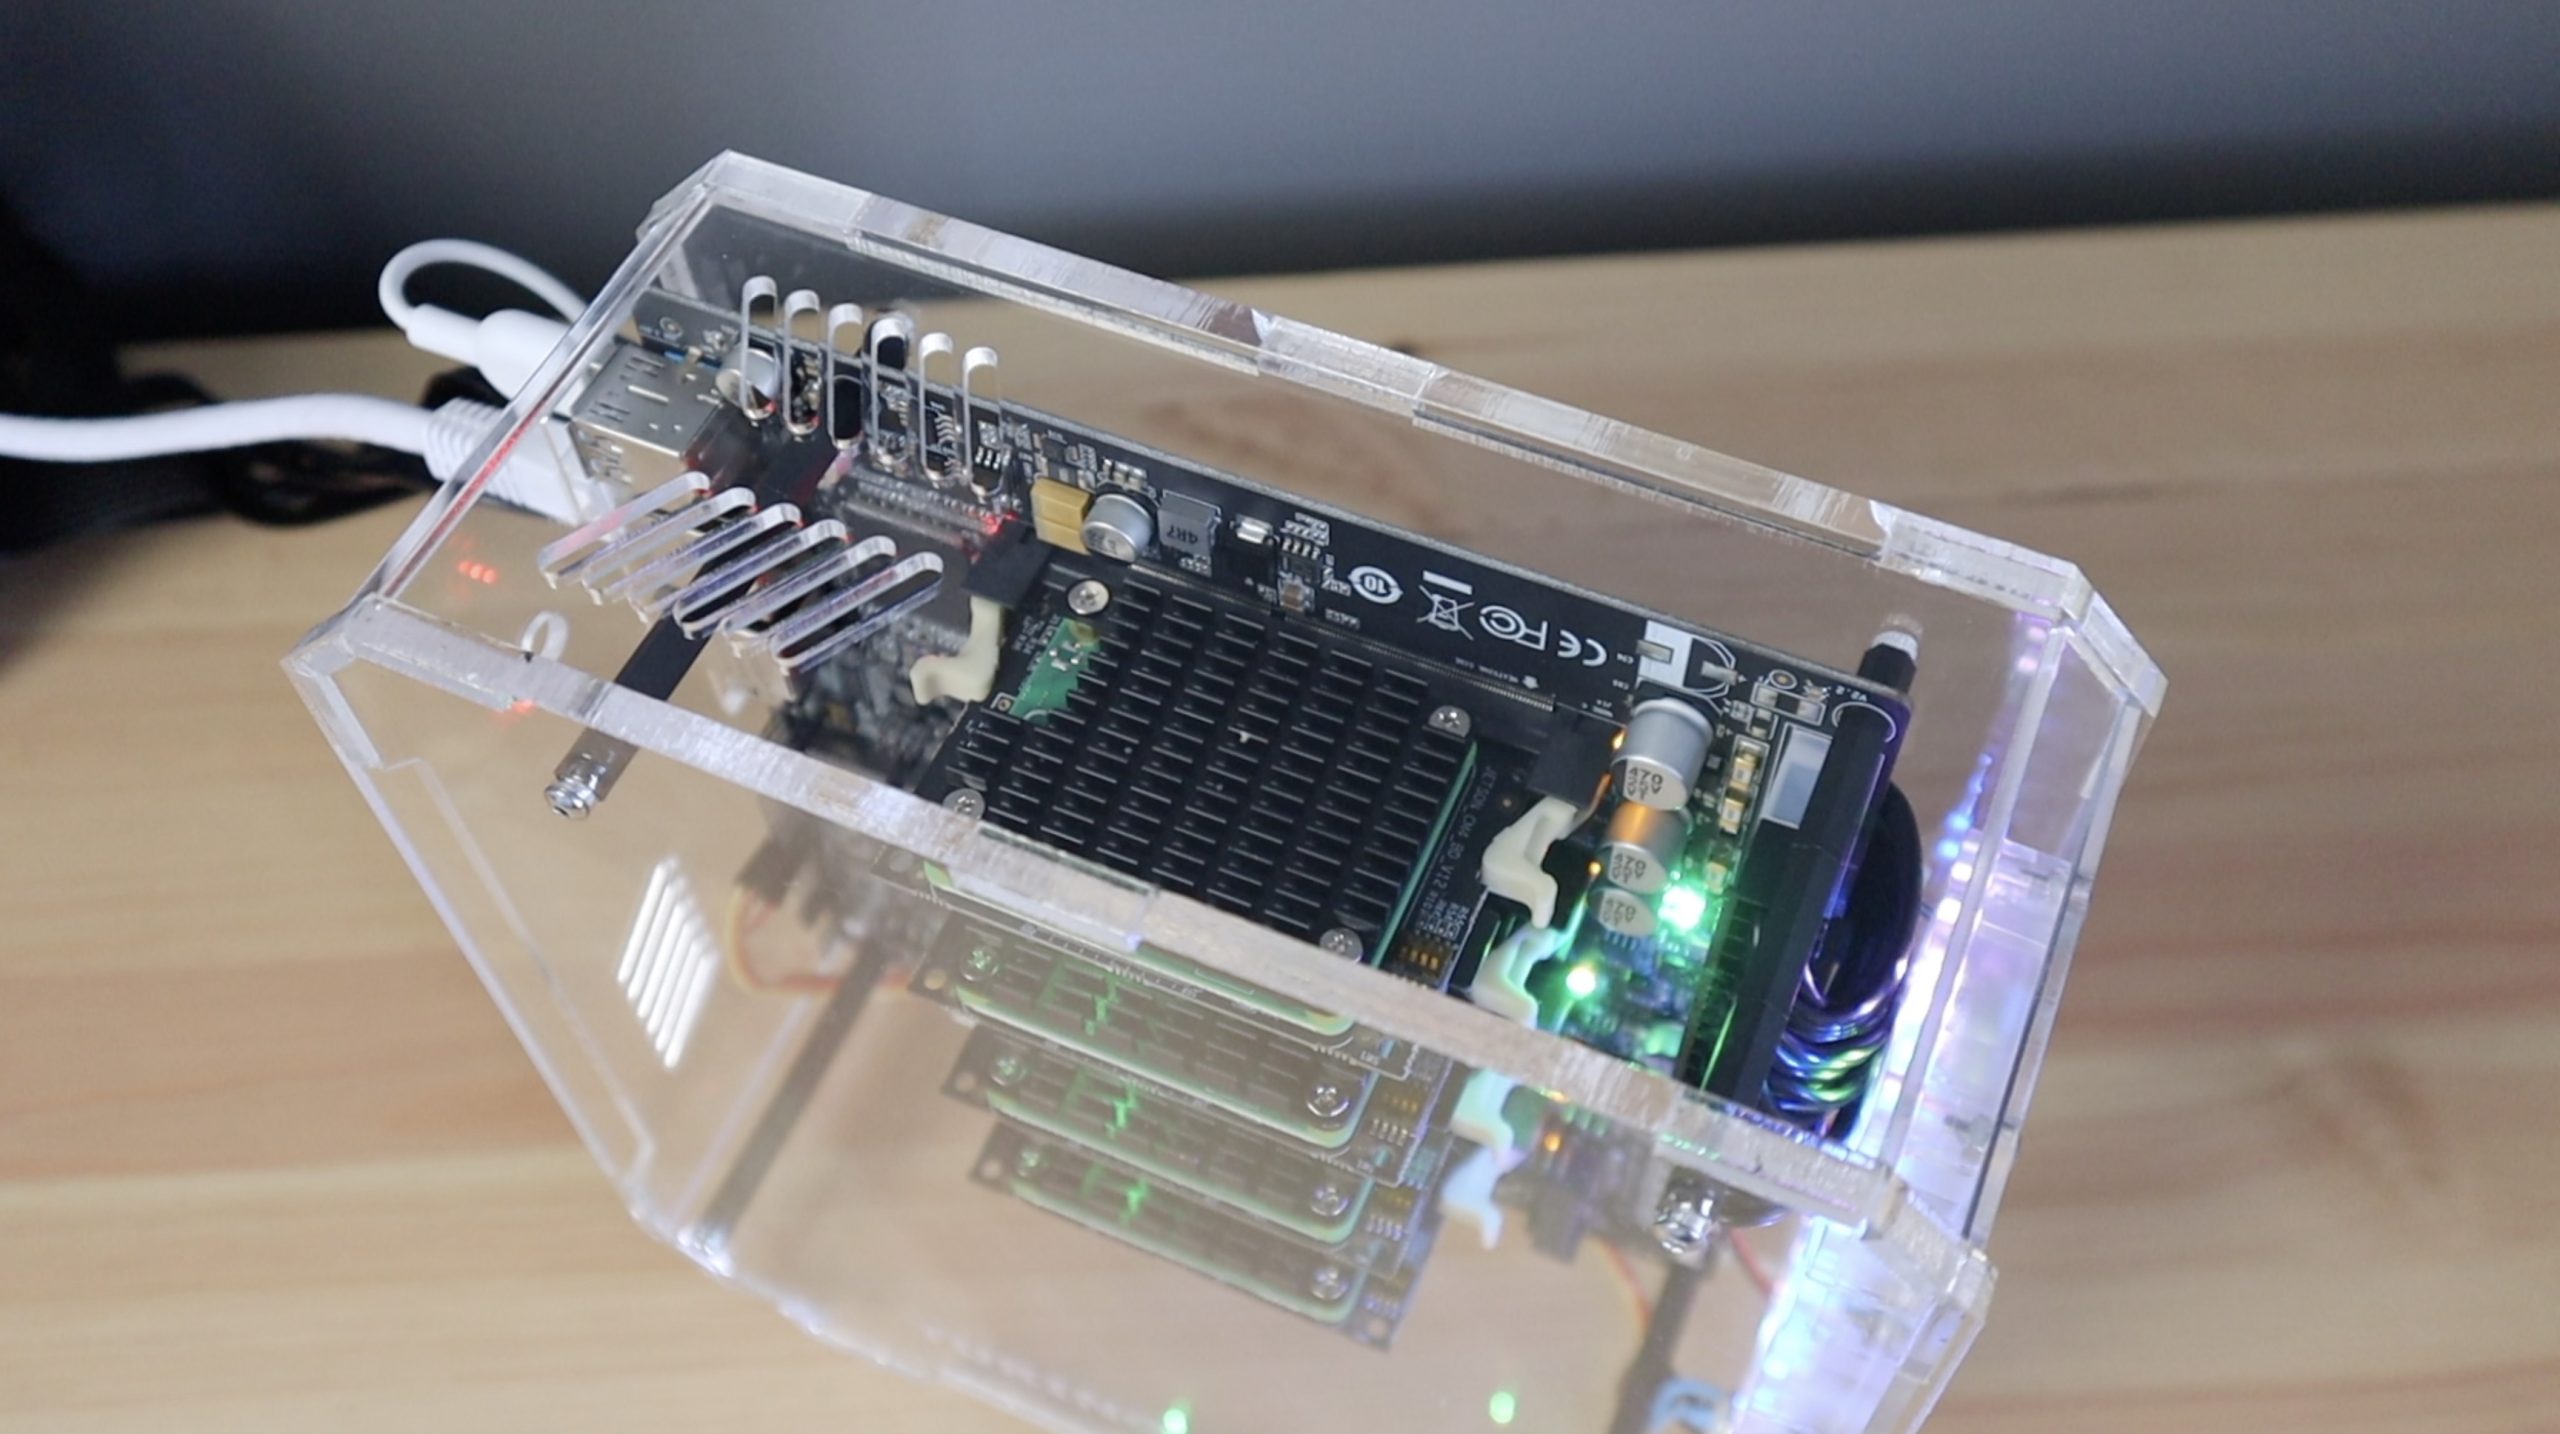
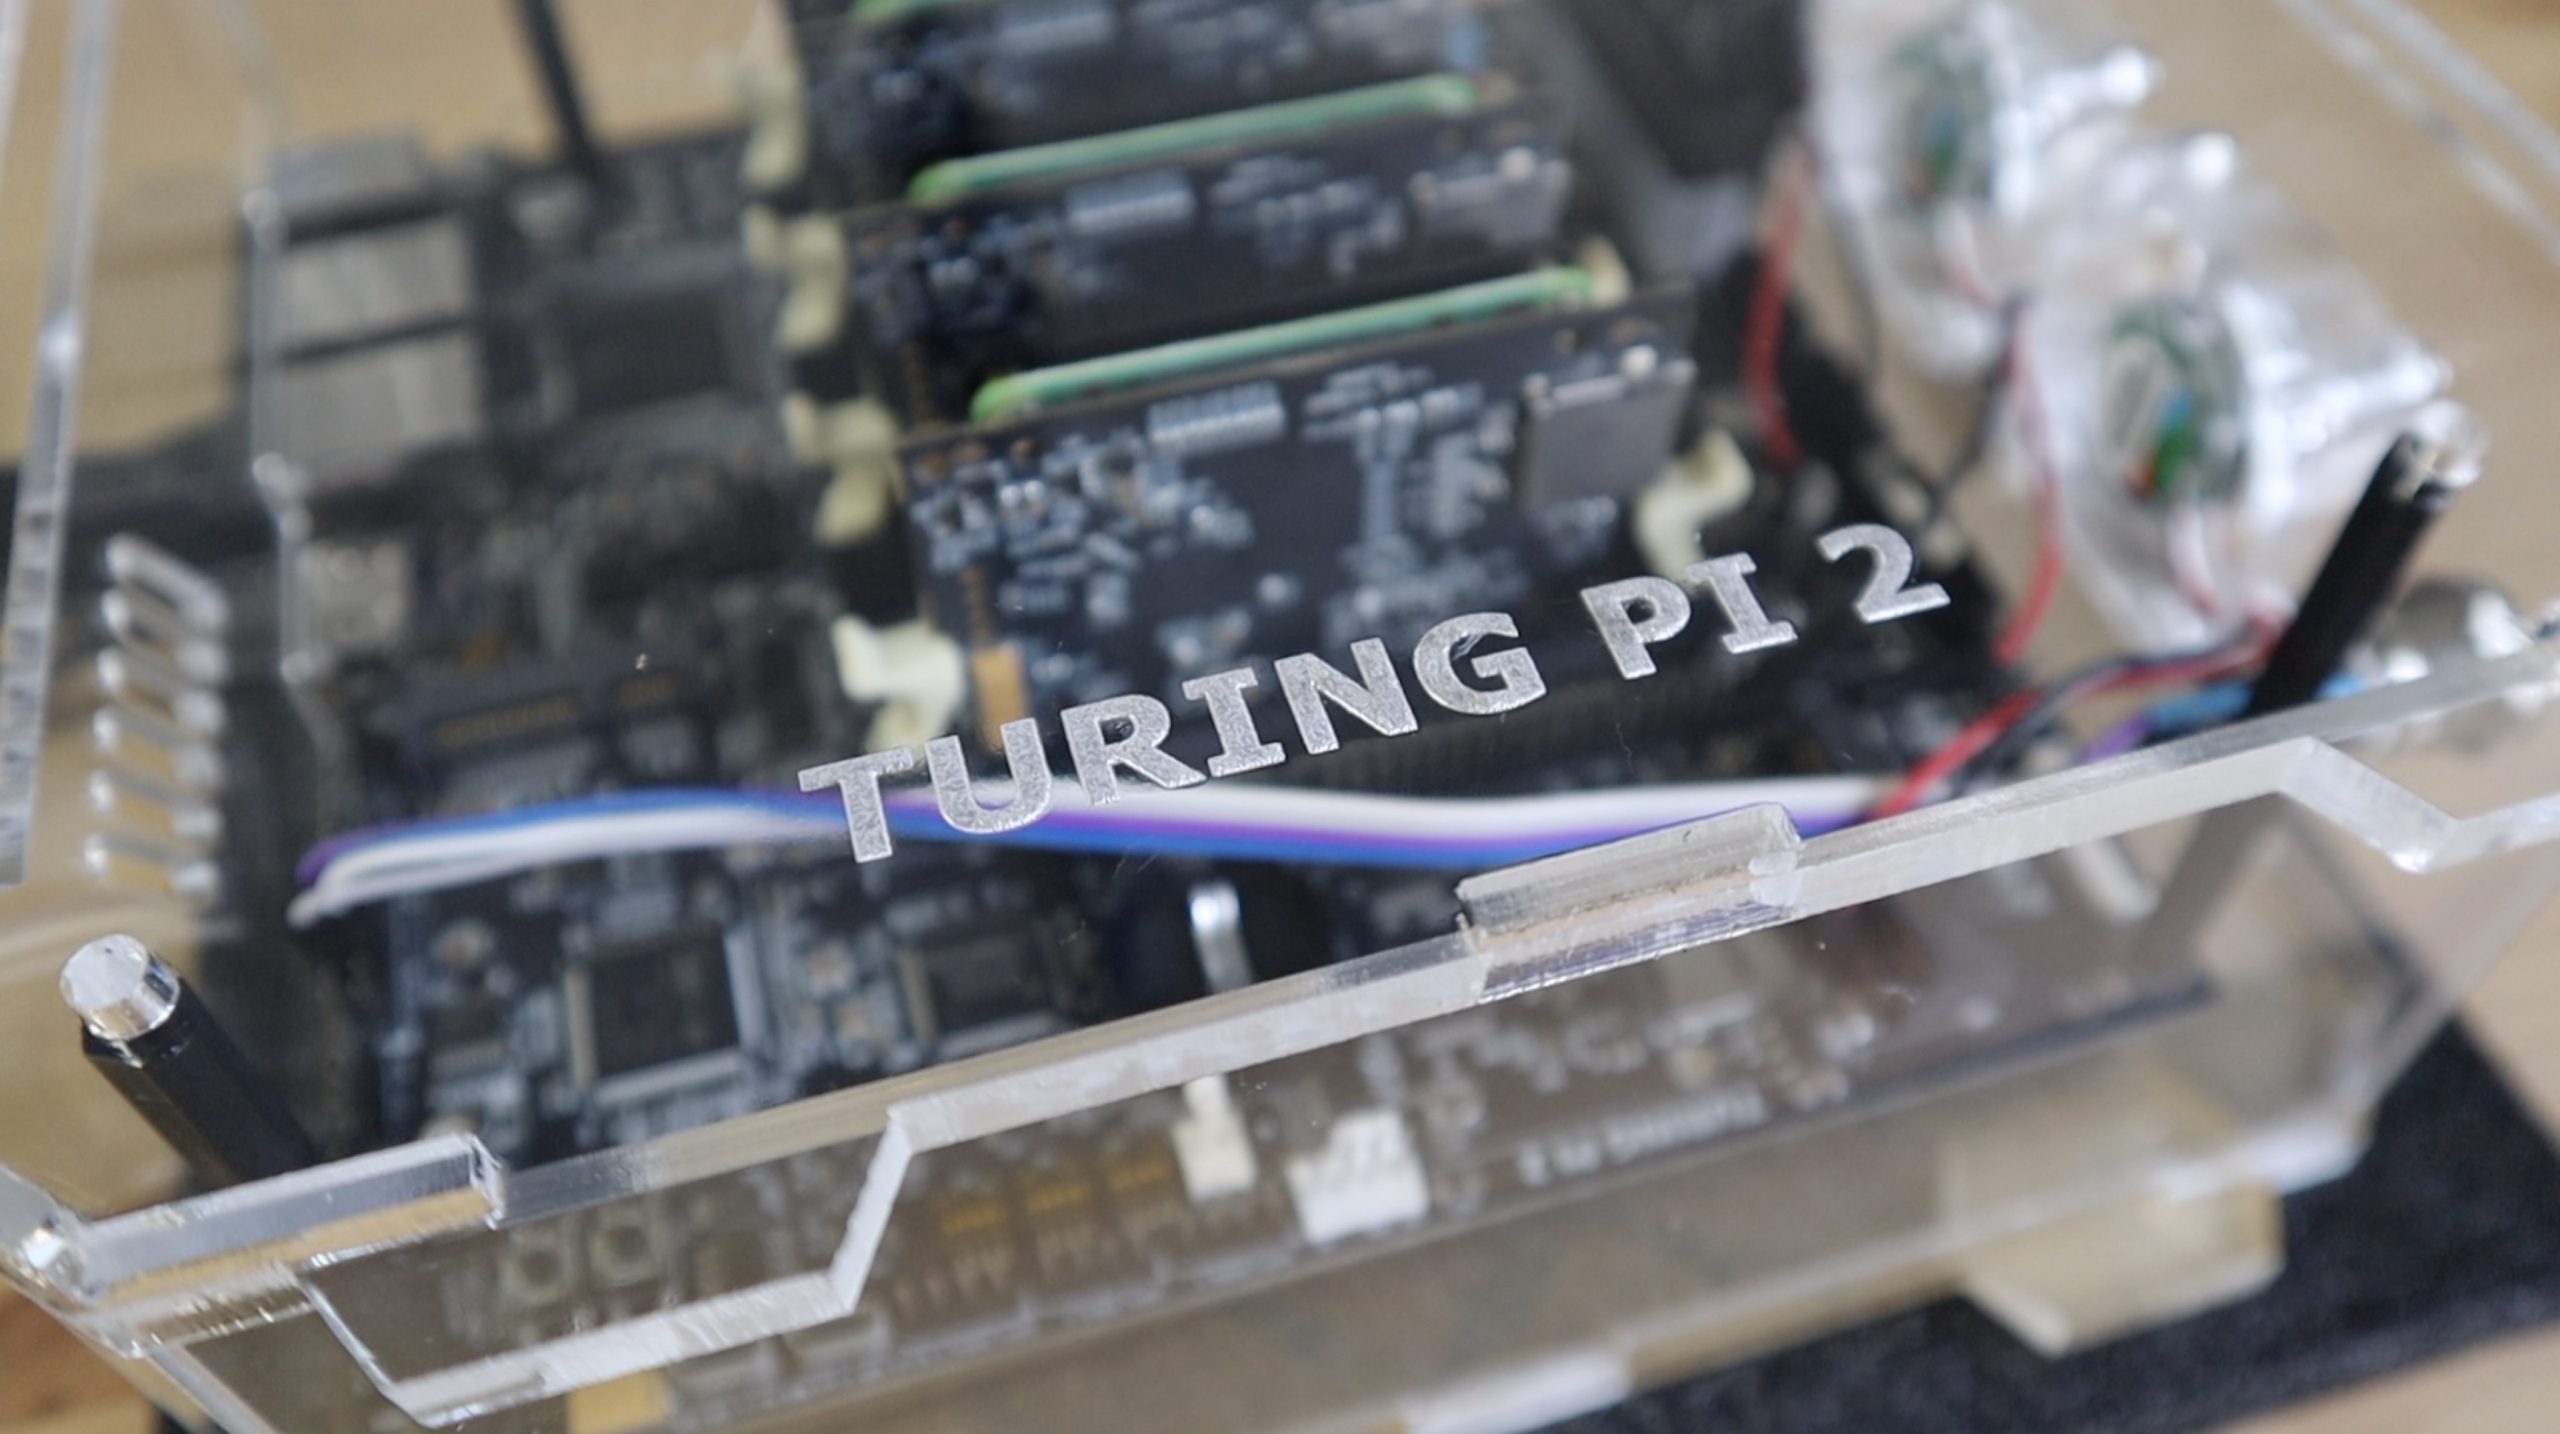
The Turing Pi 2 has 4 SO-DIMM slots that can each accommodate either a Pi Compute Module 4, through an adaptor board, or a NVIDIA Jetson module.
It’s Mini ITX design means that it’ll also fit into standard ITX computer cases.
It’s got an onboard managed gigabit ethernet switch that networks the 4 slots and makes them accessible through one of the two onboard Ethernet ports.

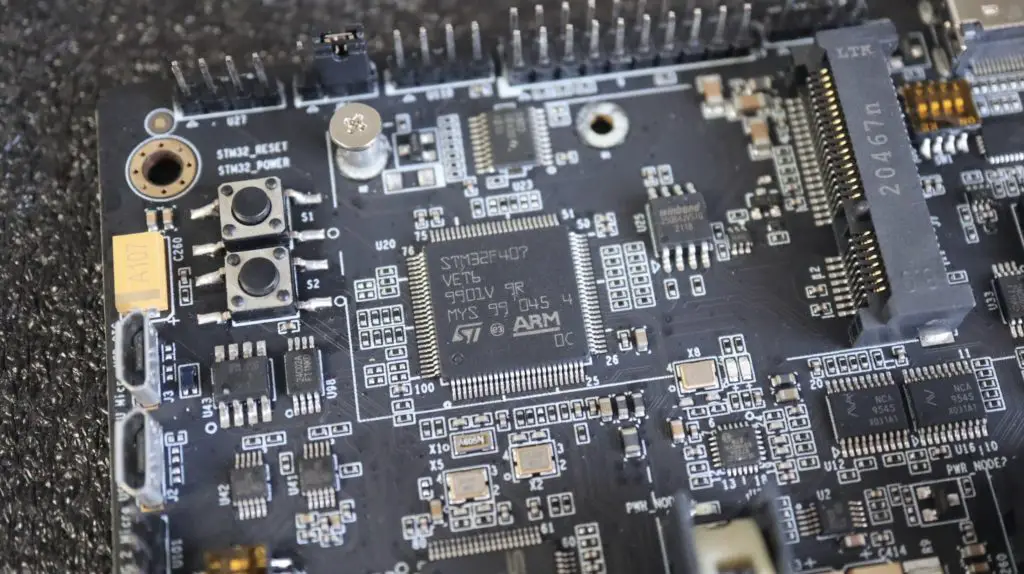
An onboard management controller manages things like fan speed through a J17 connector, interface buttons and LEDs, as well as power to each slot.
Each slot also has some additional interfacing associated with it, so you’ve got HDMI, GPIO and a mini PCIe port available to slot 1, a mini PCIe port available to slot 2, two SATA III ports available to slot 3 and four USB 3 ports available to slot 4.
If you’re going to be using CM4 modules, like I am, then you’ll need to use these adaptor boards to be able to plug them into the SO-DIMM slots.
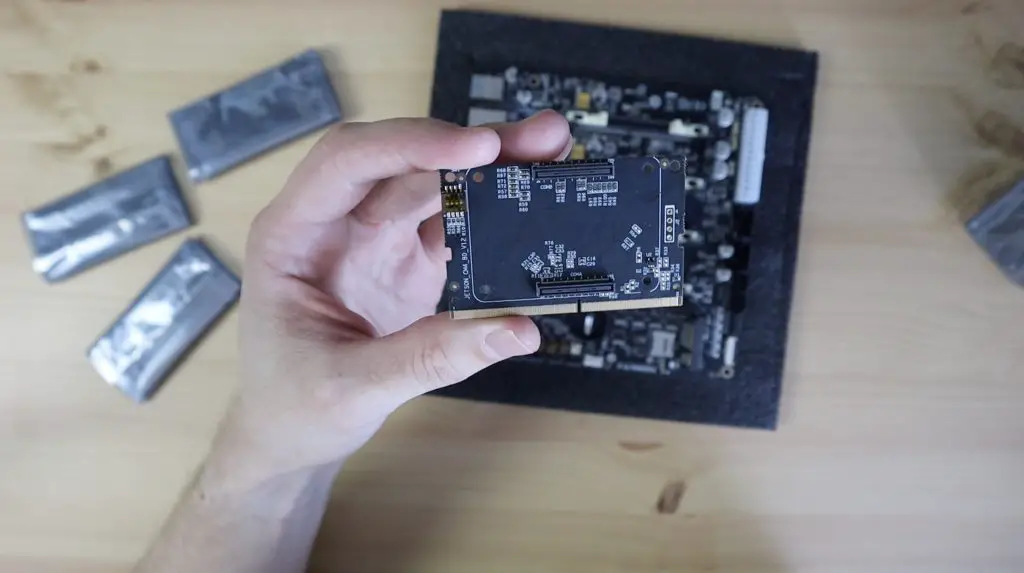
These adaptor boards also have onboard SD card slots, which you’ll need for the operating system image if you’re using a Compute Module without onboard EMMC storage.
Preparing The CM4 Modules
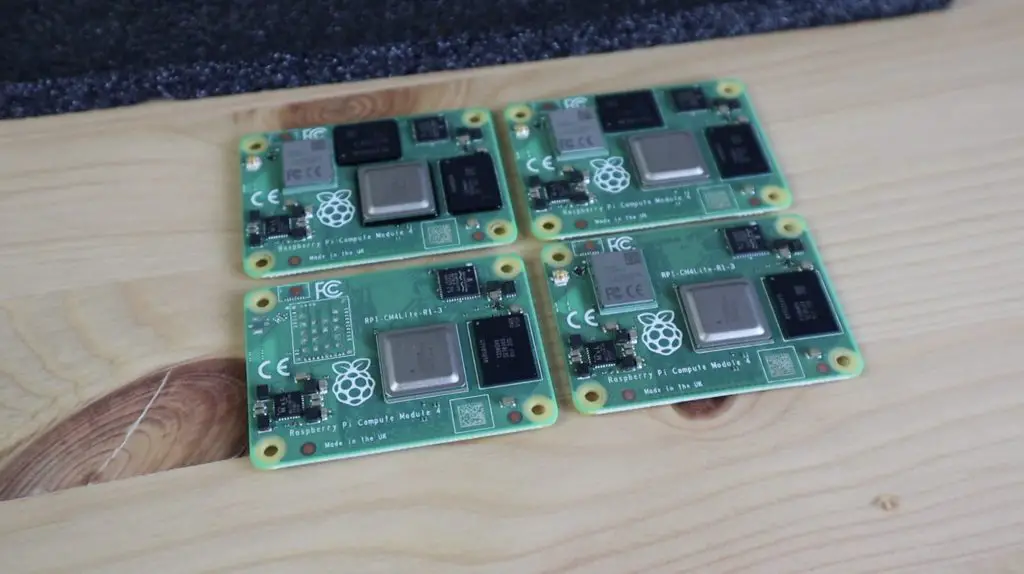
If you can source the right CM4 modules, you can theoretically create a 16 core cluster with 32GB of ram. Unfortunately, CM4 modules are pretty scarce at the moment, so I have to use what I’ve got available. I’ve got two 4GB CM4 modules with 32GBs of onboard EMMC storage, and I’ve got two 2GB CM4 Lite Modules, meaning that they don’t have any onboard storage. One of these Lite modules has WiFi and the other doesn’t, but we’re not going to be using that in this cluster in any case.
The CM4 modules just snap into place on the adaptor boards. There are four holes in the corners to hold them together with some machine screws, but I prefer not to use these as they tend to bend the CM4 modules if you don’t use the right size spacers.
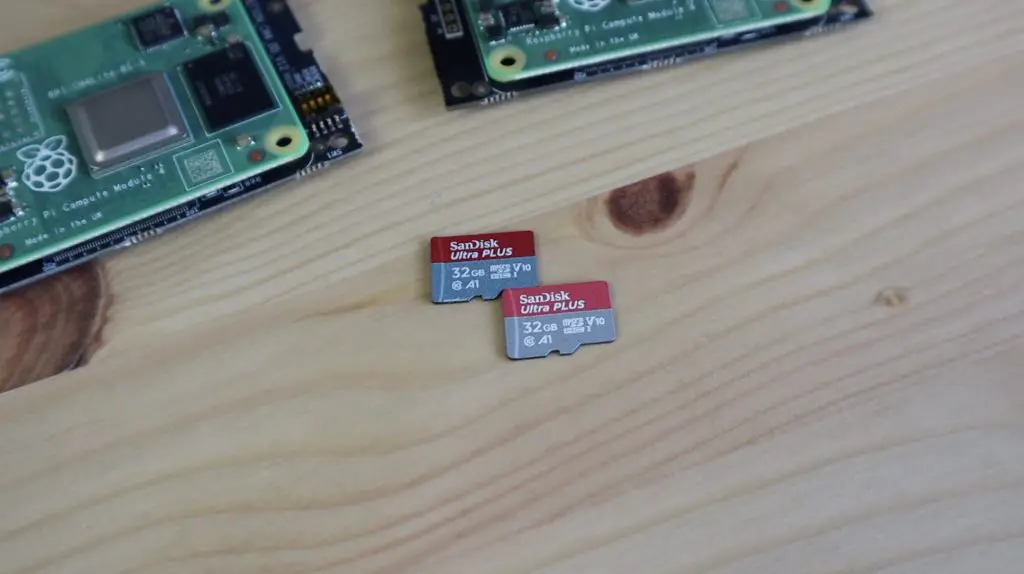
On the two Lite modules, I’ll need to use micro-SD cards to load the operating system. I’m using Sandisk Ultra Plus cards for this, they’re reasonably cheap but are still fast and reliable.
The modules can then just be pressed into the SO-DIMM slots and they’re then ready to go. They are also apparently hot-swappable, meaning you can plug in or remove them from the slots without having to turn the power off, although I’d prefer not to chance this.
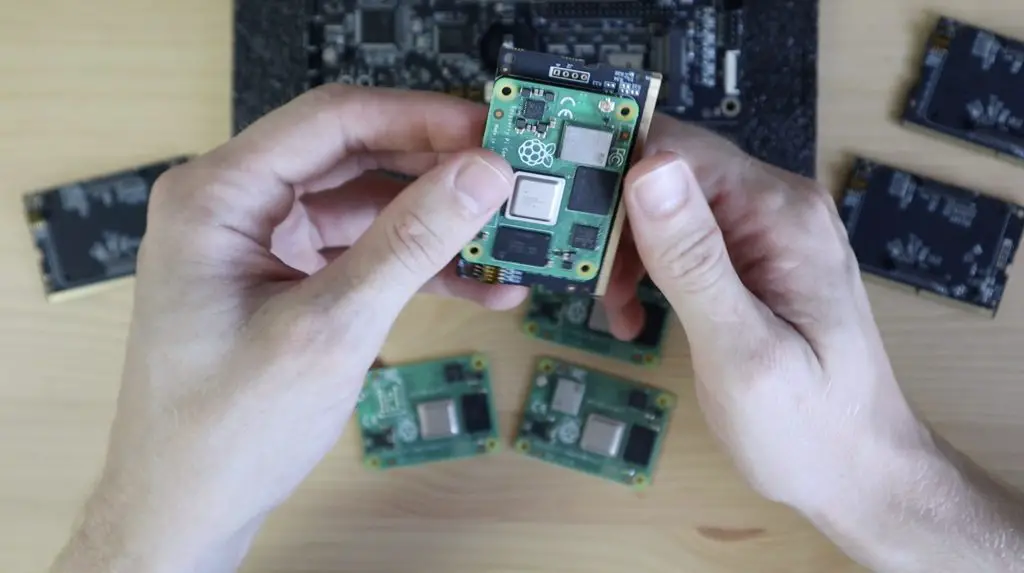
Before I plug all of them into the board, we need to do something to assist with keeping the modules cool. I’m going to be using these black aluminium heatsinks by Waveshare. They are just screwed into place over the CM4 module, using the four screw holes in the corners, with some thermal tape between the heatsink and the CPU and Ethernet controller.
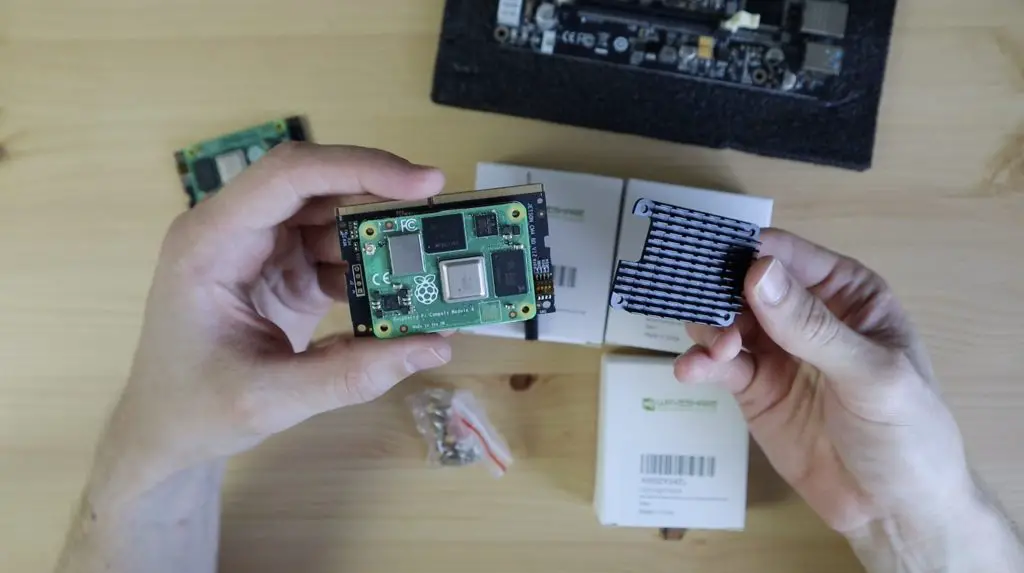
Waveshare’s instructions are for the nuts to face outwards, but I think they look better with the brass standoffs and screws the opposite way around so that the screw heads face outwards. This doesn’t seem to cause any issues with the spacing, the nuts fit perfectly between the CM4 modules and the adaptor boards.

Let’s add the heatsinks to all of the modules and we can then plug them into our Turing Pi 2 board.

With that done, our cluster is basically assembled. All we need to finish it off is to plug in a power supply and an Ethernet cable.
Powering The Turing Pi 2
Power is supplied to the board through a 24 pin ATX connector from a typical computer power supply. They recommend using a compact supply, like the PicoPSU, mine hasn’t arrived yet, so I’m going to be using a 450 watt power supply from another project.
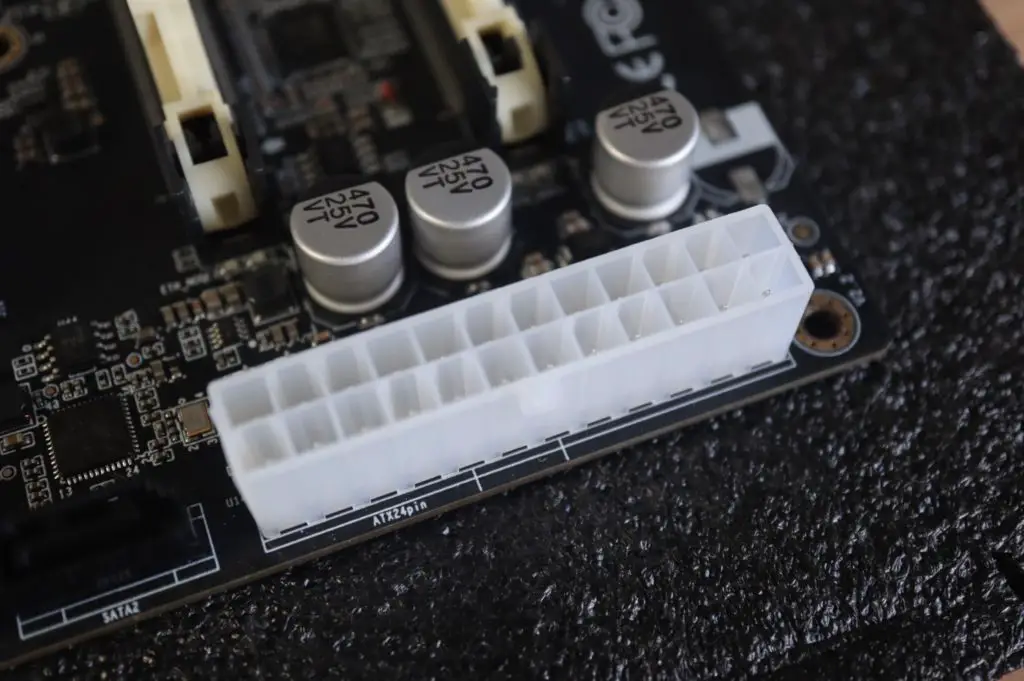
The board only needs a maximum of around 60 watts, so I’ll definitely be changing over to the PicoPSU as soon as it arrives.
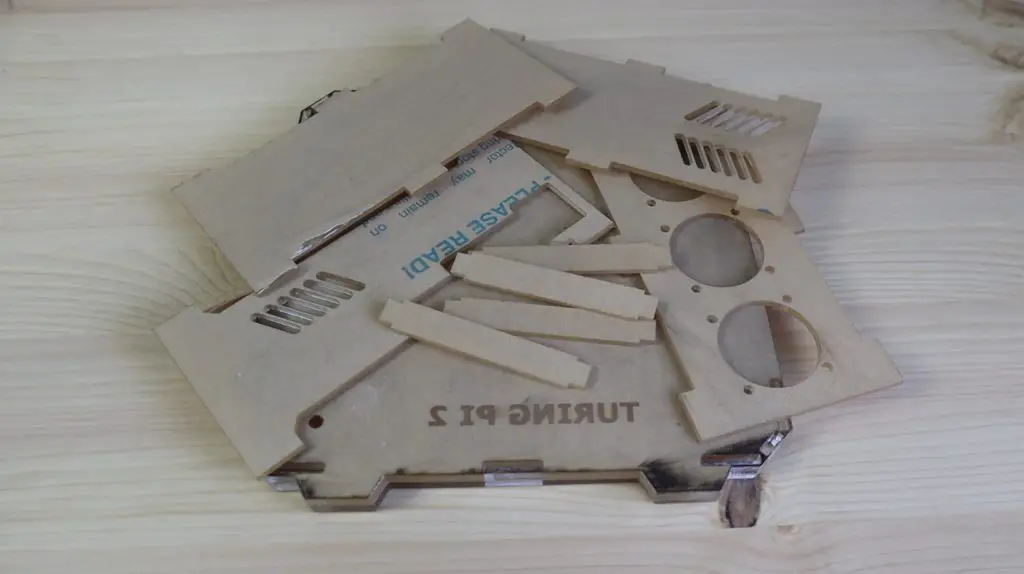
Designing & Laser Cutting A Case For The Turing Pi 2
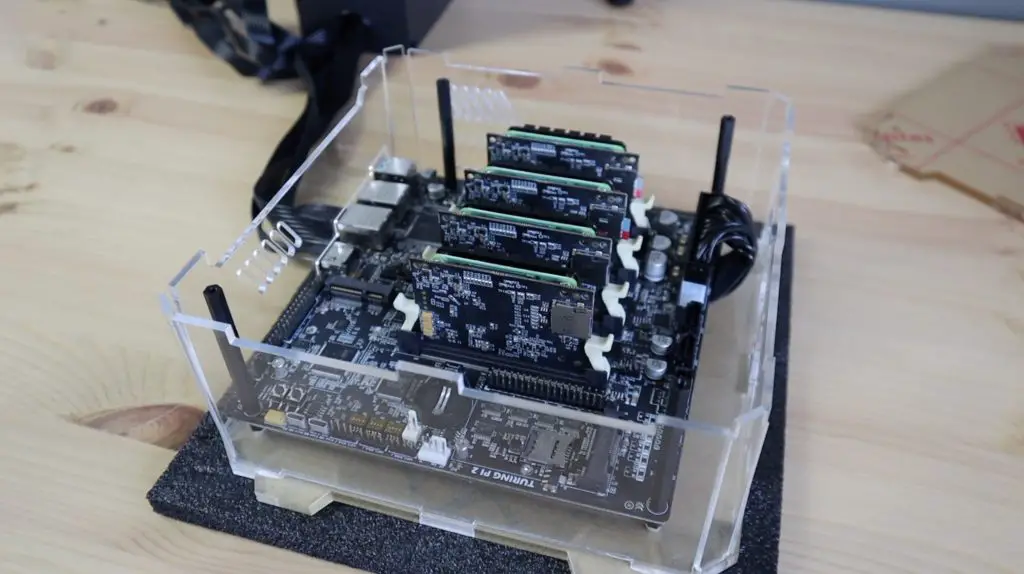
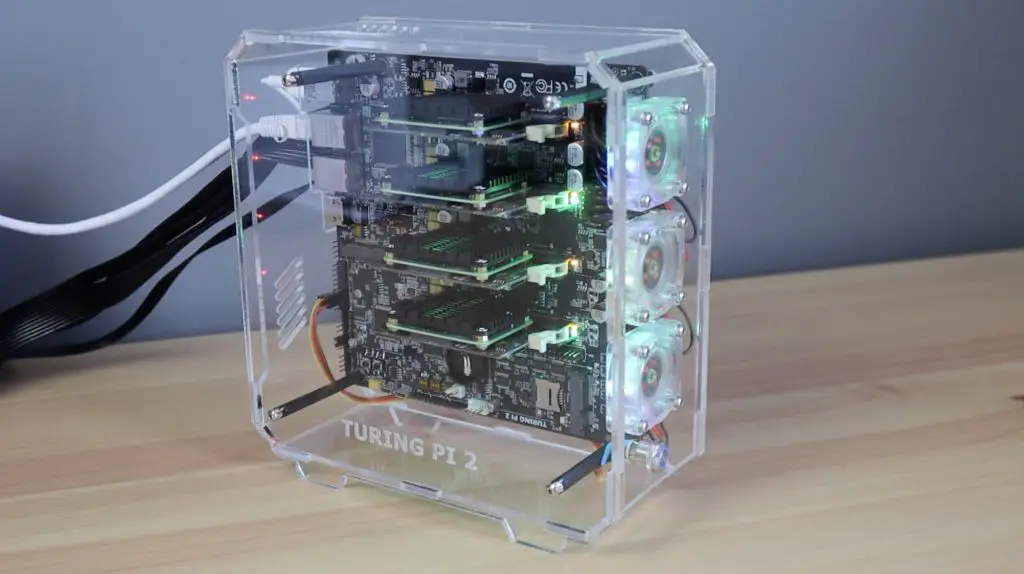
As I mentioned earlier, you can put the Turing Pi 2 board into any mini ITX case. I had a look online for some options, but they’re all too bulky for what I am going to be using the cluster for. I also like the look of the Turing Pi 2 board and modules, especially once all of the power and activity lights are on, so I’m going to design and cut my own from clear acrylic.
I started out with a similar form factor to my water-cooled Raspberry Pi build. Since the mini-ITX board already has screws in the four corners, I could use nylon standoffs and do away with the 3D printed corner pieces. So I could make an all-acrylic design.
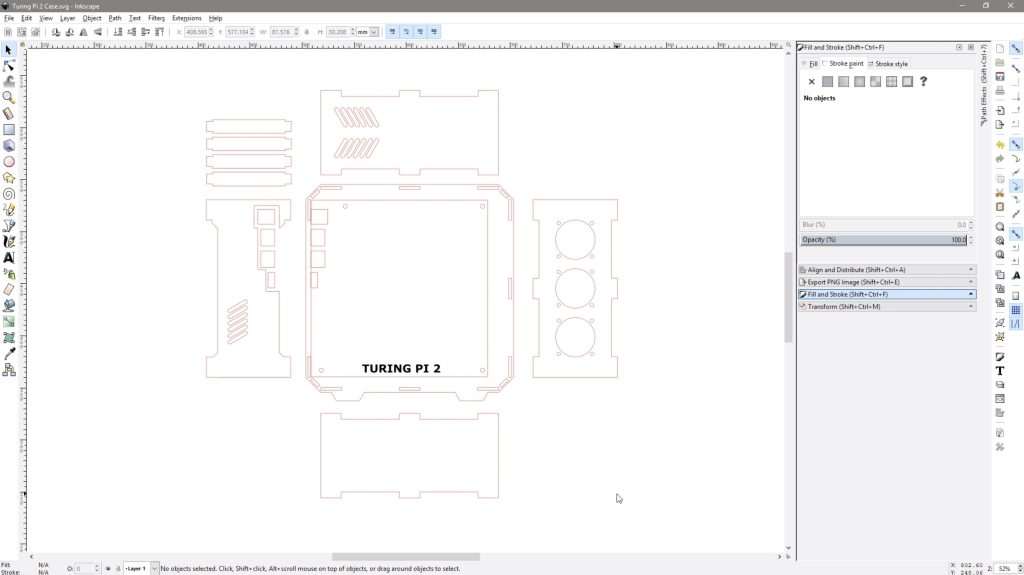
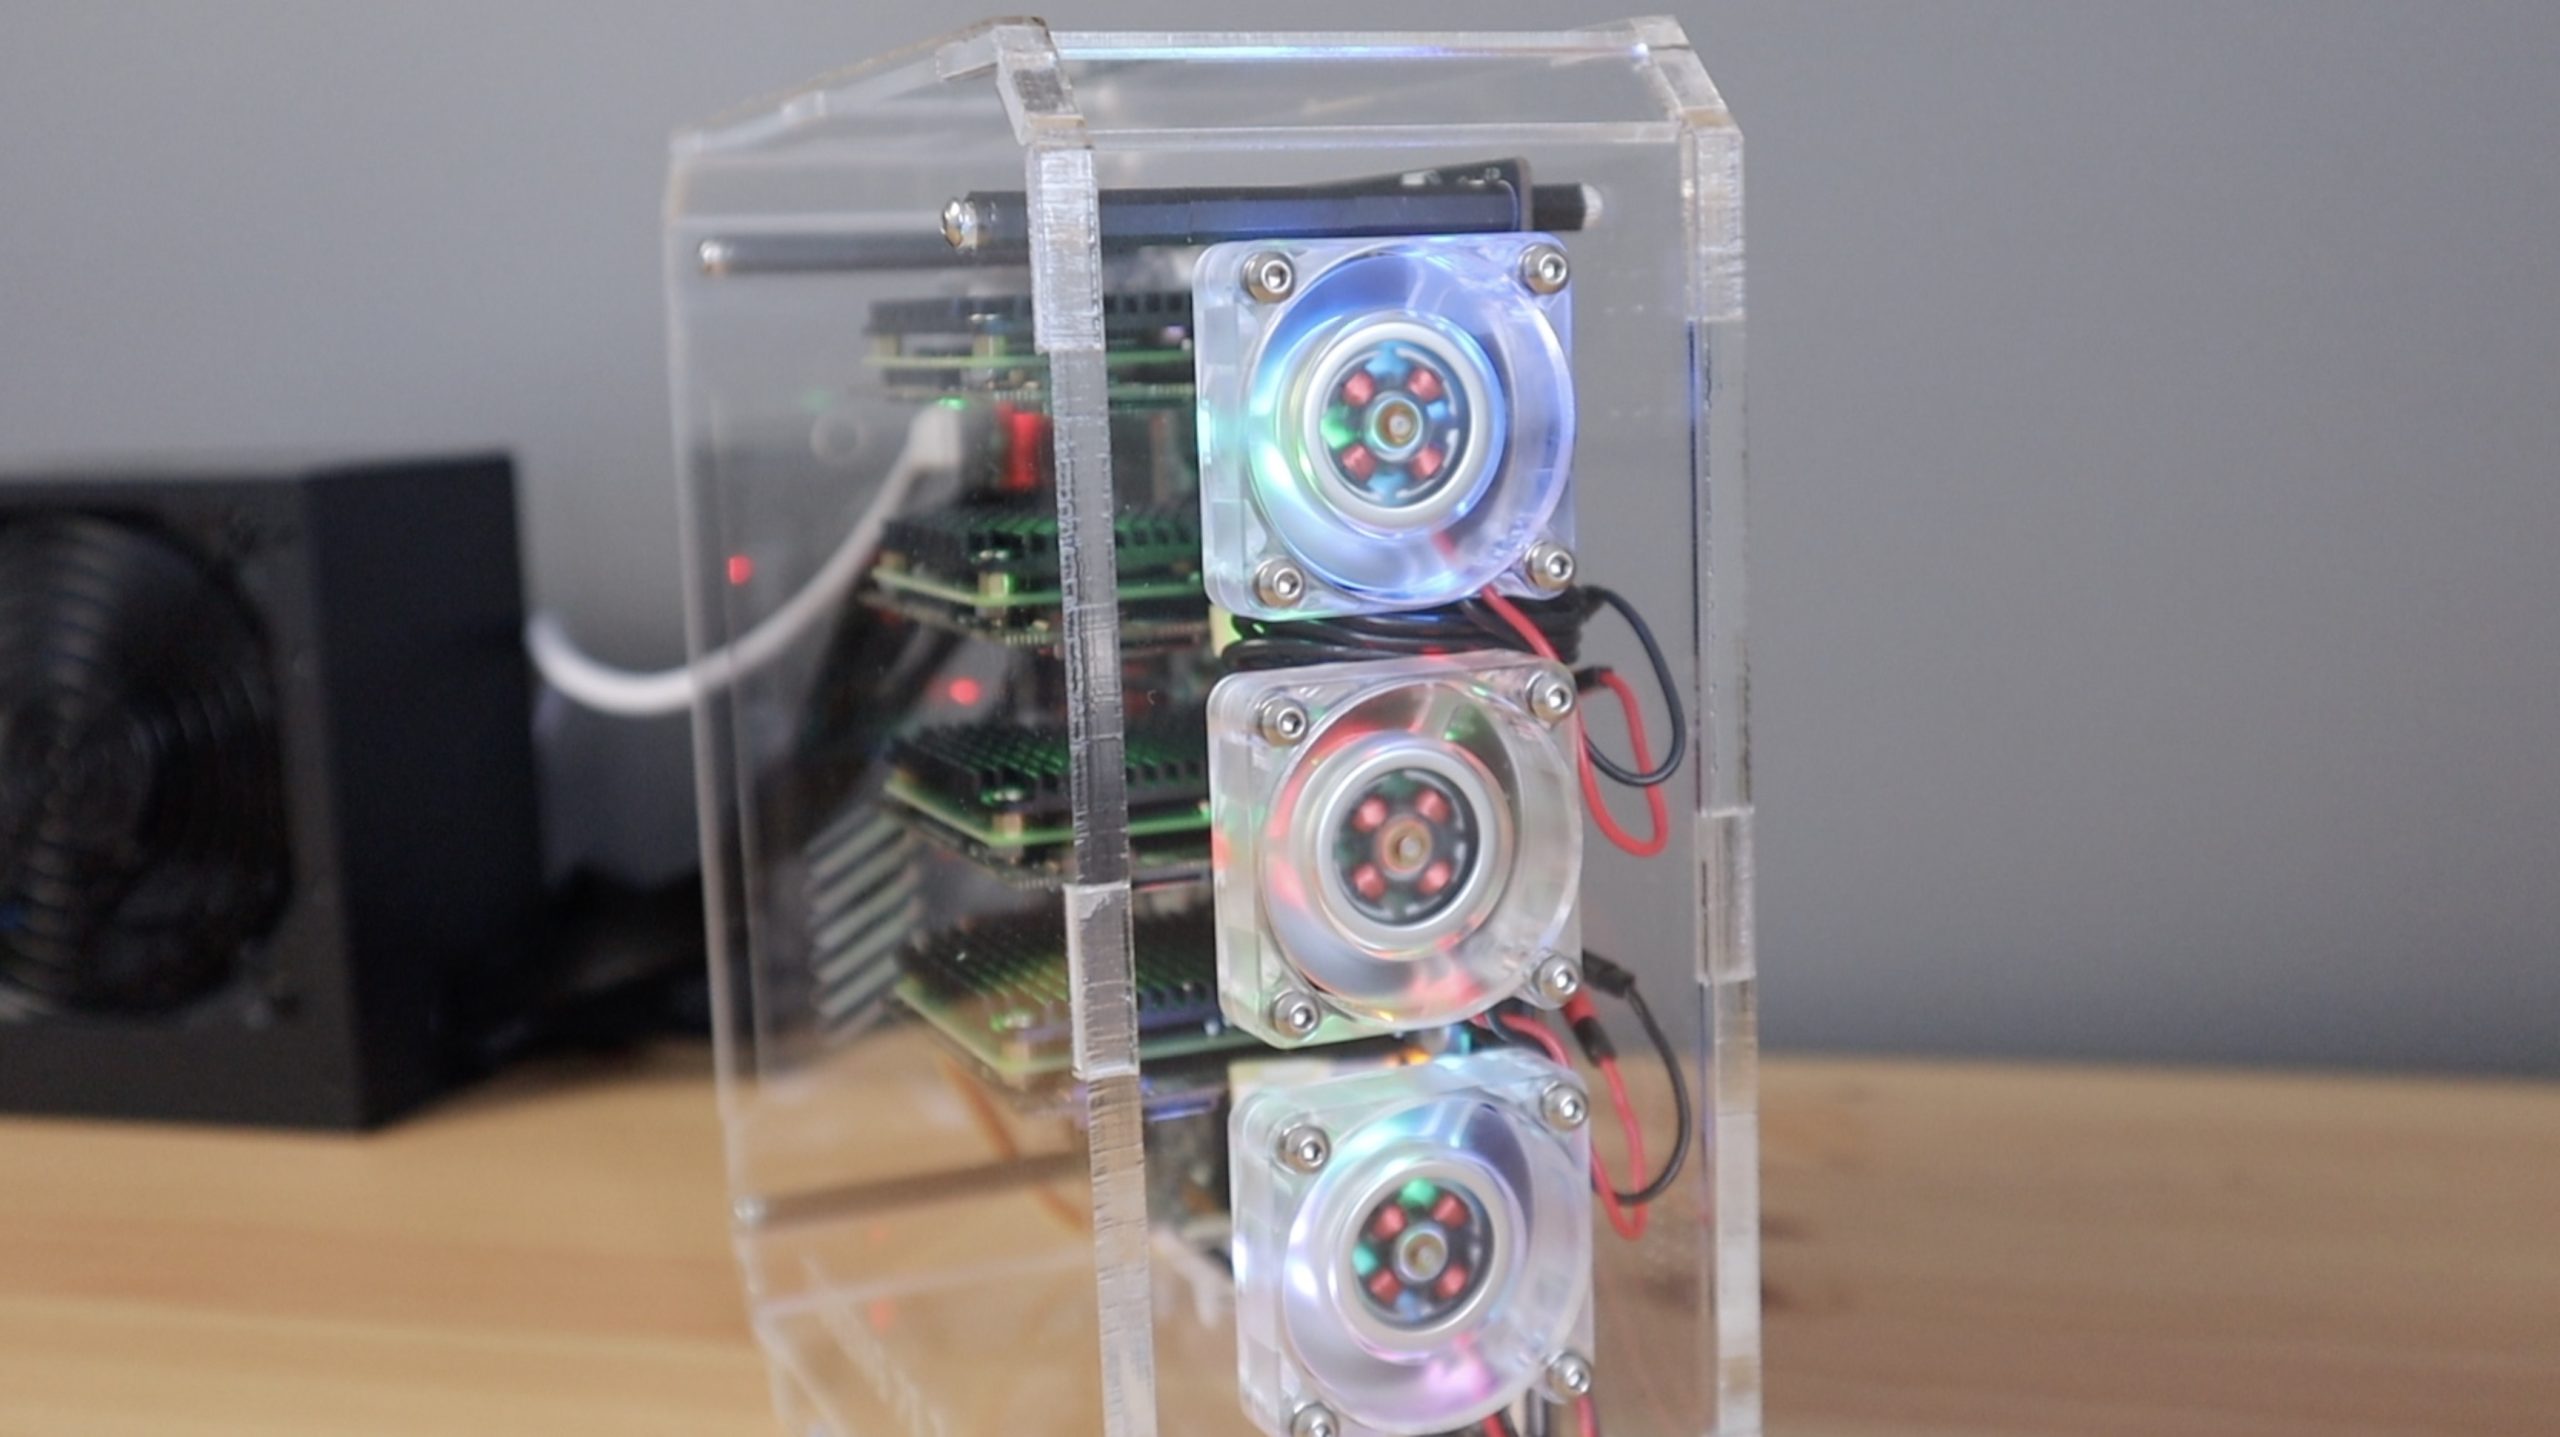
I added cutouts for the ports at the back and cutouts for three 40mm 5V fans on the front. You could rather use a single 120mm fan on the side as a quieter solution, but they’re quite thick and the fan will then cover up the CM4 modules, which is what I wanted to avoid in the first place. I also added a cutout for a power button on the front panel and then some ventilation holes to allow the fan’s air to escape at the top and on the back.
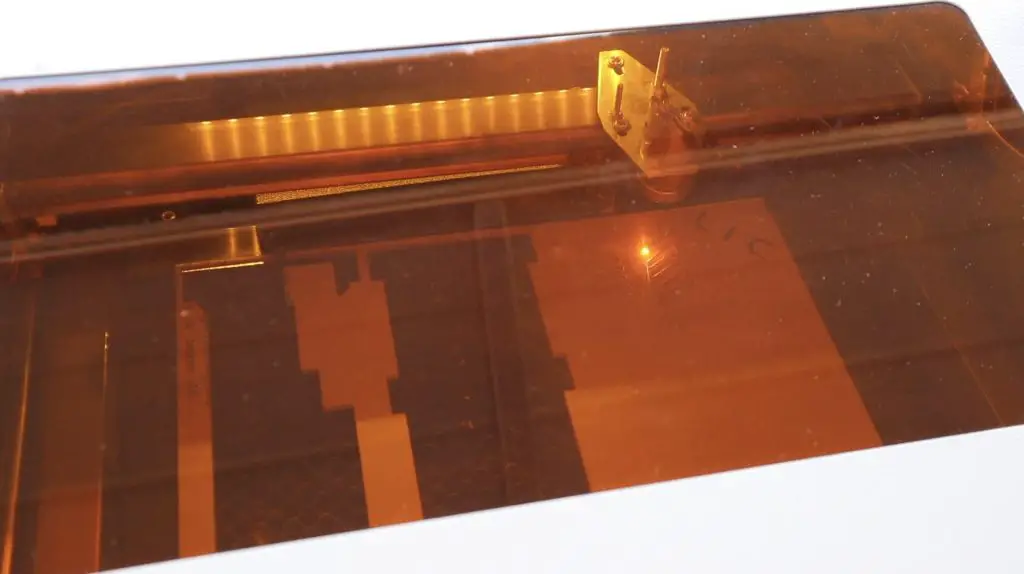
With the design done, let’s get it cut out on my laser cutter.
I’m going to use 6mm clear acrylic for the larger side panels to give it some rigidity.

The other panels will all be cut from 3mm acrylic.
Assembling The Turing Pi 2 Case
Once the panels are all cut, we can start assembling our case.
As mentioned earlier, I’m going to be mounting the board using some M3 nylon standoffs. So let’s start by melting an M3 brass insert into each of the holes in the back side panel so that we’ve got something to screw the standoffs into. The melting temperature of acrylic is about 150-160°C, so if your soldering iron has an adjustable temperature setting then set it at 160°C or slightly higher.

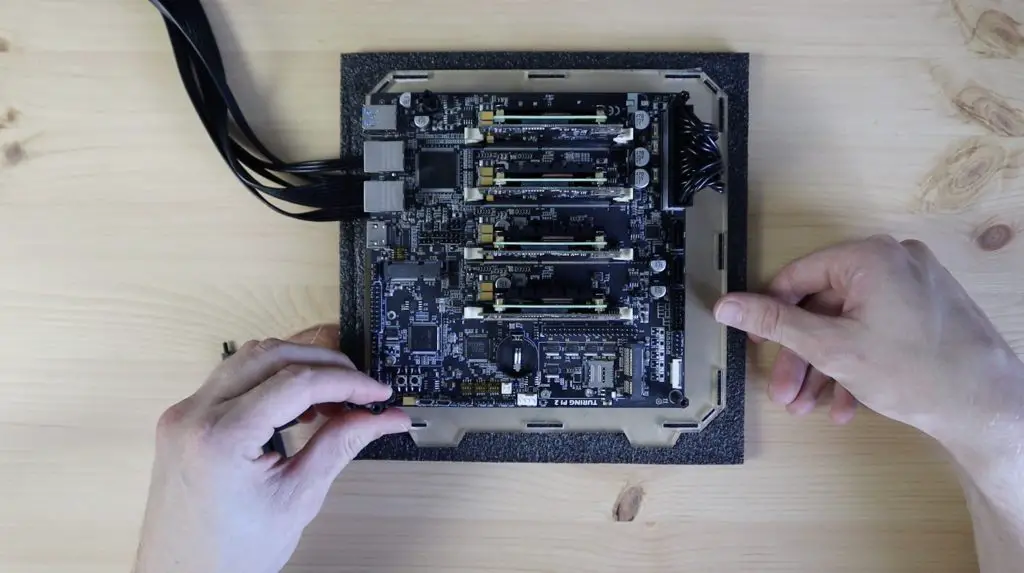
Once those are in place, we can screw in our Nylon standoffs. I’m using 8mm standoffs on the bottom and then a series of 20mm standoffs on top of the board until we clear the CM4 modules.

So let’s screw in the 8mm standoffs first.

We can then place the board over them, with the ATX power cable and connector running beneath it. This is hopefully temporary and will be replaced with a small cable and barrel jack once the PicoPSU arrives.
Let’s then add the remaining nylon standoffs to each so that the front side panel clears the CM4 modules. I found that 3 x 20mm nylon standoffs provided enough room for the CM4 modules, so the overall internal width is 70mm.
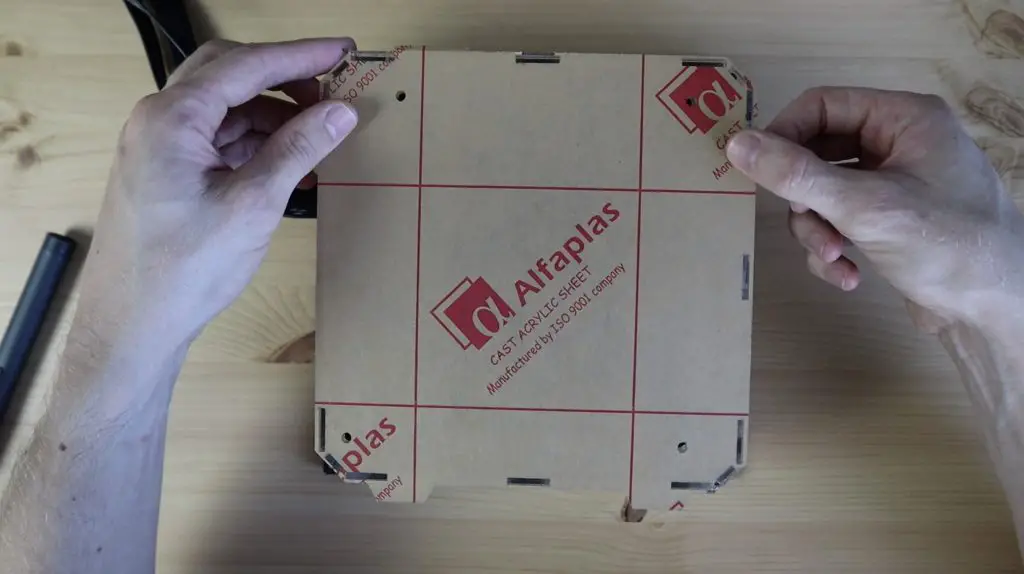
Now we can peel the protective film off of our other acrylic pieces and push them into place.
Before we close up the main side panel, we also need to mount the power button and fans onto the front panel.
I’m going to use three 40mm RGB fans that I’ll screw into place using some M3 button head screws and nuts. I’m going to leave them unplugged for now as I’ll need to make up a harness to connect them to the 5V supply pins.
The power button I’m going to use is the same one I used for my water-cooled Pi build, the cable should just be long enough to reach the required pins on the opposite side of the board.
Once the fans and power button are secured on the front panel, we can re-insert the front panel into the slots on the 6mm back side panel.
The last thing we need to do is to place the 6mm front side panel over the top to lock the other pieces into place. We’re not going to do that just yet as we need to first flash the operating system onto and prepare SD cards for our CM4 modules. So let’s move on to the software.
Loading The Operating System Onto The CM4 Modules
Before we can boot the Pi’s up, we need to load the operating system that we’re going to be using on each of them. This is where you have a few options, depending on what you’re going to be doing with your Turing Pi 2.
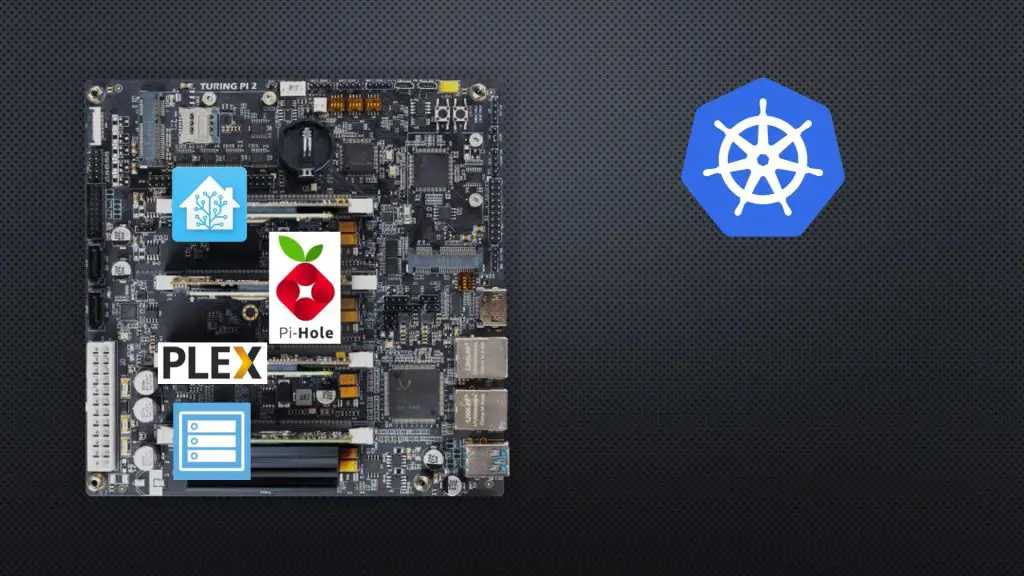
You could load different operating systems and or apps onto each of your Pi’s and use them as individual servers on your network, so for example have Pi-hole running on one, OpenMediaVault on another, Home Assistant on the third and a Plex server on the fourth. Each Pi will have its own IP address, will be identifiable by its own mac address, and will act in the same way it would if it were individually connected to any switch on your home network.

Another option, which is the option that I’m going to be setting up, is to install Rapsberry Pi OS on each, then install Kubernetes. Kubernetes will have a master node and three worker or slave nodes and I’ll then be able to just tell Kubernetes what apps I’d like deployed on the cluster and it’ll manage the deployment of the apps automatically. So it’ll decide which Pi to run each app on and can do things like load balancing and adjust for a missing node if one is removed.
So I’m going to start by flashing Raspberry Pi OS onto each Pi. I’ll have to do this in two ways because two of my modules have onboard storage and two require SD cards.
The ones that have onboard storage need to be installed on the board (or another carrier board) and need to be powered up with boot mode disabled. They can then be individually connected to my computer using the slave USB port so that they act like SD cards, visible to Raspberry Pi Imager.
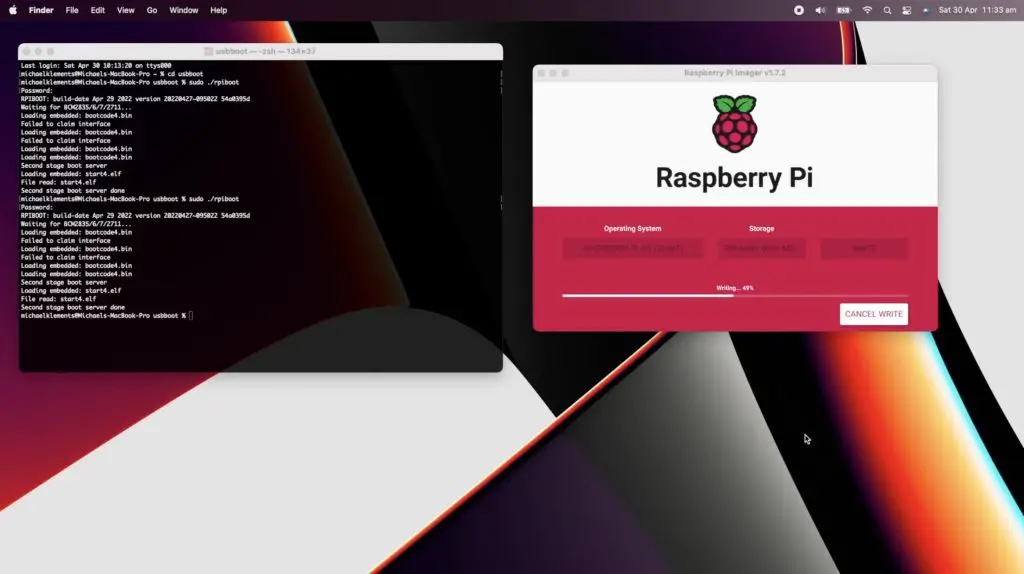
For the ones without eMMC storage, I need to just flash two microSD cards using a microSD card reader.
In Raspberry Pi Imager, I’ll set the name of each node and turn SSH on so that we can access it over the network to continue the installation of Kubernetes.
I’ve put the SD cards back into nodes 3 and 4, which have our Lite modules on them, and I’ve flashed Raspberry Pi OS onto nodes 1 and 2. So we can now power it up.
To close up the case. the acrylic pieces need to be lined up with the slots in the main side panel and we can then push it down into place and secure it with four M3 button head screws into the nylon standoffs.
I’m not going to screw the side panel down just yet as I might need to open it up again to get to the modules or SD cards while setting it up.
Boot Up The Cluster For The First Time
I’ve now connected the fans up to get 5V from a USB port, so let’s try boot up our Pi’s and continue with the installation of Kubernetes.
When you push the power button, the board’s management system starts up each Pi in succession, so first node 1, then nodes 2, 3 and 4.
There are a number of LEDs assigned to each slot and on the adaptor boards. These show power to the slot, Ethernet activity, power on the adaptor board and activity for each CM4 module. So those are what I wanted to keep visible with the clear case design.

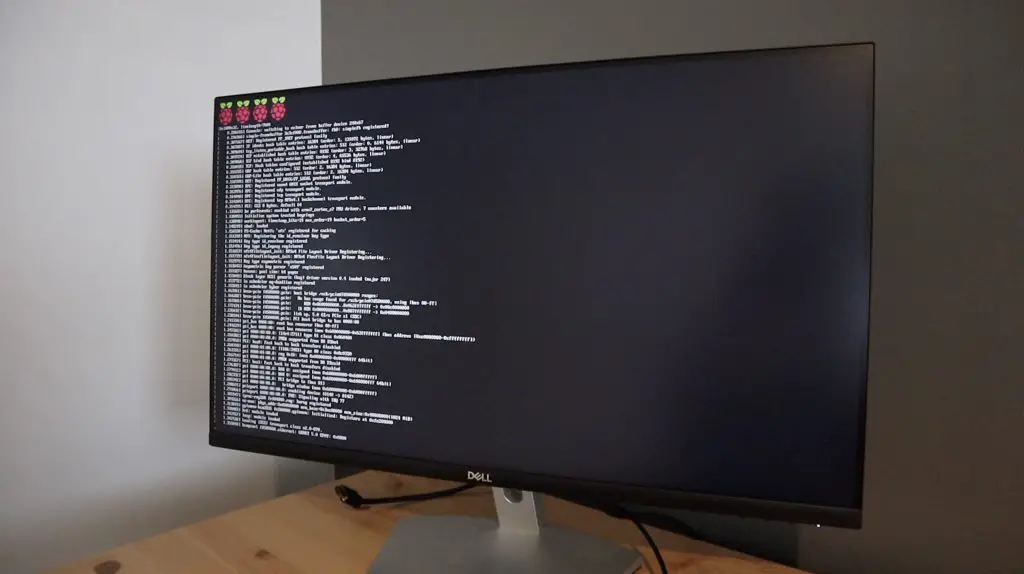
After a few minutes, the Pi’s should all have finished their first boot process. You can also monitor the progress on node 1 by plugging the Turing Pi 2 into a monitor.
You should notice significantly less flashing of the activity LED on the back of each carrier board. You can then move on to setting up Kubernetes.
Setting Up Kubernetes On The Turing Pi 2
I’m just going to go through a summary of the installation process of Kubernetes, if you want to set it up on your own cluster I suggest following Network Chuck’s video, he’ll take you through the entire process step-by-step.
The Kubernetes distribution that I’m going to be installing is called K3S, which is a lightweight distribution that is designed for use on resource-constrained devices like our Raspberry Pis.
After allowing the Raspberry Pis to boot up, we’ll need to SSH into them to install and set up Kubernetes. I’ve already assigned hostnames and static IP addresses to each node on my local network, this ensures that each node is given the same IP address by my router every time it comes online.
I’m going to SSH into each node using Putty on my windows PC and I’m going to start by setting up the master node.
We’ll install Kubernetes as the root user using a single line with some setup information following it:
curl -sfL https://get.k3s.io | K3S_KUBECONFIG_MODE="644" sh -s -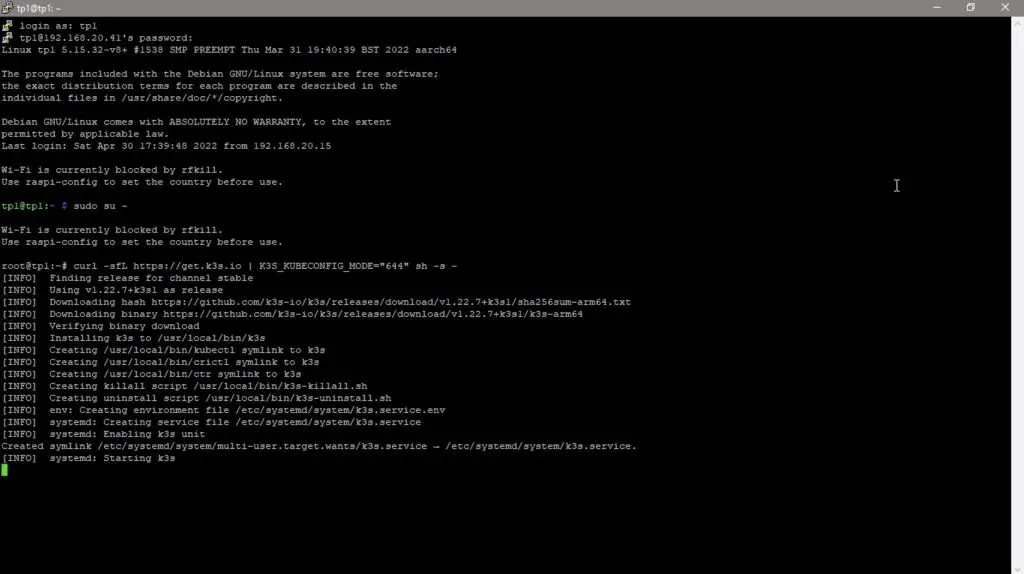
Once it is installed, we’ll need to copy our master nodes key or token as we need this to set up our worker nodes:
sudo cat /var/lib/rancher/k3s/server/node-tokenWe now have a basic cluster running, although it only consists of a single node. So let’s log into our other three nodes and install Kubernetes so that they can join our cluster.
We do this with a similar command to the master, but this time including the master node’s token and IP address:
curl -sfL https://get.k3s.io | K3S_TOKEN="<INSERT TOKEN>" K3S_URL="https://<INSERT SERVER IP>:6443" K3S_NODE_NAME="servername" sh -Replace <INSERT TOKEN> and <INSERT SERVER IP> with the token that you copied from the master node and your master node’s IP address.
Once we have completed the setup on the fourth node, we should have our cluster ready.
We can confirm that all of our nodes are connected and available by again running the kubectl command on our master node:
kubectl get nodes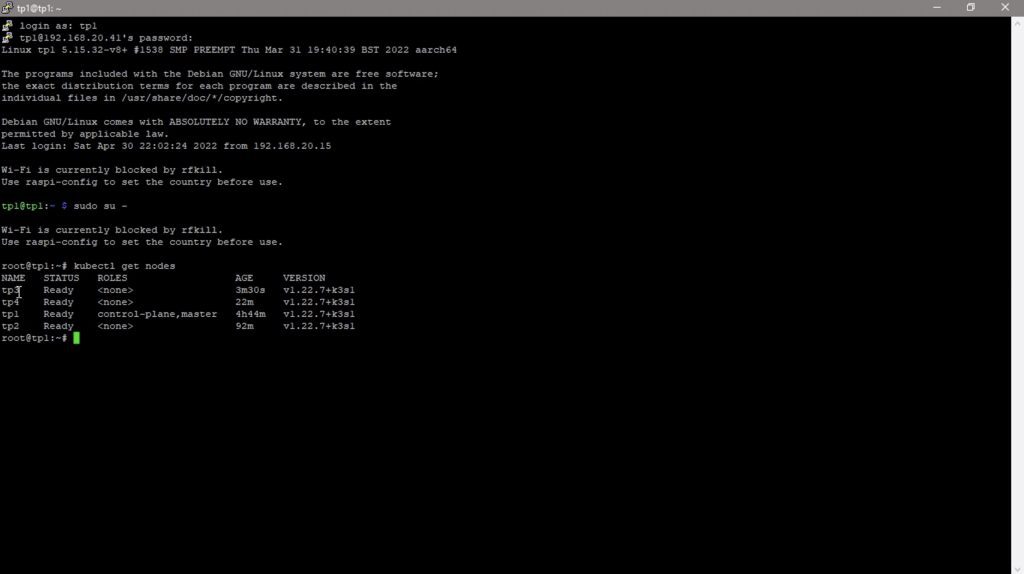
Our 4 nodes are now available and our cluster is ready for us to deploy apps on it. I’m not going to go into this in this video as it’ll then be too long, but this essentially involves creating a .yaml configuration file for each app you’d like to deploy on your cluster and then a single command line to deploy it from our master node.
Final Thoughts On The Turing Pi 2
Before we finish off, let’s take a look at its power consumption. The cluster uses around 25W once it is running a few apps, and when heavily loaded this goes up to a maximum of about 30W. So this is significantly less than running an old laptop or computer instead of the cluster.
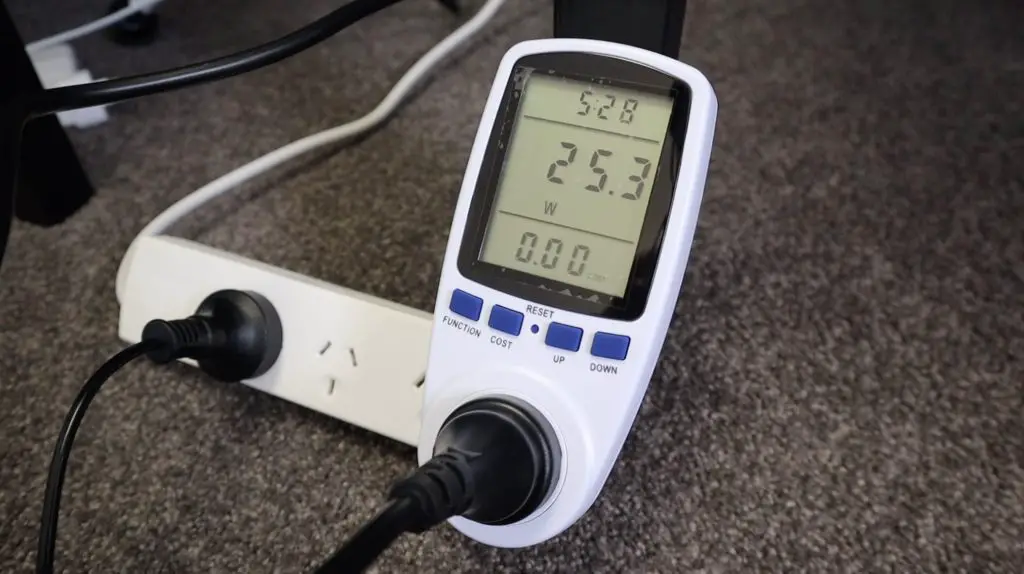
It’s also worth keeping in mind that this is with a 450W power supply, so it’ll probably come down by about 5-10W once I switch the cluster over to a smaller PSU. I’ll post an update here when I do.
Overall, I really like how the case has turned out. It’s simple, protects the Turing Pi 2 and still allows you to see into it and see all of the activity and indication LEDs. One addition I might make on the next version is to add some space for one or two 2.5″ SATA drives to be mounted so that they can be easily plugged into the available ports.
Is there anything else you’d like to see me add to the case design? Let me know in the comments section below.
I think the Turing Pi 2 has a lot of potential; the upgrade to CM4 modules unlocks a significant amount of computing power and the all-in-one solution really makes it easy to get started. There is a lot of interfacing available on the board and it’ll hopefully all be made available and accessible through updates to the firmware in the coming months. I look forward to improving my cluster as the community evolves with it.
This Turing Pi 2 board and it’s firmware are still beta versions, so there will likely be a few tweaks and changes made before the final production runs. But the good news is that they’re launching on Kickstarter this week, so definitely go check their campaign out. I’ll leave a link to it as soon as it goes live. You can sign-up for their newsletter and updates in the meantime to stay informed.
Let me know what you think of the Turing Pi in the comments section below, what are you going to use it to run?
What overall size did the case end up at Michael? Amazing design by the way. Imagine all those lights inside a black acrylic case?
It’s roughly 200mm x 210mm x 85mm overall. Yeah I’m going to try cut it from grey tinted acrylic as well and see how that comes out.
Hi Michael,
great work and wonderful write-up.
Please let us know whether we can download the CAD files for the acrylic case.
Thank you – Gustavo
+1 would be great if you could share your design. It looks awesome!
I’ll definitely do that. I’m just making a few adjustments to it to better accommodate the PicoPSU and then I’ll make the design available.
Awesome! I just learned that my local library has a laser cutter I can use, so I’m excited to give it a go!
I’ve been sitting on my TuringPi since I received it because I can’t get my hands on any CM4 modules, but it looks like they’re starting to come back in stock places.
Excellent! Thank you!
?
Hi Michael,
I’d be interested too in the CAD design for that case. can I download from somewhere?
Thank you.
I would also like the CAD design for my TuringPi 2 build that will hopefully ship before christmas.
Any chance you would share it?
Thank you.
Thanks for reaching out through my Etsy store
Is the design available for purchase there? I’d love to get my hands on it if it is.
Do you have a link to the store?
Hi! Is the CAD design available for purchase? I’d love to get one for myself!
Was the CAD ever posted? It’s better than anything else out there.
Is there a way to buy the case? Also the grey version of the update looks dope and would be great to buy it!
Hi Michael
Just Bought my own Turing Pi2 – And do like the case very much.
Nut never used etsy before – but can not find the CAD files or anything – Can you please link to the CAD drawings .- if they still exist on Etsy
Hi Michael,
can you share a link to CAD files or your Etsy store where I could buy them?
Thank you.
Do you know of any manufacturing updates? I bought a board the first week of December, and still waiting for it to be shipped. Original estimate was first week of February, which has never been updated.
Hi Michael,
I would like to use your acrylic case design for my new Turing pi 2.5, if you can share it that would be great I am open to buy it as well.
NVIDIA Jetson Nano Modules do not work on the Turing board, no adapter for them and they are different physical interface