Pi-hole is a clever piece of software which acts as a network-wide ad blocker. It enables you to block ads on websites, ads in apps on your mobile devices and even on your smart TV, regardless of the software they’re running and without the need for any other local software on the device. Pi-hole also improves your network speed, because the ads are blocked before they are downloaded. This also saves data if you’re on a limited data plan.
A web interface lets you interact with your Pi-hole and view stats on your network traffic.
Now that you know what Pi-hole is, let’s have a look at how to to set one up on your home network, step by step.
If you’re running a large network with lots of users and traffic then the best device to use would be one of the Raspberry Pi 3 or 4 models with an ethernet connection to your router. But for a smaller home network with less than 50 devices and only a couple of users online at a time, a Pi Zero W works perfectly.
I’ve been using one for a month now.
Here’s a step by step video guide to setting up your Pi-hole, read on for the written guide:
What You Need To Make Your Own Pi-hole Ad Blocker
- Raspberry Pi Zero W Complete Kit – Buy Here
Alternately, buy the individual components:
- Raspberry Pi Zero W – Buy Here
- 32GD Micro SD Card – Buy Here
- Raspberry Pi Zero Case – Buy Here
- Power Supply – Buy Here

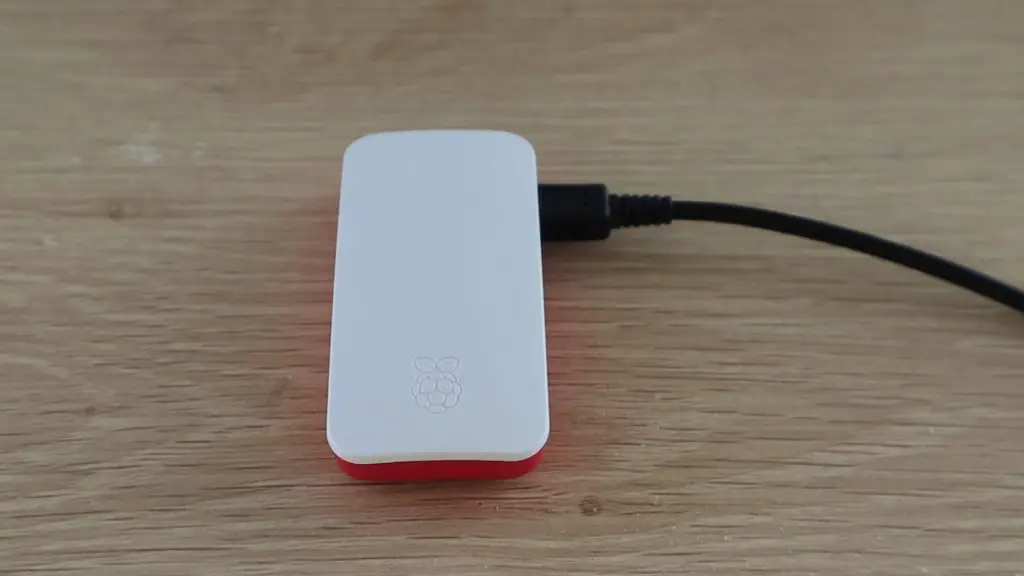
You’re going to need a Raspberry Pi Zero W, a micro SD card of at least 16GB, and something to put the Pi into to protect it, I just used the official case. You can usually buy these kits online for around $30-$50 dollars which includes everything you need, even a power supply, although you can buy the Pi alone for as little as $10 if you do some searching.
You won’t need a mouse, keyboard or monitor for this as we’ll be using another computer on the network to set up the Pi-hole.
Preparing Raspberry Pi OS Lite On The SD Card
We’ll start by preparing the Raspberry Pi’s operating system on the SD card, Pi-hole will then be installed to run on this operating system later.
Plug your microSD card into your computer. Don’t worry about formatting it just yet, we’ll get to that in a minute.
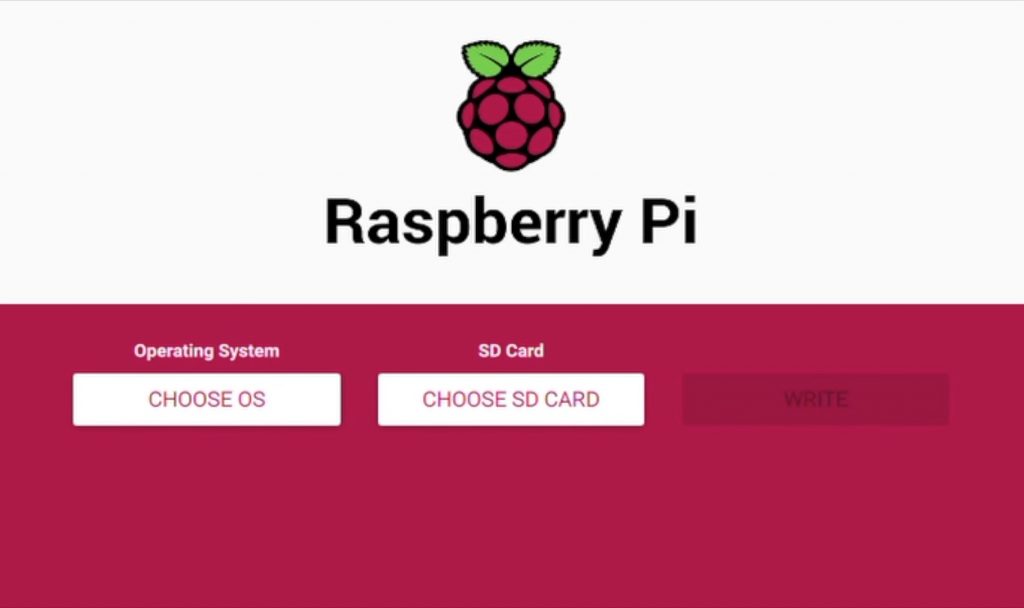
Start by downloading the Raspberry Pi Imager on your computer. This is a fairly new tool and it’s one of the easiest to use. They have a version for Windows, Mac and Linux.
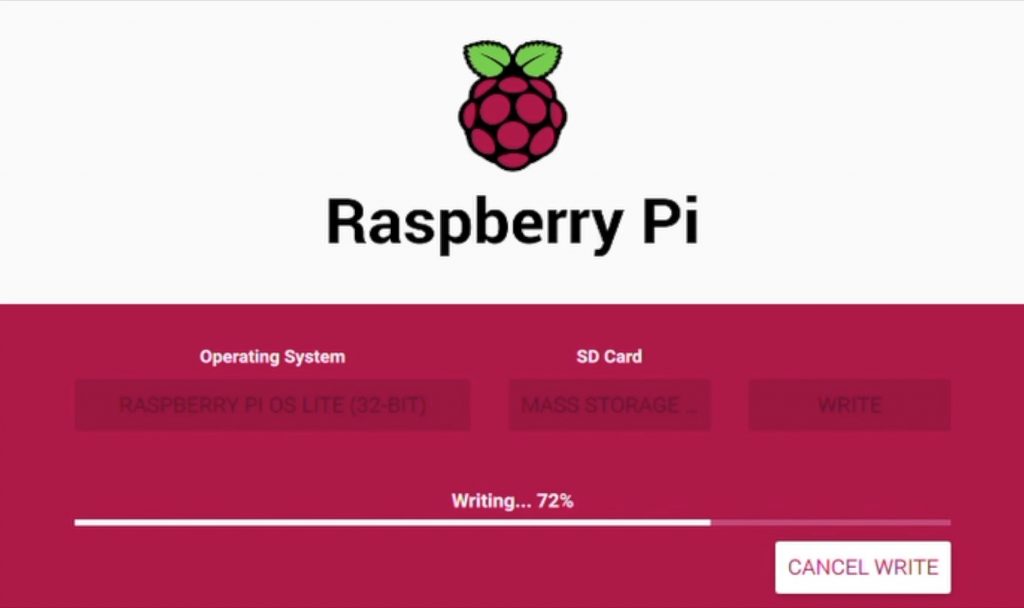
You just select the Raspberry Pi operating system you need, which in our case is Raspberry Pi OS Lite, and then select the SD card you want to write the image to. Click write and let the tool do the rest, it’ll write the image, check it and then eject the SD card.
There is a bit more to do on the SD card before we’re done on the computer, so you’ll need to plug it in again to access it. You might get a couple of windows pop up and one which says you need to format the card in order to use it, just ignore these and close them. Don’t format the card again.
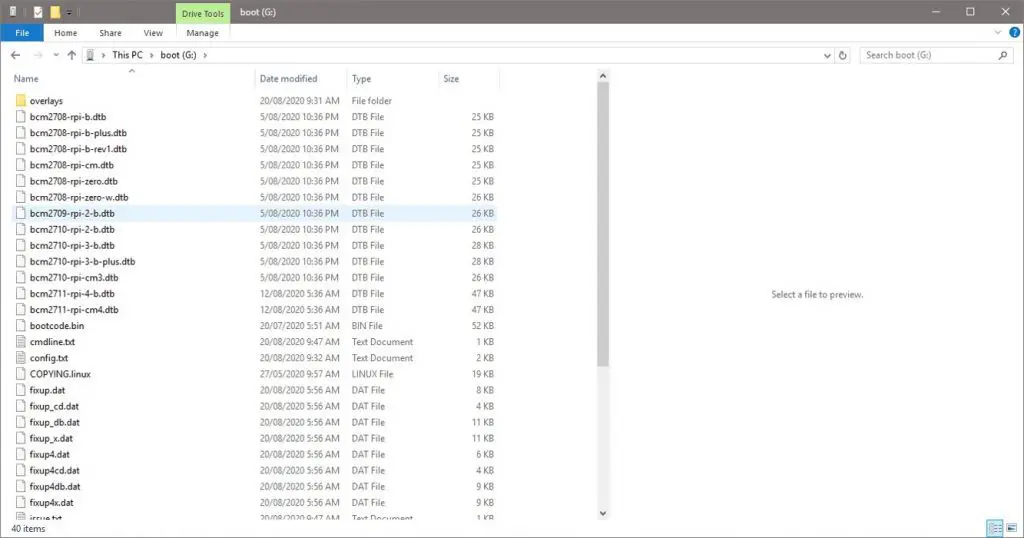
The will be one readable partition on the card called boot, you should be able to open this partition and you’ll see a number of files. We need to add two files to this directory, one to tell the Pi how to connect to your network and another to enable SSH so that you can access it over the network.
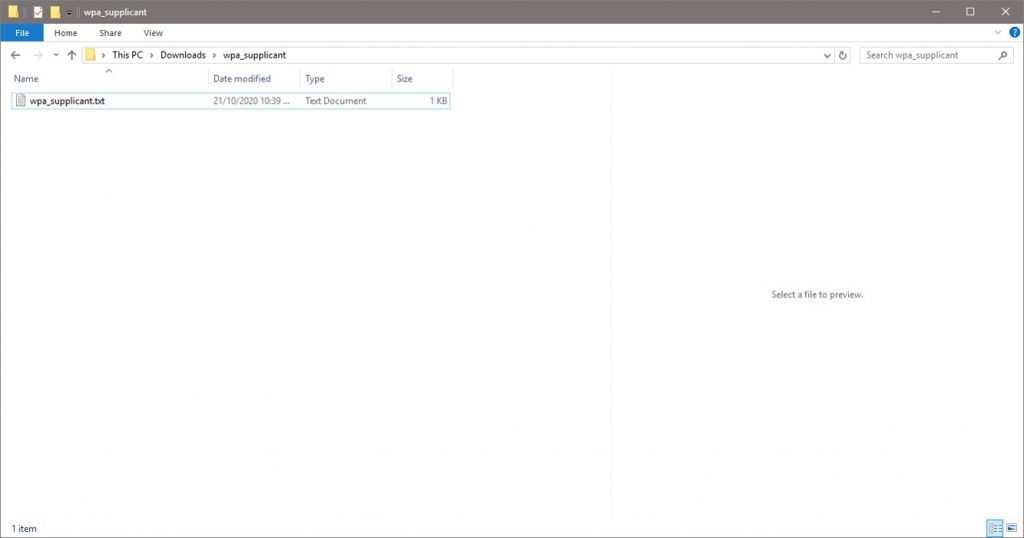
Download the network settings template wpa_supplicant and open it using a basic text editor like Wordpad.
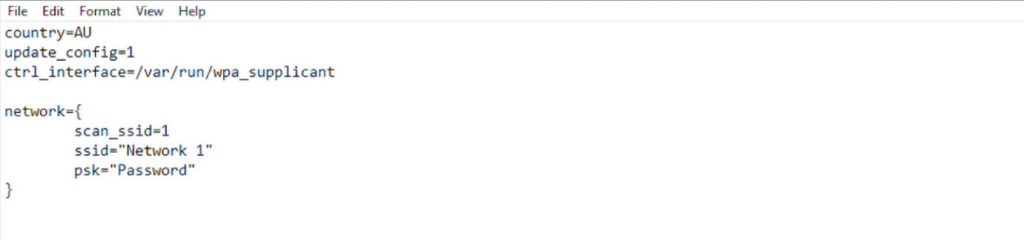
In the network settings section, you need to add your local WiFi network name next to ssid and your network password next to psk, leaving all of the punctuation marks in place. You can also change your country code at the top if you’d like, this can be set up later though.
Save and close the file.
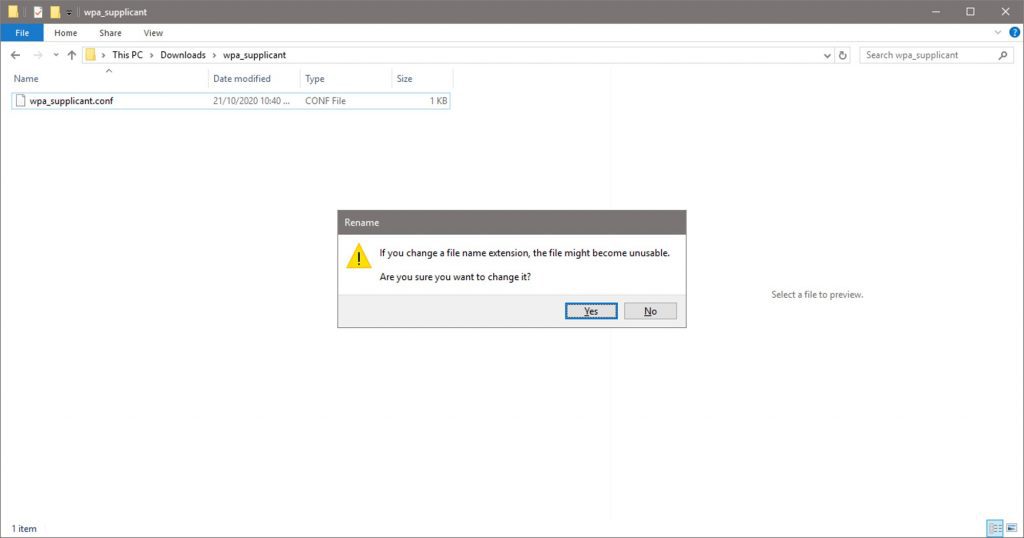
Now change the extension of the file from .txt to .conf. Click yes if you are given a warning.
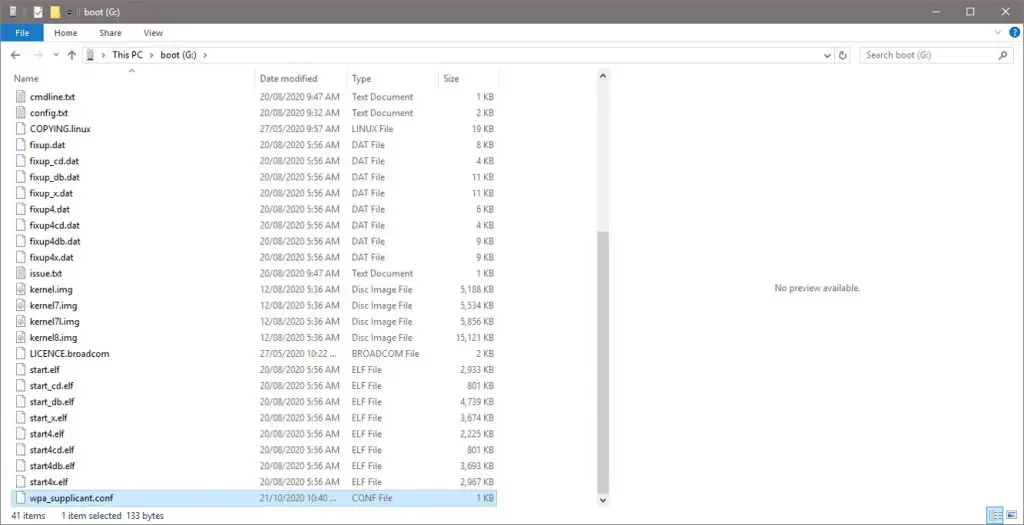
Now copy this file into your boot directory.
Thats the first done, now we need to add an SSH file.
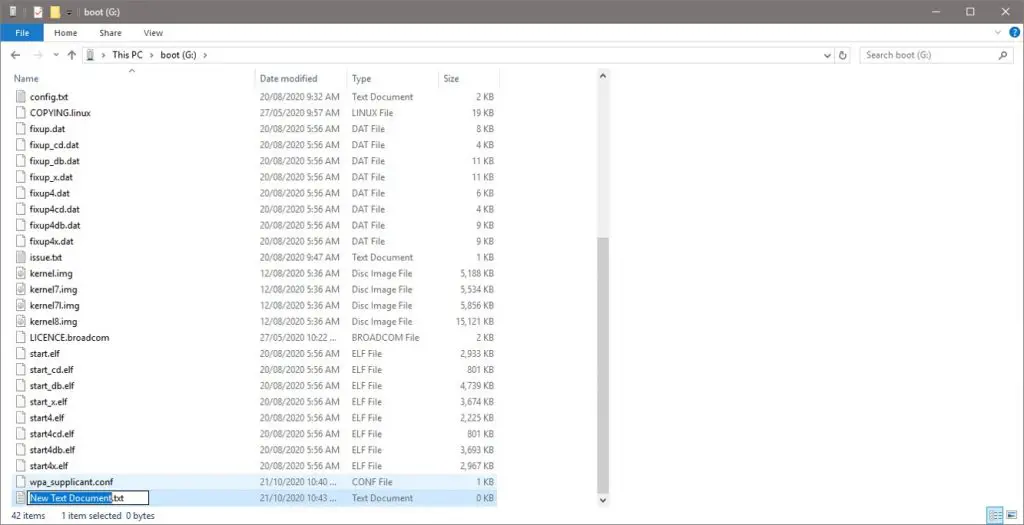
Create a new text file and change its name to ssh and remove the extension. So the file should just be a blank file called ssh with no extension.
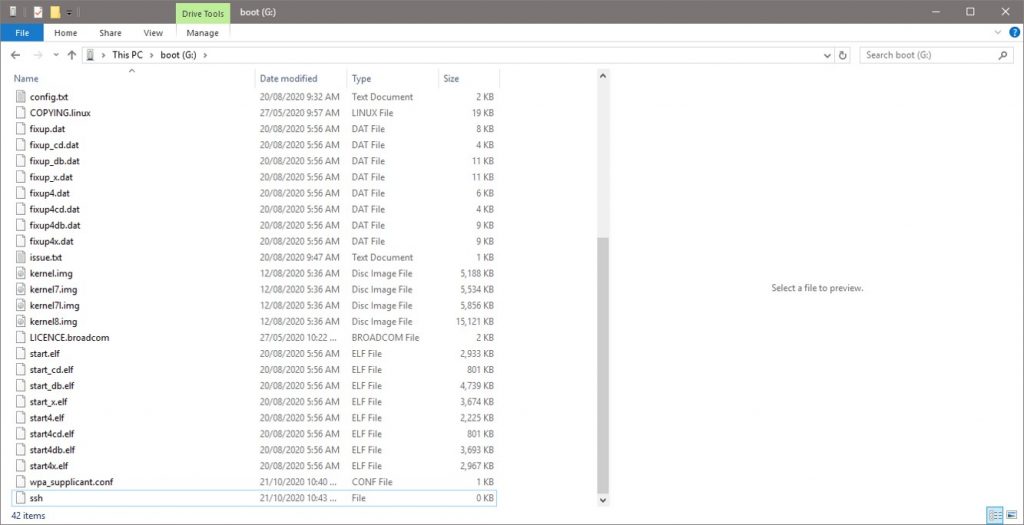
Once you’ve got both of these files then you can eject and remove your SD card.
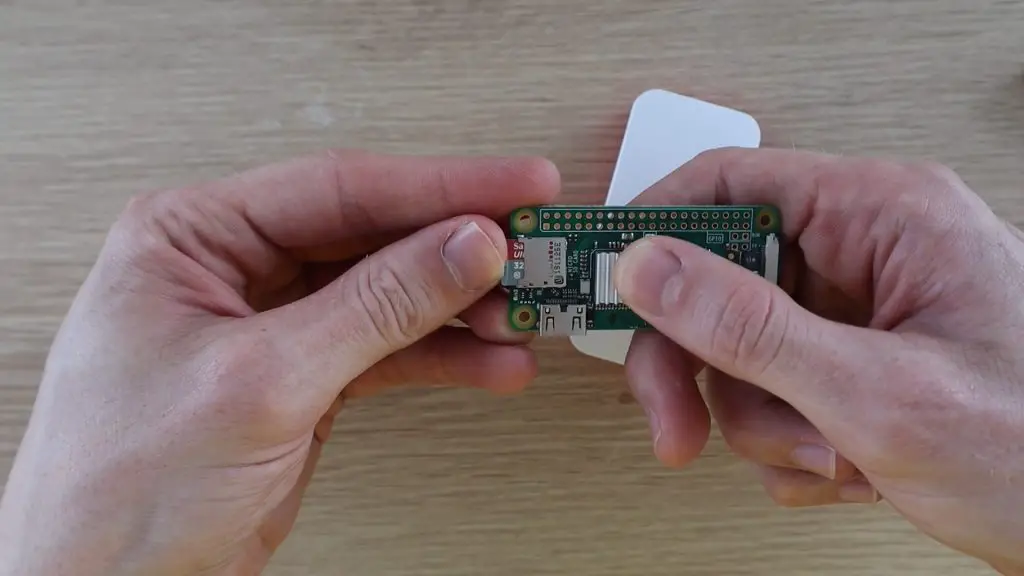
Plug the SD card into your Pi, then put it into it’s case and plug the power cable in. It’ll take a few seconds to boot up.
First Boot & Connecting To Your Pi Zero W
Finding Your Pi’s IP Address
Now that you’ve got your Pi booted up and (hopefully) running, you need to be able to access it in order to install Pi-hole onto it and make any settings changes or updates.
To do this, you first need to figure out your Pi’s IP address, which has been assigned by your router. There are many ways to do this, one of the easiest is by logging into your routers admin page. You’ll need to do this later anyway to make a few changes to your router’s settings. There are often details on how to login to the admin page, along with the default username and password, on the label on the router.
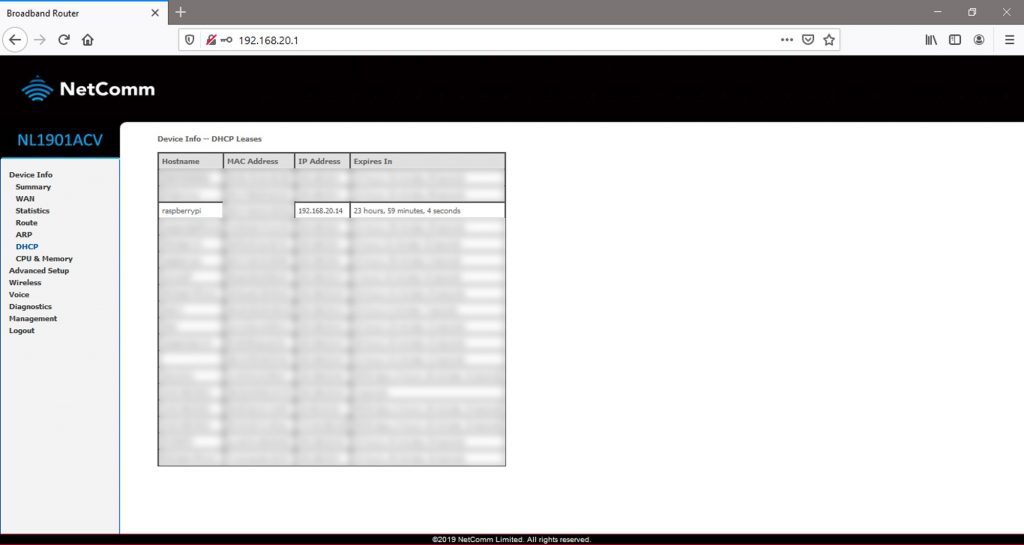
Depending on how complex your router’s software is, you may need to do some exploring until you find a page which lists all of the devices currently connected to the network along with their IP address, this is usually called a DHCP table. Take note the IP address assigned to your Pi.
While you’re logged in, you need to set this IP address (or another one if you’d like) up as a static IP address, so that your router always assigns this same address to your Pi-hole, this is an important step, you’ll see why in a bit. Again, all routers are a bit different, so you’ll need to do some digging if you don’t know how to set up a static IP on yours. If you can’t find the option, try googling your Router’s model and the words “static IP” and you should find some information.
You’ll typically need your Pi’s MAC address, which should also be listed in the DHCP table, and the IP address which you want to use. Enter these to assign your chosen IP address to your Pi each time it joins the network. If you choose a different one to the one currently assigned then you might have to reboot the Pi after this step.
Now that you’ve got your Pi’s IP address, you can access it over the network.
Connecting To Your Pi Over The Network
You’ll need to install a terminal emulator / SSH client like Putty to access your Pi’s terminal.
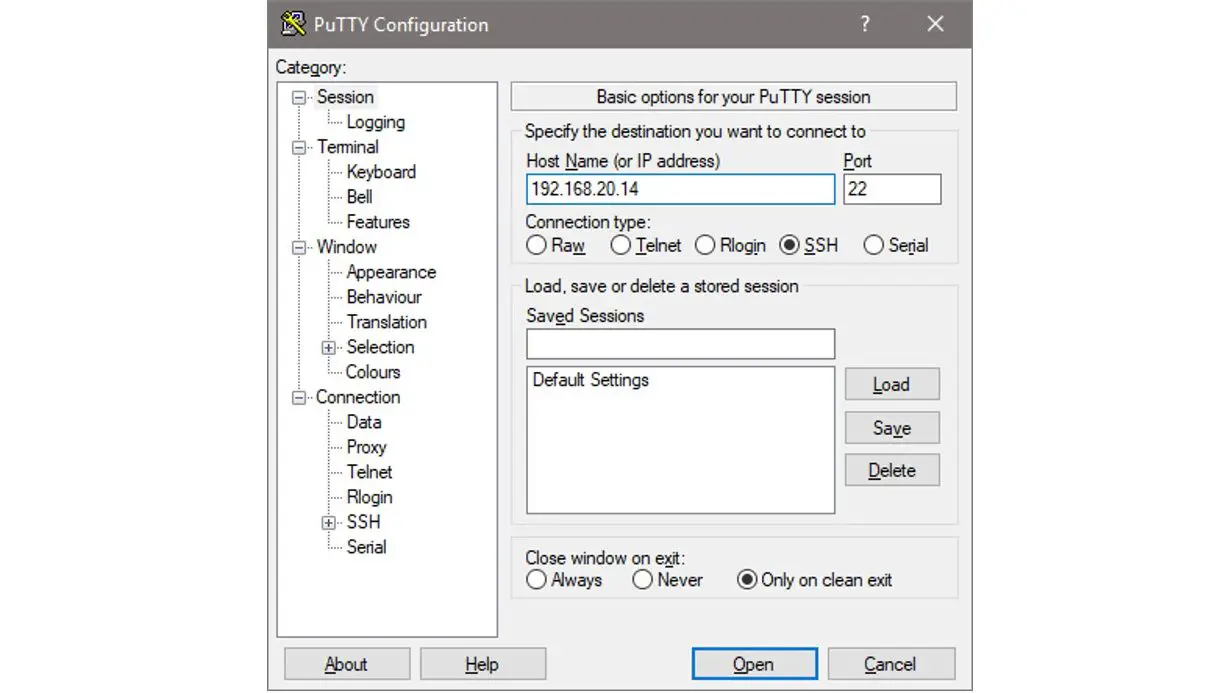
Enter your Pi’s IP address and then click open to attempt to connect to the Pi.
You’ll get to a black terminal display that asks you for a login. The default username is “pi” and the password is “raspberry”.
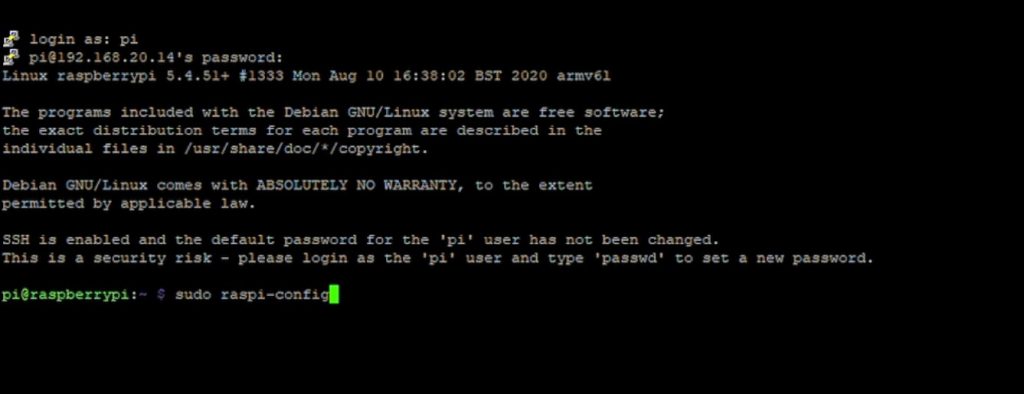
You’ll want to change these as soon as possible. So it’s a good idea to run the configuration tool first by entering:
sudo raspi-config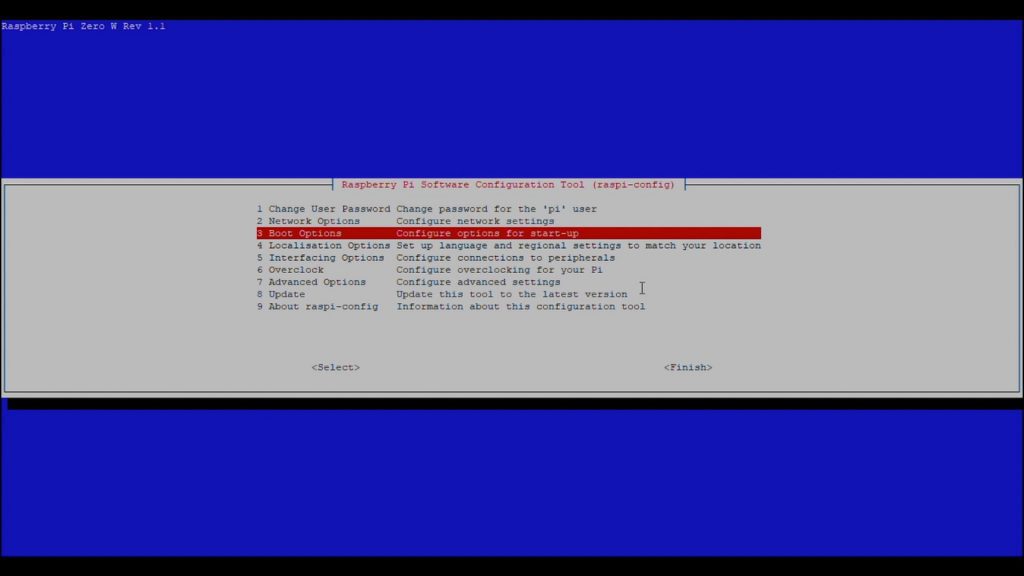
This tool lets you change a number of settings on your Pi.
As a start, you should change:
- The default username
- The password
- Make sure that you’ve got the correct regional settings selected.
Installing Pi-hole On Your Raspberry Pi Zero W
Now you should have your Raspberry Pi Zero set up properly with a new username and password and connected to your network, with access to it over SSH.
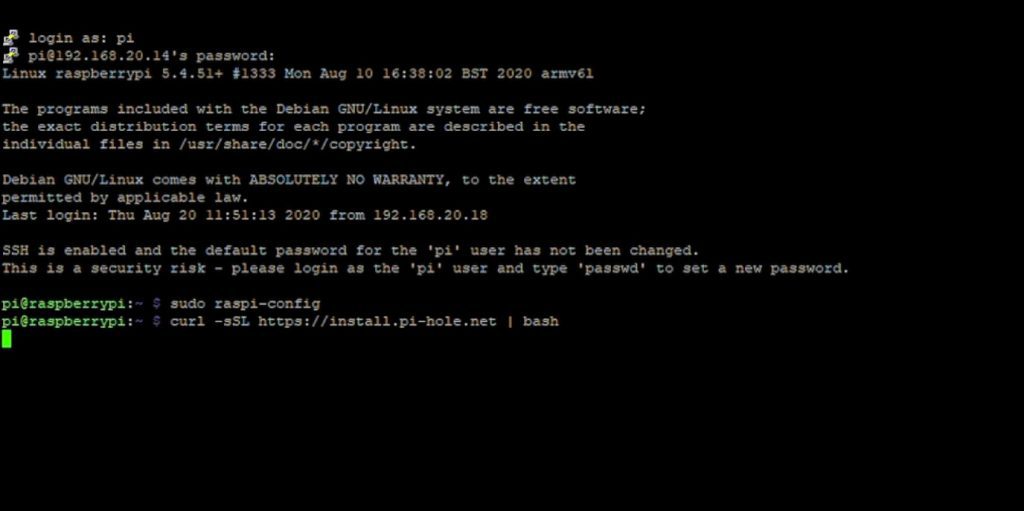
Now you can install Pi-hole by entering the following command:
curl -sSL https://install.pi-hole.net | bash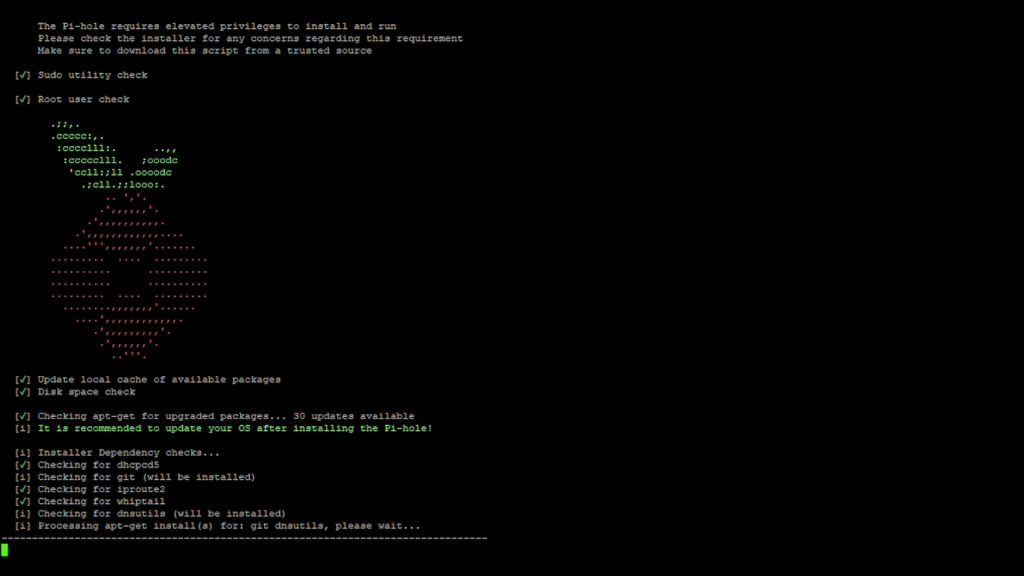
The Pi will start downloading and installing the software. It takes a couple of minutes to run through and you’ll then get to the following page to guide you through the Pi-hole setup.
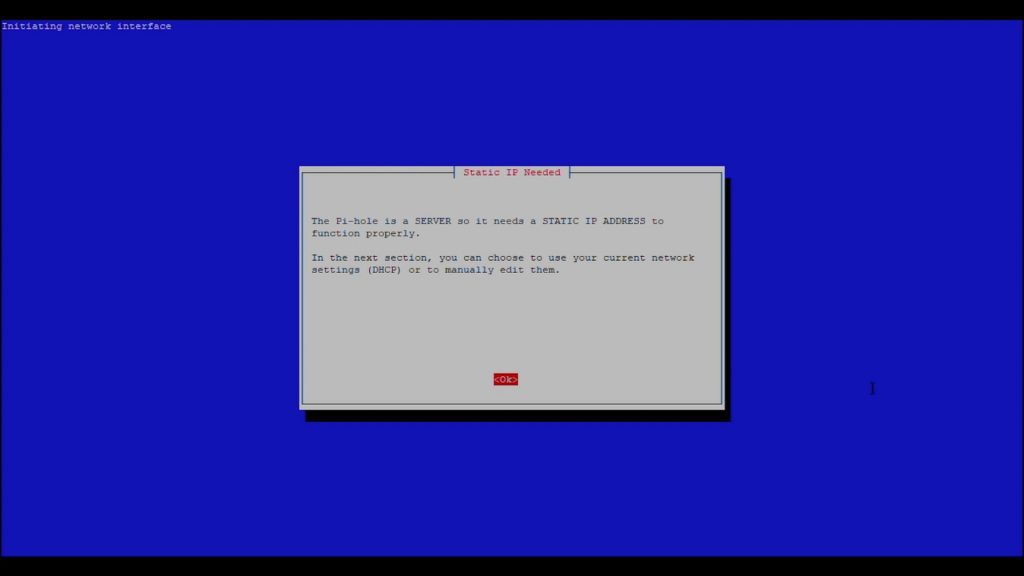
For the most part, you can just run through the default selected options and hit OK for each. You shouldn’t make any changes to these settings unless you know what you’re doing or you’ll likely just land up with a Pi-hole that doesn’t work.

You might want to change your Upstream DNS provider if you’d like. This is just the provider which your Pi-hole is going to use as the name server for your domain requests.
Also, make sure that the IP address listed is the one which you set as the static IP for your Pi.
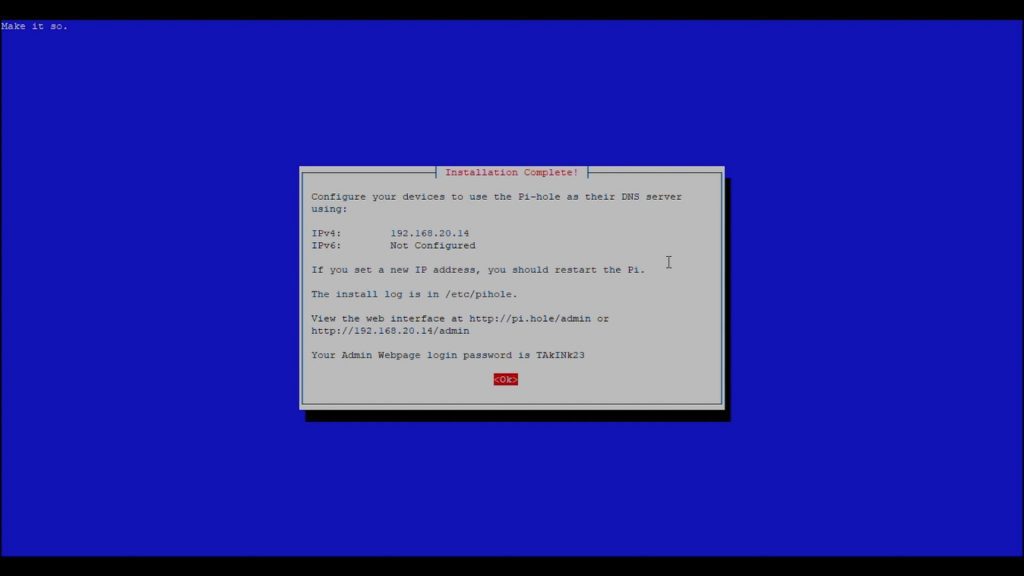
It’ll then run through another setup process and you’ll finally get to an “installation complete” display. Take note of the Admin Webpage password as you’ll need this to log in to the Pi at a later stage to view the detailed statistics and to change any settings. You’ll be able to change this password from the web interface – but you need this password in order to do so.
You can change your Pi-hole password at a later stage over SSH using the command:
sudo pihole -a -p (new password)You can now close the terminal connection.
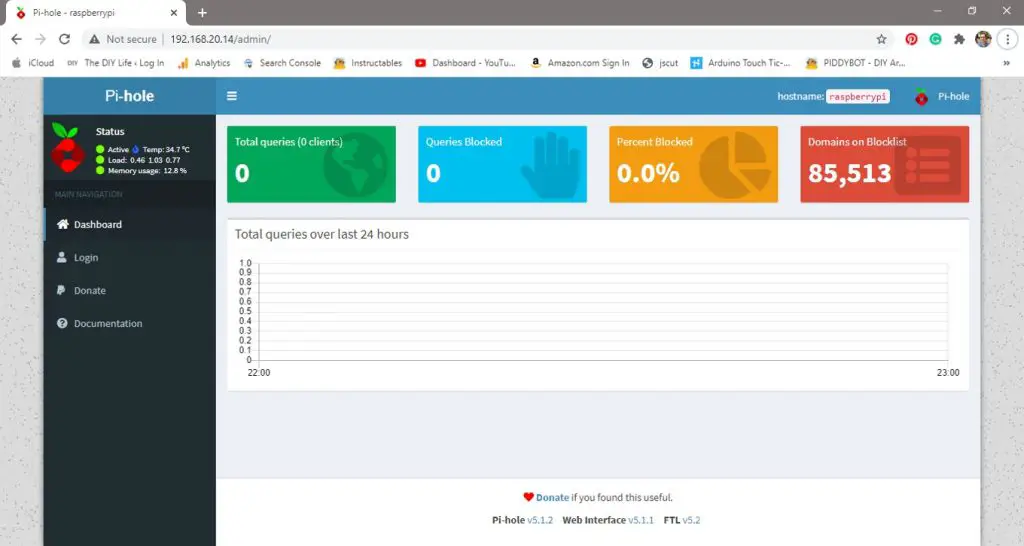
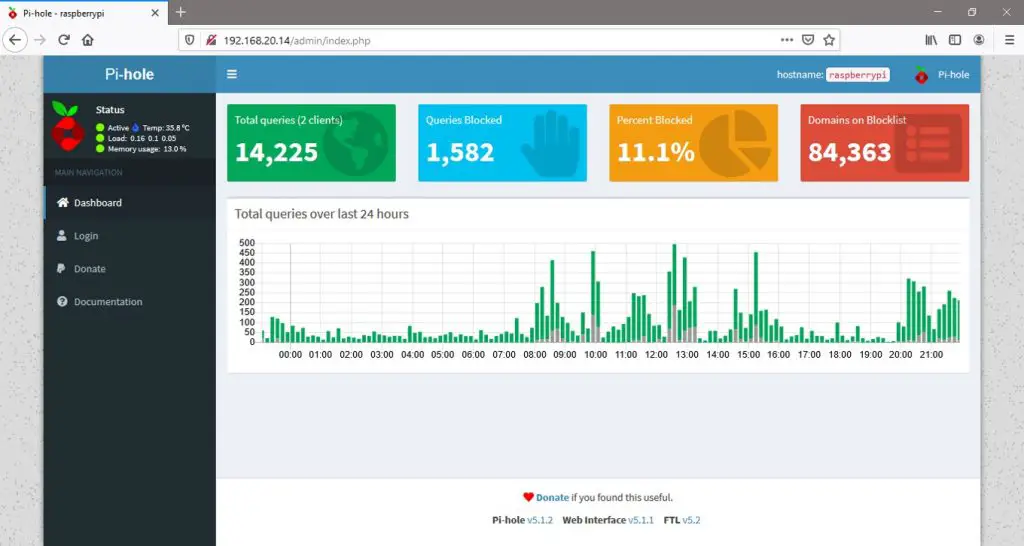
Test if Pi-hole is running by going to your browser and typing in the IP address that you’ve configured for your Pi along with forward slash and admin.
192.168.20.14/adminYou should see a page like this show up. You’ll notice that no queries have been received or blocked yet because the router isn’t directing traffic through the Pi-hole, there is still one last thing to set up.
Setting Up Your Router To Direct DNS Requests Through Your Pi-hole
You’ll need to log back into your router and find your DNS settings page.
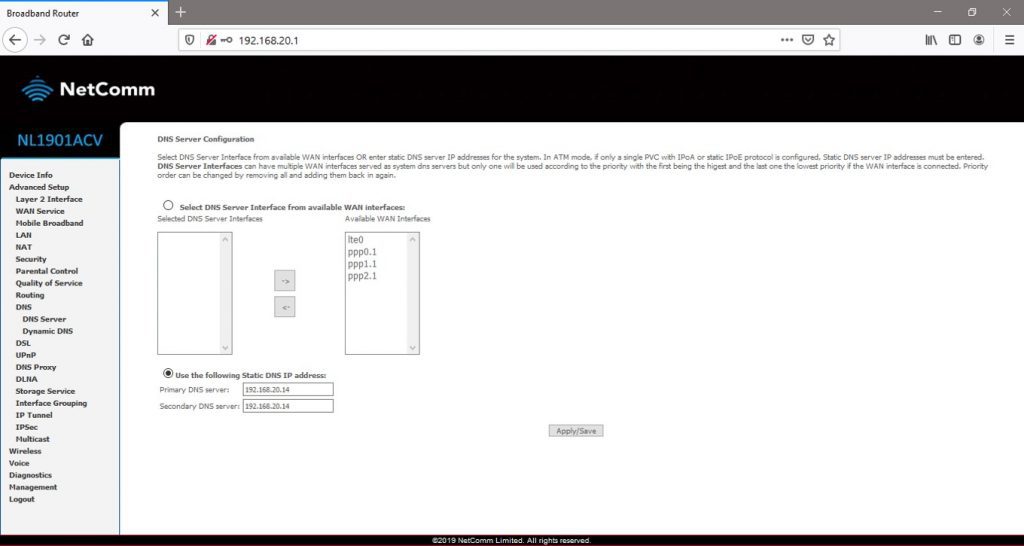
Here you’ll need to set your Pi-hole’s IP address as the primary DNS server, if your router has to have a secondary DNS server, then type the same address into that field as well. Click save or apply to make the changes. You may then need to reboot your network devices to take effect.
If you go back to your Pi-hole dashboard, you should now see requests coming through and ads queries being blocked.
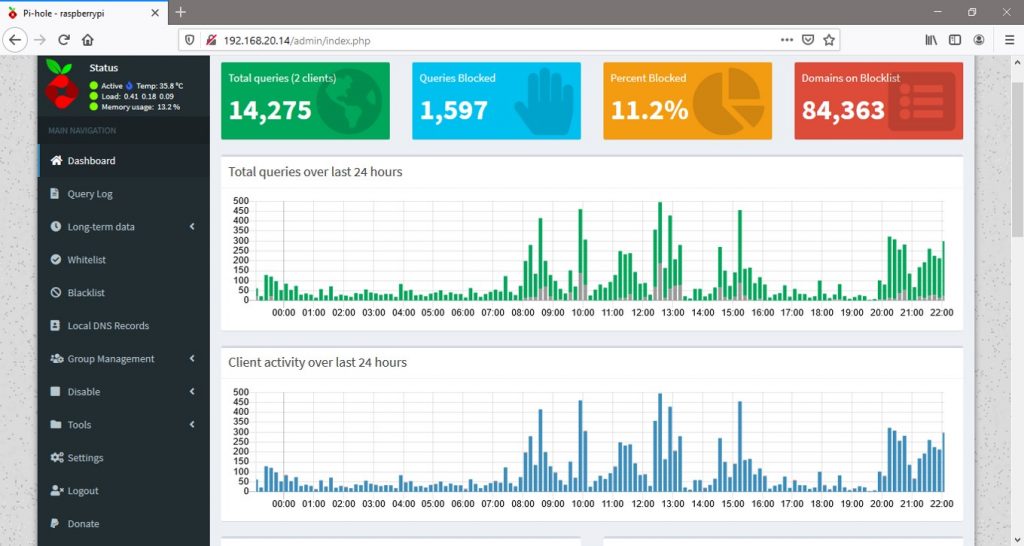
If you log in to your Pi-hole using the admin password that was created during setup, you should have more access to the network statistics and see detailed logs.
You’ll also be able to change settings, add or remove domains on the block list, and reboot or turn off your Pi.
Remember that if you turn off your Pi and your router’s primary and secondary DNS server are set to your Pi’s address, you will no longer have access to the internet until your Pi is back online. So make sure that your Pi-hole is on a reliable power source, preferably the same one as your router.
Some routers have a USB port on them which has enough power to supply an external drive. This port usually supplies enough power to drive a Raspberry Pi Zero W running as a Pi-hole, so you can ensure that they’re always on together.
This guide is just a starting point to get your Pi-hole up and running, there is a lot more than can be done using Pi-hole once you’re comfortable with it.
You can also set the Pi up to run the DHCP service, which allows the Pi-hole to identify devices by their name rather than IP address and even integrate powerful third-party anti-malware and anti-phishing DNS services.
That’s it, you’ll now be able to enjoy an ad free browsing experience on your home network!
Its worth noting that there are some limitations to the ad blocking ability of the Pi-hole. The Pi-hole is simply blocking requests being made to domains which are known to serve ad content, if the website you are accessing serves its own ad content, from their same domain, then the Pi-hole won’t block these ads. Typical examples are ads running on Youtube videos or Facebook ads in your Facebook news feed.
Let me know if you’ve used a Pi-hole in the comments section.
I have used Pihole a lot. But I have to redo one. Because my orange pi has experienced a failure.
I had made an answer on quora also to use it.
Thanks for this article. A possible addition is the use of additional blocklist. I have found it much less easy to implement on recent versions of pihole. But there are things on github that can make it easy.
After reloading the OS a few times, on my windows 10 PC all I see is a “recovery” drive, not a “boot” drive- I put the SSH file and WPA supplicant file in there but it doesnt seem to log into my wifi. what might i be doing wrong here?
same here, I can’t locate the “boot” drive.
The boot drive should be the only accessible drive that comes up when you plug the SD card into a PC. Are no drives being detected by your PC or are they all inaccessible?
Hi Micheal,
I will be setting up the pi-hole network ad blocker this week. My router has 2 wifi bands with my devices spread amongst them. How do I configure the wpa_supplicant file to identify both the wifi bands?
Hi Nishanth,
I haven’t worked with a dual-band router, but I wouldn’t imagine that this makes any difference to the Pi-hole. I would think that your Pi-hole would connect to your router using the 2.4Ghz band for its own communication, but as long as the DNS settings for your router point to the Pi-hole then the Pi-hole will work across both bands anyway. This works in the same way that the Pi-hole doesn’t need Ethernet to block ads on the Ethernet connected devices on your network.
Hope this makes sense.
I don’t have a source, but my router has a different SSID for 2.4GHz and 5GHz. With just the 5GHz SSID my Pi Zero WH wasn’t able to connect to the network.
It depends on the Raspberry Pi model.
As far as I’m aware, Raspberry Pi’s arent able to connect to 5Ghz networks without an external adaptor. This doesn’t really matter though, it’ll still block ads served on your 5Ghz network if it’s configured to be your routers DNS.
This varies. The Pi 4 does support 5GHz, although there was a firmware bug. I know there is a USB-hub/ethernet adaptor for the Pi Zero.
I suppose it’s a Maker thing. Can we do it fancy?
The one flaw I have found is where you mention changing the log-in name from “pi”. You can’t do that from “inside” the account you’re changing. Google and there are ways of doing it, but I am not sure about doing it on a headless Raspberry Pi.
when trying to set the Pi-hole’s IP address as the primary DNS server i get a message that says DNS server address and LAN address cannot be on the same subnet. I have a smooth brain and have no idea what this is
It seems like your router is complaining about the DNS server being on your local network.
We’re probably all using the 192.168.0.0 – 192.168.255.255 private address block, and apparently that can be split into subnets. The details are going to depend on your router. I use the addresses on the 192.168.1.0 subnet and I suppose I could put the pi-hole on 192.168.2.1 which could be specified as a subnet.
It’s one of those very basic networking ideas which most of us don’t need to bother with. But you could put the manager’s computer on a different subnet to the computer they have in the warehouse to track stock, and set up different limits on what they can access.
Don’t trust me on anything specific. That will depend on what you have, and some routers are not very capable. But if you’re getting that warning, it suggests your router might be able to be set up to fix it.
ur not actually supposed to get it on 192.168.2.1, any thing with 2 in that chain before the last number makes somne kind of error or so im toald
Hi Michael,
I have a micro usb to ethernet adapter to have everything wired and not wireless, but in your setup you dont mention how to point to the wired connection instead of wireless. That would be super useful.
Why point your routers DNS to the Pihole ? why not have your DHCP supply your clients with the Pihole as primary DNS and the router as secondary ? Pihole down your clients will still work and yr router, if that’s the case, won’t start about DNS on a local LAN.
Sure, there are a number of ways to deploy a Pi-hole on your network. I’ve tried to make this method as simple as possible for beginners.
Hi Michael.
I am unable to change Primary or Secondary DNS address on my provided modem/router. Function has been disabled. What do you suggest is the best work around?
You’ll then need to set the DNS address up locally on each device. If you go to your WiFi network settings on your phone/tablet/laptop, there should be an option to set the DNS address. This will be your Pi-hole’s address.
Hi Michael
I’ve followed your steps, but currently stuck on WiFi / Router. Router isn’t showing anything “raspberry” connected or even trying to connect.
On the Raspberry itself, typed ifconfig and its not showing any ssid or ip address.
This part should be expanded on, cause if the RPi Zero W isn’t connected to the WiFi and the ssid name is correct, what to do next from the RPi commandline ?
Have you any details on what to do next ?
Driver / modules that need to be loaded ?
A manual configuration ?
I’ve used raspi-config > System Options > S1 Wireless LAN > But it says “No Wireless Interface Found”
Which is strange as I do have Raspberry Pi Zero W
Any help would be usful
Hi Vinod,
This sounds like an issue with the hardware or firmware on your Pi – it’s certainly not a “normal” part of this installation process.
If you type in “sudo iwconfig” do you get anything on wlan0 or any errors?
Hi Michael
I’ve reflashed my memory card with both Buster Lite and Bullseye Lite.
Both say :-
lo no wireless extension
From “firstrun” file :-
systemctl enable ssh
cat >/etc/wpa_supplicant/wpa_supplicant.conf <<'WPAEOF'
country=GB
ctrl_interface=DIR=/var/run/wpa_supplicant GROUP=netdev
ap_scan=1
update_config=1
network={
ssid="MyWiFi"
psk=72ae87a897bc78abffc1e07a06e32cb99fdf321a465b7324029a64af6349f253
}
WPAEOF
The above was generated from Raspberry Pi Imager, by Ctrl+shift+x and manually from your articule.
Is the WiFi automatically enabled by default, if not how can I enable it ?
It could well be that I received a faulty RPi Zero W
Thanks for any help.
It should be enabled by default. It also looks like it is setting the region settings etc. from the “firstrun” file so I would guess that it is a hardware issue.
Perhaps try flashing a full desktop image and see if you can see and connect to a WiFi network that way.
Hi Michael
Sorry, I also had also tried desktop version for both Buster and Bullseye . On both OS’s they both can not see / detect the WiFi when I clicked on the network icon.
So its a hardware issue.
Thanks for your help Michael, at least I got to the bottom of this problem. Now am on the hunt for a replacement Pi Zero W 🙂
Thanks for the excellent write-up. I stumbled on one small issue: In you text you write that the name of the file for SSH access is “SSH” while actually it should be “ssh” (lowercase). The screenshot actually shows this, but I didn’t look close enough initially. You might consider changing that.
Thanks for the feedback Johan, I’ve updated the text to be in lowercase now.
Hi
I found this write up from a link in your youtube video.
Definitely well present and excellent.
It worked first time, however i did get caught on the pi-hole download and setup as a i had a typo ( linux text is case sensitive and even a space can throw it out )
I followed 99% of your advice ( the only thing i did not follow was changing the routers DNS, all i need to change is just 1pc and that was done easily enough
holy cow THANK YOU- the best instructions for a know-nothing like me. worth noting that they recently disabled the default pi:raspberry login- update that and there will be none better!
Hey man, putty accepts username pi but doesn’t accept password as raspberry, any ideas?
Actually it accepts it but says access denied.
Just had this issue myself, defaults changed in April 2022 but you can change the username and password when writing to the sd card. Do instructions as above but before clicking ‘write’ click on the settings button and you can edit username and password.
Sorry man, I am stuck here also.
To which steps are you referring and edit what ad where exactly?
Nevermind, I just bypassed this, here is what I did in case anyone is on the same problem:
I pluged the SD card in a normal raspberry pi and did the initial setup, language, user and password. After that, plugged the SD card in the RBZW connected used those details and it worked.
Thank you all!