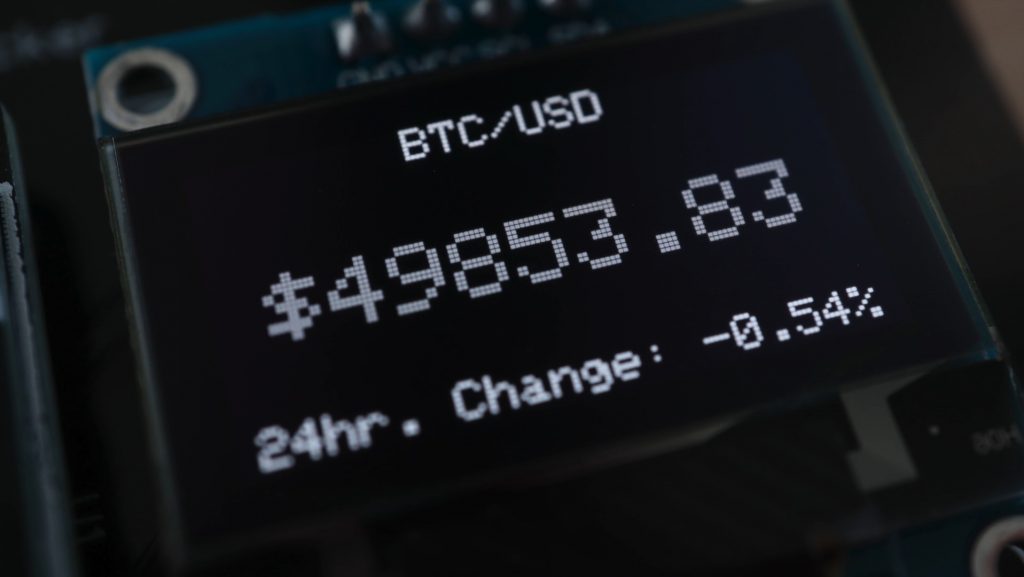
Today we’re going to be making a desktop Bitcoin ticker using an ESP32 development board and an OLED display. This one has been programmed to display the current Bitcoin price in US dollars, but you could set it up to display any cryptocurrency or even multiples cryptocurrencies in any local currency, as long as there is an API available for it on one of the exchanges.
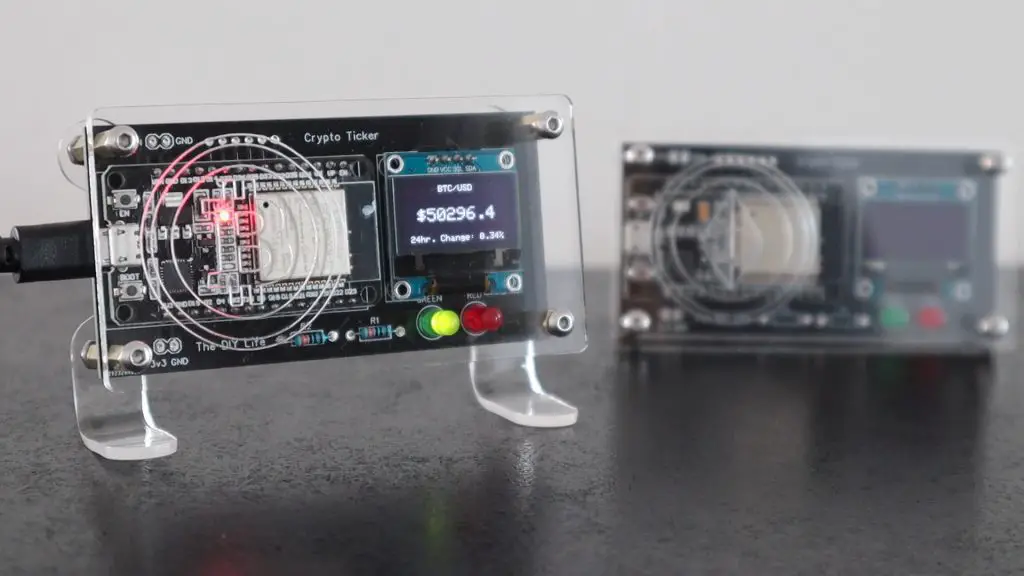
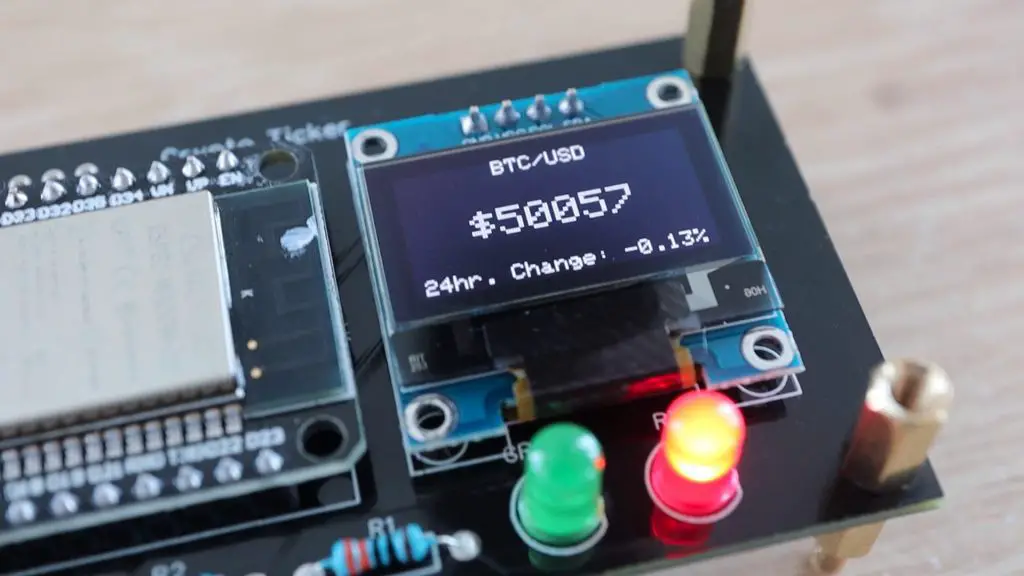
Along with the price, it displays the percentage change from yesterday’s closing price. It also lights up either a red or green LED underneath the display depending on whether the price has increased or decreased.
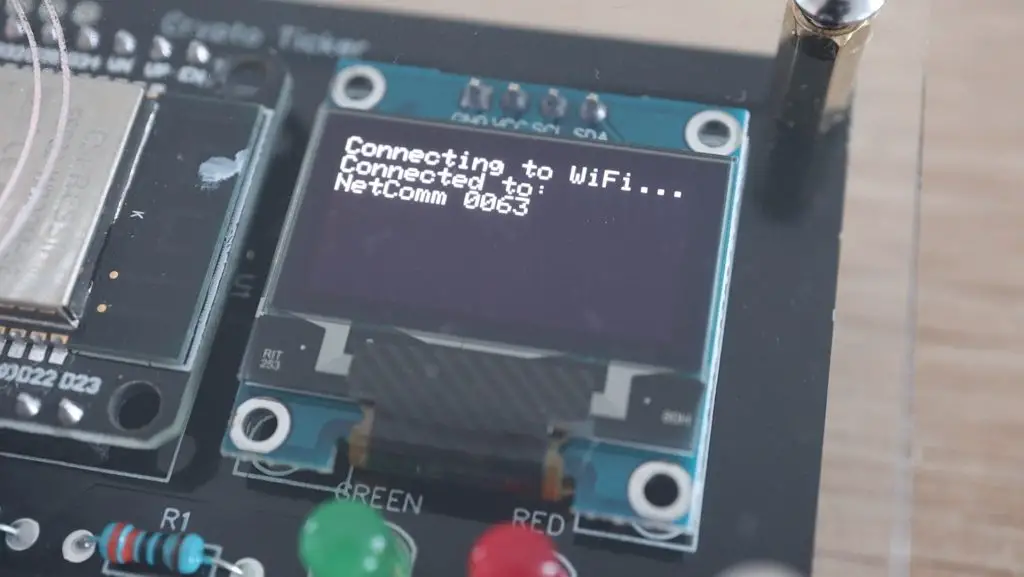
The ticker is powered by an ESP32 development board, which has built in WiFi. It connects to your WiFi network and fetches the updated Bitcoin price through the Coindesk API every 15 minutes. The code is based on Andrew Budziszek’s version on GitHub, with some added functionality for the LEDs and the Bitcoin logo on startup.
If you enjoy cryptocurrencies, then have a look at my recent Bitcoin Full Node which I built on a Rapsberry Pi.
Here is my video of the build and the ticker running, read on for the written instructions to build your own:
What You Need To Build Your Own Bitcoin Ticker
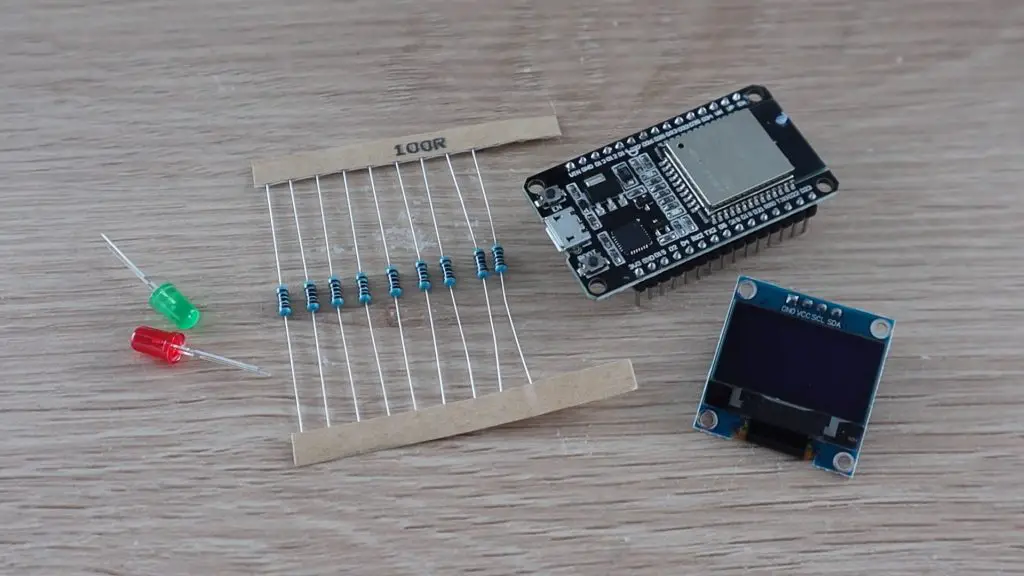
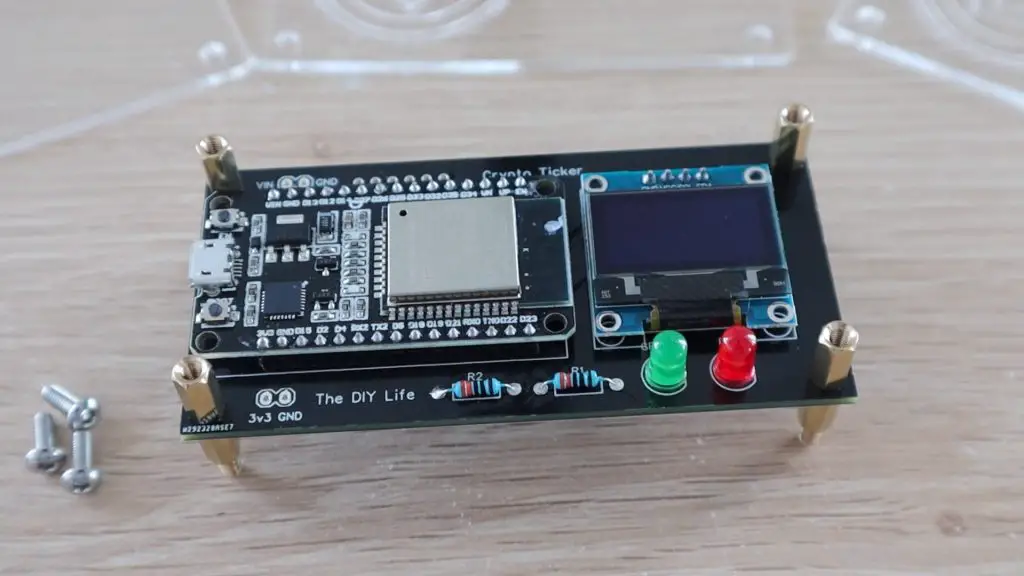
To build one of these, you’ll need an ESP32 development board, an I2C OLED display, a green and red LED and two resistors. I had 100ohm resistors here, but landed up using 330ohm ones for the final assembly.
You can buy a kit for this project, which includes the electronic components, PCB and faceplate here – Crypto Ticker Kit
Amazon Affiliate Links
- ESP32 Development Board – Buy Here
- I2C OLED Display – Buy Here
- 5mm Red & Green LEDs – Buy Here
- 330-ohm Resistors – Buy Here
- M3 Brass Standoffs – Buy Here
- M3 Button Head Screws – Buy Here
Banggood Affiliate Links
- ESP32 Development Board – Buy Here
- I2C OLED Display – Buy Here
- 5mm Red & Green LEDs – Buy Here
- 330 ohm Resistors – Buy Here
- M3 Brass Standoffs – Buy Here
- M3 Button Head Screws – Buy Here
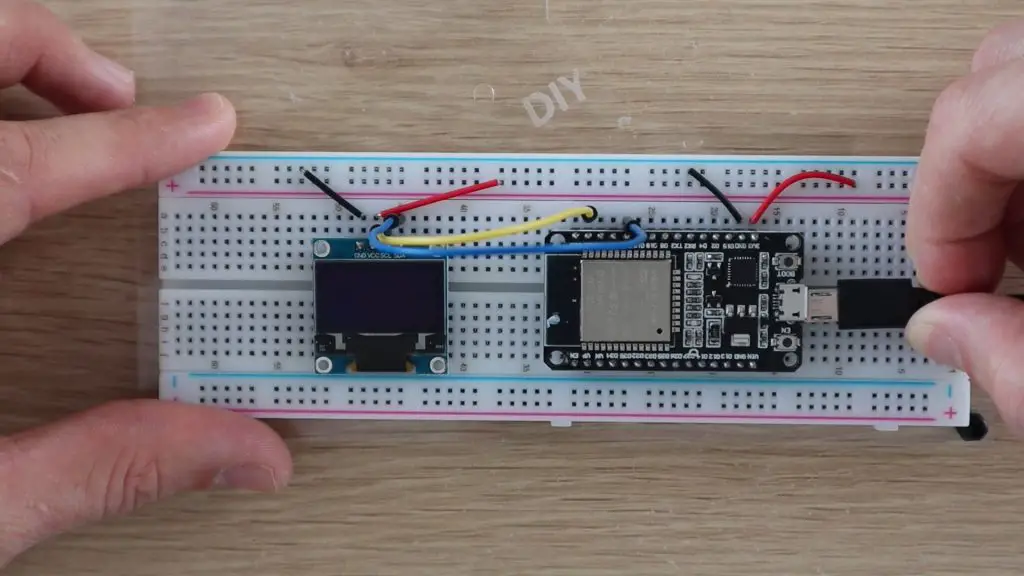
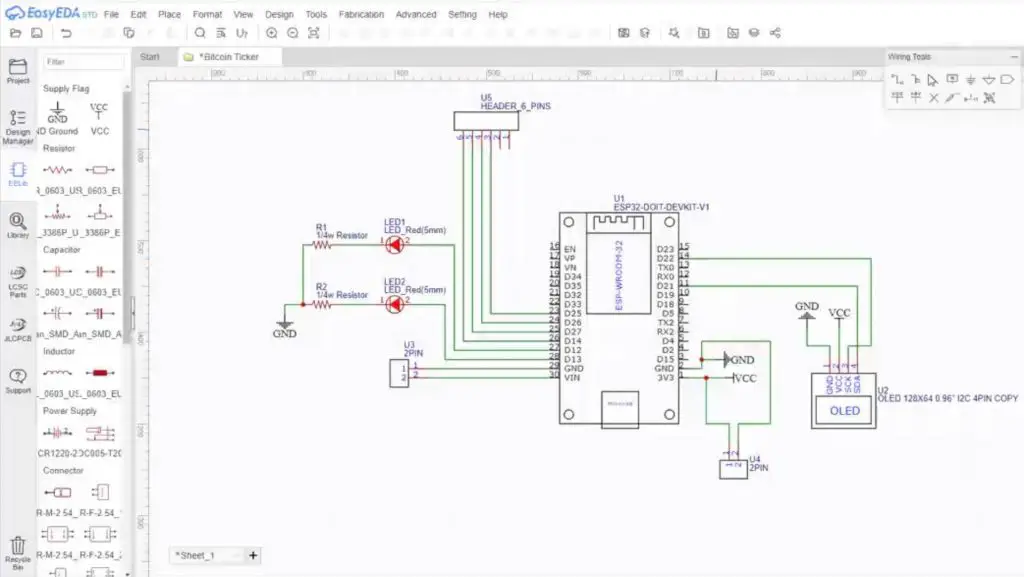
Connecting The Components On A Breadboard
As with most of my projects, I started out by assembling the components on a breadboard to test the connections and the code. My breadboard isn’t big enough to access the pins on both sides of the ESP32, so I just tested the OLED display as LEDs are quite straightforward to connect and program.
There are only four connections to be made, two for power and two for the I2C connection to the display.
One thing to be aware of is that there are two different versions of these displays available on the internet, one which has the GND and VCC pins the opposite way around. Make sure you check the polarity before supplying power to the display or you might damage it.
Once you’ve connected the display, you just need to upload the code using the Arduino IDE. If this is the first time you’re using an ESP32 board in your Arduino IDE then you’ll need to install some additional software first.
I uploaded the original version of the code along with my network name and password and the Bitcoin ticker came to life.
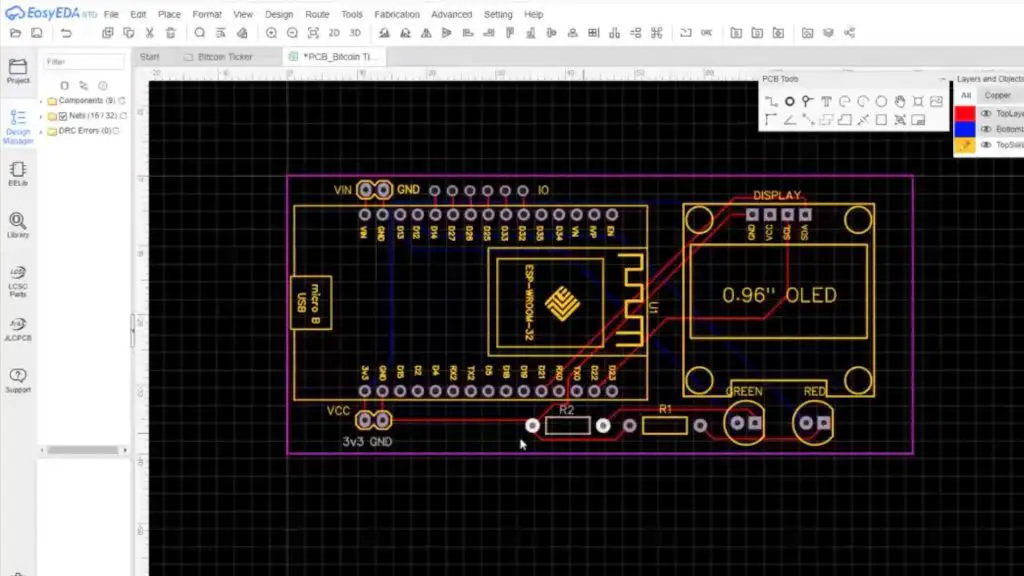
Designing And Assembling The PCB
I then designed a PCB to mount the components onto. I drew up a circuit diagram and added the LEDs to the circuit. I use Easy EDA to design my PCBs as it is free and web-based, so you don’t need to download or install anything on your computer.
PCBs are a great way to neaten up your projects and make them a lot more durable. I always add a couple of power connections and some additional IO access holes onto my PCBs in case I want to add something at a later stage.
I drew up the PCB, added the traces, silkscreen and some mounting holes.
PCB Way provided the PCBs for this project for me to share with you. They offer quick turnaround times and are really affordable, with basic PCBs like these from just $5 for 10 pieces and they’re made up in a day or two.
If you’re interested in getting your own PCBs made up, you can use their online quote tool to get an instant price before you place your order.
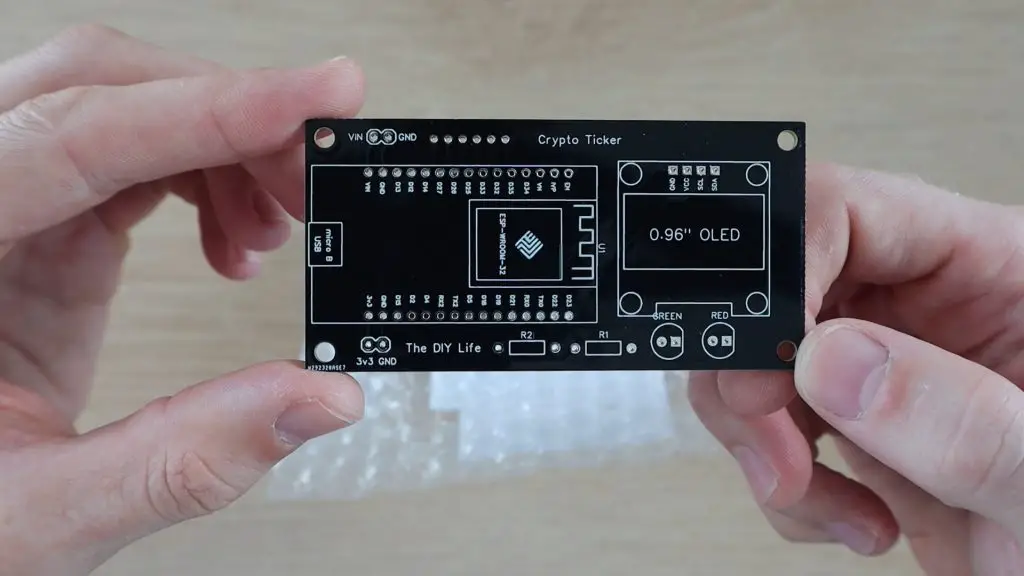
I ordered these in black as the PCB is going to be visible in the final design of the Bitcoin ticker. I didn’t want to design a case to cover the whole board. As you can see, they’re really good quality boards and they’re well finished off.
Now lets get our components mounted onto the PCB.
The assembly of the PCB is really straight forward. The orientation of the components is shown on the silkscreen. The only part you need to be careful with is the polarity of the LEDs, the flat side of the LED (negative or cathode) should be lined up with the flat side on the silkscreen.
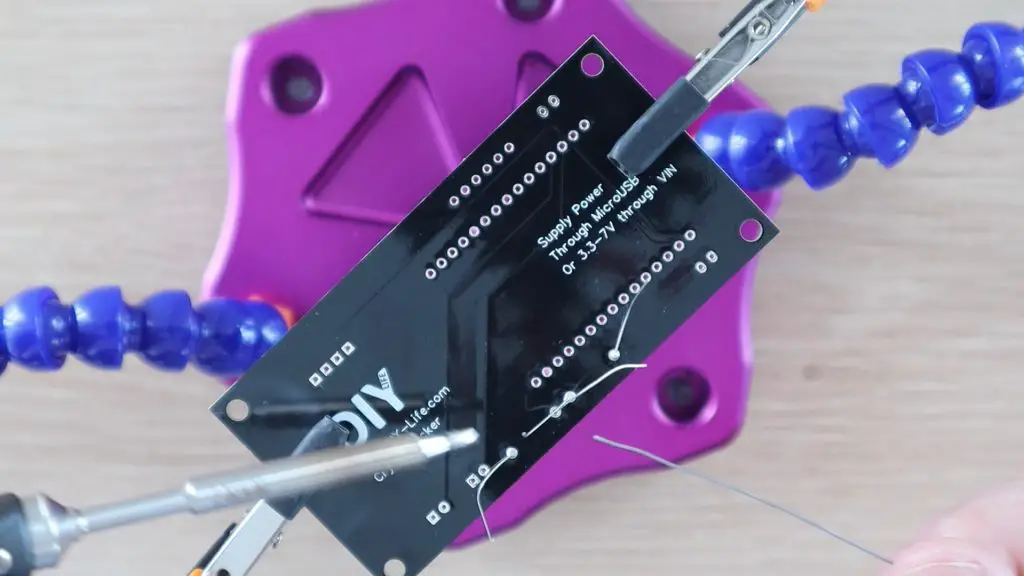
Once you’ve got all of your components mounted, you can trim the ESP32 and OLED display pins sticking out of the back of the PCB if you’d like. This is not entirely necessary though.
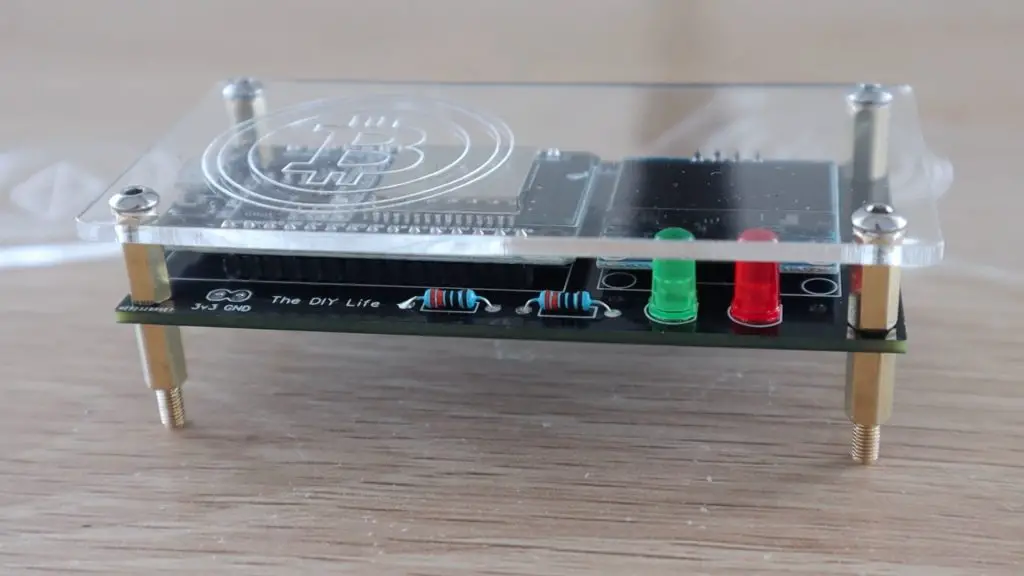
Making A Cover Plate For The Bitcoin Ticker
Next, I designed a cover plate to protect the PCB. This just protects it from accidental bumps when the Bitcoin ticker is on your desk and prevents a short circuit if anything metallic comes into contact with the pins on the display or ESP32.
I designed the cover plate to be cut from a piece of 2mm clear acrylic.
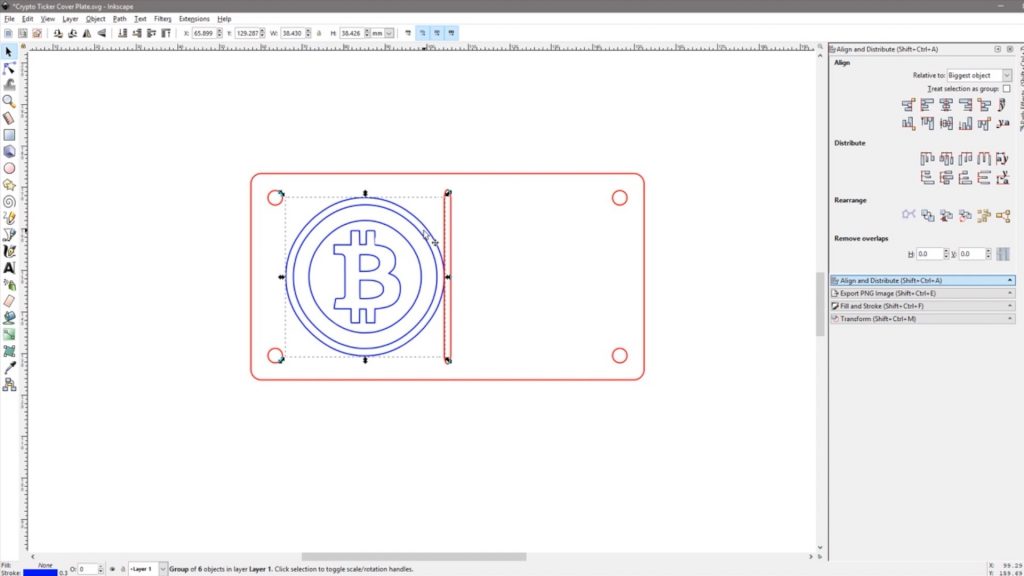
I also added the Bitcoin logo to the cover. I designed a couple of other cryptocurrency options to play around with, so I could convert the ticker to show pricing for Ethereum or Dogecoin as well.
I made up a set of legs that are just cut from some scrap acrylic. They’ll need to be bent at 90 degrees at the indicated markings and these then fit onto the back of the brass standoffs behind the PCB.
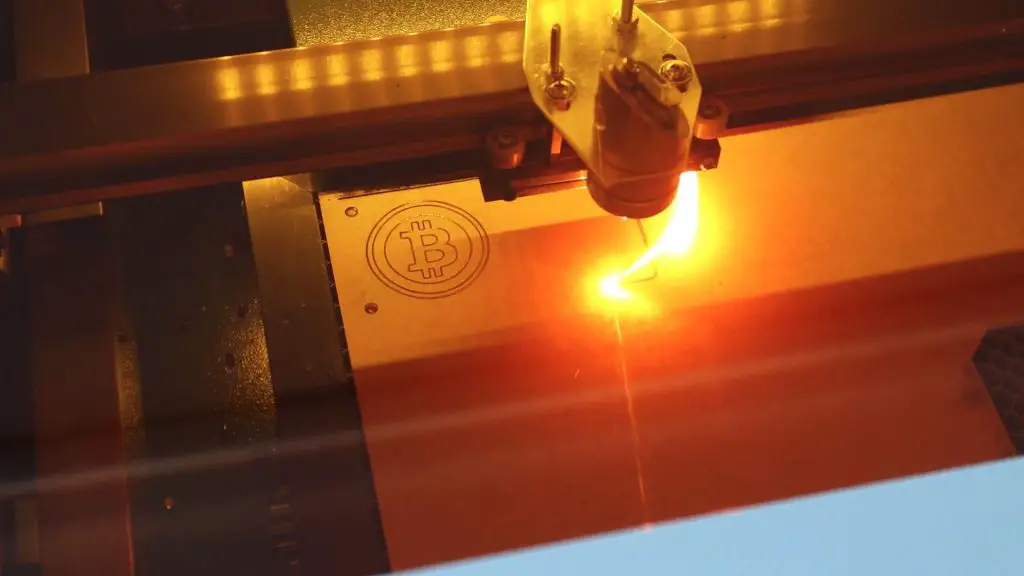
I then laser cut and engraved the cover plate.
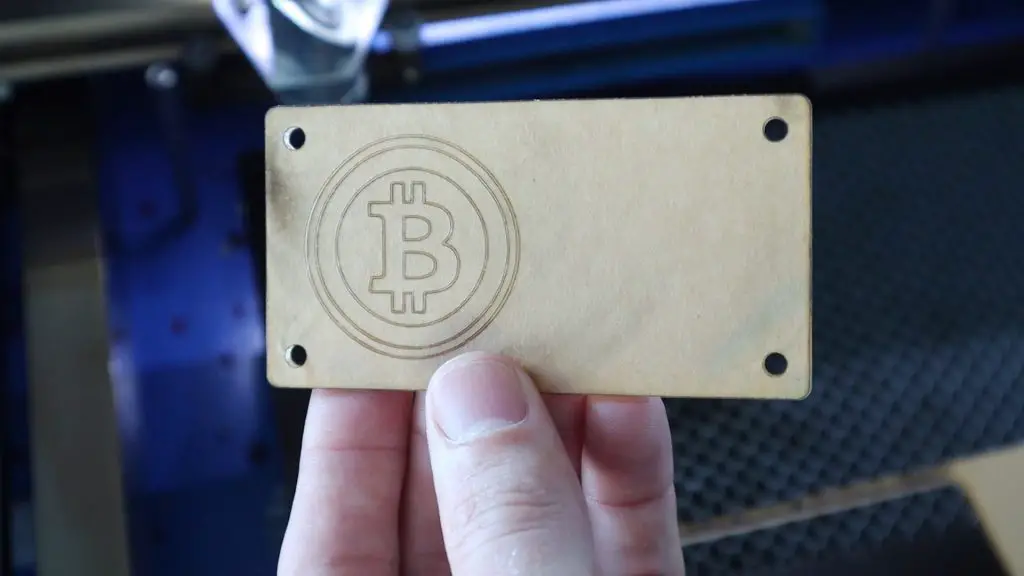
The cover is mounted onto the PCB using some M3 x 10mm brass standoffs and M3 x 8mm button head screws.
I mounted a set of standoffs onto each side of the PCB so that the ticker can then be mounted onto a stand, bracket or shelf.
Modifying The Code To Use The LEDs
Now that the Bitcoin ticker is complete, we just need to modify the code to make use of the two LEDs as well. Fortunately, there is already a test in the code to see whether the price has increased or decreased in order to calculate the percentage, so we just need to add the LED pin IO lines to these sections to get them to turn on and off. I also added a line to put the ESP32 to sleep for 15 minutes between updates to save power.
You can download the code from my GitHub Repository.
Once you have downloaded the code, you’ll need to upload it to your ESP32.
Start by selecting the correct board. In Tools > Board select DOIT ESP32 DEVKIT V1.
If this is the first time you’re using an ESP32 board in your Arduino IDE, you probably won’t have the above option, so you’ll need to install some additional software first.
Important – some of the libraries used below (HTTPClient.h) are packaged and installed with the specific ESP32 board installation process outlined above. Please make sure that you follow this process to install the ESP32 board option in your Arduino IDE or you’ll get compilation errors identifying missing libraries.
Select the correct port that your ESP32 is plugged into via Tools > Port.
Windows 11 – Some Windows 11 installations might not have the CP2102 USB to UART driver installed and your COM port won’t show up in the IDE. If you open Device Manager then you’ll see it listed with an error. You can download the driver from Silicon Labs.
You might also need to install a couple of libraries if they’re not installed by default. These are listed in the sketch after //Include the required libraries. If you try compiling the code and are given an error mentioning any of these libraries not being found then try searching for them in the Arduino IDE Library Manager by going to Tools > Manage Libraries. They are all standard libraries found in the library manager.
Also, make sure that you set your WiFi Network Name and Password to your own network. Make sure that these match exactly, they’re case-sensitive and need to include any spaces or characters as well.
Finally, click Upload to upload the sketch.
xreactx has also provided an alternative sketch for Cardano.
I uploaded this modified version of the code and the Bitcoin ticker was then complete.
Let me know what you think of this Bitcoin ticker in the comments section. Are you going to try to build your own?
Really love the project! Do you mind sharing the PCB design as well?
Build my own PCB based on your video and learned quite a lot. Thank you for the project!
That’s great to hear Sebastian, well done!
I can buy the gerber file itself ?
Thank you for this Amazing project. Would you happen to know how to make the prices update realtime Michael?
Also wanted to know how to change the cryptocurrencies displayed! can’t wait to try this out!
You’d likely need to pay for an exchange to provide real-time information. Most free APIs have a limit to the number of requests you can make per day or per hour unless you pay for them.
I want to buy PCB files?
Can I use for this Project a ESP8266?
Would you share your stand.
thanks
I unfortunately lost the original stand file, but I’ve put together another simple set of legs that’ll fit onto the same mounting holes. You’ll just need to bend the acrylic at 90 degrees at the indicated markings. The link is under the cover plate link.
I’m experimenting some glitches on my display. I just copied your code, the same as it is in the page. Can be something in the code?
Thank you very much for this project.
I bought the kit which arrived today (After it travelled to the other side of the world), the instructions were very clear.
Since this is my first time with Arduino, It took me some time to understand how to load all the libraries needed and upload the project. it works great and I learned some new things.
I guess I should not look only at RPI projects going forward.
That’s great, thanks for the feedback Meir!
Hallo Michael
Tolles Projekt.Läuft alles gut.
Ein Problem habe ich.Ich habe vier Nachkomma stellen.
Es ich es auf zwei reduzieren?
Im dank Vorraus
Andreas
You can reduce the decimal places by multiplying it by 100 (two decimal places) then converting to an int and then converting back to a double and dividing by 100.
Hi! I tried to do that because I want to learn, but I couldn´t. I am doing this project for myself.. Is there any other way to at least convert BTCUSDPrice to an Int value? I been trying but the display always shows 4 decimals. Thanks I love this project!!!
Can you write this part of the program? I also want this program without decimal places like on your pictures. Thank you!
I’m not sure anybody else had this problem or if I am wrong.
esp_sleep_enable_timer_wakeup(900000000); //Sleep for 15 minutes
This line wasn’t working causing the program to check the price as fast as the esp32 could do it. I discovered this while looking at the wifi output with a spectrum analyzer. I replaced it with a Delay command. that “fix it”.
I assume this either has something to do with the board type selected/installed or the type of ESP32 development board you’re using. One of the two isn’t interpreting the sleep mode correctly. A delay achieves the same end result, just without the power saving.
Thanks! great project, I’m using ESP32 – wroom 32d – with esp32 Dev mod selecton. If that helps anyone.
Hi Michael,
My wife got this for my birthday as a fun project, but I have ZERO coding exp. I’ve followed all directions and set up the esp32 and downloaded all libraries as indicated by Andrew Budziszek. When installing the Adafruit_SSD1306.h library, it says that additional library add-ons are required which are Adafruit_BusIO and Adafruit_GFX_Library. I’ve copied and pasted your code with the additional libraries installed and get the following error message when verifying. Thanks for your help! I’m totally lost
C:\Users\Danny\Documents\Arduino\libraries\Adafruit_BusIO\Adafruit_I2CDevice.cpp: In member function ‘void Adafruit_I2CDevice::end()’:
C:\Users\Danny\Documents\Arduino\libraries\Adafruit_BusIO\Adafruit_I2CDevice.cpp:44:10: error: ‘class TwoWire’ has no member named ‘end’
_wire->end();
I’ve also tried running it with the BusIO and GFX libraries deleted from my system and get the following error
In file included from C:\Users\Danny\AppData\Local\Temp\arduino_modified_sketch_456230\CryptoTicker.ino:8:0:
C:\Users\Danny\Documents\Arduino\libraries\Adafruit_SSD1306/Adafruit_SSD1306.h:39:26: fatal error: Adafruit_GFX.h: No such file or directory
compilation terminated.
exit status 1
Hi Dan,
That’s great. There are a couple of possibilities for the errors you’re getting, but I’ll definitely try help you out.
Perhaps start again by checking that you’ve got the correct board set up and selected. Use this guide to install the “ESP32 by Espressif Systems” boards in Boards Manager. Once this is done, make sure that you’ve got the board selected as “DOIT ESP32 DEVKIT V1” with 921600 upload speed, 80Mhz flash frequency. If the wrong board or a different board library is used then it might not have the dependent libraries that this code requires.
Once that is done, try confirming that each of the 7 libraries are installed by using the libraries manager and the search bar – Adafruit_SSD1306, WiFi, Wire, HTTPClient, NTPClinet, WiFiUdp, ArduinoJson.
Download a fresh copy of the code from this page and just edit the SSID and password fields (lines 22 and 23), leaving the “” marks around the name/password.
Then try re-verifying it again. Let me know if that doesn’t work for you and I’ll try see what we can do to get the libraries working.
Thanks Michael, Got it working!
The problem I was having is that when you search in the library manager there are no libraries specifically named ‘WiFi’, ‘Wire’, WiFiUdp’ . I’m not sure if things got updated since this was made but for those going forward these are the specific libraries that I downloaded to get it to work
-AceWire
-Adafruit_BusIO
-Adafruit-GFX_Library
-Adafruit_SSD1306
-Uno_WiFi_Dev-Ed-Library
-ArduinoHttpClient
-ArduinoJson
-NTPClient
Hope this helps!
nice, having the same problem. did you had to edit the code to use those librarys?
I didn’t edit the code. Price updates are working, but the red and green lights do not seem to be working, but I’m ok with that. So maybe code needs an update ?
Hi, i’m having the same issue. If i use this librarys i have to make changes to the code right?
Nevermind- lights are working code is bueno
hello dan can you please share your code u used with all those libraries u mentioned? i am still getting same error
Thanks for the work. I’ve bought your set and building it with your tutorial – it’s just working fine!
That’s great!
I can’t find the right Lib for HTTPClient.h.
CryptoTicker:11:10: fatal error: HTTPClient.h: No such file or directory
#include
^~~~~~~~~~~~~~
compilation terminated.
exit status 1
HTTPClient.h: No such file or directory
Arduino HTTPClient Lib will not work, also all others in the List of the Lib Bibibliothek. Any Hints?
I have this error: ‘
HTTPClient.h: No such file or directory.
Your CODE has the verison in Capital letters but….the library that can be found at GitHub or in Arduino library Manager is this:
HttpClient
Can you please package all the right libraries in a ZIP, otherwise the project can not be compiled.
Many thanks.
Rafa
I loved this project! I received the kit as a gift and although I have very limited experience soldering & working with microcontrollers I managed to get it running. (My biggest struggle was having my PC recognize the ESP32 as a COM port rather then a USB but thanks to reddit and a few different drivers I was able to resolve)
Does anyone know of a BTC/CAD API that I could substitute in?
That’s great, thanks for the feedback Andrew!
I’m not aware of any BTC/CAD API’s that are available for free – perhaps try asking around on Reddit.
Getting this error: HTTPClient.h: No such file or directory. Can you please help me or update the code
Hi,
You need to follow the specific guidelines that I’ve linked to in order to install the ESP32 board in your Arduino IDE. This particular package contains the required libraries, including the HTTPClient.h one.
hey Michael,
great project. I got it working without any problems but i cant find out how to get the values in Euro. can you help me with this?
thanks in advance.
The coingecko api stopped workiing