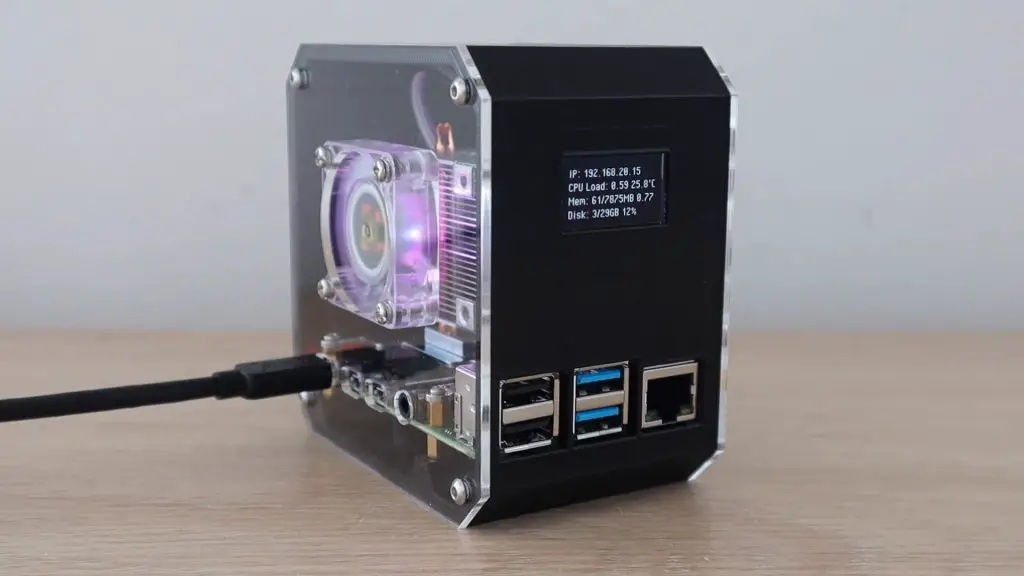
In this guide, I’ll show you how to program a 128×64 I2C OLED stats display as a quick dashboard for your Raspberry Pi. I use this script on my Raspberry Pi Desktop Case and a lot of people have asked me for some more in-depth setup and programming instructions to get it running.
You can make your own Raspberry Pi Desktop case by following my build guide, or buy a premade kit from my Etsy store.
This guide is written specifically for a Raspberry Pi 4B running Raspberry Pi OS Buster, although you should be able to work through it for other Raspberry Pi models.
Update: For those running Raspberry Pi OS Bullseye, please use my revised guide.
Here’s a video guide to connect and program the OLED stats display, read on for the full written guide and script modifications.
What You Need For This Project
Amazon Affiliate Links
- Raspberry Pi 4 – Buy Here
- Ice Tower – Buy Here
- Micro SD Card – Buy Here
- Raspberry Pi Power Supply – Buy Here
- I2C OLED Display – Buy Here
- Female to Female Jumper Cable – Buy Here
Banggood Affiliate Links
Connecting Your I2C OLED Stats Display To Your Raspberry Pi
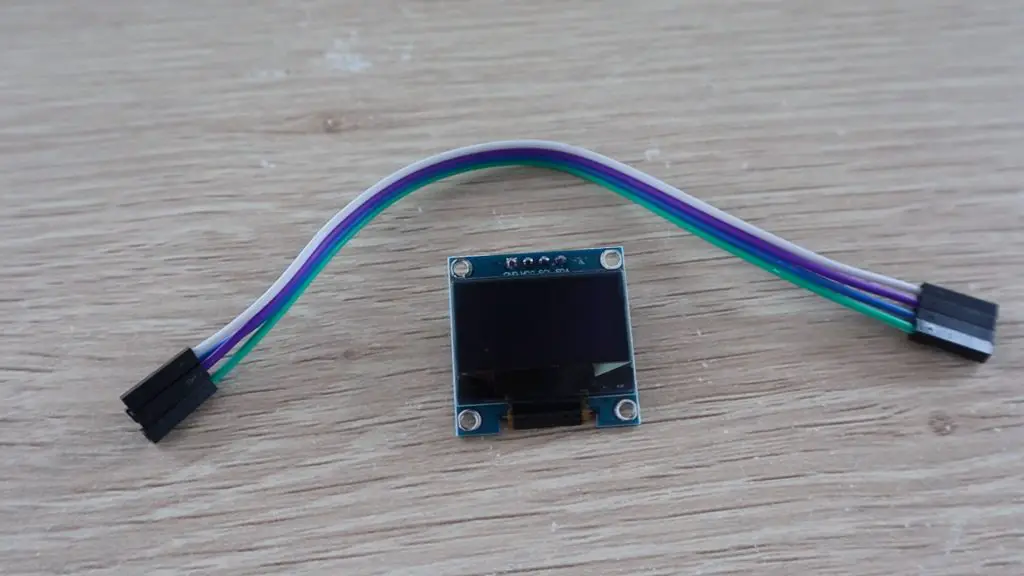
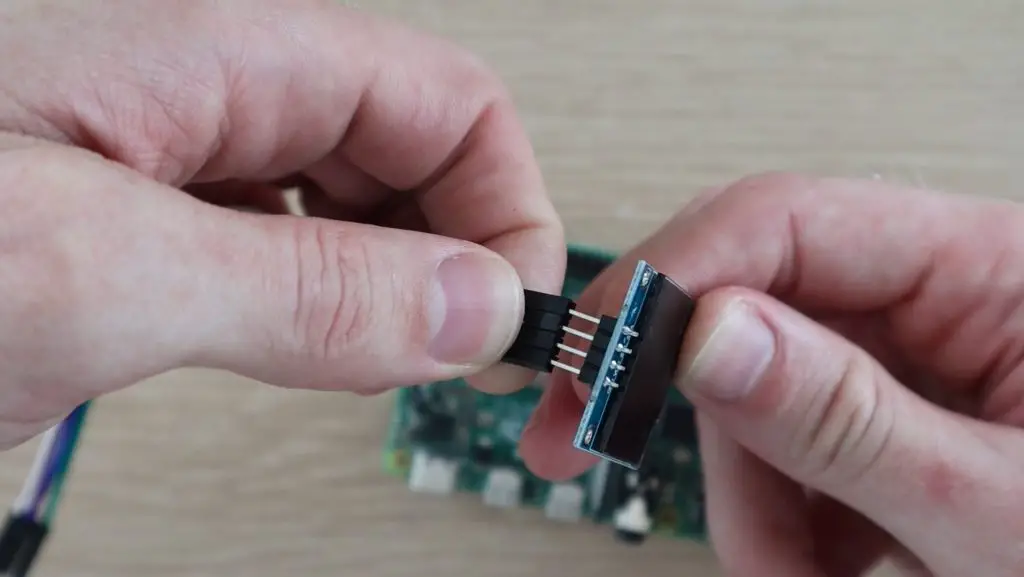
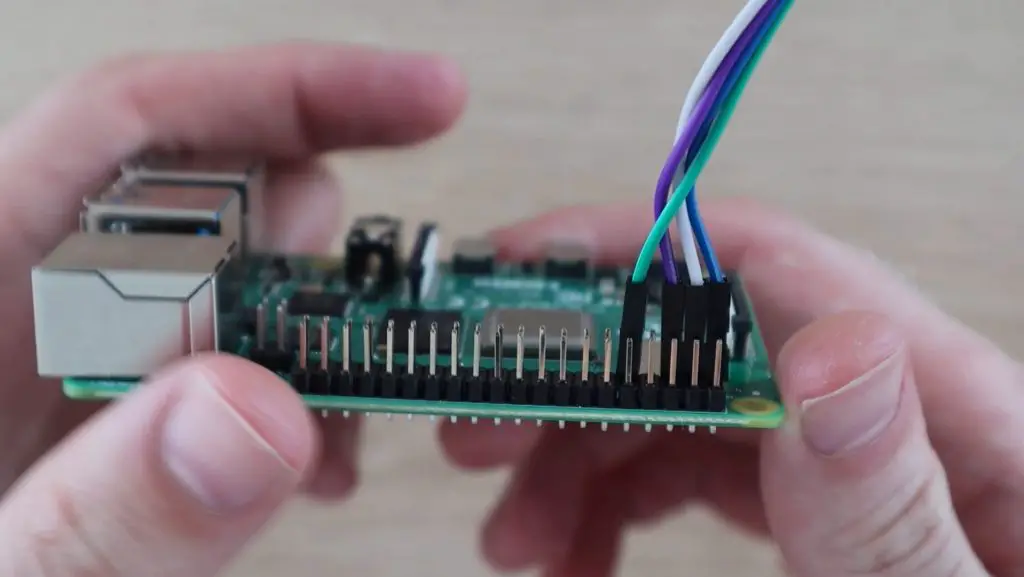
We’ll start by hooking the display up to the Raspberry Pi. To do this, you’ll need a 4 wire female to female jumper cable. The colours on the cable don’t matter, they’re just there to help you keep track of which wire goes to which terminal.
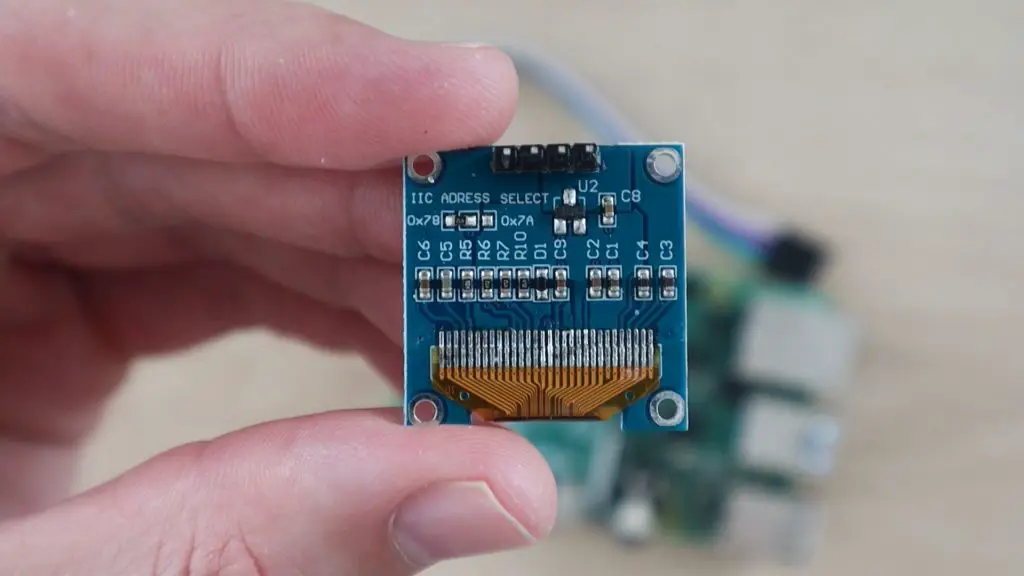
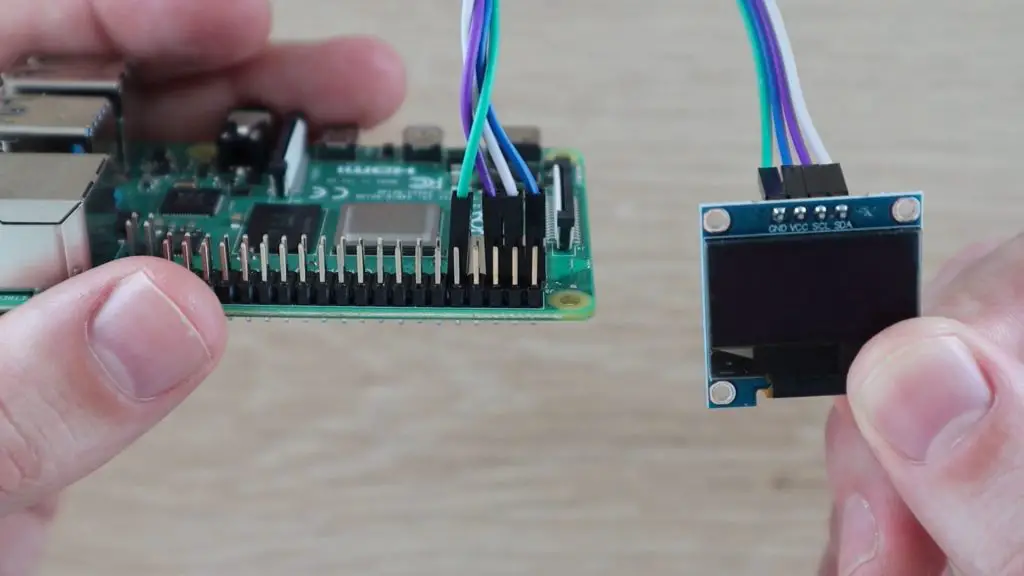
The OLED display’s pins are labeled on the front, which seems to confuse a lot of people, especially when they’ve installed the display into a case or housing and the front area above the screen is no longer visible.
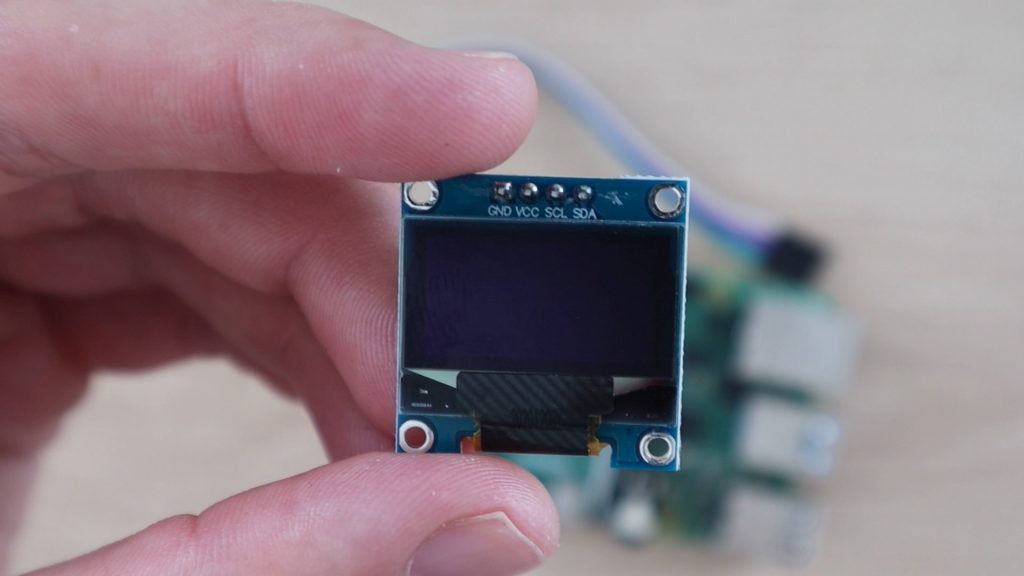
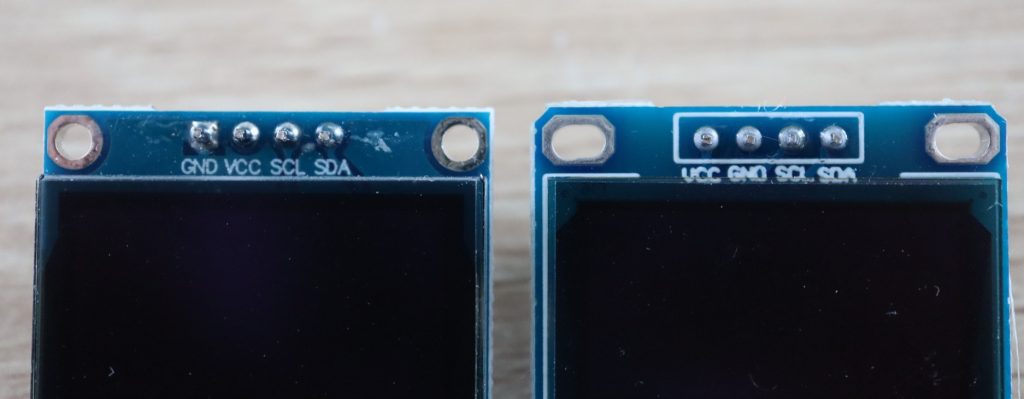
These are most commonly GND, VCC, SCL, and SDA. Don’t just copy this arrangement though, make sure you check your own display as there are versions of this display that have the VCC and GND pins the other way around.
These displays don’t have reverse polarity protection, so if you connect them incorrectly (even just once) then it’s quite likely that they’ll be damaged and will no longer work, even if you correct the wiring afterward.
Plug your ribbon cable into these pins and then make a note of which colour you’ve got connected to which of the four pins. If you’re installing the display into your case before connecting it then it’s a good idea to write down which colour is connected to which pin so that you don’t forget.
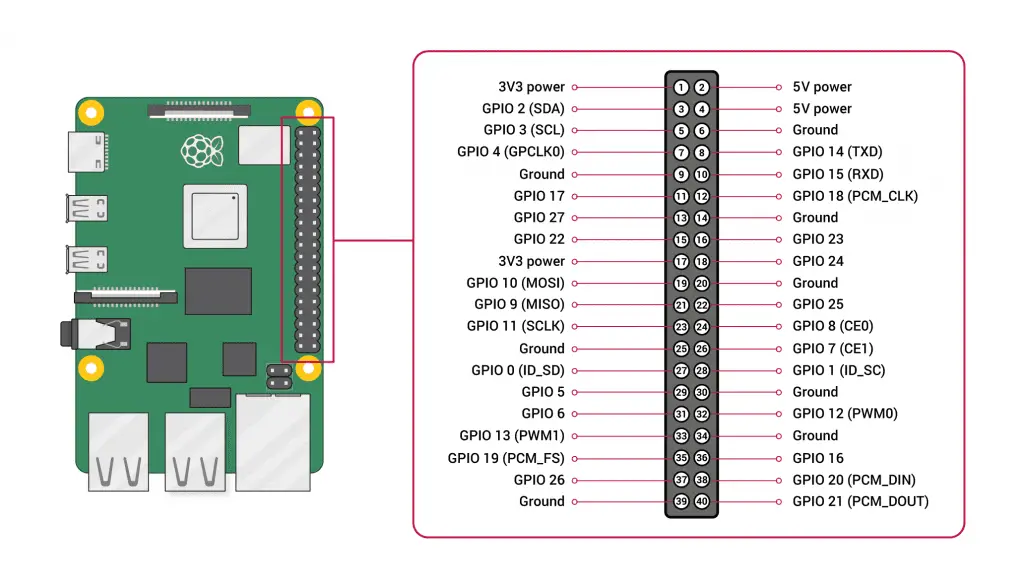
Next, you need to plug the other ends of the jumpers into your Raspberry Pi’s GPIO pins. The Pi’s GPIO pinout diagram can be found quite easily online and is available on the official Raspberry Pi website.
Make sure that your Pi is off and the power is disconnected before plugging or unplugging jumpers from the GPIO pins. You don’t want to short a connection or plug a lead into the incorrect pin by mistake and not have a chance to check your connection before powering it up.
You’ve got a few options for the GND and VCC jumpers. I usually plug the GND jumper (mine is green) into Pin 14, but you can use any pin labelled Ground. I plug the VCC jumper (mine is blue) into Pin 1, which is a 3.3V power pin. Again, you can use any of the 3.3V or 5V power pins as this display can run on both 3.3V and 5V.
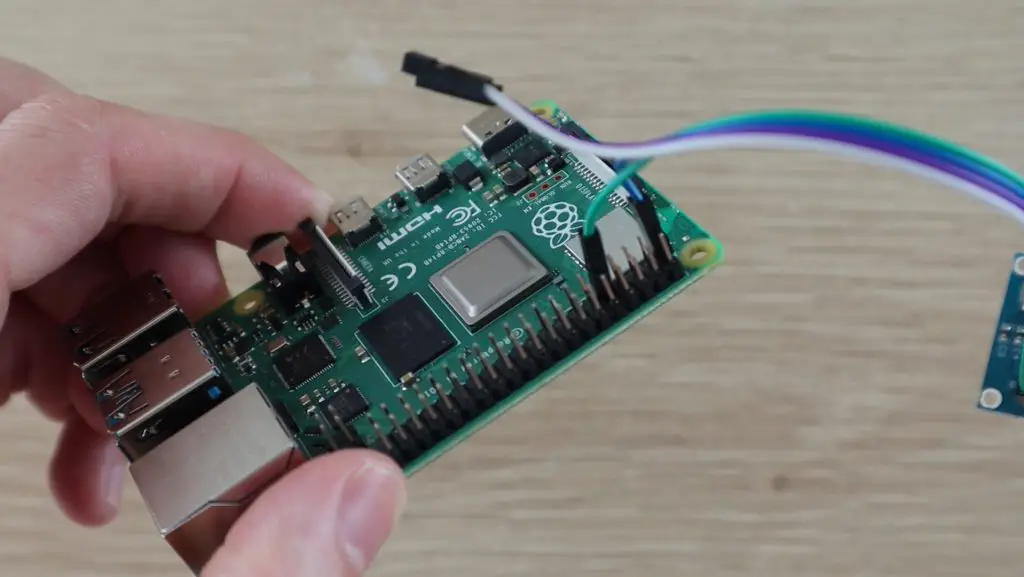
Next, we need to connect the communication jumpers SCL and SDA, which just get plugged into the corresponding GPIO pins. Plug SCL (mine is purple) into Pin 5 and SDA (mine is white) into Pin 3. Don’t get confused between the GPIO numbers and the Pin numbers, ignore the GPIO numbers on the diagram and just go by the SDA and SCL labels and the corresponding pin numbers.
Check all of your connections again and you’re then ready to power your Pi up and get started with programming the display.
Programming The OLED Stats Display
Once you’ve booted up your Pi, you should be on the Raspberry Pi OS desktop. It’s possible to do this installation on a headless Pi as well, it’s just easier to make the required layout changes to the script in the full version first.
Enabling & Testing I2C Communication
To get the display to show our Raspberry Pi’s performance stats, we’re going to be running a Python script. Before we do this we need to enable I2C communication on the Pi as this is how it communicates with the display. You can either do this through the preferences menu or by typing this command into a new terminal window:
sudo raspi-config
Select interfacing options, then I2C and then select Yes and then reboot the Pi by typing in the following command:
sudo rebootOnce your Pi has rebooted, you need to check that the following 3 libraries have been installed. You may already have them installed, but it’s worth checking. Run each one of these commands individually in your terminal:
sudo apt-get install python-smbus
sudo apt-get install i2c-tools
sudo pip3 install Adafruit_BBIO
Once you’ve done that then you can check that your Pi is able to see that your display is connected. You can do this by typing in the following command:
sudo i2cdetect -y 1You should then see a table, similar to the below, that shows a single pair of characters in it. This code indicates the I2C address of your display.
0 1 2 3 4 5 6 7 8 9 a b c d e f
00: -- -- -- -- -- -- -- -- -- -- -- -- --
10: -- -- -- -- -- -- -- -- -- -- -- -- -- -- -- --
20: -- -- -- -- -- -- -- -- -- -- -- -- -- -- -- --
30: -- -- -- -- -- -- -- -- -- -- -- -- 3c -- -- --
40: -- -- -- -- -- -- -- -- -- -- -- -- -- -- -- --
50: -- -- -- -- -- -- -- -- -- -- -- -- -- -- -- --
60: -- -- -- -- -- -- -- -- -- -- -- -- -- -- -- --
70: -- -- -- -- -- -- -- --
If your table is returned blank then you’ve either got a wiring issue or I2C communication isn’t turned on. If you get a table full of characters then you’ve probably made a wiring mistake as this happens if SDA is shorted to ground. Go back and re-check your connections to your Pi and display and re-check that you’ve got I2C communication enabled after a reboot.
Don’t proceed with trying to get the script to work if you don’t get the correct response in this step, if your Pi isn’t able to see the display thats connected to it then it won’t be able to communicate with it to get anything displayed.
Downloading And Running The Adafruit Stats Script
Next let’s have a look at the python script and how to install it.
The script is one of the example scripts provided in the Adafruit Python SSD1306 library, with some tweaks. There is a note on the Github page to say that this is a depreciated library, but that doesn’t mean that you can’t use it or that it will no longer work. It just means that they have developed a better or more recent set of libraries. We’re not so much interested in the library as we are in the stats example script, so we’re going to use it anyway.
Download the script by typing in the following commands:
sudo python -m pip install --upgrade pip setuptools wheel
git clone https://github.com/adafruit/Adafruit_Python_SSD1306.git
Next, navigate to your library’s directory:
cd Adafruit_Python_SSD1306Then run the setup script to install the library. Make sure that the python version you choose here matches the version you are going to run the actual script in.
sudo python3 setup.py install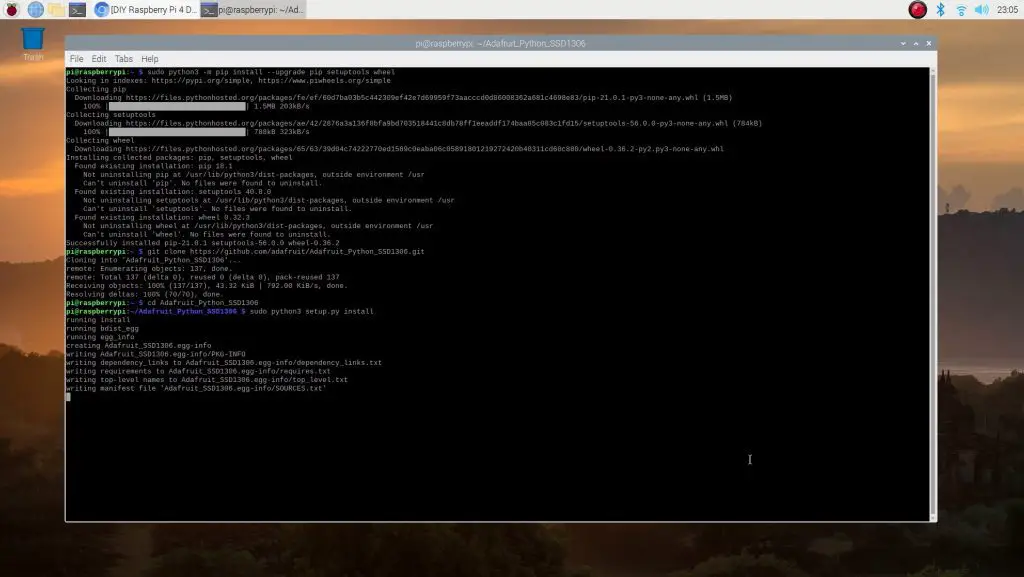
Next navigate to the examples directory in the Adafruit directory:
cd examplesThen execute the stats script:
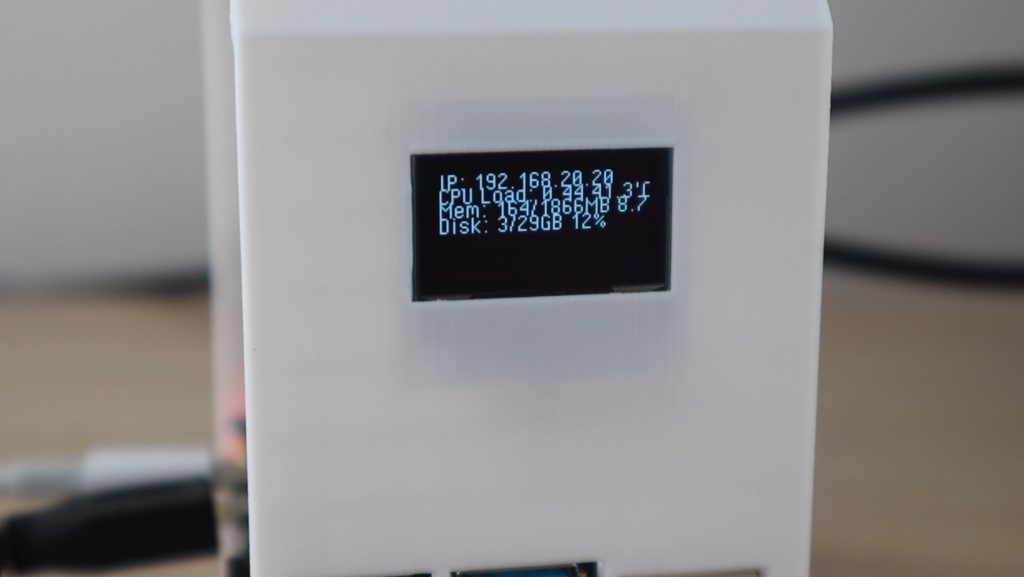
python3 stats.pyYou should then see your Pi’s stats shown on the display.
You can see the text isn’t that clear, there are a few weird characters on the display and the CPU temperature isn’t displayed. So we’re going to try and fix those in the following section.
Adjusting The Display Content & Layout
The following steps are done on the Raspberry Pi OS desktop and edits to the script are made in Thonny Python IDE (which comes pre-installed).
Open up the examples folder in the Adafruit library which you were working on in the previous step and use the Thonny Python IDE to open up the stats script so that you can edit it.
Copy these two portions of the script below and paste them into your script on your Pi.
Add the following two lines to the script at the end of the “# Shell scripts for system monitoring from here” section
cmd = "vcgencmd measure_temp |cut -f 2 -d '='"
temp = subprocess.check_output(cmd, shell = True )
Replace the following lines in the “# Write two lines of text” section.
draw.text((x, top), "IP: " + str(IP,'utf-8'), font=font, fill=255)
draw.text((x, top+8), str(CPU,'utf-8') + " " + str(temp,'utf-8') , font=font, fill=255)
draw.text((x, top+16), str(MemUsage,'utf-8'), font=font, fill=255)
draw.text((x, top+25), str(Disk,'utf-8'), font=font, fill=255)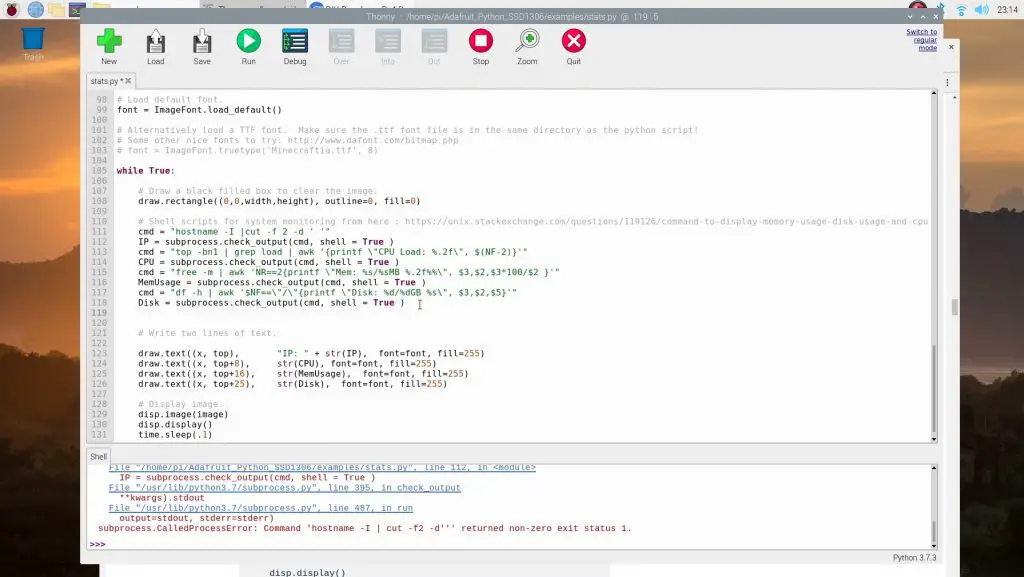
Have a look at the video at the begining if you’re unsure about which lines to replace or change.
Running the script you can now see that the characters are gone and the temperature is being displayed alongside the CPU load:
This is where I left the display in my original video, but it looks a lot better if you use a better font, which allows the text to fit into the width limit and uses the full height of the display, so let’s look at that next.
First, let’s change the display size so that we’re using all of the display’s pixels so that the text is a bit clearer. This display is actually a 128 x 64 display, not the 128 x 32 display which is set by default.
Comment out the line near the top which sets the display size to 128 x 32:
# disp = Adafruit_SSD1306.SSD1306_128_32(rst=RST)And then uncomment the line which sets the display size to 128 x 64:
disp = Adafruit_SSD1306.SSD1306_128_64(rst=RST)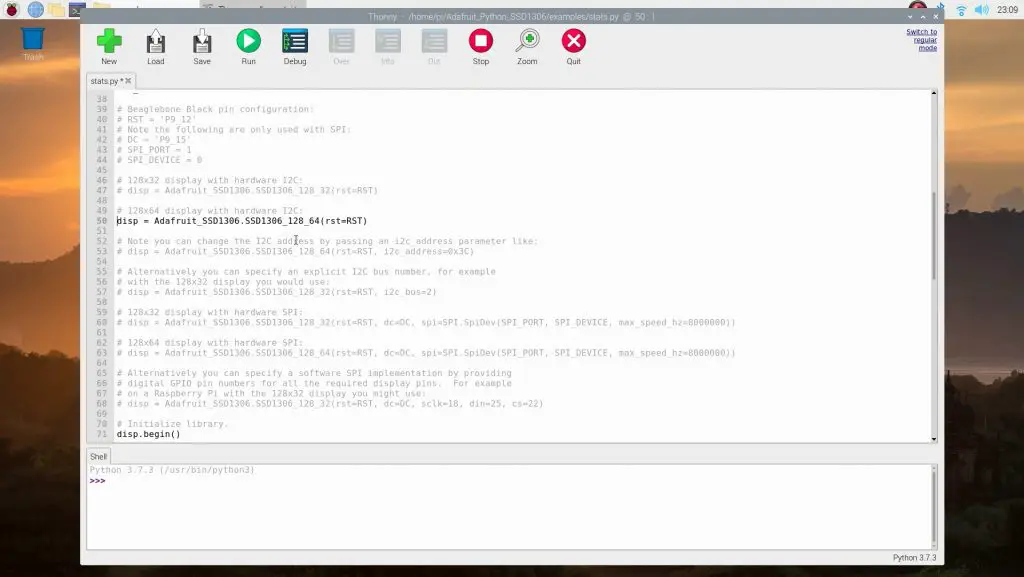
If you run the script you’ll now see that the text is much clearer, but it all bunched up in the top half.

We can play around with the spacing, but this font is just not great for this stats layout. So let’s now look at changing the font.
Download the font PixelOperator.ttf from https://www.dafont.com/pixel-operator.font and then unzip the contents of the download.

Look for the standard pixel operator font and copy the font into the same directory as your stats script.
You’ll then need to copy the filename of your font, along with the extension, to put into the script.
Comment out the line which loads the default font:
# Load default font.
# font = ImageFont.load_default()
Uncomment the line which loads the replacement font and paste your filename into it, keeping the inverted commas on either side. You can also play around with the font size by editing the number after the font name, I’ve used 16 here.
# Alternatively load a TTF font.  Make sure the .ttf font file is in the same directory as the python script!
# Some other nice fonts to try: http://www.dafont.com/bitmap.php
# font = ImageFont.truetype('PixelOperator.ttf', 16)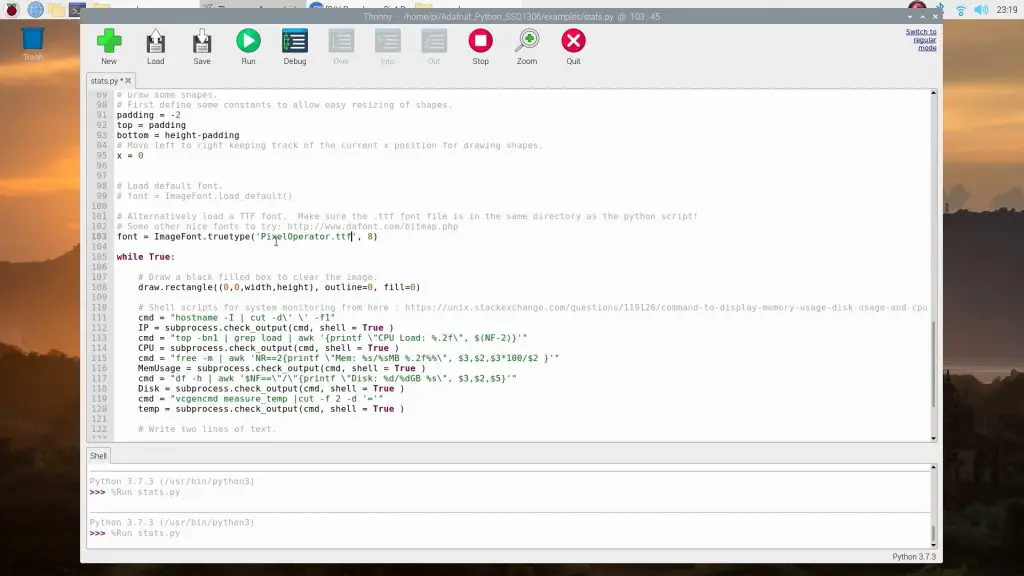
If you now run the script you’ll see that the text is a bit taller and is in your new font, but it’s still bunched up at the top of the display. So the last thing we need to do is adjust the layout.
Adjusting the layout is a bit of a guessing game until you get it looking the way you’d like it to, or just copy the numbers I’ve used:
draw.text((x, top+2), "IP: " + str(IP,'utf-8'), font=font, fill=255)
draw.text((x, top+18), str(CPU,'utf-8') + " " + str(temp,'utf-8') , font=font, fill=255)
draw.text((x, top+34), str(MemUsage,'utf-8'), font=font, fill=255)
draw.text((x, top+50), str(Disk,'utf-8'), font=font, fill=255)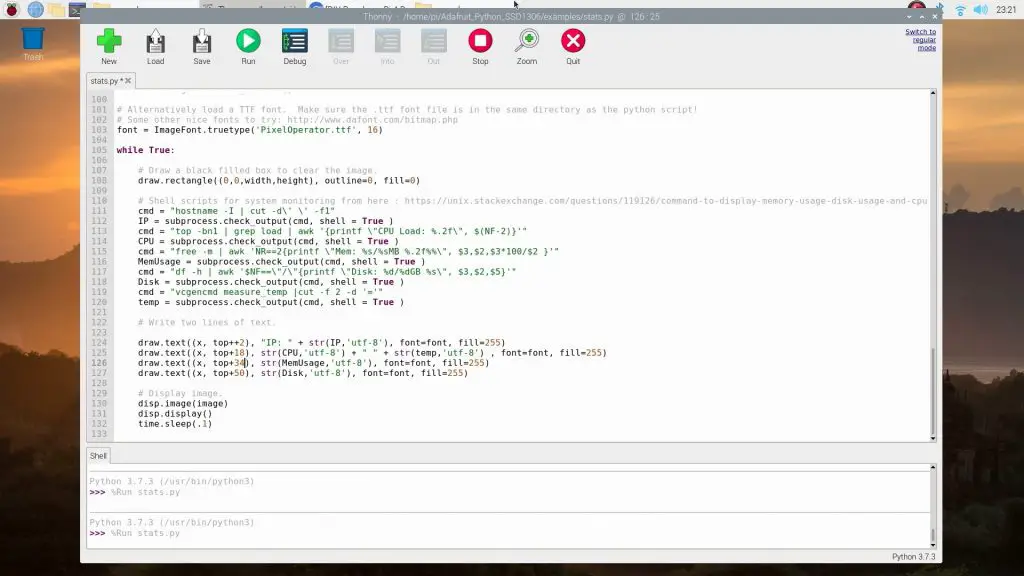
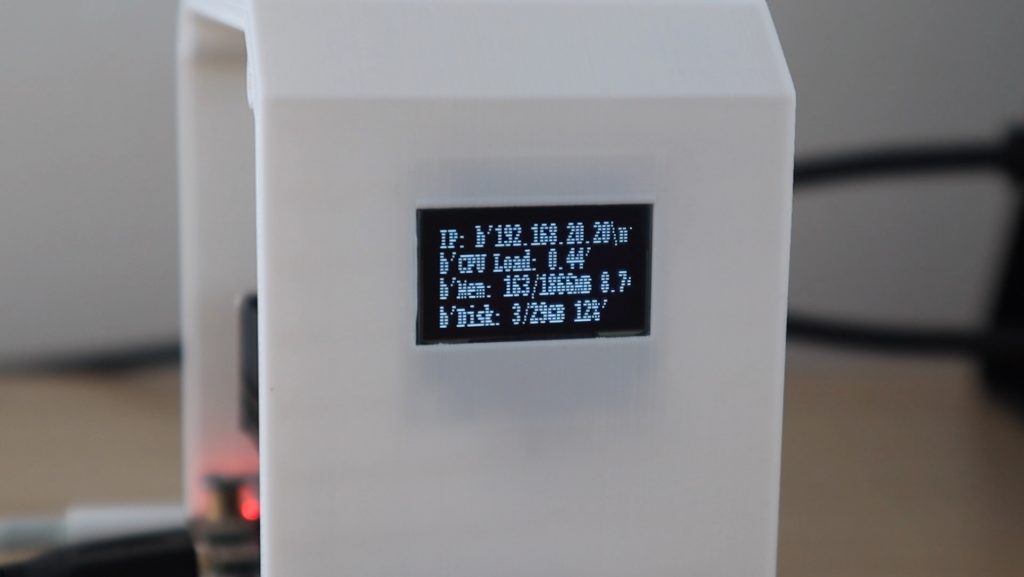
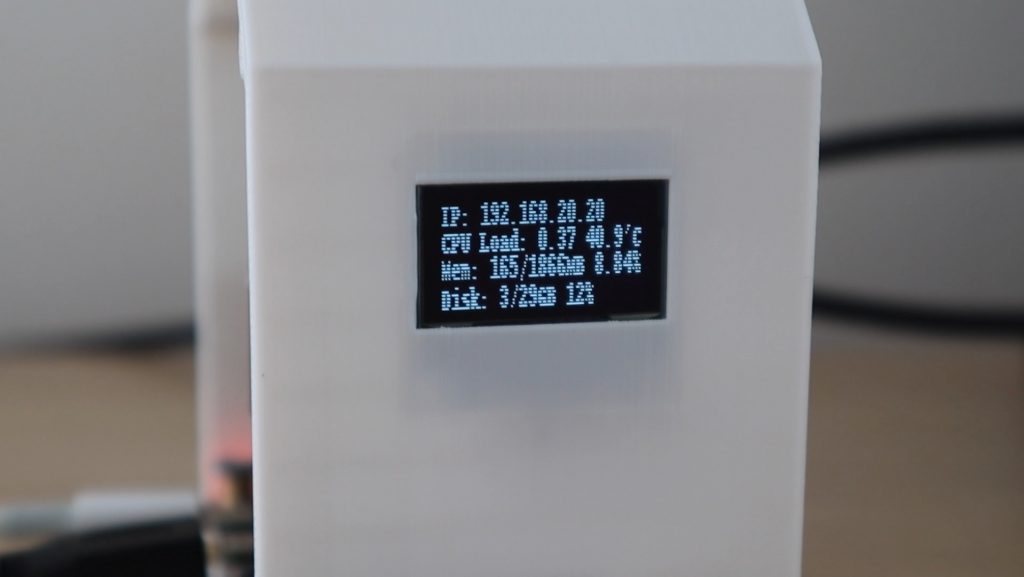
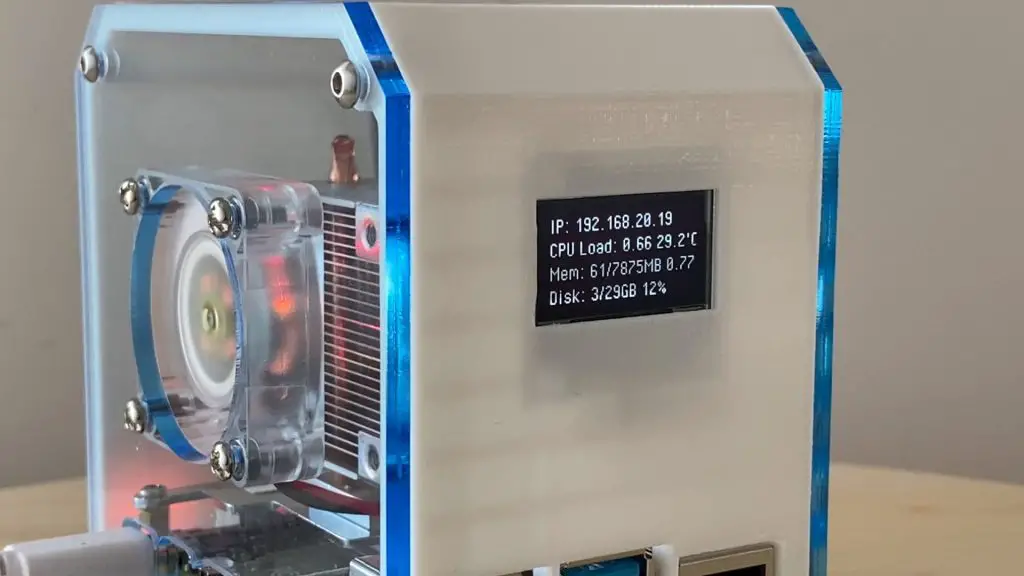
When you’re done, you should now have a clear OLED stats display running on your Pi.
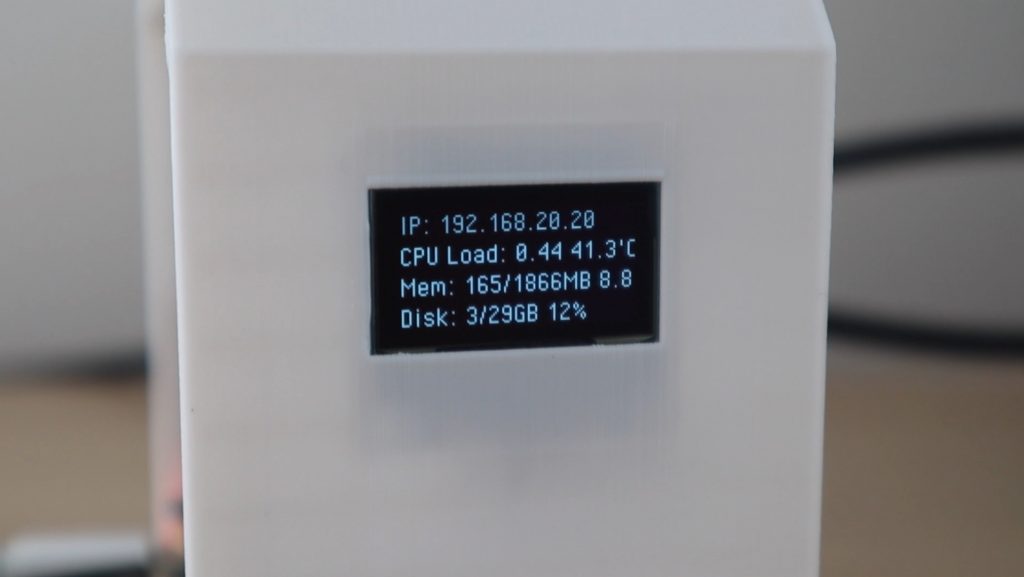
This script will continue to run and update the display as long as you’ve got your IDE open. But we want it to run all the time and run on startup, so there’s one last thing to do.
Setting The Script To Run Automatically On Startup
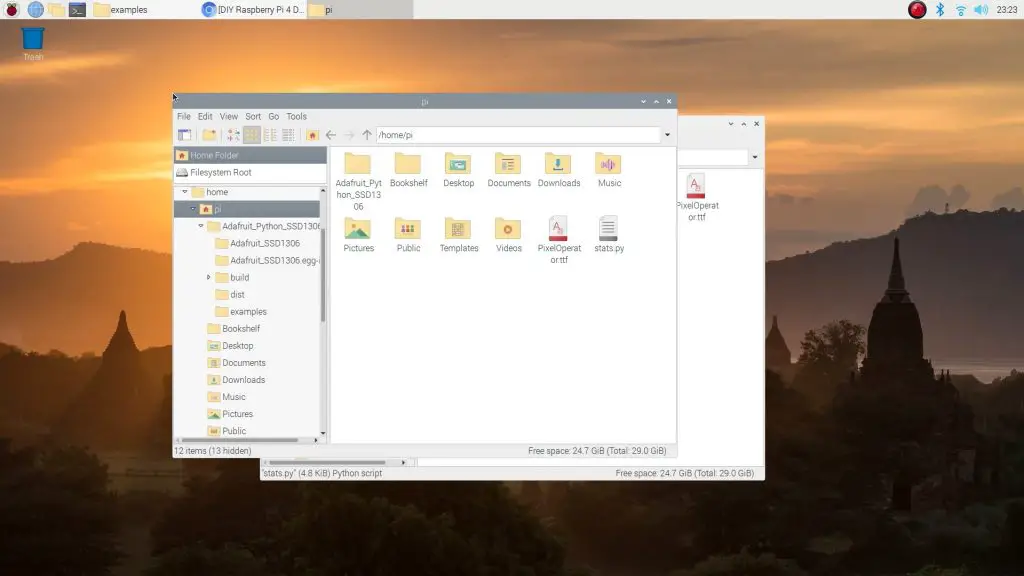
Copy the OLED stats display script and the font into your home directory.
Open crontab by typing the following command into your terminal:
crontab -eIf this is the first time you’re opening crontab then select 1 as your editor and hit enter.
Add the following line to the end of the file to run the script:
@reboot python3 /home/pi/stats.py &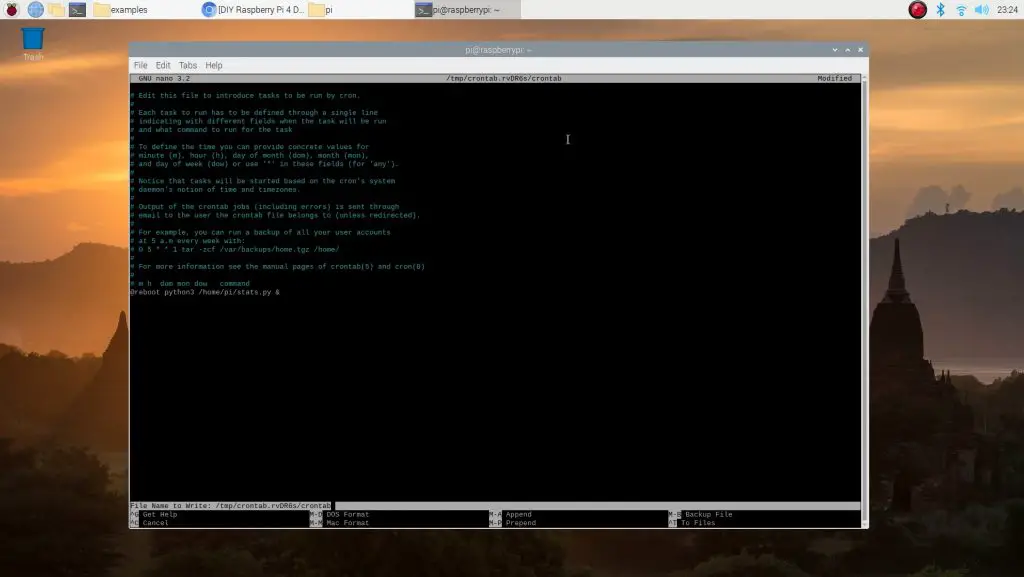
You might need to change the directory to suit the directory that you’ve got your script saved into.
Also don’t forget the & at the end to tell the Pi to continue starting up and run the script in the background.
Save the file when you exit and then try rebooting your Pi to see if it is working correctly.
If it is all working correctly then you should have a working stats display which starts up automatically each time your Pi boots up.
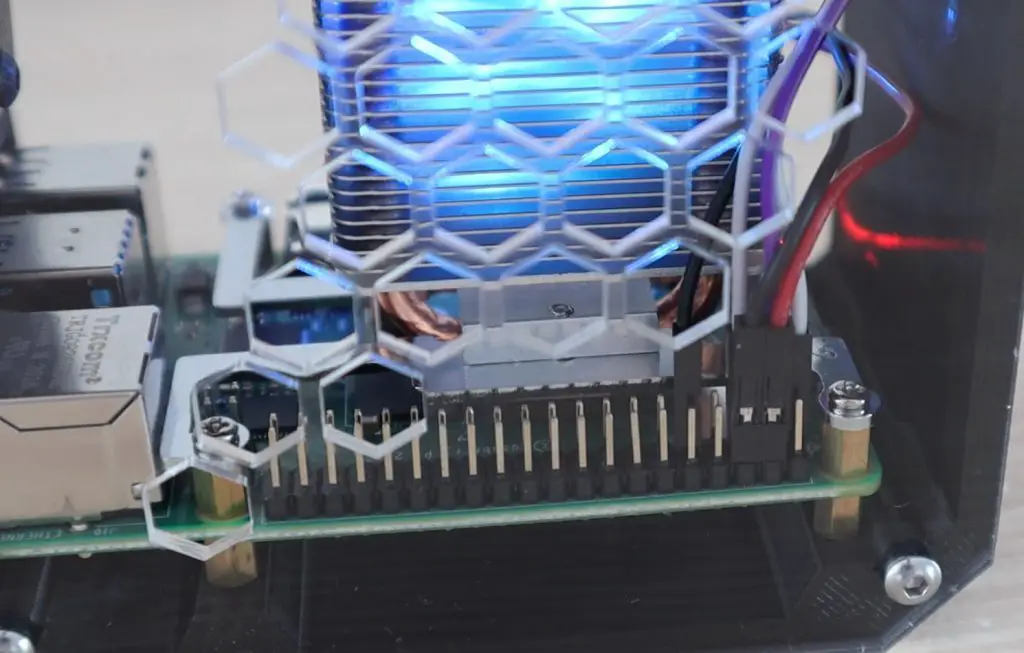
If you’re using an Ice Tower with your stats display, plug the fan’s power cables in to the 5V and GND GPIO pins next to the display’s connections as shown below.
Let me know what you think of this OLED stats display in the comments section below and let me know what you’re using it for. Have you built it into your own case?
Hi Michael,
Thank you again for a great tutorial and for the amazing case!
One note though, pip3 isn’t always installed, so I suggest adding the ‘sudo apt install python3-pip’ command before entering the ‘sudo pip3…’ command.
Arik
Thanks for the tip Arik,
I’ll get this step added to the guide as well.
hi
i also trying to display the stats of my raspberry 3b+ and now able to.
can you help me with that?
i getting :
Traceback (most recent call last):
File “stats.py”, line 47, in
disp = Adafruit_SSD1306.SSD1306_128_32(rst=RST)
File “/usr/local/lib/python3.4/dist-packages/Adafruit_SSD1306-1.6.2-py3.4.egg/Adafruit_SSD1306/SSD1306.py”, line 288, in __init__
File “/usr/local/lib/python3.4/dist-packages/Adafruit_SSD1306-1.6.2-py3.4.egg/Adafruit_SSD1306/SSD1306.py”, line 107, in __init__
File “/usr/local/lib/python3.4/dist-packages/Adafruit_GPIO-1.0.4-py3.4.egg/Adafruit_GPIO/I2C.py”, line 66, in get_i2c_device
File “/usr/local/lib/python3.4/dist-packages/Adafruit_GPIO-1.0.4-py3.4.egg/Adafruit_GPIO/I2C.py”, line 98, in __init__
ImportError: No module named ‘Adafruit_PureIO’.
whats the problem ? can you help me with that ?
Hey,
I would like to really thank you for this nice case. And I really appreciate that you made a new Video and new Post about it because I had trouble to get the font displayed correctly. I could not try it out until now, but I definitly will.
So I made a remix of your case because I am more a fan of round edges. I would like to ask you if I am allowed to post that remix over at thingiverse. And of course I would give you a proper credit and will link this page in the post. What do you think about it?
I created this the get something like a miniature version of my Desktop PC Case (Aerocool DS Dube), which I really love.
Greetings from germany :o)
Hi Jennitty,
That’s great, glad you like it!
Please don’t post the case to Thingiverse. I’d be happy to add your remix download to the original case’s and this post, with full credit to you.
Best regards,
Michael
Hi Michael
Great work as usual, just a slight issue.
If I add the script in the crontab and reboot, the display flashes up and goes blank.
If i run the python script from the home directory –
python3 /home/pi/Adafruit_Python_SSD1306/examples/stats.py
I get the following error
Traceback (most recent call last):
File “/home/pi/Adafruit_Python_SSD1306/examples/stats.py”, line 103, in
font = ImageFont.truetype(‘PixelOperator.ttf’, 16)
File “/home/pi/.local/lib/python3.7/site-packages/PIL/ImageFont.py”, line 853, in truetype
return freetype(font)
File “/home/pi/.local/lib/python3.7/site-packages/PIL/ImageFont.py”, line 850, in freetype
return FreeTypeFont(font, size, index, encoding, layout_engine)
File “/home/pi/.local/lib/python3.7/site-packages/PIL/ImageFont.py”, line 210, in __init__
font, size, index, encoding, layout_engine=layout_engine
OSError: cannot open resource
However if i run python3 stats.py directly from the examples folder it works..
Any ideas?
It looks like it’s not able to find the font you’re using within the folder you’re running the script from.
FYI, I had this same issue. I resolved it by changing to the directory of the script before running it in cron. In your case, I would think that this crontab line should work:
@reboot cd /home/pi/Adafruit_Python_SSD1306/examples; python3 /home/pi/Adafruit_Python_SSD1306/examples/stats.py &
That helps me too, thanks!
Thank you very much for this instruction and fun little project.
I love this little displays, I am glad I have now one connected to my Octopi Raspi. 🙂
That’s great, thanks for the feedback Luigi!
Love it! One question would I be able to display pi-hole stats?
I have never tried to do so, but you can set the script to display any metrics that are made available by other applications. So I would imagine you could pull data from pi-hole if you wanted to.
Great Tutorial my display works flawlessly thanks to all your information and steps. Great Job. The only thing I had to troubleshoot was I received two errors. Once I installed the following two packages worked perfectly.
sudo apt-get install libopenjp2-7
sudo apt install libtiff5
Thanks Again!!!!
Thanks for the feedback Matthew. I haven’t seen those packages come up previously, what operating system/version are you running?
Thanks so much for making this follow up tutorial because I was having a little bit of trouble using the original one you created. I’m new to the world of R-PI and was extremely excited when cases arrived today. Love this case by the way! I immediately got started using your tutorial and I have to say that everything worked great with the exception for the final step. It’s probably my fault because I opted to use a direct path to the stats.py file in the example folder rather than placing it and the font file on my desktop. Nonetheless, I cannot get the script to auto run upon reboot. Alternatively, I did try it from the home screen as describe in your instructions and it still did not work. Any idea what could be wrong? The info and path I entered and saved in the crontab file was @reboot python3 /home/pi/Adafruit_Python_SSD1306/examples/stats.py & . Again, as I mentioned, I did try @reboot python3 /home/pi/stats.py & and placed the two files on the home screen, but it still did not work.
Great write up! im very new at all of this but followed along and all is working well.
Is there a way to have the display turn off/clear when the Pi is shutdown? Then if i follow the last steps and have the script run on boot, will it auto turn on?
You’d probably have to run a pkill command to stop the current script and then run another script to “blank out” the display. You could also try using one of the GPIO pins to switch the power to the display on or off.
In crontab after I try to exit it says “ File name to write: /tmp/crontab.LfxgzD/crontab” and it gives me a bunch of options but you never said which one to do. Would you please tell me?
It asks you whether you’d like to save the file and you just need to enter Y or y for yes.
Hi Michael,
Great video and mod for your original case. I have a question regarding 3d printinhg the case (all the haps on the case have support filling which can be pushed out after printing. Which paramtere did you use in Cura to create these support fillings.?
Thanks
Rav
Nice work Michael Klements,
Thanks Jibin
hello! Thanks for detailed instructions! I am having a trouble! at first following your step, everything worked totally fine! but when I updated raspbian, there is no longer anything shown on the display by default. I checked everything! I check whether anything in crontab has been changed, but there was all okay as per your instruction. but still this program does not run at startup! please help!
I’ve found this happens from time to time on my Pi’s as well. Delete your Crontab file and create a new one, or just replace the existing one. For some reason this seems to work.
Fantastic tutorial. I really enjoyed this project, making the case and getting the display functioning.
I changed the apostrophe to a degree symbol. Here’s how I did it if anyone is wondering:
Insert: new_temp = str(temp[0:2], ‘utf-8’) + ‘°’ +’C’
before the line : draw.text((x, top+18), str(CPU,’utf-8′) + ” ” + str(temp,’utf-8′) , font=font, fill=255)
And change the line: draw.text((x, top+18), str(CPU,’utf-8′) + ” ” + str(temp,’utf-8′) , font=font, fill=255)
to: draw.text((x, top+18), str(CPU,’utf-8′) + ” ” + new_temp , font=font, fill=255)
This is a quick modification I made. Hopefully it works for you.
Thanks for sharing this Jeremy!
HEy very straight forward and easy to do.
Thanks for also the small additions and changes to layout and change the font! Awesome!
Just a quick question: How to Show different Disks? Like a mounted USB disk? Is it possible to have the Disk line Scroll and show each after another – or switch between on and another?
same for IP? Wired and Wifi?
Thanks a lot!
Yes you can change the script to display any metrics available via the shell scripts. There is more information available through the link provided above this section – https://unix.stackexchange.com/questions/119126/command-to-display-memory-usage-disk-usage-and-cpu-load
Thanks i figured it out:
I wanted to know how to display “2 Pages” with different informations in first.
The easy trick was:
# Write two lines of text.
draw.text((x, top), “IP: ” + str(IP), font=font, fill=255)
draw.text((x, top+8), str(CPU), font=font, fill=255)
draw.text((x, top+16), str(MemUsage), font=font, fill=255)
draw.text((x, top+25), str(Disk), font=font, fill=255)
# Display image.
disp.image(image)
disp.display()
#show display content for 2 seconds
time.sleep(2)
#Clear Display
draw.rectangle((0,0,width,height), outline=0, fill=0)
#Get Secondary Disk
cmd = “df -h | awk ‘$NF==\”/YOURUSBDRIVEHERE\”{printf \”Disk: %d/%dGB %s\”, $3,$2,$5}'”
#Write second Page
draw.text((x, top), “IP: ” + str(IP), font=font, fill=255)
draw.text((x, top+8), str(CPU), font=font, fill=255)
draw.text((x, top+16), str(MemUsage), font=font, fill=255)
draw.text((x, top+25), str(Disk), font=font, fill=255)
# Display image.
disp.image(image)
disp.display()
time.sleep(2)
can you fix the code for I2C OLED sh1106?
I am noob here. First time connect any non USB device with raspberry pi. Follow instructions but unfortunately my OLED is sh1106. Can someone guide me to change lib file
Hi Michael,
I get as far as
sudo python -m pip install –upgrade pip setuptools wheel
and it just returns No module named pip
Did you manage to move from this step? I am in same boat.
Used this and it works everytime:
sudo apt-get install python-smbus
sudo apt-get install i2c-tools
sudo apt-get install python3
sudo apt update
sudo apt-get install python3-pip
Pip3 –V
sudo i2cdetect -y 1
sudo python3 -m pip install –upgrade pip setuptools wheel
git clone http://github.com/Adafruit/Adafruit_python_SSD1306.git
cd Adafruit_python_SSD1306/
ls (Should show a DIR containing “setup.py” in it)
sudo python 3 setup.py install
ls
cd examples
>>>>>AT THIS POINT I COPIED TGE REPLACEMENT stats.py OVER via WinSCP<<<<<<
ls
pip3 install pillow
sudo apt-get install libopenjp2-7-dev
sudo pip3 install –upgrade Adafruit_BBIO
sudo apt-get install python3-dev python3-rpi.gpio
Python3 stats.py
**** At this point it the OLED should now show its display ****
**** NOW DO THIS BIT ***
Crontab -e
add this line: @reboot python3 /home/pi/stats.py &
Amazing tutorial! After buying the kit from you I am amazed. Everything went well according to the tutorial, except for the display programming. I keep getting a lot of weird characters all the time. Also everything i tried after the first time we edit stats.py, changing to 64 lines, etc doesn’t work.
I get the following error:
>>> %Run stats.py
Traceback (most recent call last):
File “/home/pi/Adafruit_Python_SSD1306/examples/stats.py”, line 71, in
disp.begin()
NameError: name ‘disp’ is not defined
>>> %Run stats.py
any help? thank you
without being able to see your code, I’d say that you’ve probably made some syntax errors. Python is sensitive to the indentation of each line, so I’ve you’ve modified these in any way, then the lines might not be functioning as expected.
I’ve tweaked the code, fixed indentation erros and now it seems to be working! The weird part about this is that when I click “Run” to check the script, sometimes the screen goes bananas, but after a reboot it works fine, haha!
Thanks Michael
That’s great. The behaviour of the screen is probably because the script is running in the background already on startup and you are then running it a second time in your IDE. So the display is receiving two sets of commands from two different scripts, that’s why it looks like it is going crazy.
When trying python3 stats.py I get:
RuntimeError: Could not determine platform.
Did some googling around but could not get this to resolve… Any ideas? 🙁
It’s likely that one of the earlier steps (like sudo python3 setup.py install or sudo python -m pip install –upgrade pip setuptools wheel) didn’t complete properly.
I won’t lie… I did run “sudo python -m pip install –upgrade pip setuptools wheel
git clone https://github.com/adafruit/Adafruit_Python_SSD1306.git” all as one string, but did run them separate after since I got an error. Is there a way to reverse actions and start over? Slowly getting more familiar with my raspberry pi as it’s my first encounter but not TOO familiar yet.
Also thanks for the quick reply!
(sorry if this is a duplicate, but it didnt look like it posted before?)
After following this guide, I got to running “python3 stats.py”
but I get “RuntimeError: Could not determine platform.”
Any ideas what could be causing this?
/facepalm, of course it shows after I posted again. sorry again!
would you able to solve the platform issues? i am hitting the same wall… Thanks.
I am having this same error as well! RPiOS Bullseye…
Hey Michael,
thanks for the great Case and your work with all those detailed tutorials.
I just received my case a few days ago and have everything set up now.
One thing that happened to me is that as soon as I changed my font to the PixelOperator one, my cronjob isn’t working anymore. So the display stays black after a reboot until I run the python3 stats.py manually. This was working well while I used the default font.
I also checked the syslog and it says that the cronjob was runned but still a black display.
Any ideas?
Thanks a bunch!
Hi Pascal,
It seems like the script is not locating the font correctly. Try either relocating both the script and font into the default directory /home/pi/ or rather use the default font.
Hi Michael,
after doing some research I was able to fix this. I needed to adjust my crontab to look like this
@reboot cd /home/me/scripts && python3 stats.py &
after doing this modification it started to work again.
I leave this here just in case someone else experiencing the same problem 🙂
Thanks for your work again.
Greetings,
Pascal
Thanks for the update Pascal, happy to hear you’ve managed to get it working correctly.
Hi Michael,
After getting your octopi monitor easy board kit, I just had to try the Raspberry pi desktop case with oled screen. I followed your instructions and got the screen working.
The only problem I have is that the IP address doesn’t show the IP, just a set of numbers with a letter before the end. I’ve noticed on your video when yours boots up it does show numbers and shortly after switches to the IP address. I’m new to Raspberry Pi and programming. Hope it is an easy fix, I’m just not sure what to do.
hi Michael,
I found the code to correct the issue on my display.
false code: cmd = “hostname -I |cut -f 2 -d ‘ ‘”
right code: cmd = “hostname -I |cut -f 2 -d ‘='”
Thank you very much for your projects and keep the ideas coming.
Thanks for sharing your fix
Hello Michael,
Can you explain me how the CPU-Load is Calculated. I use your script from Github, but it mostly shows 0.00% and from time to time you can see 1.00%. But if i compare it to the RaspiOS Buster panel usage monoitor it should give you arround 4 – 7% in idle…
Hi Alexander,
It is not calculated in this script, this script just fetches the data from the OS. Yes, I would expect that you should be getting at least 4-5% when idle.
Not sure if you’ve tried but I’m adding Windows 11 with my son onto his RPI 4 8Gig with your Ice case.
We had the screen working great on RPI OS. How easy would it be to get it working on W11? Would the script have to change at all?
Sorry if that’s a newb question.
Windows likely doesn’t have the same packages/libraries that Rapsberry Pi OS does so I think it’ll be a bit of a challenge to get it to run.
I think the set of commands are out dated. I navigate to the Examples directory as per your command but when I run python3 stats.py I keep getting the error:
No module names Adafruit_GPIO. As mentioned running all the previous commands were accepted and worked
I get the same error. Anybody aware of the cause?
I get the same problem, too 🙁
Thank you for sharing this great information! I built a case similar to your design but using 3/16″ plexiglass. I 3d printed 4 corners to join it together. Just got the OLED display working using the info above. Works great!
That’s great Bob!
Thank you very much for this tutorial. I am in the process of assembling a webserver to a rural school. Is it possible to add the name of the server alone with the status to display?
The display just runs on a simple Python script, so you can quite easily add additional information or remove unwanted information from what is displayed.
Thank you very much. I will try that.
Great tutorial on building and configuring the OLED. As a noob to Raspberry Pi’s I am still learning about programming and how to use the Pi. Quick question, Is there a way to display temp in Farenheit and not celsius?
Unfortunately no easy solution is available as the Pi only has the temperature available in celsius. You’d need to convert the text to a number and then do the conversion before converting it back to text to display.
This is a great tutorial. I followed it to the letter and got the desired result when running the python script from the command line. However when I inserted it into the crontab for automatic startup, it shows a brief moment the correct settings on the display and then all of the sudden switches to a two line display.
I have no idea where it comes from. I use user pi for logon and the entry in crontab is exactly as described in the tutorial???
Any ideas ??
Thanks nevertheless for the fantastic tutorial ..
Probably you are running it form a sub directory in your home folder and not your home folder itself.
I had to change my strip by adding
# Added by Gene
import os
os.chdir(“/home/pi/Adafruit_Python_SSD1306/examples”)
I had to add the following to my stats.py script as I was not running the script from the root of my home folder
# Added by Gene
import os
os.chdir(“/home/pi/Adafruit_Python_SSD1306/examples”)
Thank you. I will give it a try
Loved this whole project.
Ran into a few issues but nothing a quick google search did not resolve!!!
Hey there! This build went great for me and after a number of bumps in the road, I managed to get this display working on Ubuntu OS 22.04 on my Raspberry Pi.
However, the automatic starting sequence using crontab isn’t working, no matter what I do. I’m certain that the directory is correct, but the screen simply stays black on startup, without even flashing. Anything I can do about this?
It might be helpful to note that I can’t load up the screen normally without root permissions, though I don’t know how much this would affect the outcome.
Salut,
j’ai terminé toute l’installation et créé le fichier virtuel env-stock.
Malheureusement à la fin toujours pas possible d’allumer l’écran, pourtant mon écran est bien vu par le système.
Comment faire pour l’activer ?
merci
Once again excellent work with your channel and website.
I have a raspberry pi 5 running the latest 64bit OS from raspberry pi imager.
I am not ablle to install some fo the command s which you have provided in your step by step guide,.
For instance
sudo apt-get install python-smbus
Reading package lists… Done
Building dependency tree… Done
Reading state information… Done
Package python-smbus is not available, but is referred to by another package.
This may mean that the package is missing, has been obsoleted, or
is only available from another source
E: Package ‘python-smbus’ has no installation candidate
Can you please update your instructions to take into consideration
Raspberry Pi OS (64bit)
A port of Debiabn Bookworm
Thanks vey much
Hi, I would really like to see the IP location, system startup time. How do I get it back? Thank you.
I don’t want to know the IP position in the network, but I want to know the system startup time on the Raspberry pi 4 with the display.
Bonjour,
J’ai un RPI4 qui tourne sous bullseyes et l’écran fonctionne nickel sur la version de 2021 (sauvegardé sur carte SD).
Avec les versions arm 12 et 13 plus moyen de faire fonctionner cet écran avec les bibliothèques adafruit 1306 et python3. Divers message d’erreurs comme plateforme inconnu ou bibliothèque non disponible ect … Pourriez vous refaire un tuto avec les toutes dernières commande d’installation.
En vous remerciant.
J’ai trouvé une commande qui enlève le blocage de la dernière commande linux et permet de faire l’installation c’est genial mon p’tit écran refonctionne a nouveau…
Running this on a headless Pi reminded me of how I used to track game progress obsessively back in the day — always wanting live stats visible at a glance without digging through menus. Same instinct, totally different context. I followed an unofficial community reference guide to cross-check some pin mappings, and it saved me from frying the display. Funny how habits from one hobby bleed into another.
Quick question for you — have you tried running this on a Pi Zero W? I got the display wired up fine on a 3B+, but when I followed the same steps on the Zero the I2C scan kept returning empty. Wondering if there’s a known fix, or if there’s some kind of unofficial community reference where people document these edge cases and workarounds for obscure setups.