Today I’m going to be thermal testing my water-cooled Raspberry Pi cluster to see if the water cooling system is effective with all of the Pi’s overclocked and running at full load, and to see if there is any significant temperature difference between the first and last nodes since they’re all connected in series.
The comments section on the build video was quite divided. Some suggested that the last Pi would start thermal throttling, some questioned having the radiator positioned first in the loop and others said that it doesn’t make any difference in what order the components are connected and mentioned a video done by JayzTwoCents on the loop order of PC components.
The only way to really be sure that the same is true for the cluster is to test it, so that’s what we’re going to do.
Here’s my video of the thermal testing, read on for the write-up:
Setting Up The Thermal Test
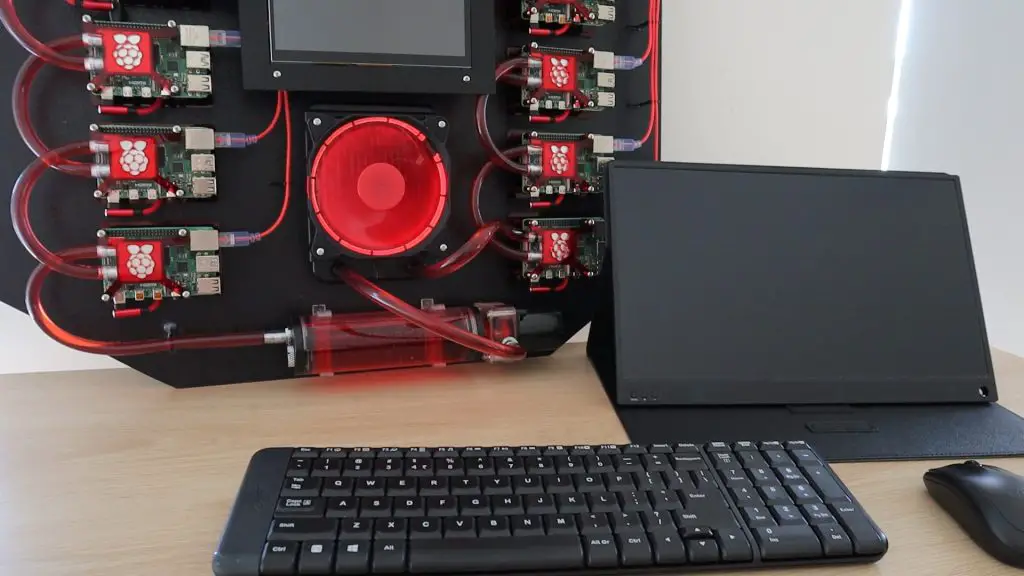
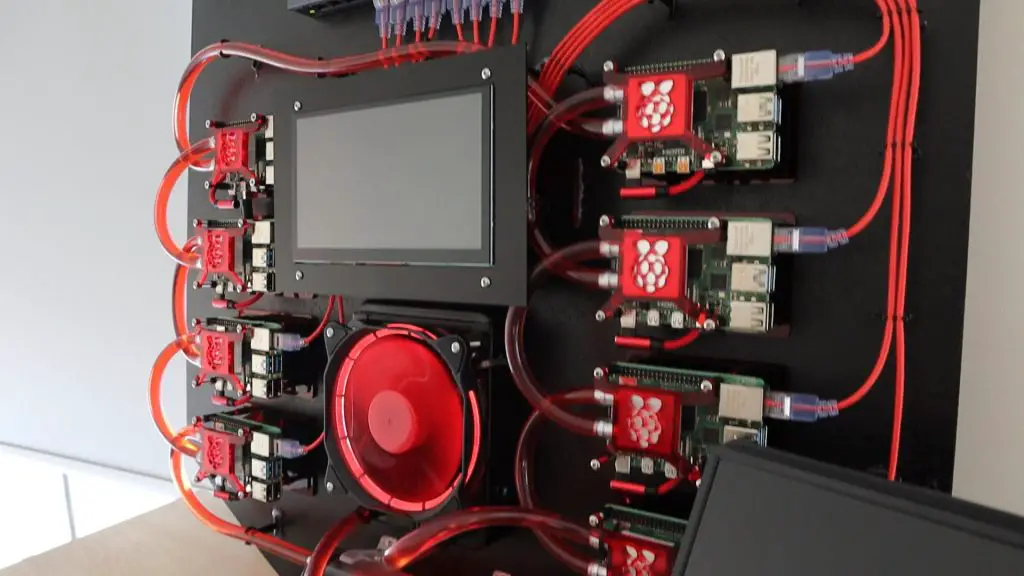
To test the Raspberry Pi Cluster, I’m going to connect a monitor, keyboard and mouse to the first node, which I’ll then use to control the other nodes in the cluster an I’ll use the onboard CPU temperature and a thermal camera to measure the temperatures of each node.
The first thing we need is a means to get the Pis to all run at full load and produce as much heat as possible. For this, I’m going to be using a utility called CPU burn. Out of all of the CPU stress testing utilities I’ve used, this one seems to be the most intense and generates the most heat.
So I’m going to install this on each of the Pi’s and then run the utility along with a printout of the CPU clock frequency and temperature every 10 seconds. I’ll then leave this running until it looks like the temperatures have levelled off and aren’t increasing anymore and we can then compare the temperatures logged by each and see if there was any significant difference between the first and last nodes in the loop.
To install the CPU burn utility, we need to open a new terminal window and enter the following:
wget https://raw.githubusercontent.com/ssvb/cpuburn-arm/master/cpuburn-a53.S
gcc -o cpuburn-a53 cpuburn-a53.S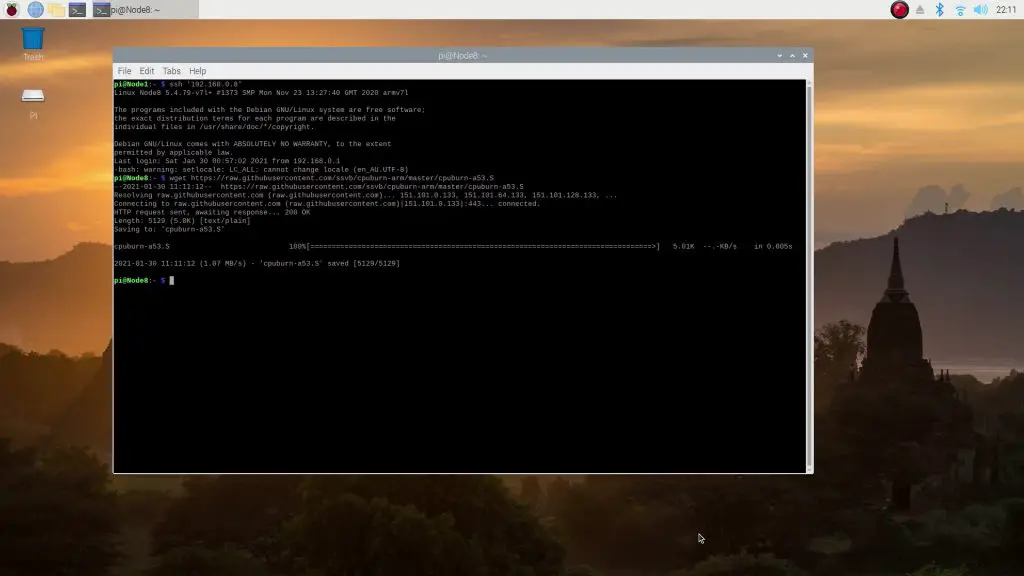
We’ll need to use SSH to install the utility on each of the 7 other nodes as well.
One thing to remember is that the nodes are numbered differently to their position in the loop. The nodes are numbered from top to bottom, left to right and the cooling water loop runs from the bottom right to the bottom left.

So the cooling loop order is actually 8,7,6,5,1,2,3,4. So if the loop order does matter, then we should have Node 8 being the coolest and Node 4 being the hottest at the end of the test.
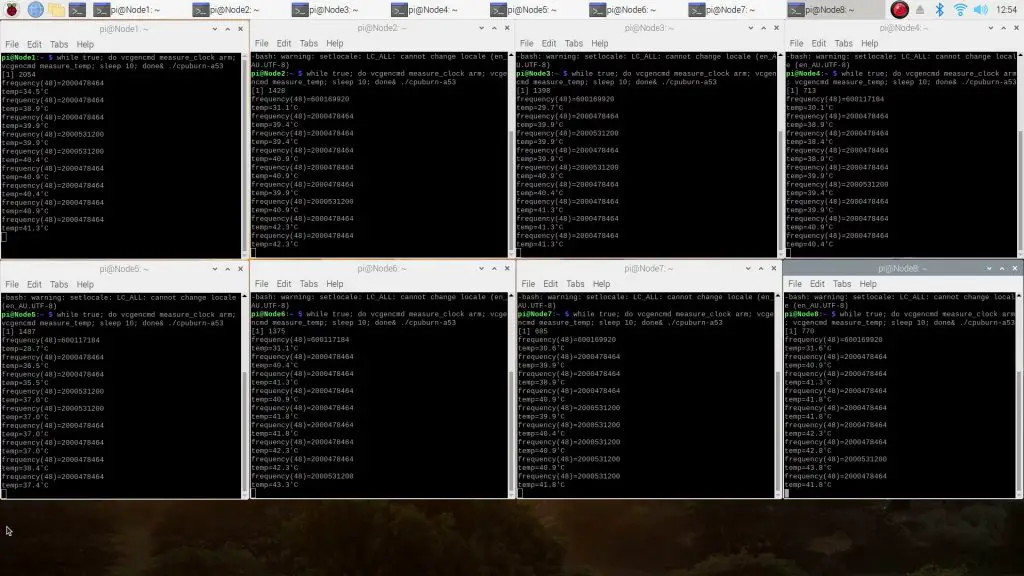
To run the test, I’ll open up a new terminal window for each Pi and prepare the command line on each so that we can just hit enter in each window to start running. I’m doing it this way so that all of the node temperatures are being displayed on a single screen so that they’re visible for this video.

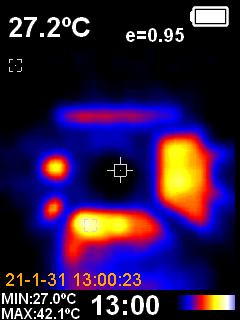
With that all prepared, it looks like the Pis have warmed up a bit when booting up, and we have a surface temperature of about 27 degrees on each Pi, and the room temperature is about 24 degrees.


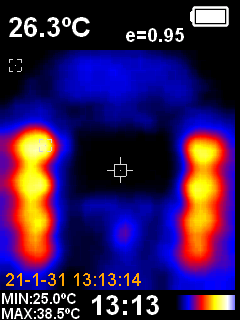
Looking a bit closer at an individual Pi, we can see there’s definitely a cool spot where the cooling block is, so thats doing it’s job. The RAM, USB and Ethernet chips have warmed up quite a bit.
Running The Thermal Testing On The Cluster
Now let’s start the thermal testing and see how it goes. You can see each Pi started off with a CPU temperature of around 30 to 31 degrees, and this spiked quite quickly to 40 degrees once the test got running.
After around 8 minutes, you can see that the individual Pis and the combined cluster is quite a bit warmer than when we first started the test.
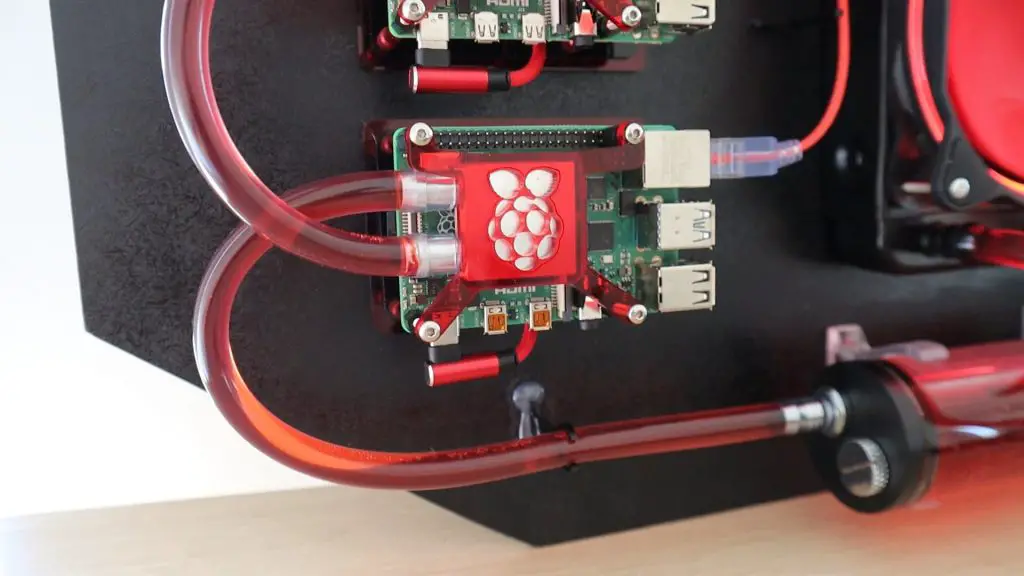
After running the test for about 10 minutes, there doesn’t look like there has been much increase in temperature over the last two minutes. So, let’s put the results onto a graph and have a look at the temperature of each Pi.
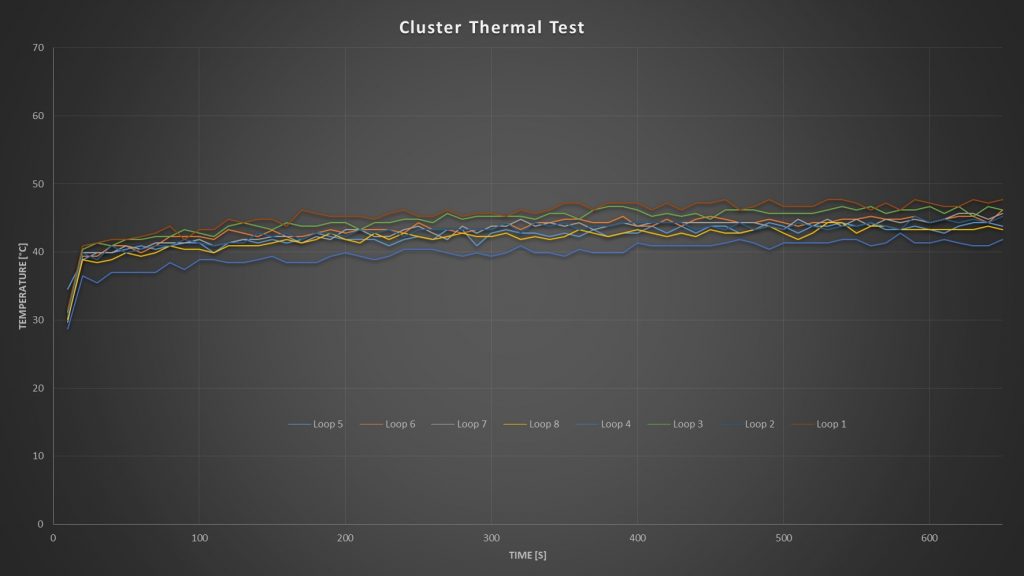
I’ve renamed each node to the order that it sits in the loop to make it easier to follow. I didn’t think that there would be much difference across the loop, but I also didn’t expect there to be such a wide variance between each Pi.
From the graph, it looks like the Pi in loop position 4, which is node 5, ran the coolest and the Pi in loop position 1, which is node 8, ran the warmest.
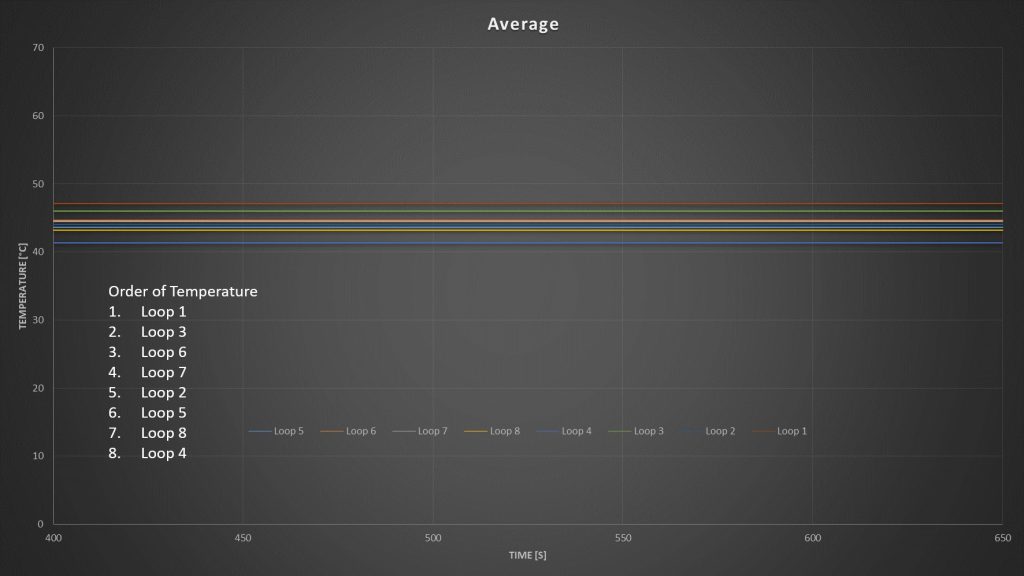
This is what the results look like if we average out the last 4 minutes of the test.
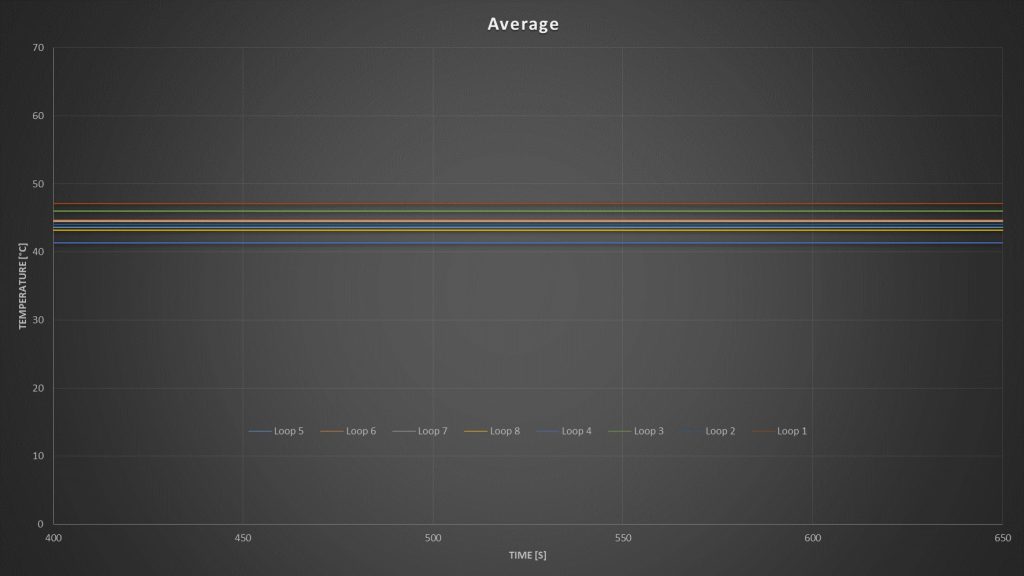
So there really doesn’t seem to be any correlation between the Pi’s position in the loop and its temperature. You can see here that the order in the loop and the average temperature of the node is pretty much random.
If the loop order was significant, then we would have seen a descending pattern starting with 7 or 8 and ending with 1 or 2.
The 4 degree temperature variation between them is more likely caused by conductivity differences between the cooling blocks, thermal paste and CPUs and manufacturing differences between the Pis. The CPUs might also generate slightly different amounts of heat.
Running The Thermal Test Without The Cooling Water Circulating
There were also a couple of comments which suggested that Raspberry Pi’s are so underpowered that they don’t need any active cooling and that a simple heat sink on each would do. So next I’m going to try turning the pump off and leaving the CPU burn utility running to see if we even need the water flow through the heat sinks. Each cooling block is effectively a 30x30x10mm heat sink, so they do increase the surface area of the CPU and should help with cooling by themselves.
After 5 minutes of running, these were the results:
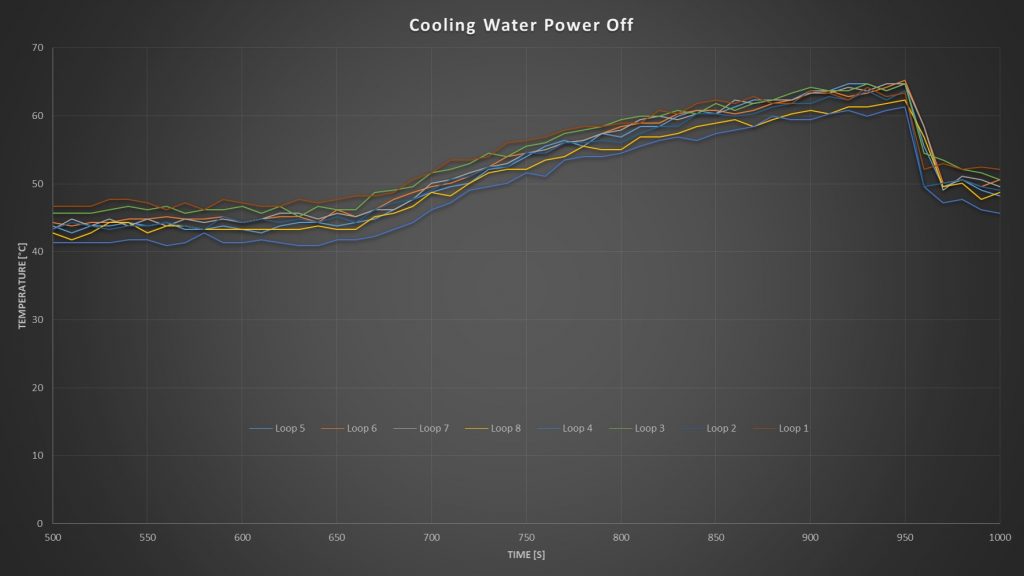
So it’s pretty obvious that the cooling blocks heat up quite a lot without the water being circulated through them.
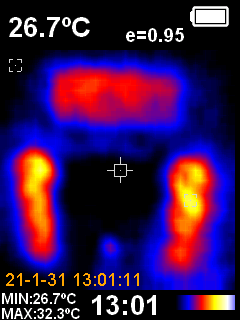
You can see from the thermal image that the circuit is much hotter than it was with the water flowing through it.
I turned the loop back on when the hottest Pi reached 65 degrees, and this was only a little over 5 minutes in. The individual Pis also look pretty cool under the thermal camera now, the emissivity difference between the acrylic and cooling blocks makes the Pi logo show up
It looks like the temperature would have levelled off somewhere around 72 degrees. So you could probably get away with running the Pis without the cooling water on without them thermal throttling, but it’s getting close, and they probably wouldn’t last very long if they’re frequenctly running at over 70 degrees.
Does Loop Order Matter?
So, from the thermal testing, it looks like the loop order has very little effect on the temperature of each component. And while this might seem like it doesn’t make sense, it’s actually got to do with the flow rate through the loop.
If the loop were running at a really low flow rate, saying taking eight minutes for a millilitre of water to get from one end to the other, then the water would have almost a minute in each node to heat up – which it obviously would. This would have an additive effect, where each Pi would increase the temperature of the water by a couple of degrees and you’d land up with a pretty significant difference in temperature between the first and last nodes.
But in this case, as is the case with pretty much all PC water cooling loops, the flow rate through the loop is quite high. Water circulates from the first to last node in this loop in under 10 seconds. So there is very little time for the water to be heated up by each node.
This doesn’t mean that the water isn’t heated up, it just means that the difference between the first and last nodes is much smaller, so much so that it’s pretty much negligible. This basically means that the temperature of the whole loop remains fairly uniform and that the order of components within the loop doesn’t really matter.
As long as you’ve got a radiator which is removing more heat than what is being put into the loop, the loop will work effectively.
Running a loop in this way is actually more efficient as well, because the greater the difference in temperature between the cooling block and the liguid running through it, the more effective it is at removing heat.
Let me know your thoughts on my thermal testing of the cluster in the comments section. Have you tried different loop orders on your computer’s cooling circuit?
Wonderful article, I really liked this update!